Welcome to the Austin Seven Friends web site and forum
As announced earlier, this forum with it's respective web address will go offline within the next days!
Please follow the link to our new forum
http://www.austinsevenfriends.co.uk/forum
and make sure, you readjust your link button to the new address!
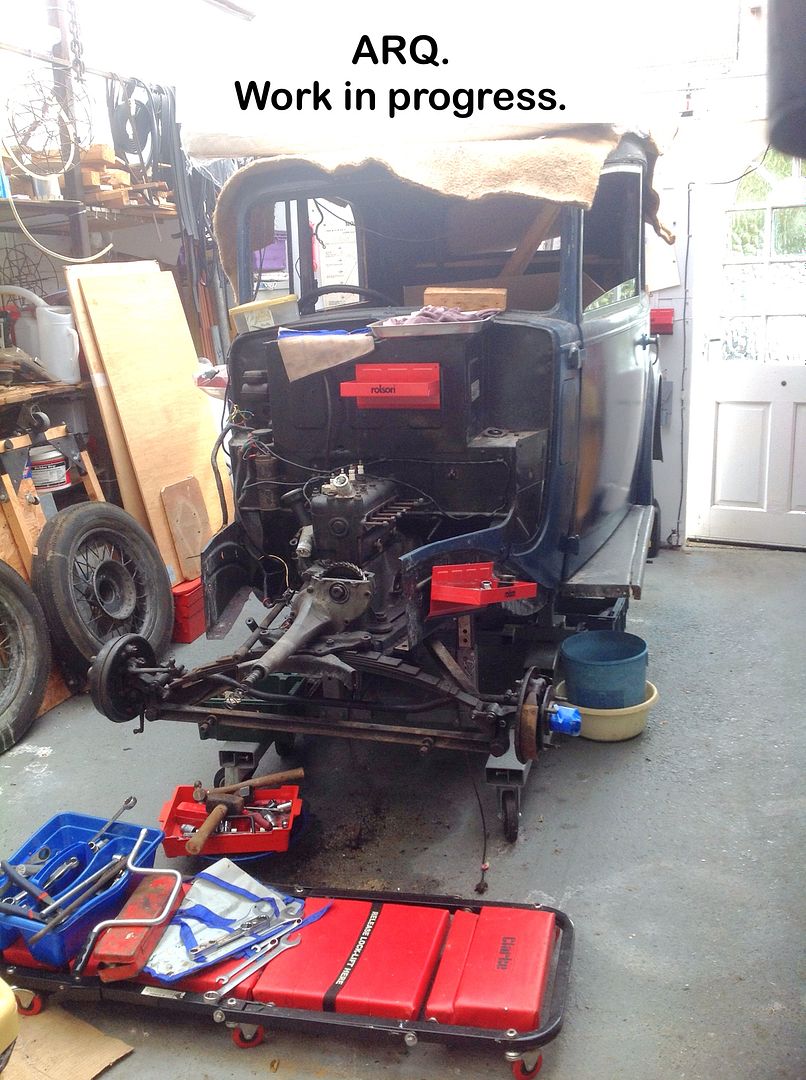
While I try to get my head around starting a Blog, and failing miserably, thought best to start a new Thread covering progress.
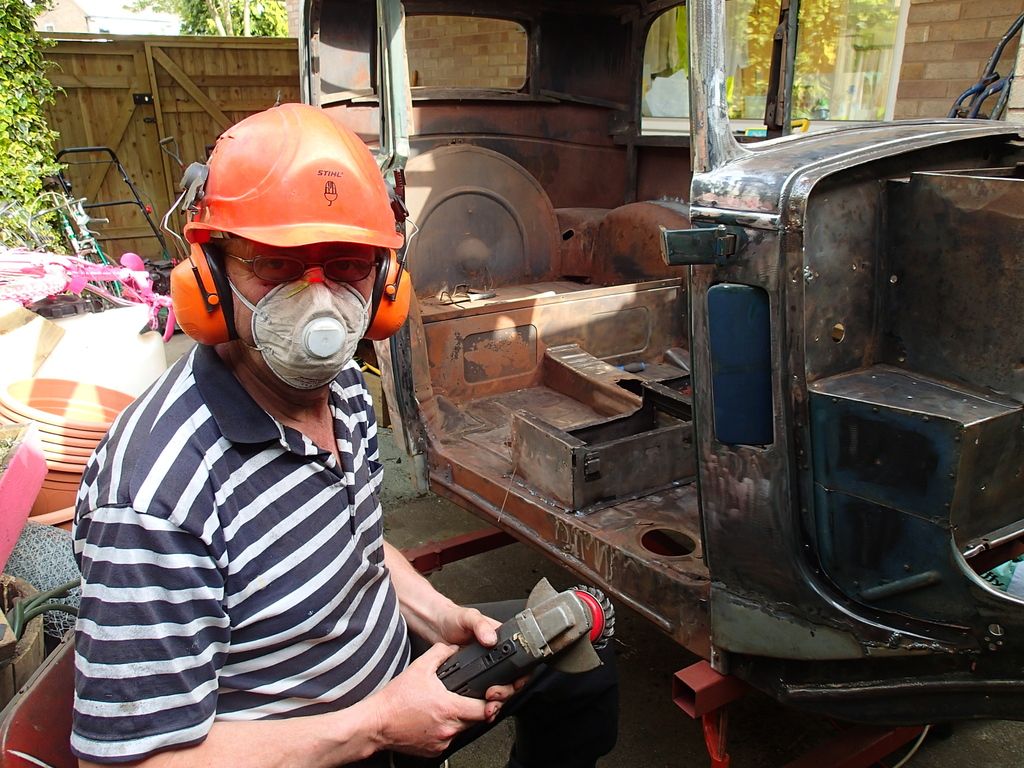
First lot of photos are of the engine/gearbox coming out.
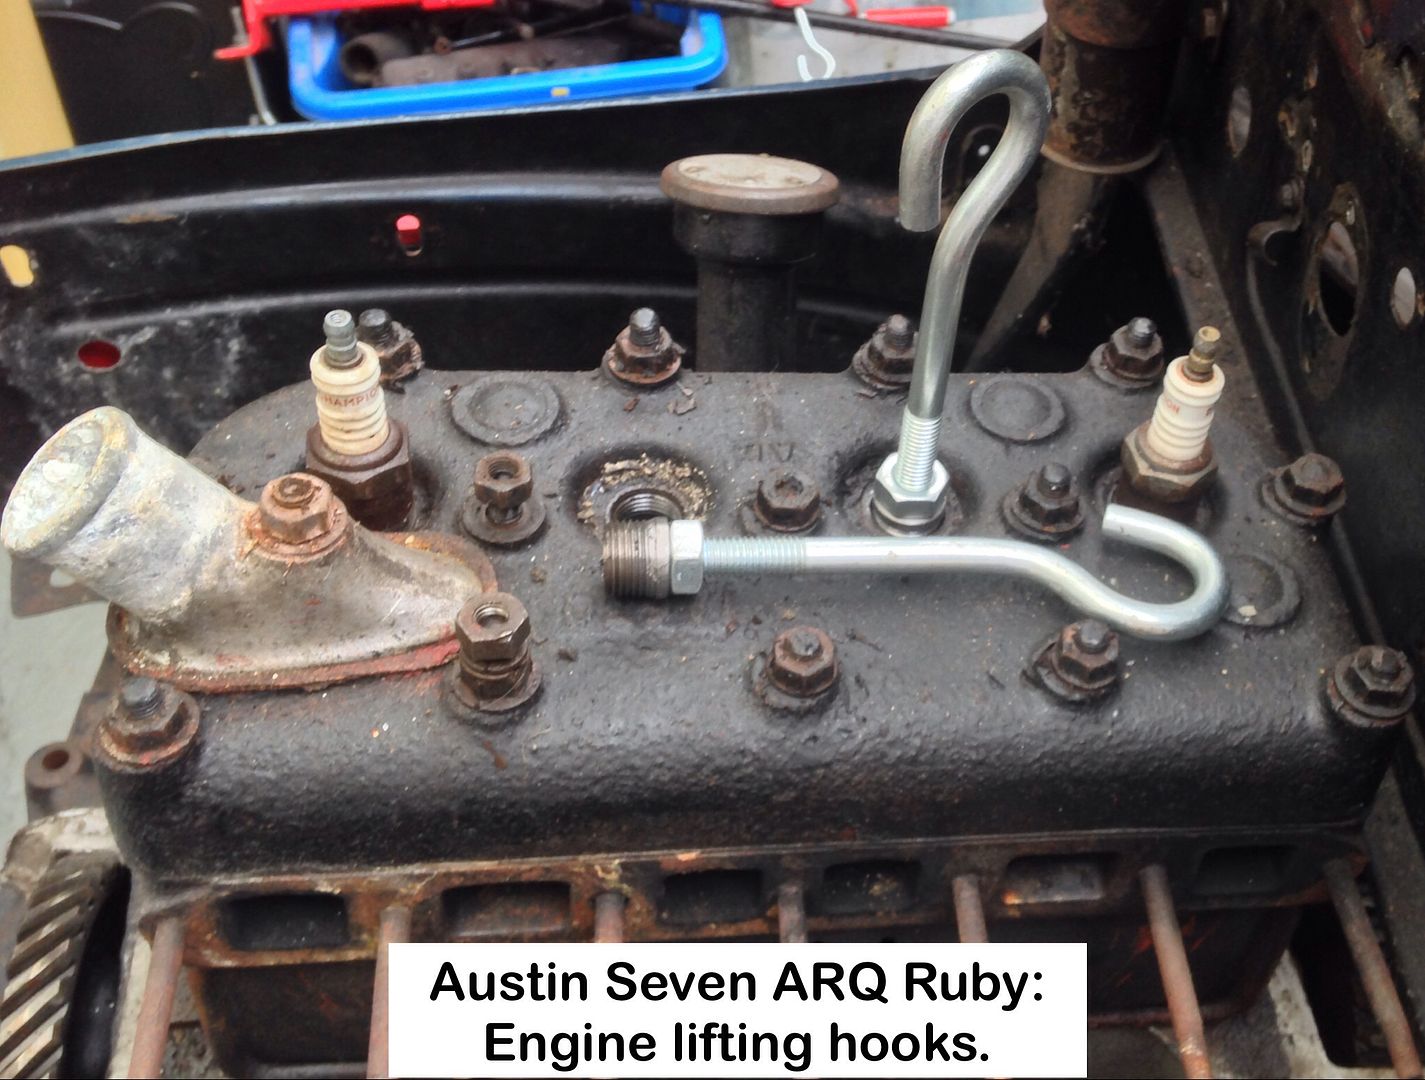
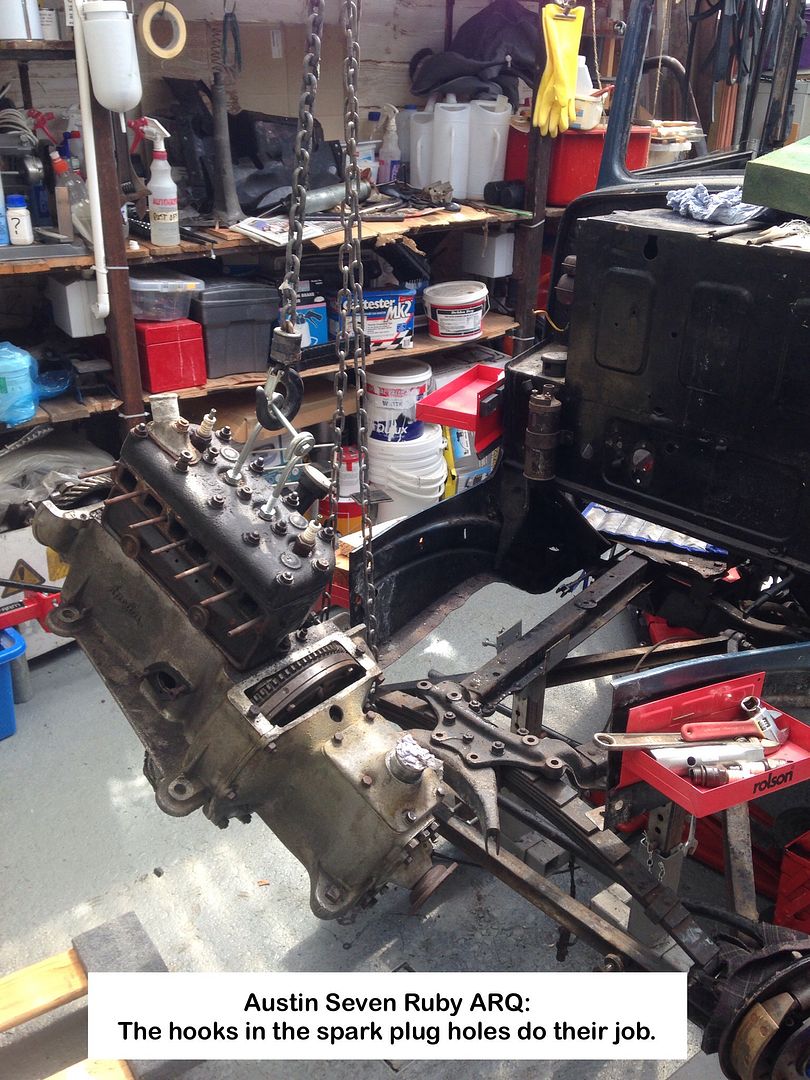
I made a brace of hooks to screw into the spark plug holes, and used as in the photos below.
Apart from the usual Anglo-Saxon to persuade things along, a bit of Up-Down-Left-Right movement, all single handed, the engine/gearbox was soon out with the aid of block and tackle.
The clutch shaft out the side of the bell housing was the main recipient of the colourful words as it would persist in diving under that large diameter engine mount washer, and the flywheel catching on the bulkhead.
The rubber engine mounts didn't help either in not allowing the engine to slide easily along the chassis.
They also received the same words until removed.
Engine lifting hooks:
Dangling in mid-air:
Safely on its trolley:

Geoff - Progress at last!
Location: South Norfolk - Next to Suffolk
Geoff
Excellent post. Photos really clear.
I have only put an engine in to my special as it was built from bits. However I didn't have the luxury of a hoist and found splitting the engine and box allowed me to manhandle the two in. Biggest problem was the blind spline. Welsh is a much more colourful language than Anglo Saxon even though I'm not too proficient at it! At least the neighbours can't understand when I swear out loud😀
Very wet here especially unloading the car after travelling back from Autokana, The broken choke cable meaning I spent much too long in the rain. Anglo Saxon and Welsh in equal measure.
Howard
Location: An extremely wet mid Wales
Well done Geoff, from the little I can see of your car it looks to be pretty solid - keep momentum
Howard & Ruairidh,
Thanks for the compliments.
I can swear in French, Polish & Afrikaans so don't upset any of my neighbours.
I didn't have any suitable chain to use with the hooks, hence the bolt and penny washers.
When I get the chain, from that loved/hated auction site, I will experiment putting the hooks into front and rear plug 'oles and then play around with the length of chain attached to each hook to see if I can get a better balance.
May try that load leveller thingy I got with the engine crane. Tried it when I moved the Marlow milling machine into the Workshop but it didn't help at all.
Ruairidh,
You are correct, the car is solid, with only 4 patches seen so far, 3 of which look as if they have been welded over existing metal, so I'm very tempted to cut them away just to make sure there isn't any tin worm lurking.
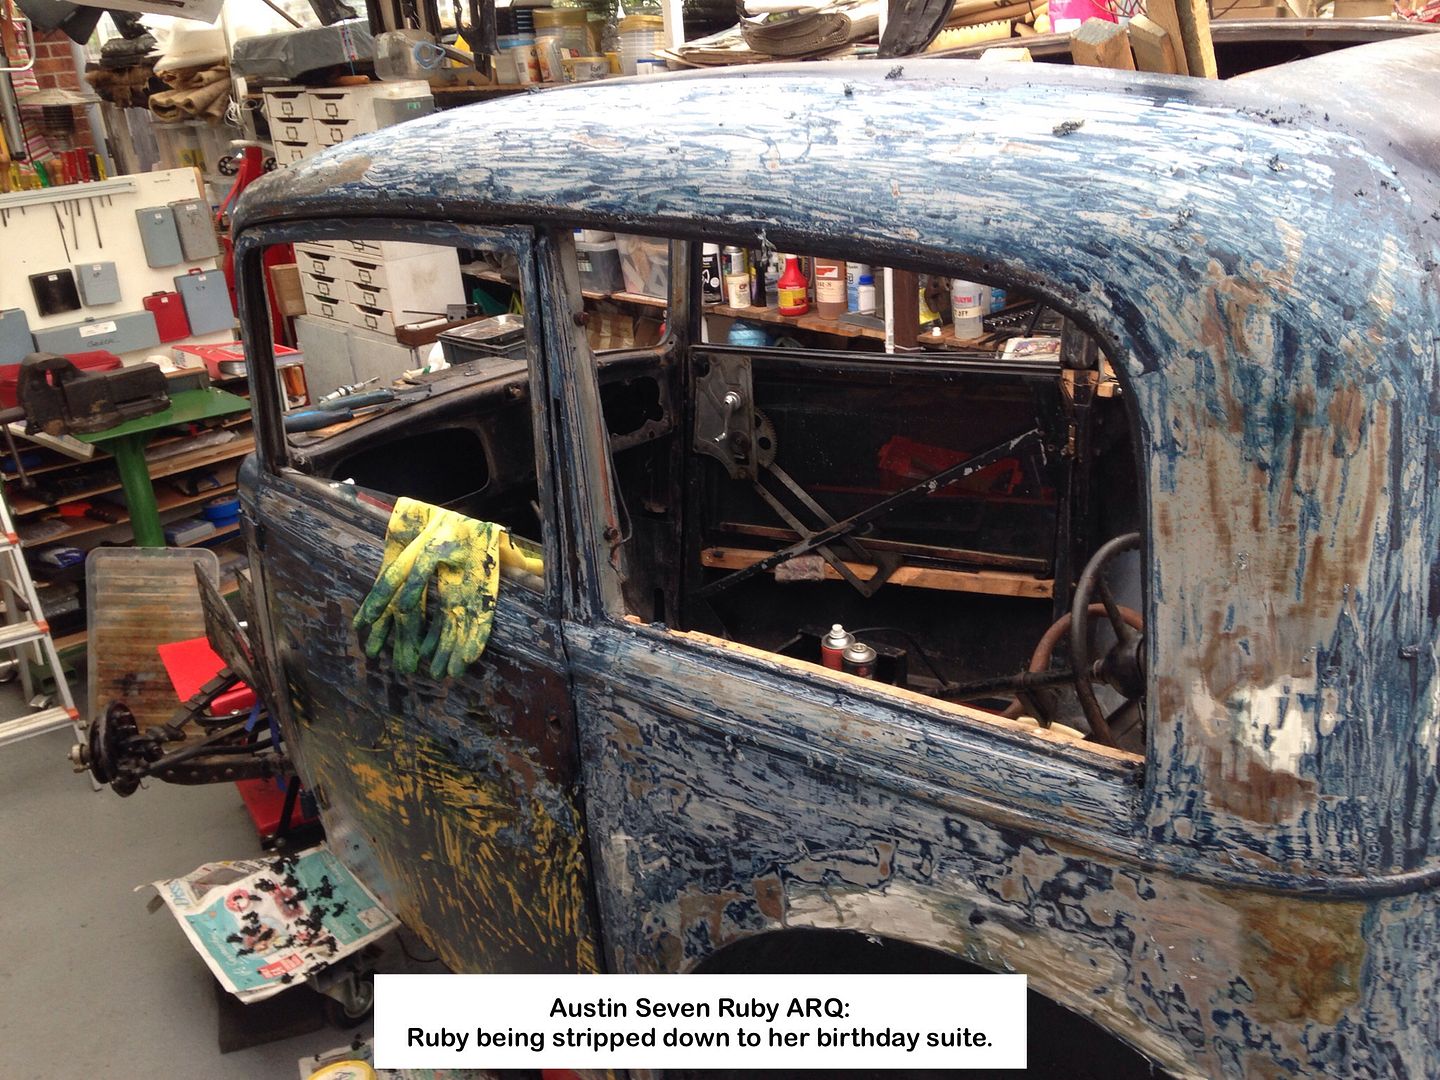
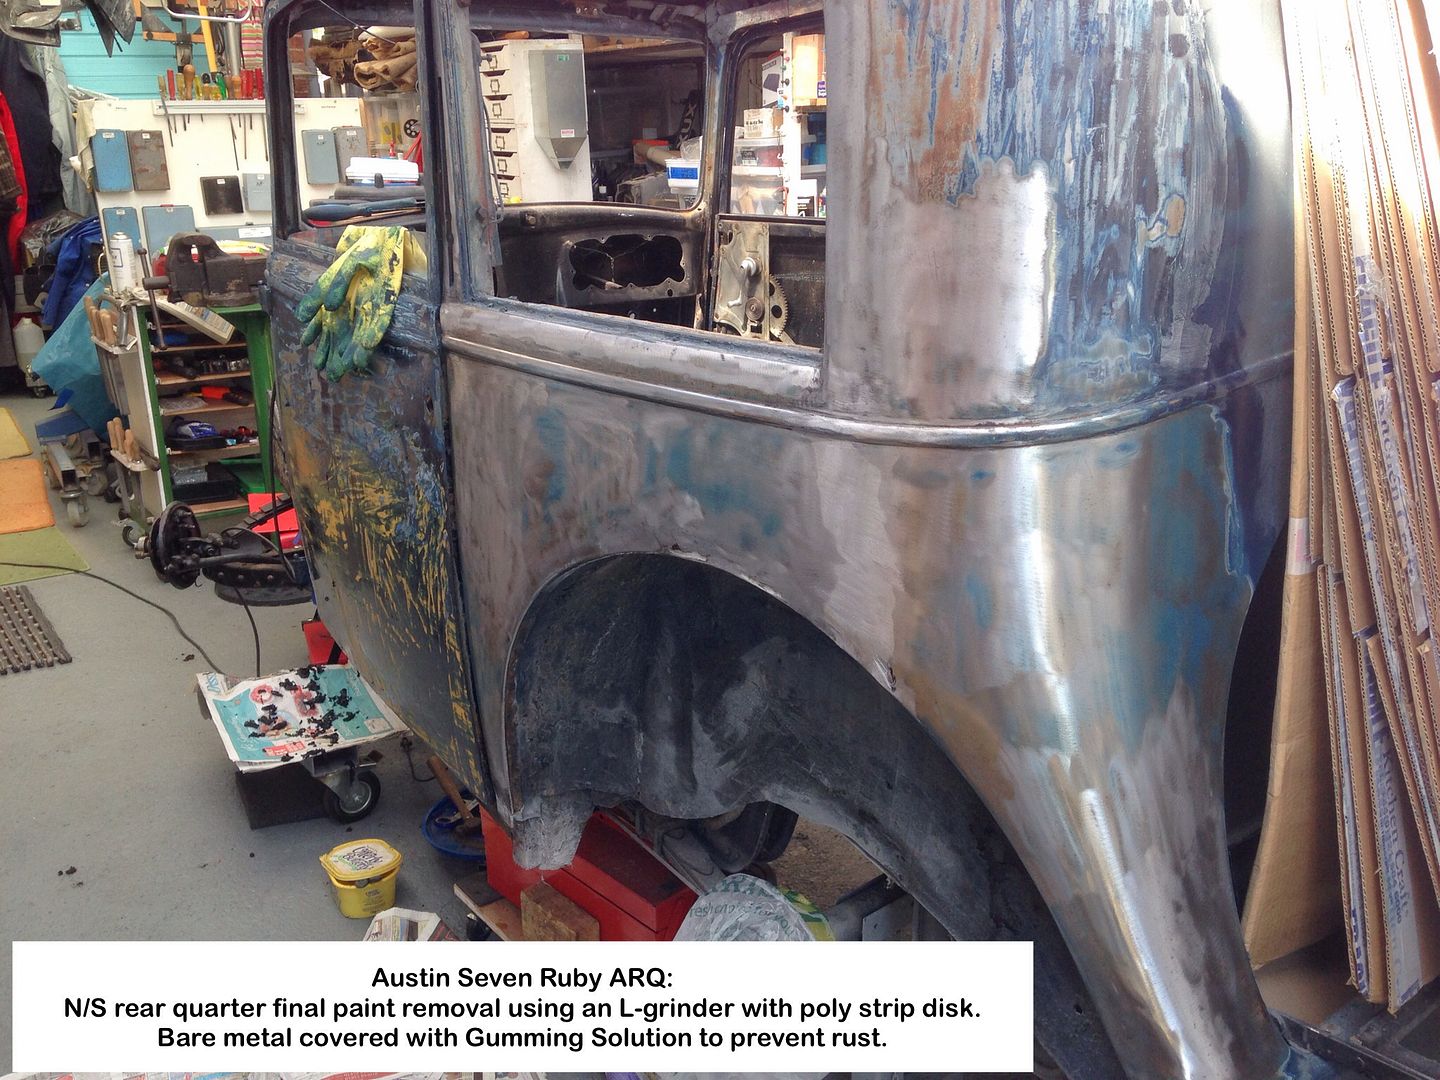
Spent today stripping the N/S paint, and this just confirmed my decision for a bare metal re-paint.
Result after second coat of Biostrip:

'Rust' measles:
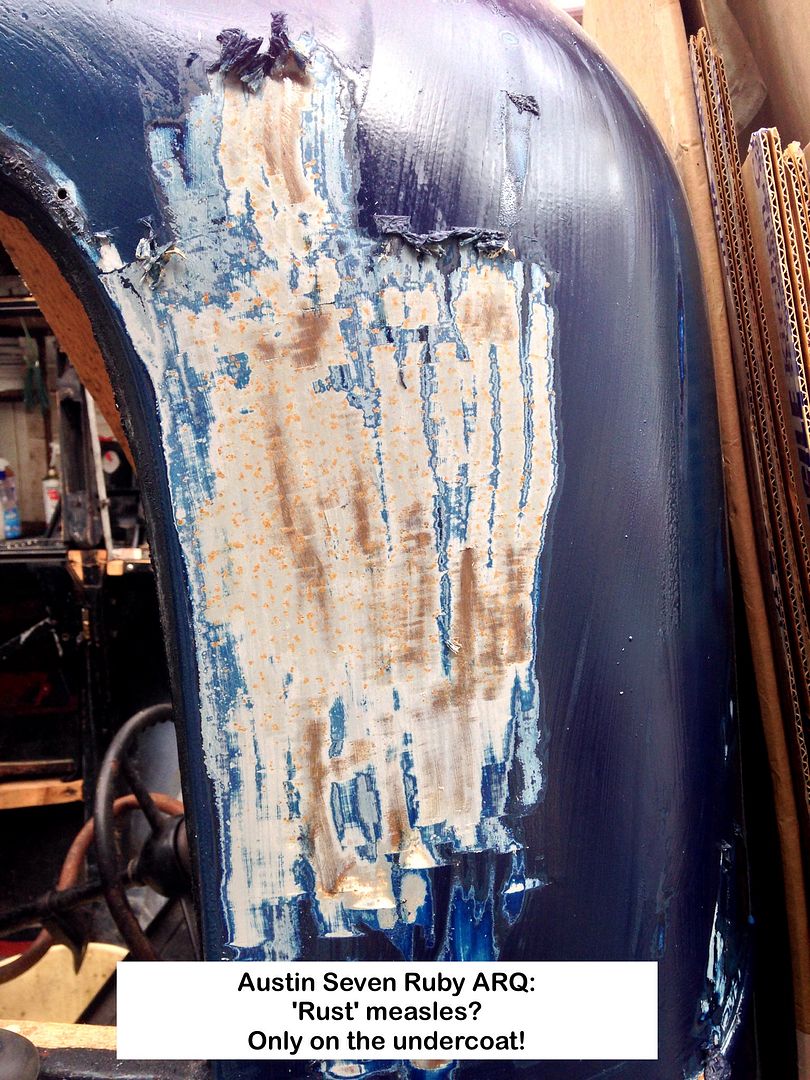
Close-up of the measles:
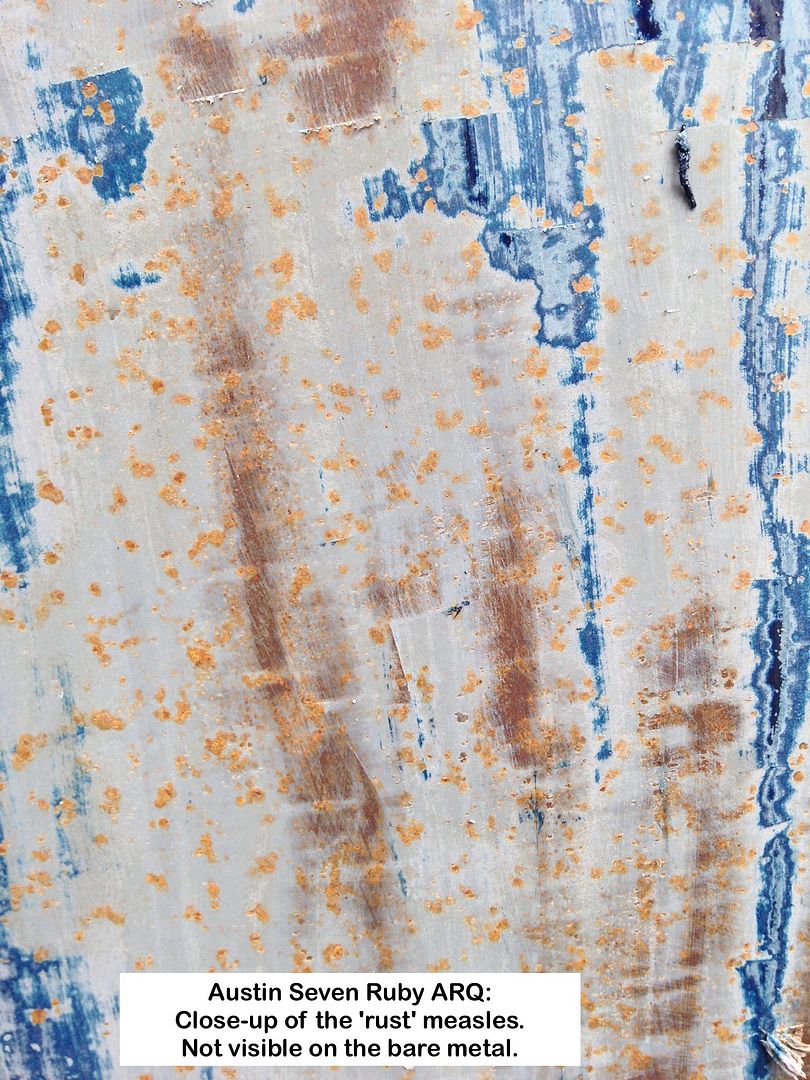
Anyone have any idea what the cause could be?
Mine so far is that the cellulose undercoat has been left long enough for it to absorb moisture, but the car was registered 31 May 1935, so not during factory annual shut-down.
Geoff - Flipping heck she turned 80 on Sunday and I forgot! 


Location: South Norfolk - Next to Suffolk
Geoff, my ruby (now in red oxide ) was in a similar state body wise after being stored in a Marley garage and covered by a tarpaulin since the ,60,s . I found ebay item 161719819121 ideal for bringing the body and surface rust back to bare metal , the removable parts ,(wings, bonnet etc) I had soda blasted.
Location: Dorchester
Agree Geoff. The grey primer is porous and should be covered quickly with the top coats to avoid this. Sevens still in their original paint tend to show a "thinness" of top coats. Fastidious polishing by proud owners would not have helped either! Another cause could be applying the first coats of grey primer in slightly damp or humid conditions.
Location: Stretham, Ely.
It is genrally reckoned that most paint coatings will allow sufficient moisture and oxygen through to promote rusting. Rely largely on chemical properties of the primer. Cars in use and regularly dried out seem to survive but stored vehicles do not. At car shows often see precious old cars, which have been long laid up, showing good paint pocked with rust blisters.The cure without incurring further risk is the problem.
Bob Culver
Location: Auckland
I've often wondered why stored stuff rusts more.
I've noticed that the layer of dust that eventually forms holds moisture on the surface. I blame this. The rust on stored stuff tends to be worse on the top horizontal surfaces facing the top. Vertical faces, or horizontal fare better.
A car in regular use, does not have that layer of dust.
Ive taken to spraying the more likely parts of the bodywork of my saloon over the winter with 3 in 1 aerosol. It has rape oil on it that sticks and protects.
I spray the cowl, bonnet, edges of the wings etc. also the vertical seams at the back.
I also use it successfully on the bare polished iron and steel on my traction engine. That lives in an open sided shed.

Some years ago I started the restoration of a 1973 Citroen SM. Like all Citroens of that era they have major rust problems.
This car had had a fire early in its life and was not repaired but dry stored. When I got it there was no rust anywhere, very rare indeed.
I stripped the body back to bare metal and had it professionally painted in twin pack primer, which the body shop told me was totally waterproof.
It was then stored in a not particularly dry lock up with some time outside under a tarpaulin. After 4 years there was still no rust showing anywhere.
Conclusion: Use modern twin-pack primer properly applied.
The primers applied to new panels are only intended to be temporary and should be removed before being painted properly.
Location: Melrose, Scottish Borders
Nigel,
Thanks for the pointer.
I use those, and they are very very good, just somewhat noisy using them with the L-grinder though.
A couple of questions for the Collective please:
1) I intend giving each bare metal panel a coat of etch primer, but will this paint also absorb water?
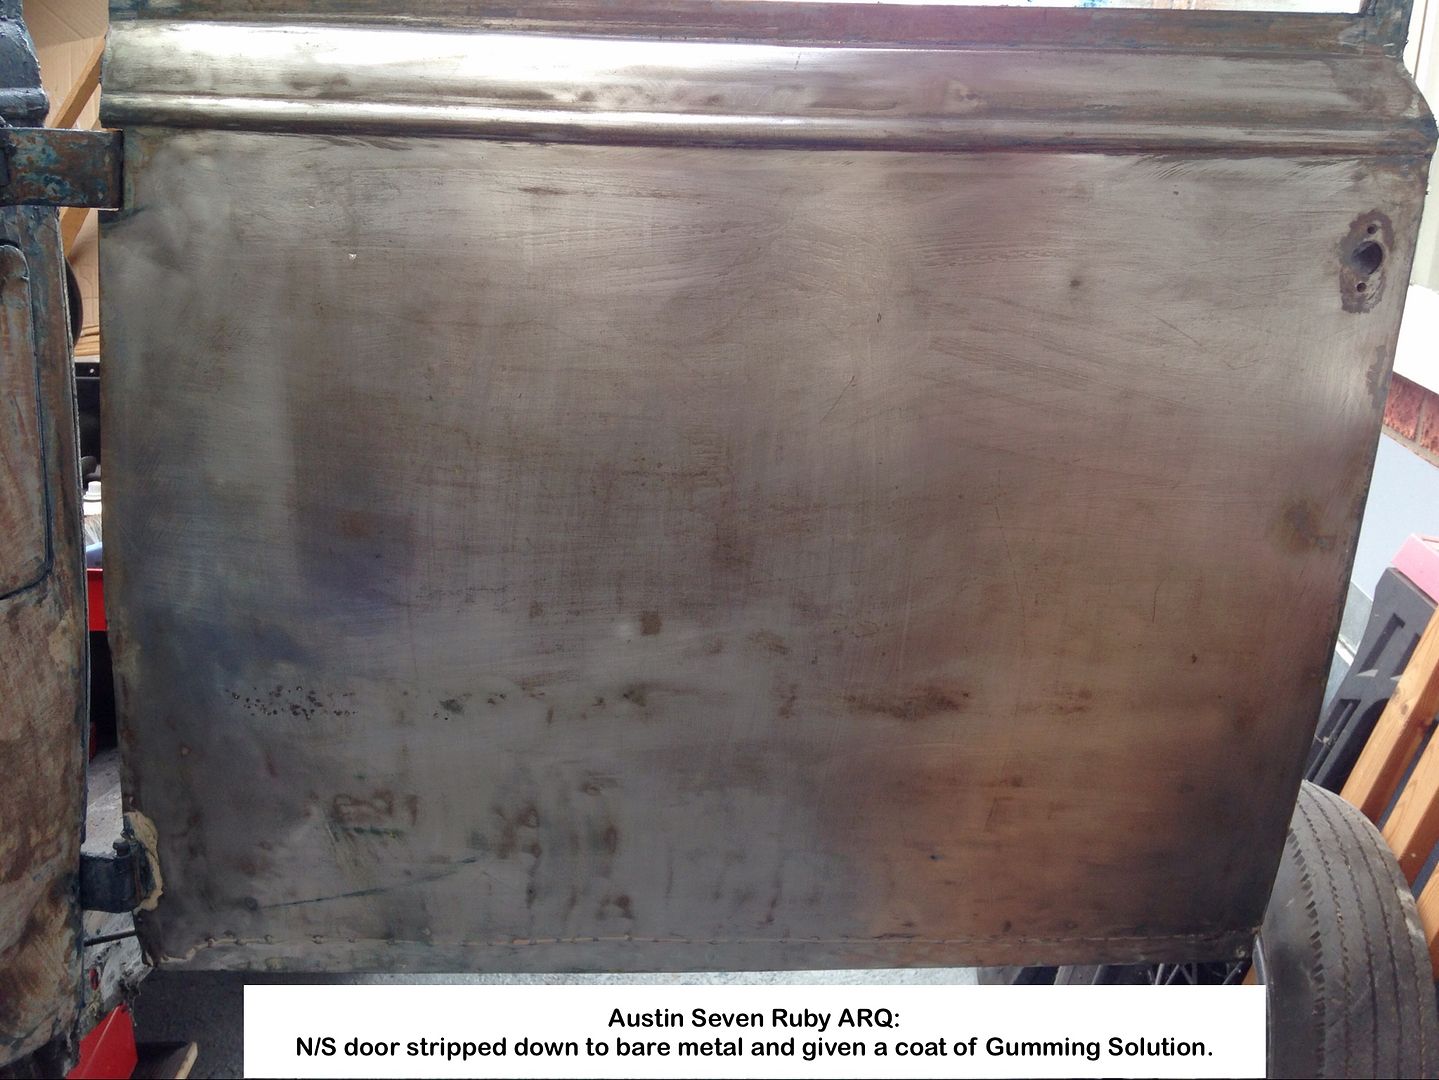
Looking at Dan Gelbart's Coatings video again, he suggests giving bare metal a coat of Gumming Solution, once scoured clean, that solution then be easily washed off with water when ready to apply paint.
Now I've searched high and low for this stuff but it appears reluctant to be found.
Anyone know of a supply please?
2) How to get rid of paint from tight corners/spaces?
Have thought of using a wire brush on the waist-line, window recesses etc that are easy to get at, but of no use into tight spaces.
Geoff - A good sleep so raring to go today 
Edit:
Two attempts to get the link working as still suffering slightly from yesterday 
Location: South Norfolk - Next to Suffolk
Popped into my local jobbing printer earlier, and came away, £5 lighter, with a litre of Agfa Copyrapid G 643 b Preserving Gum.
Printers use it to prevent their aluminium plates from oxidising.
Told to wash it off using warm water.
I'd like to use 2-pack, but don't have the necessary breaking apparatus, so it will be a case of washing down, and etch primer just before base coat.
Geoff - Pedal-to-the-metal now that protecting the bare metal has been sorted 
Location: South Norfolk - Next to Suffolk
The Gumming Solution works a treat.
Not a sign of rust after a few says, so thank you Dan Gelbart for that.
A question please:
Are there any things to be careful of when removing the glass/winding mechanism from Ruby Mk.1 doors?
Any specific sequence?
Did a number of searches, but fruitless.
Geoff - Hanging Unistrut in the Carport to run my Skyhooks along.
Location: South Norfolk - Next to Suffolk
Hi Geoff,
The problem with the printers gum is you have to wash it off. You will be exposing the surface to moisture again. My first car had been parked under a pine tree for a few years and required using a acid to treat and prep the metal. Sorry I can't recall the product but it creates a black oxide coating on the metal and can be painted over. With ruby I had used pa10 (red oxide) etch primer which is water proof to protect the parts. Pa10 was commonly used on structural steel work as the only required coating. ( these days a 2 pot costing is used as its a lot harder)
PA10 can be thinned with mentholated spirits for spraying.
Regards Bryan
The best stuff I ever used for protecting unpainted steel is, or was, called Kephos. You just wipe it on the bare steel and it protected it from rust. I used up the last of it some time ago and have been looking for more ever since. I think this is the same stuff:
http://www.solvents.net.au/index_htm_files/PAINTGRIP%20253%20%28212997%29.pdf
I used to just wipe it on with a rag and anything coated in that stuff would stay rust free for years.
Simon
Location: Auckland
Thanks for the suggestions on protecting bare metal.
Anyone with suggestions on removing the door glass and mechanism, or is it straightforward?
I'm just concerned about that spring getting loose at the wrong moment.
Geoff - Thank goodness I have a good kneeling cushion 
Location: South Norfolk - Next to Suffolk
Hmmm.
Have I stumped the collective wisdom or are some on holiday I wonder? 
The two extra Skyhooks are done and painted, so back onto the Ruby, BUT I really do need any advise on removing the door glass and winder mechanism pleeease 
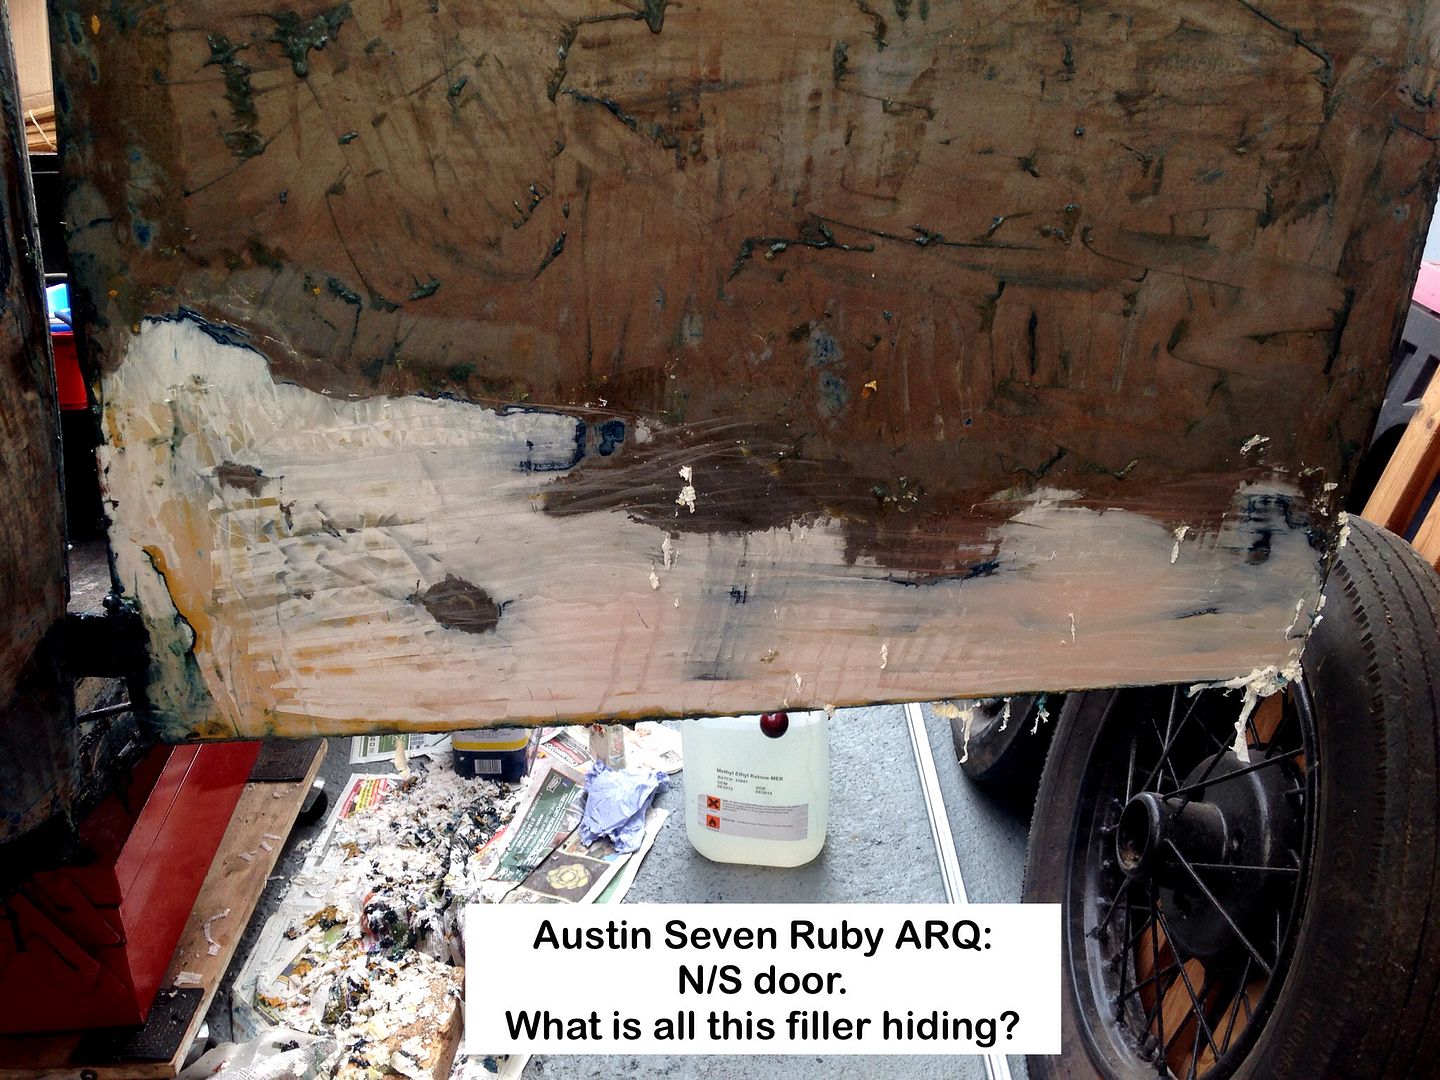
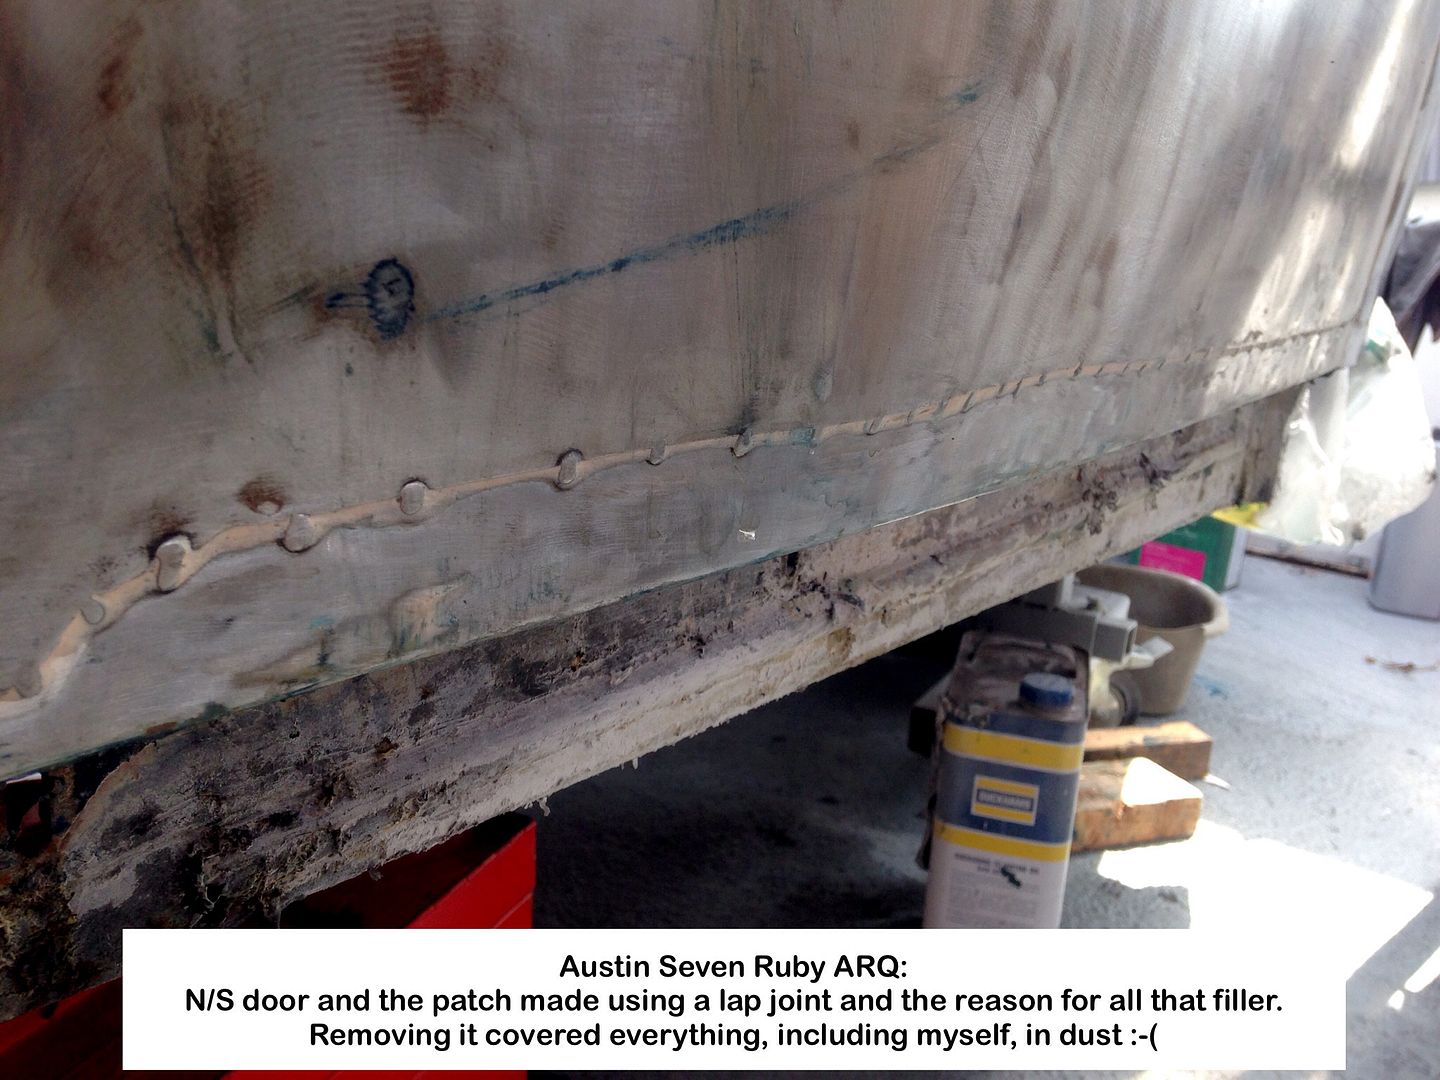
The N/S door has had its lower few inches replaced, but the lap joint has created a perfect water reservoir on the inside, so that has to be redone with a proper TIG butt weld.
Removing all the filler used on the exterior of the door has covered everything in sight in a white dust, as I had to use a poly strip disk in the L-grinder.
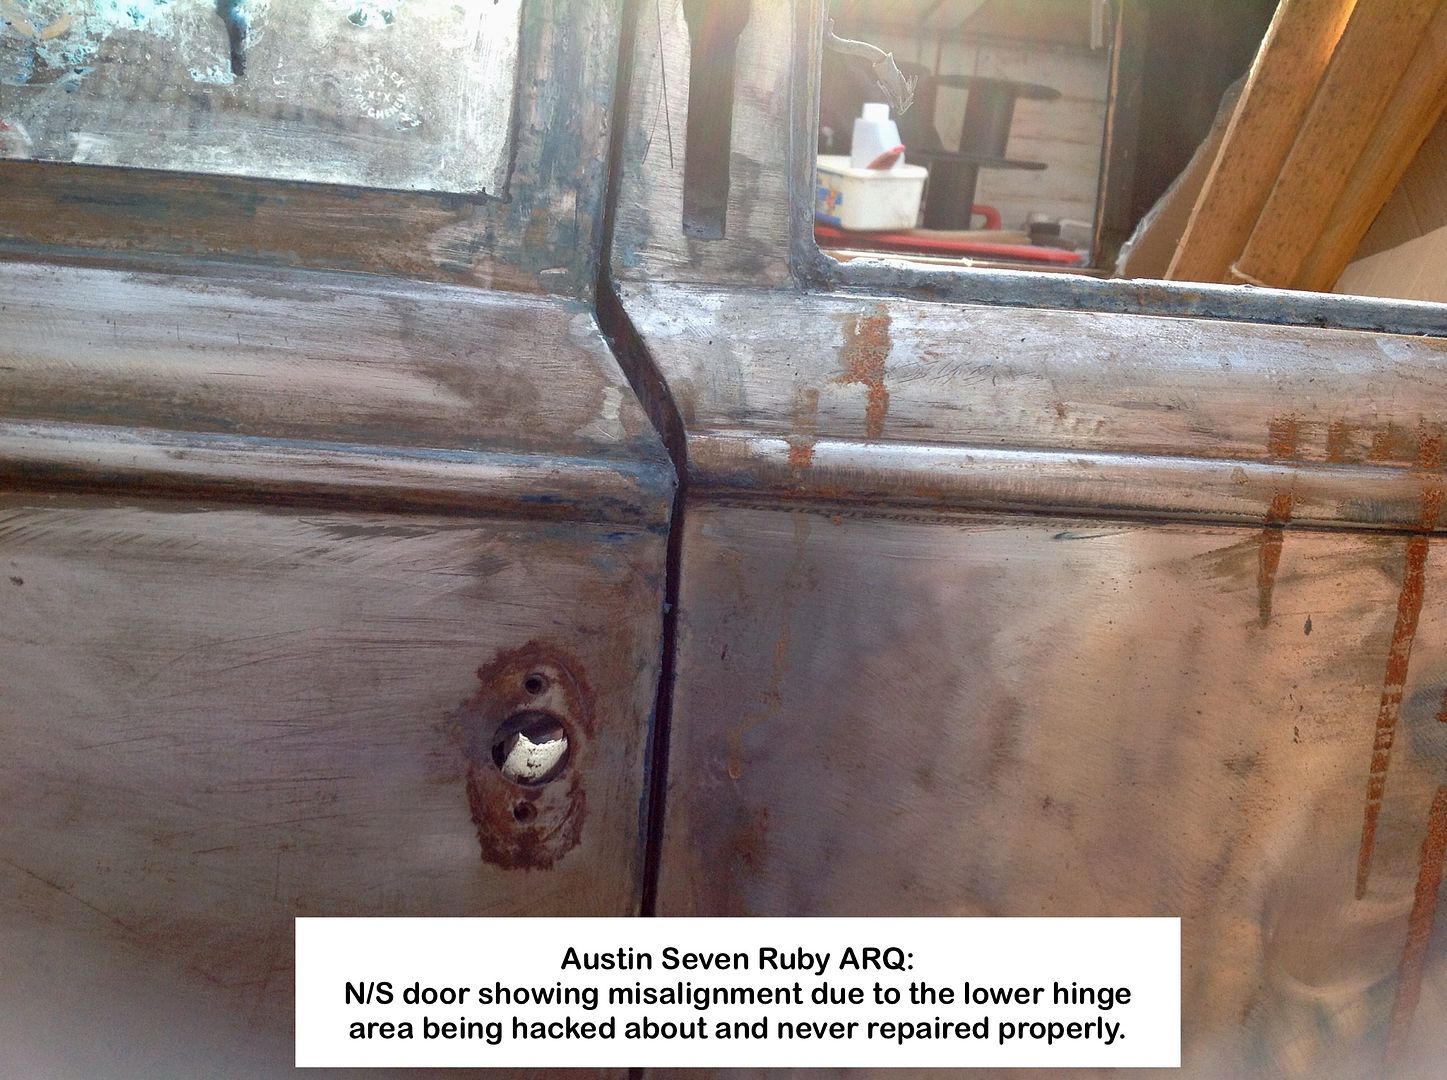
The section of the door that the lower hinge bolts to has been well and truly hacked, resulting in said door dipping by 3/8" and now well and truly out of alignment. No wonder it sounded like a jack hammer when driving.
Geoff - Next project, in my spare time, will be to make a spot welder
Location: South Norfolk - Next to Suffolk
I've reorganised the photos and hopefully haven't broken any links to any.
Been sidetracked once again, but this is the progress so far:
1 - All that yellow paint on the door is covering the repair done that I can only describe as a bodge to beat all bodges.
I've only managed to get one photo link up, as Photobucket  has now become less than useless as they are now more interested in buying up other companies instead of fixing their main product!
Now looking for a better means of storage, so any advise welcome.
Geoff - I am ready to hurl all computers out the frigging window 


Exit:
Ah surprised that only one link is broken, but don't remember what the photo was, so cannot fix
Location: South Norfolk - Next to Suffolk
I used milkstone remover on mine after it was stripped. I've yet to paint the wings and bonnet and they show no sign of rust at all after a year in the garage (I've been a bit poorly).
Milkstone remover is phosphoric acid used to clean out milking machine pipes. It converts any tiny bits of rust left in the metal and does a good job of protecting bare steel.
As far as I can see it is by far the cheapest way to buy phosphoric. I bought mine (5l) from Scats country stores in Billingshurst who ordered it for me. Their website seems unwell at the moment!
Hello Peter,
Get well soon.
Never new that stuff existed, but I do have nearly neat phosphoric acid that I use all the time, applying it via a spray bottle.
Whiffs and stings a bit, but nowhere near as bad as hydrochloride acid.
Never use hydrochloric indoors/workshop/garage as it WILL RUST ALL bare metal in sight, as I found out in the '80s.
Geoff - Will try adding more photos tomorrow.
Location: South Norfolk - Next to Suffolk
Wonders will never cease, but oh so excruciatingly slow just getting links from Photobucket.
2 - The blue is just paint stain from the poly strip disk and not paint.
3 - N/S door and the filler used.
4 - N/S door stripped, the bodges patch visible along the bottom. May not look bodged, the lap join has left a perfect water collector inside, with the hinge side a mess.
5 - N/S door and a closer view if the patch and reason for that thick layer of filler. It took ages to remove using the poly strip disk and covered everything in sight in a layer of white dust.
6 - N/S door misalignment due to that horrible bodge at the hinge attachment point
This post has taken me 50min to do, so enough of the torture from Photobucket.
Geoff - Enough is enough their crappy system now!
Location: South Norfolk - Next to Suffolk
More photos added to Photobucket.
I'm still using it as it's the only cloud storage that allows folders within folders, thus easy to put photos into groups.
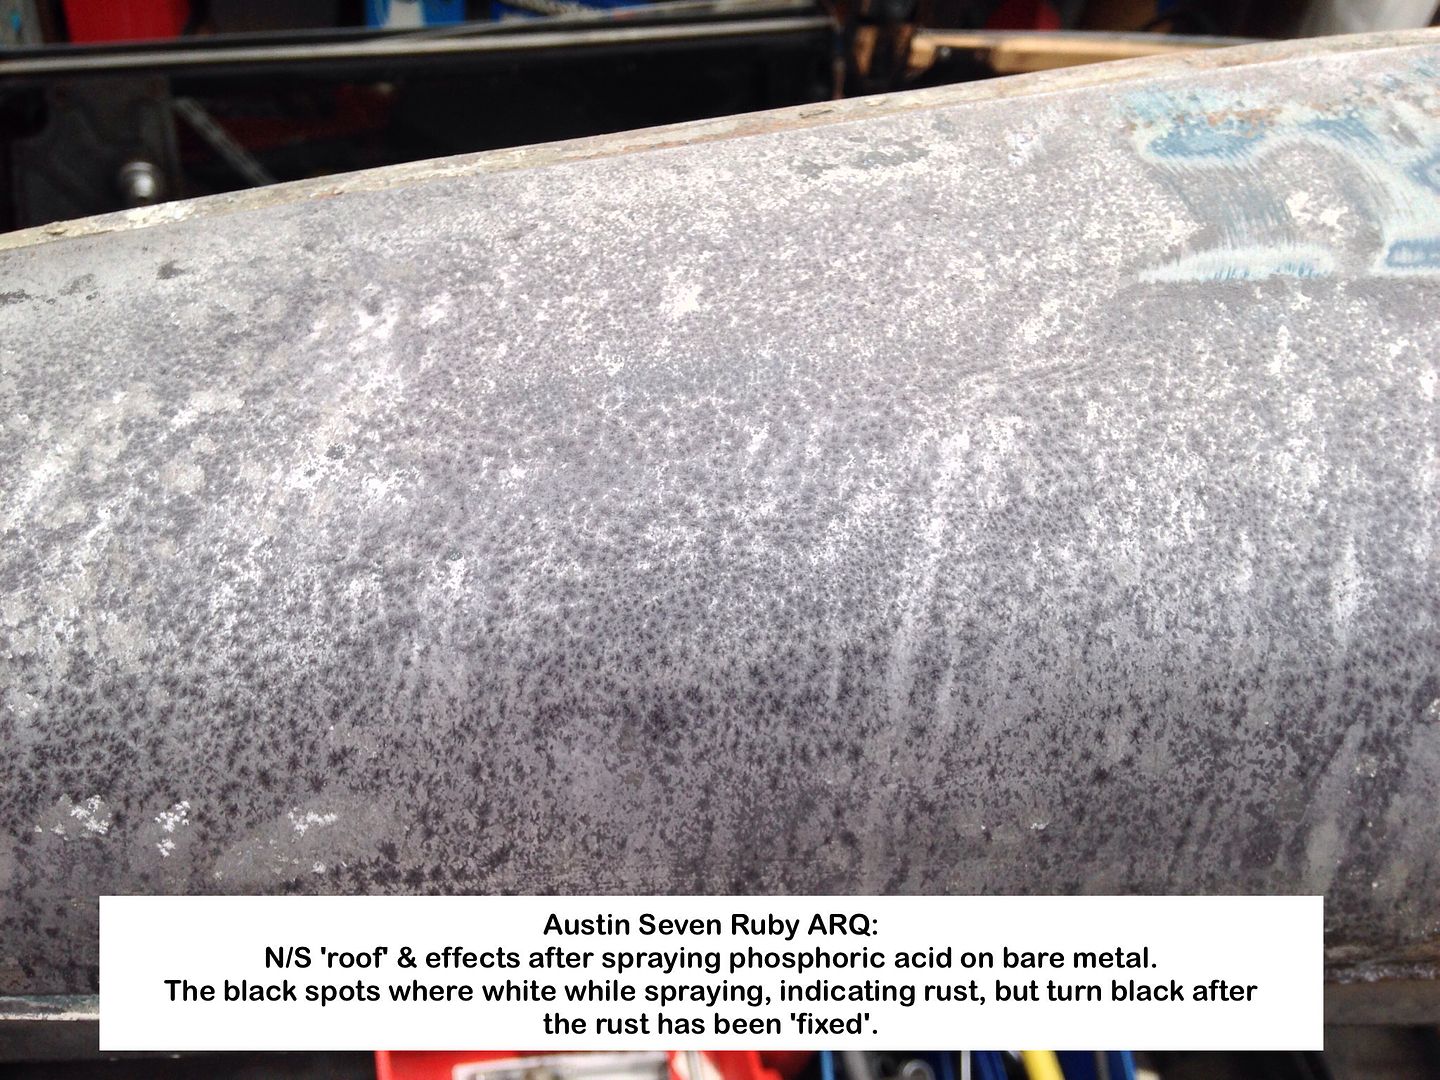
7 - Used a poly strip disc to get to bare metal, then sprayed with phosphoric acid.
The acid turns white on contact with rust, then black once the rust is 'fixed'.
What I didn't do was use either a microfibre or tak cloth to remove the rust dust left on the surface.
Now it's either the rust dust turning black or it's actual rust still in the pores of the metal.
Next time, out of curiosity, I will do as Dan Gelbart suggests and scrub the metal with Vim in order to get into the pores, then spray with acid and see what happens.
Yes I know, overboard, but that's me
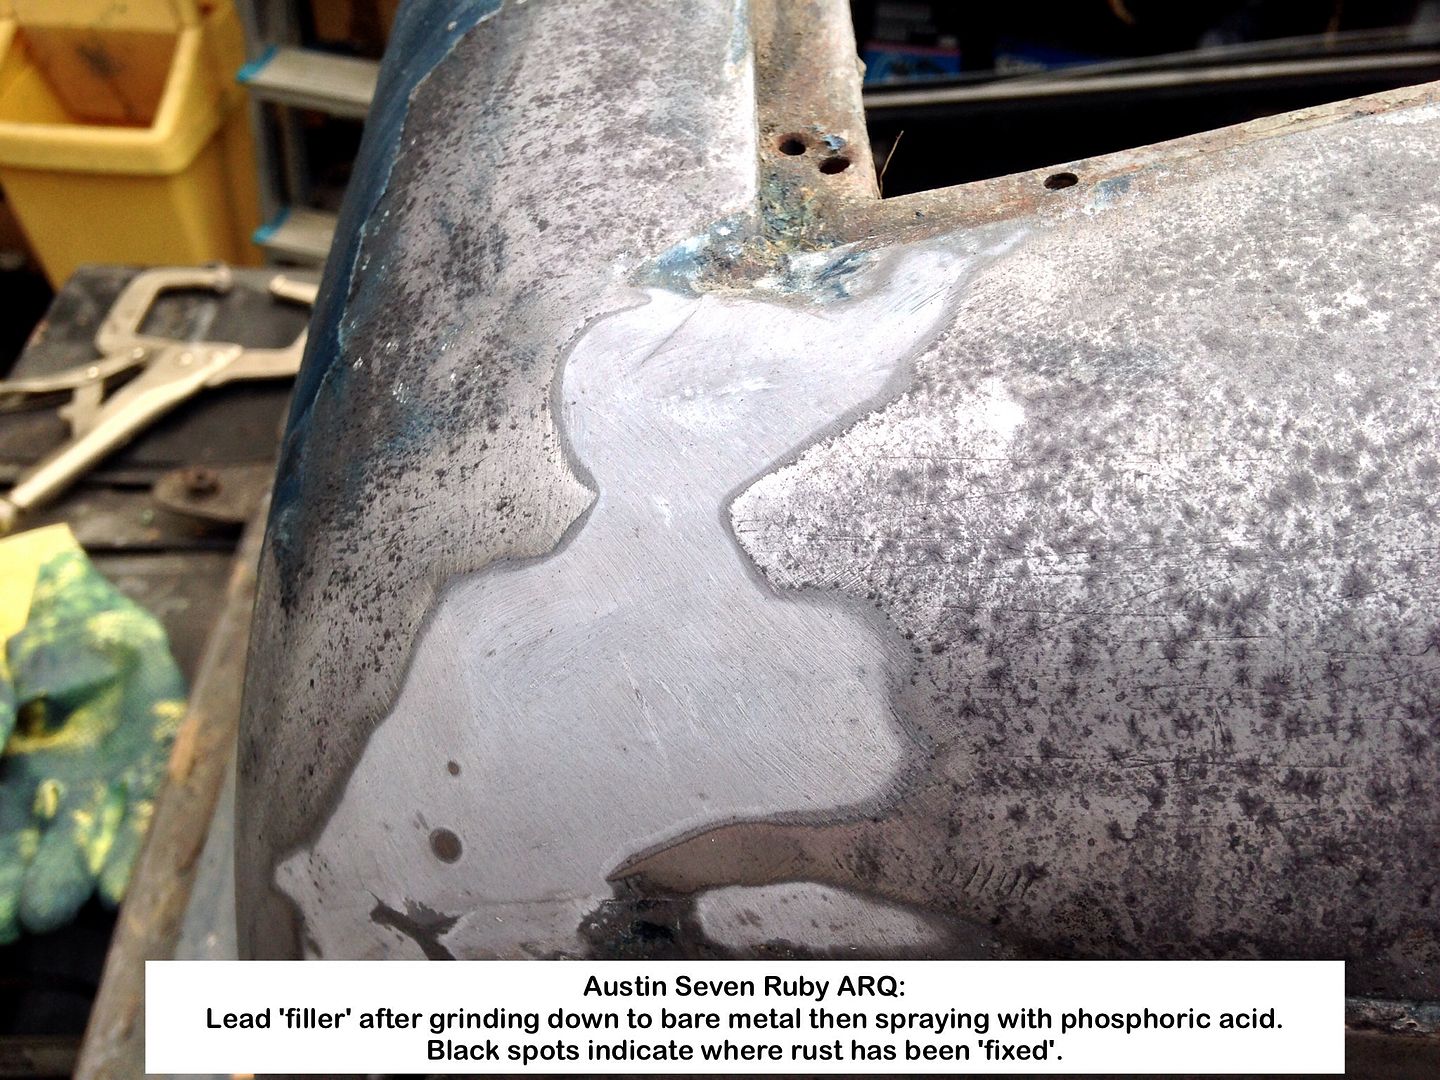
8 - More of the same, plus either a repair or normal leading work. Will find out if the O/S had the filler as well.
The 'ding' in the corner of the Sliding Roof aperture is clearly visible, and was also filled, but the lead escaped when removing paint.
Will put the frame back in before I attempt any metal bashing.
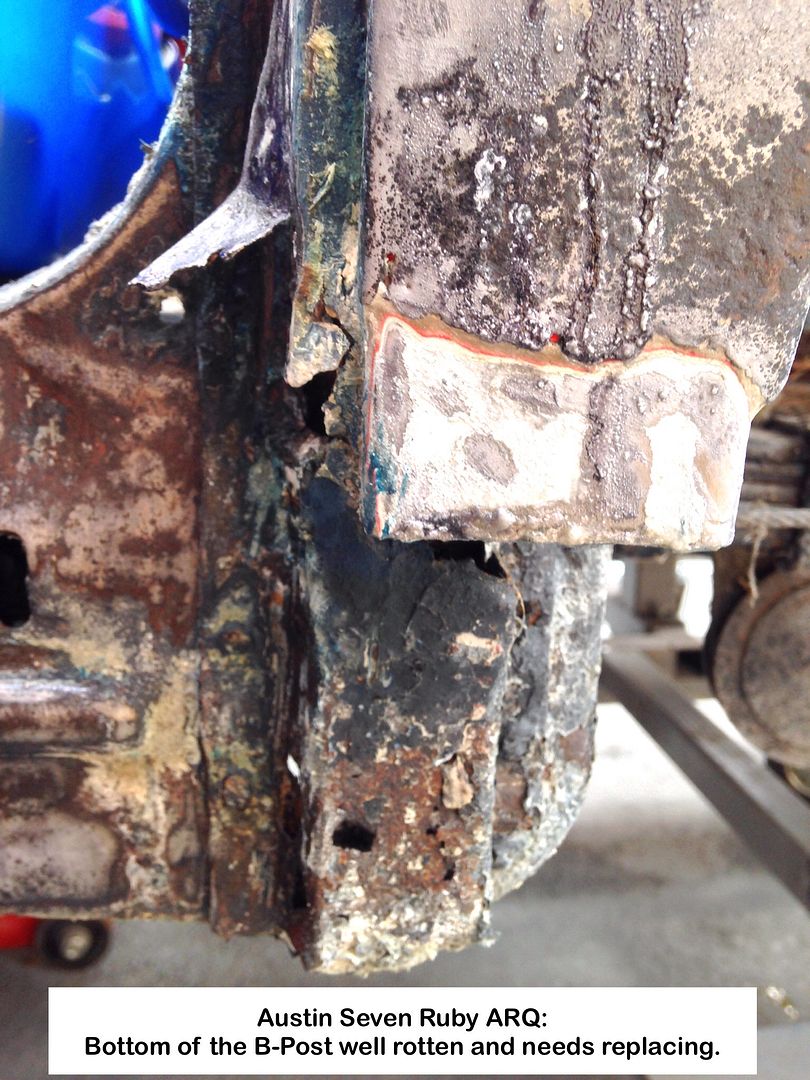
9 - This is nasty, and we spoke too soon Ruairidh.
Self explanatory and will test my metal bending ability. Wish I had paid more attention when Dad was repairing our cars.
More to follow later, as it would make my day if things crashed right now.
Geoff - Taking her indoors for an interview
Location: South Norfolk - Next to Suffolk
Nice job Geoff, well done!
I would not be too stressed about the surface rust that you are uncovering, it has taken 80 years to get to that state, but the metal is good quality and preparation prior to re-painting is the key to a long-lasting finish.
You will not stop the rusting process only slow it down to a level that is negligible or to a manageable rate, the new paint will encapsulate the metal and will help, primer coats are porous, the top coats are doing the work (along with polish) to prevent moisture contacting the metal.
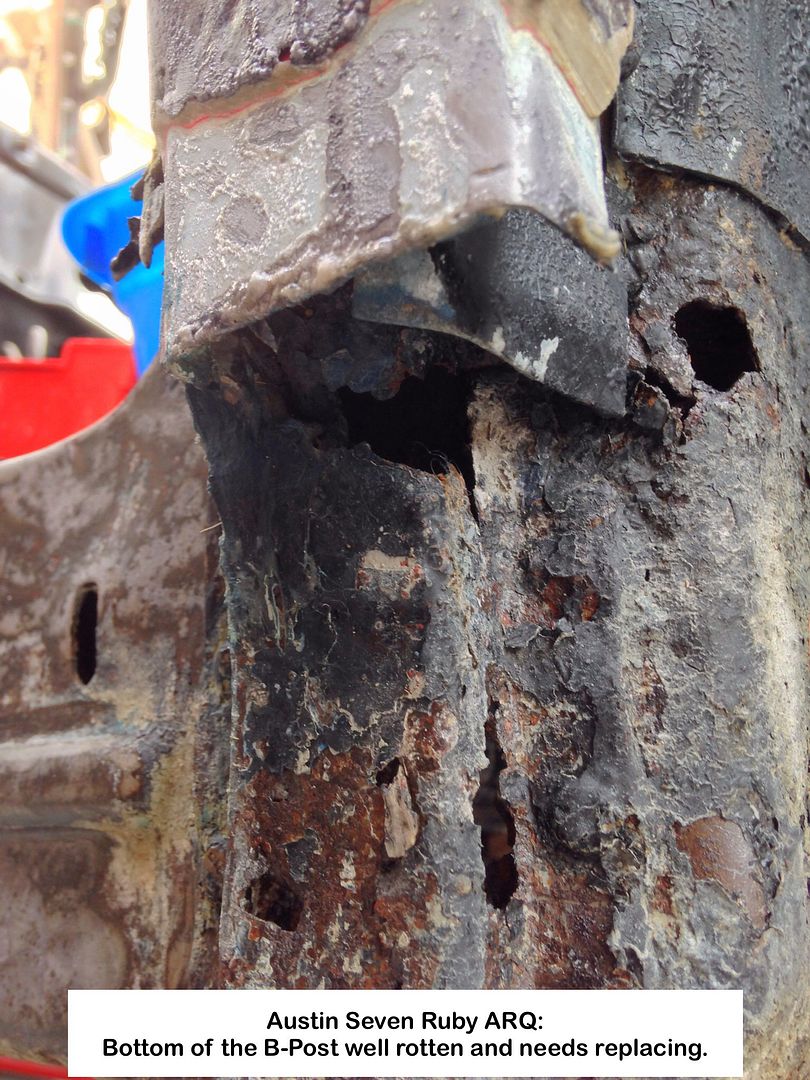
You have got some rust repairs to undertake to your B post base, protecting the inside (this is open, not sealed off) with cavity wax or whatever, will reduce the corrosion, so should be good for another 80 years!
Look forward to seeing more pics as your work progresses!
Location: Saltdean, Brighton
Thanks Ed.
Pretty relaxed at the condition, she being in her dotage, and better that a lot of young 'uns.
Interview over, followed by a meal at Mr. Ds American Diner, A11 Southbound, between Attleborough and Wymondom, and highly recommended. Nice Harley in the entrance plus a full size wicker one as well.
10 - This is going to need careful thought and hopefully the O/S will provide the 'plans'.
11 - No real surprise, and as Ed mentioned, completely open at the bottom, so something I will rectify I think.
12 - How this happened is anyone's guess, but need to think of a way to pull it out, not having a slide hammer.
Fill with lead after a little bit of hammer work probably the easiest and quickest. See 13.
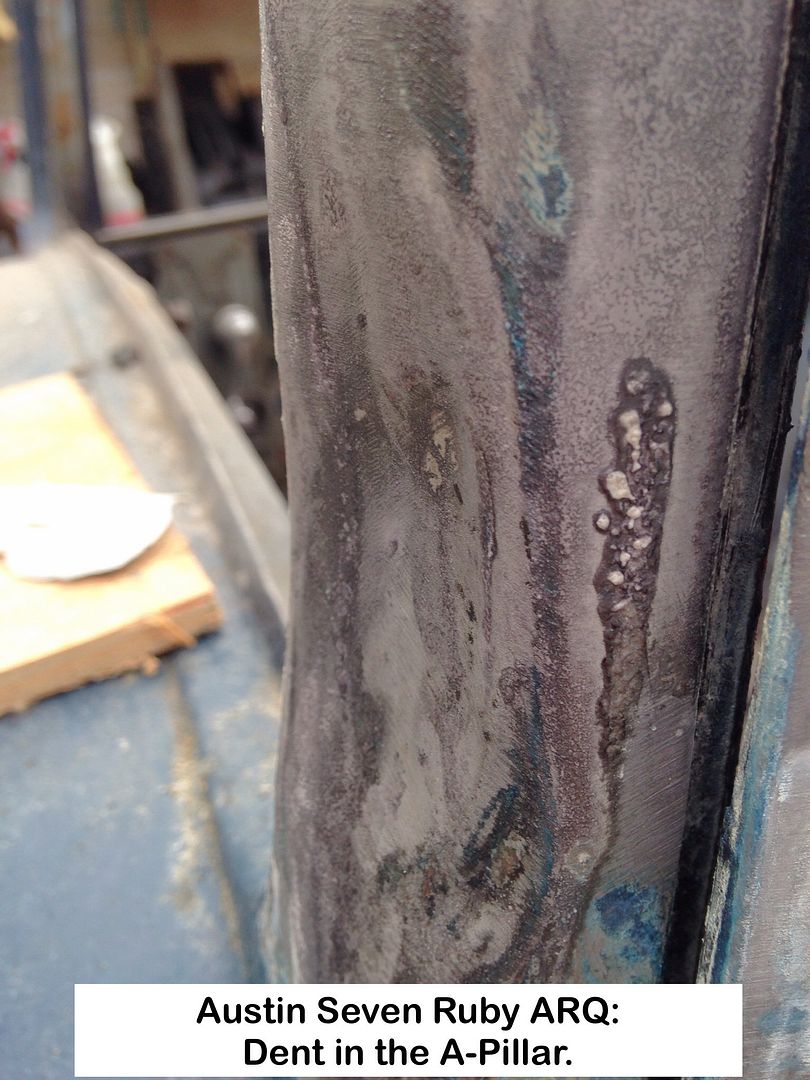
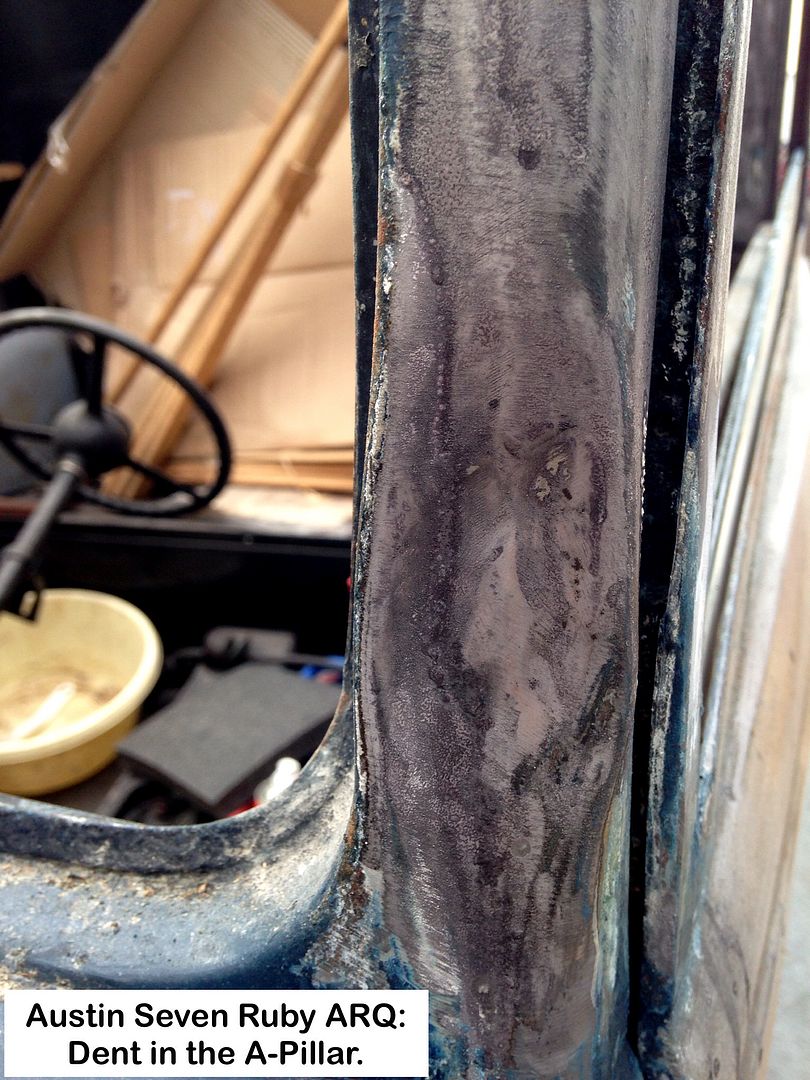
13 - That ding has pushed the A-post side in towards the Windscreen and needs persuading back into place.
That's your lot for now, as I've spent the last couple of days getting rid of all of that the white filler dust! 
Geoff - Need to practice stripping
Edit:
] left off end of top photo link.
Location: South Norfolk - Next to Suffolk
Hi Geoff
Here is a picture of the base of my B post, it is all covered up now, but that was how it looked, the repairer tried to get it as accurate as possible and it is about right, hopefully, you can zoom in and give you a better idea of how it should look.
That dent in the screen pillar is a bit of a bugger, would you consider getting the remains of a screen aperture off a scrap shell and un-picking the factory welds and stitching this in? Still, it must have looked ok before...

Location: Saltdean, Brighton
Gary,
Thanks for the photo.
It will help no end, even though the O/S on mine 'looks' unmolested, but will only find out when I get to that side.
Am prepared to try anything to remedy that A-Post dent, so would appreciate any help on getting a surround as mentioned.
This morning continued vacuuming up that white filler dust, then removed the rear bumper, but had to slice off one of the not so chrome bolts as it just spun.
Then the saga of getting the irons off, N/S nuts no problem, but O/S saying 'NO' so resorted to spraying some Rust Freeze on them.
Why oh why aren't these bolt heads against the irons rather than sandwiched between body panels thus making then impossible to remove?
Started swearing at a precious restorer again, this time mixing bolt sizes on the Luggage Rack bracket that bolts to the body.
Not helped by the difficulty of getting a spanner onto the rearmost bolt inside the Wheel Well, and then having to have arms like an Orangutang to get another up between the 'bleep' body parts as per Bumper Iron bolts.
All that made my morning, so cried enough, what with my N/S knee giving me grief, and family off on their yearly jolly tonight AND moving house. Well planned - NOT!
Geoff - Grinning and bearing it through gritted teeth 

PS:
Need a  or bigger!
Location: South Norfolk - Next to Suffolk
Things have slowed down somewhat, what with domestic duties and my ongoing treatment, BUT -
Having seen the extent a previous restorer went to, I've decided to play safe and remove the body.
I reLly need to make sure there are no hidden surprised chassis wise and floor pan wise.
As I will no doubt have to do this single handed, I've been thinking of ways to achieve the end result.
Now I intend making two wheel trolleys, one to bolt onto the rear bumper iron body mount bolts, but stumped as to the front end.
Raising the rear of the body high enough is no problem, but the pointy end has me scratching my noggin.
Bracing the engine compartment as indicated is no problem either, BUT will that sheet metal take the strain?
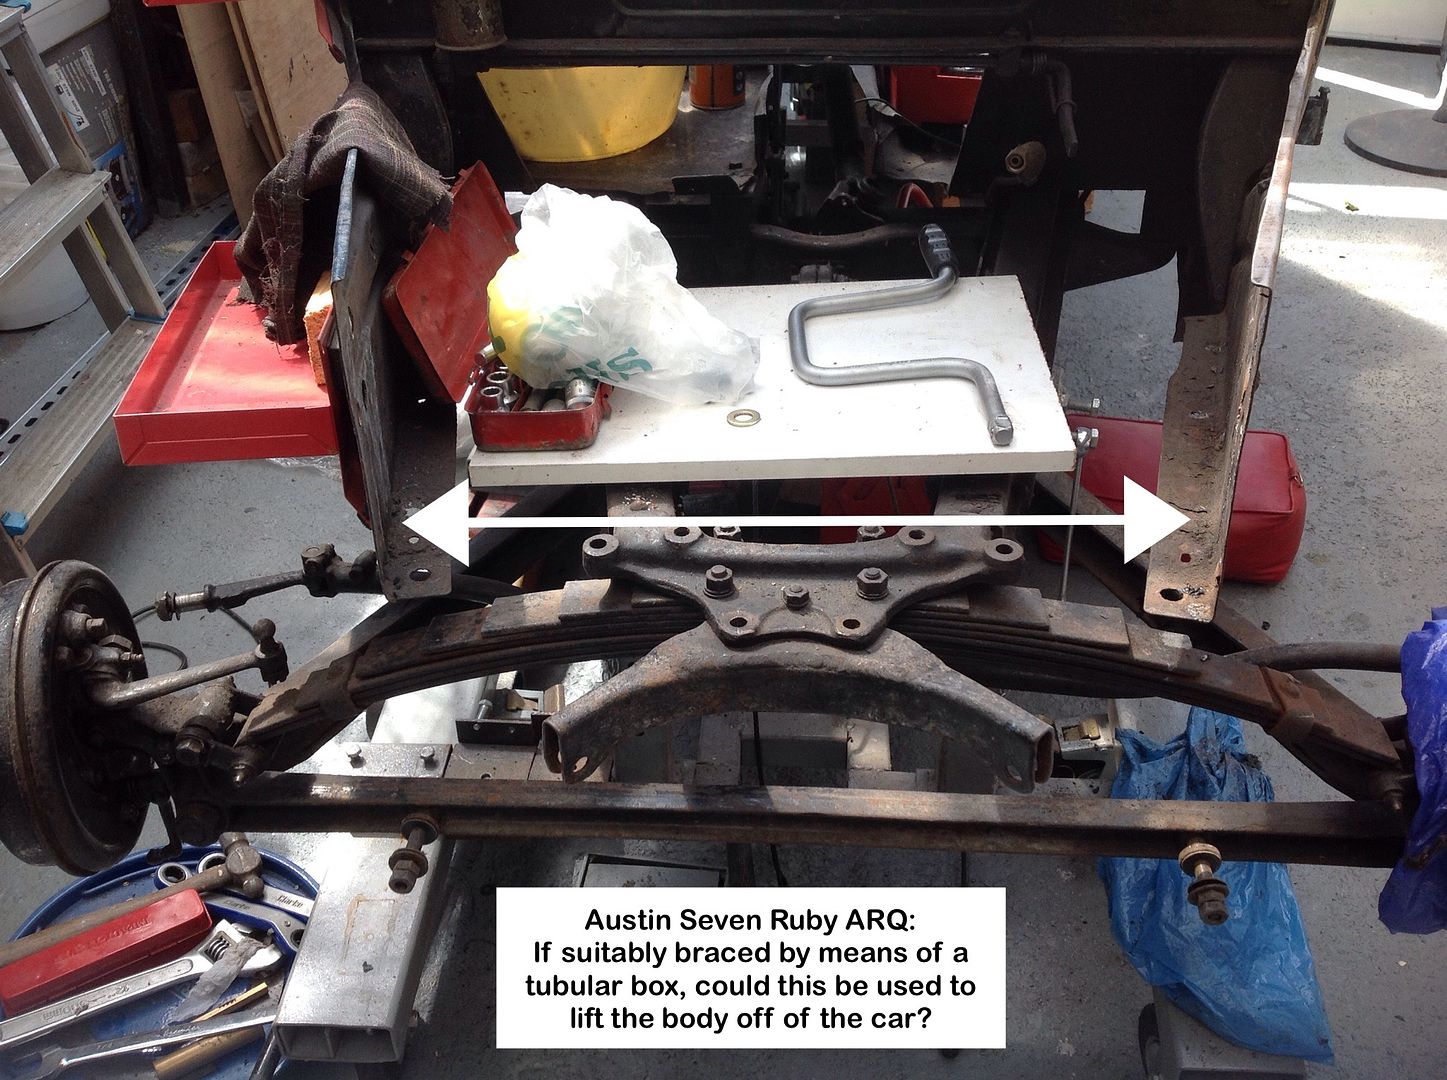
Will also want to attach my car rotisserie to this as well.
Geoff - I just knew progress was going a tad too smoothly 
Location: South Norfolk - Next to Suffolk
Not a problem to lift here Geoff. My Ruby body is off and I often lift it here manually. The two 'inner wings' flex a bit but not much. As for the rotisserie, I'm not sure. I generally get 3 of us to manually turn it over, though once I did it on my own - very slopwly and carefully.
Geoff, at the front end, why not just attach everything to the bulkhead, this is where it attaches to the chassis, and on DVD footage showing the bodies meeting up with the chassis in the factory, the straps are at this point, not the scuttle extensions. That way you shouldn't have too many worries. Like the sound of the rotisserie, look forward to seeing your pictures of this in due course.
Location: Saltdean, Brighton
Very slopwly--- Andrew 34 ruby I like that it has visions of me working!!!
Geoff, did you wash off the phosporic acid after treatment, or just leave it to dry? My body is at about the same stage, though all welding is finished, and after a bit more use of the disc I will be using phosphoric acid. I was intending washing it off but interested to hear your experience.
Thanks guys.
Excellent advise.
Gary,
What DVD are you referring to please?
Andrew34ruby,
I've left the phosphoric on, and no sign of rust so far.
Reading all I can, it is safe to do so, but with conflicting advise on removal or not before painting.
I will do a 'Dan Gelbart' and scrub the body down, dry, then paint.
Need to read some more though.
If you remove the acid and leave before painting, you could be left with metal just rearing to rust again.
Not having experimented, I have no idea.
Is there a chemist in the house?
Geoff - 34° in the Carport has 'Stopped play'
Location: South Norfolk - Next to Suffolk
On mine I didn't realise that the acid would wash off so I used an abrasive disc. Then cleaned everything up (lots of dust), wiped it down with degreaser and painted it all in one day. Very busy day.
If it washes off, wiping it over with meths should get rid of the water before it rusts again I would have thought.

I may have missed it during the early post on this thread but why did you not get the whole car sympathetically blasted and weld able etch primed. It saves all of this heart ache with grinders, strippers , rust killers and missing the bit that will mess the whole job up when it is painted and comes through again. I have had three cars done by a company in Gosport and swear by them.
Location: Oakley, Hants
Well in my case (seems to mirror Geoff's car) it is because I want to do it myself. You might as well just pay to have the whole thing done.
Gary,
I've been looking at your suggestion of attaching the framework for the rotisserie, but cannot see where/how to do it.
Grey matter refusing to co-operate as usual.
Derek,
If I could afford such I would, but like Peter I enjoy getting my hands dirty.
How much did they cost Derek?
I realise costs differ, but it will give us some idea.
Peter,
Been out into the Carport to have another look at the acid covered metal.
Running my hand over it, it felt like emery paper but the bits came away when I rubbed my fingers over it.
Used a piece of cloth to do more rubbing, resulting in a very fine dust and particles coming off, and leaving the surface smooth enough for primer.
If no rust appears, particularly with the humidity we are now experiencing, I will be happy to leave as is.
Next time I will spray an area, then spread the acid using a cloth, as an experiment, as I think I spray too much on.
Geoff - With family wedding next month, Greece and I have the same problem finance wise
PS:
Every time I see tha header I cringe 
Location: South Norfolk - Next to Suffolk
My reasons...
1. I bought the car to enjoy working on.
2. If someone blasted too hard it could ruin the whole thing.
3. If they prime it I have no way of knowing whether they blasted all the rust or not. Rust might still come through.
Letting someone else loose on it just puts me so much out of control. You were lucky, you found a good company.
Will strip the paint from the bottom area of the O/S B-Post to get some idea of its construction, which hopefully will help me reconstruct the N/S.
Does anyone have photos or cross-sectional drawings showing how they are constructed, or able to point me in the right direction please?
Geoff - Carport 10° cooler so time for action.
Location: South Norfolk - Next to Suffolk
Thanks Gez.
I had signed up with them, but haven't started a blog yet.
Geoff - How long a piece of string?
Location: South Norfolk - Next to Suffolk
Andrew,
How did you support the rear of your Ruby body when you took it off?
I intend to use my CarTrolleys so that I can roll it outside, but cannot of course use the bumper irons as I first thought to.
Anyone have any ideas on fixing a suitable frame to the rear to fit onto the CarTrolly please?
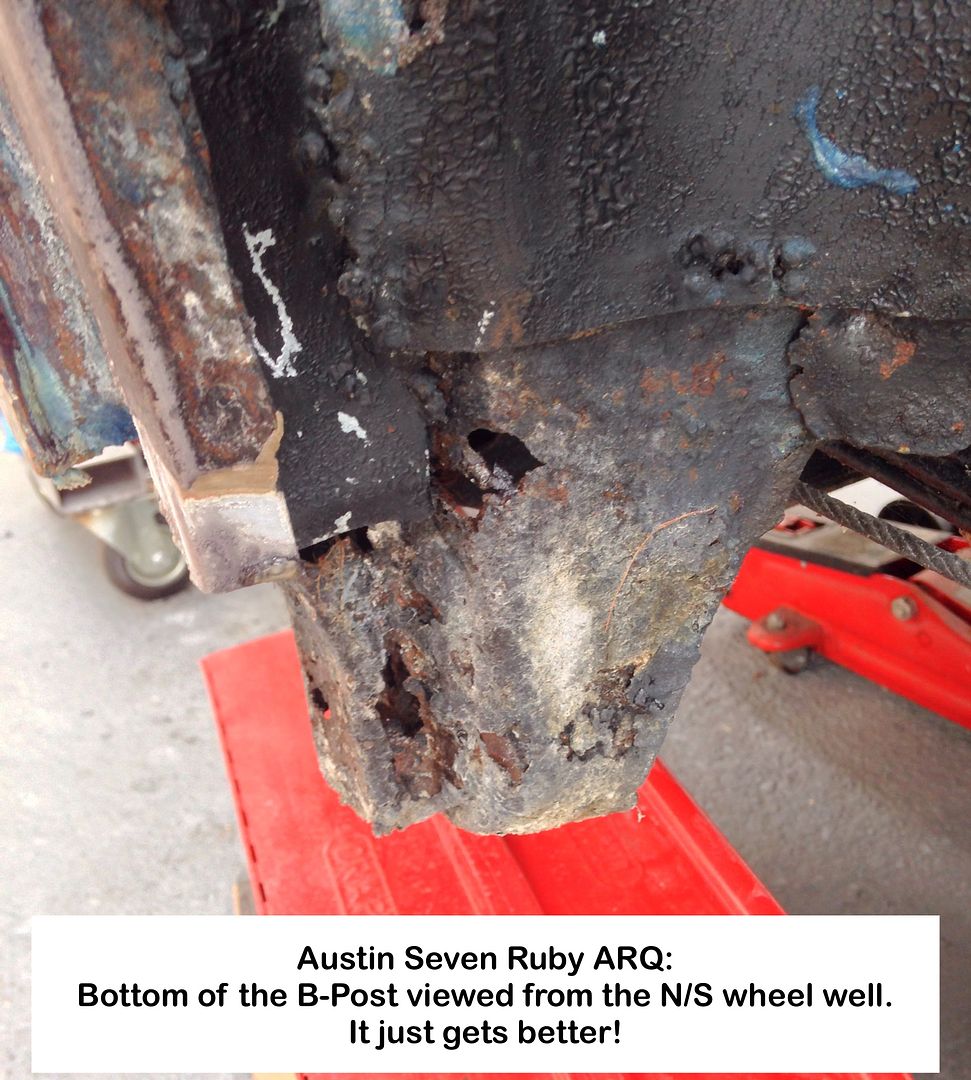
Things are just getting better, with that 'patch' at the bottom of the NS B-post just being pushed in then covered in filler.
Photo 14:
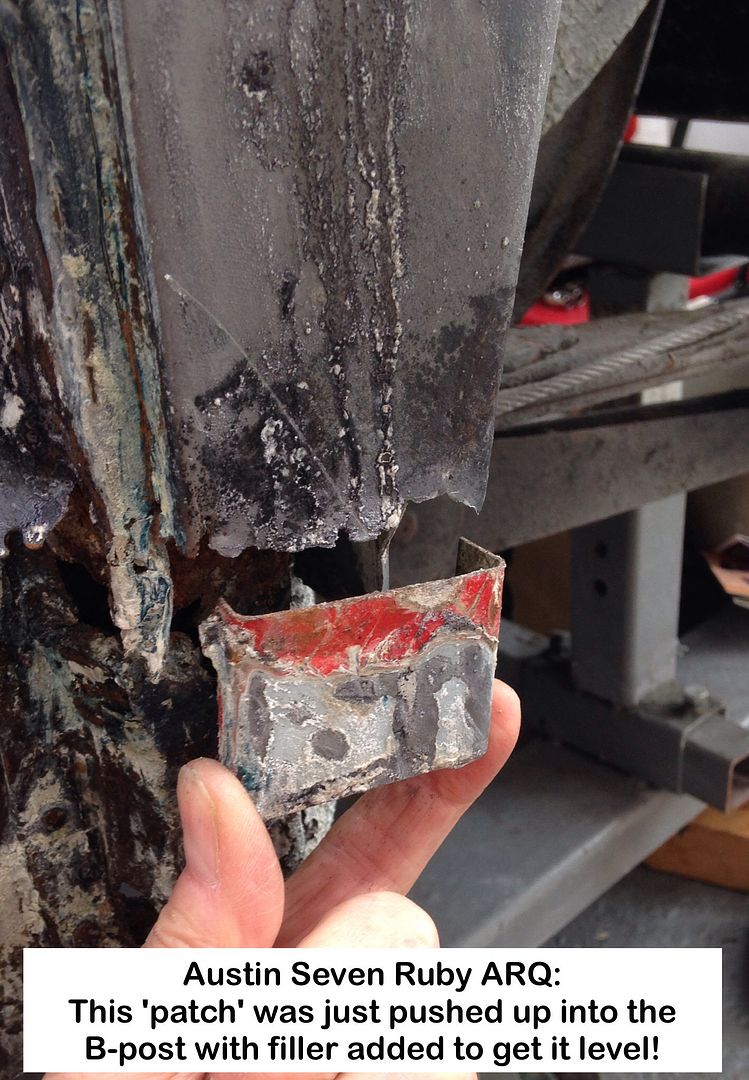
The following speak for themselves, and make me shake my head, with 'King of Bodge and Filler' springing to mind, and NOT in a complimentary way either.
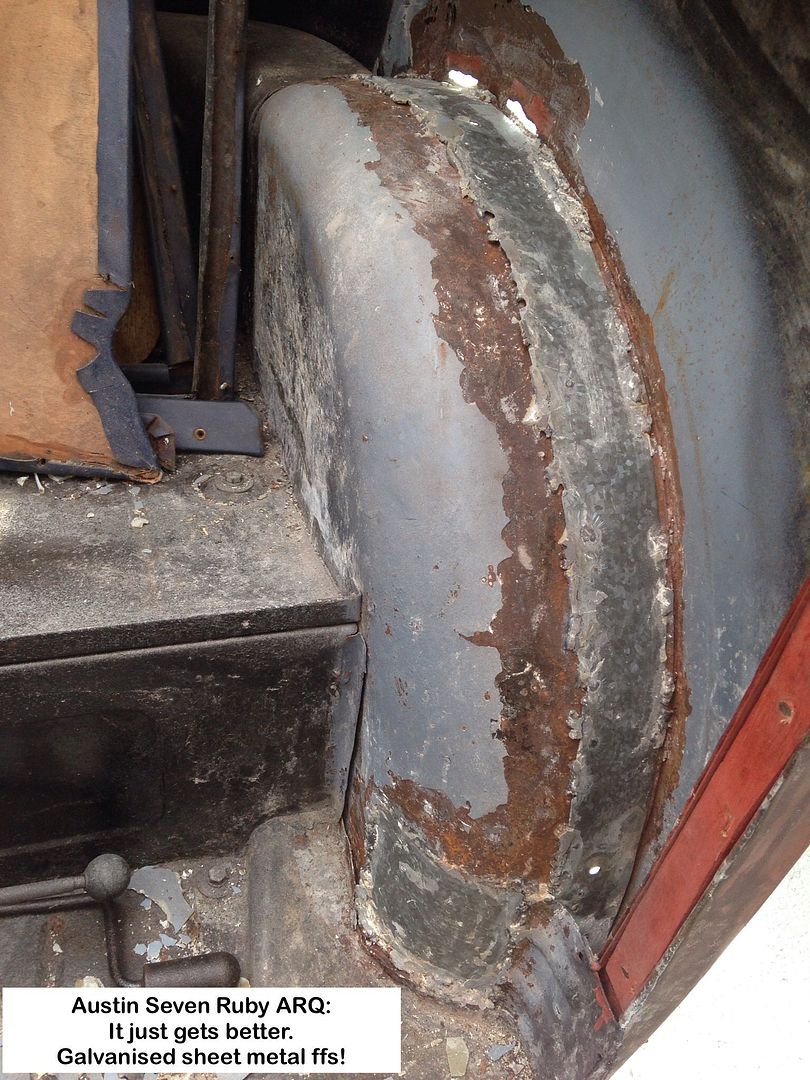
NS rear inner wheel arch.
Time to investigate what those two bits of filler, on the outside, would reveal, and this is the horror that came to light, covered in places with 1/4" of filler.
This shows just how rust has a free for all under filler if the metal isn't protected!
Photo 15:
Time for the OS inner wheel arch:
Photo 16:
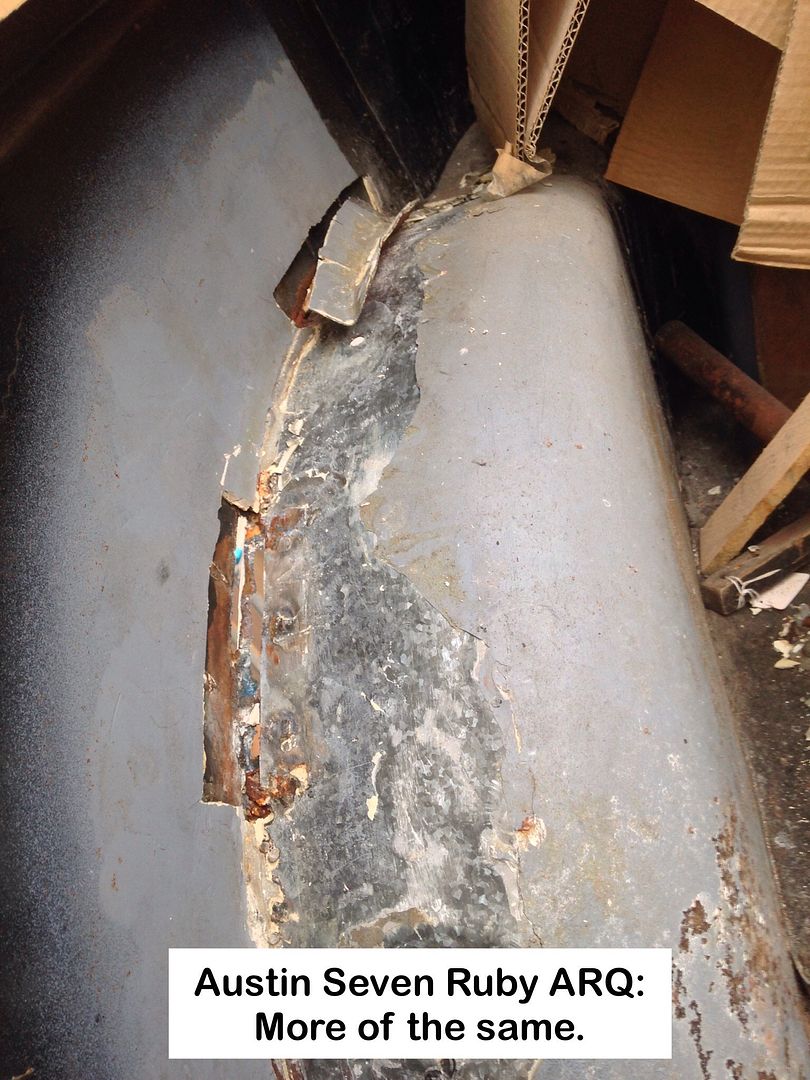
Photo 17:
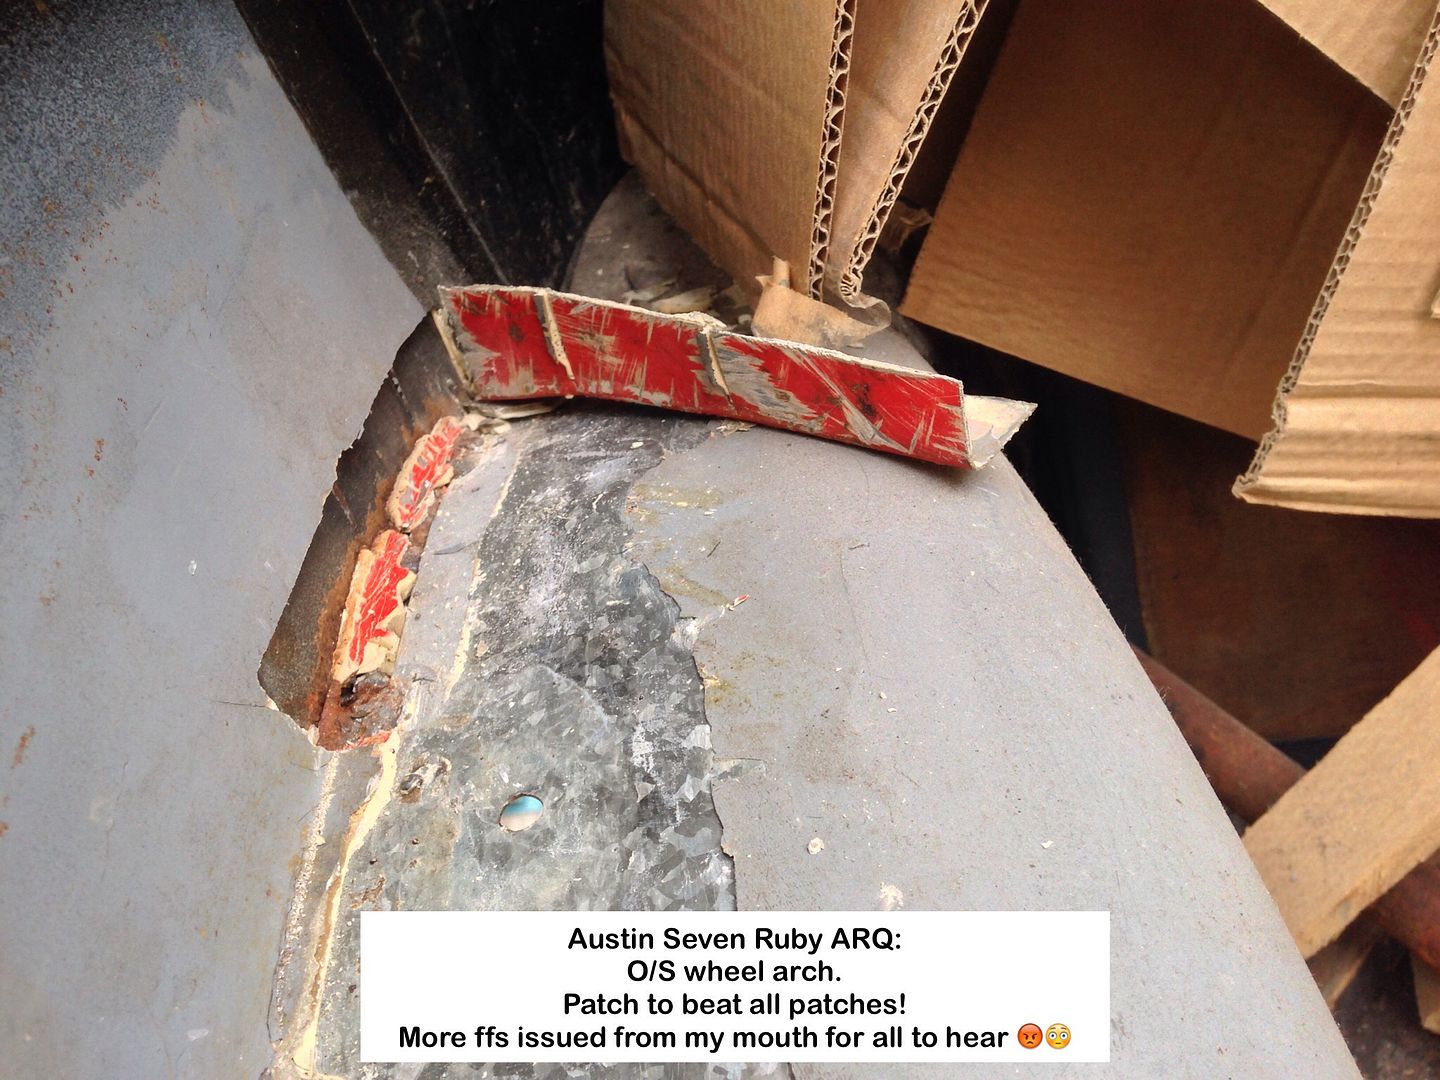
Photo 18:
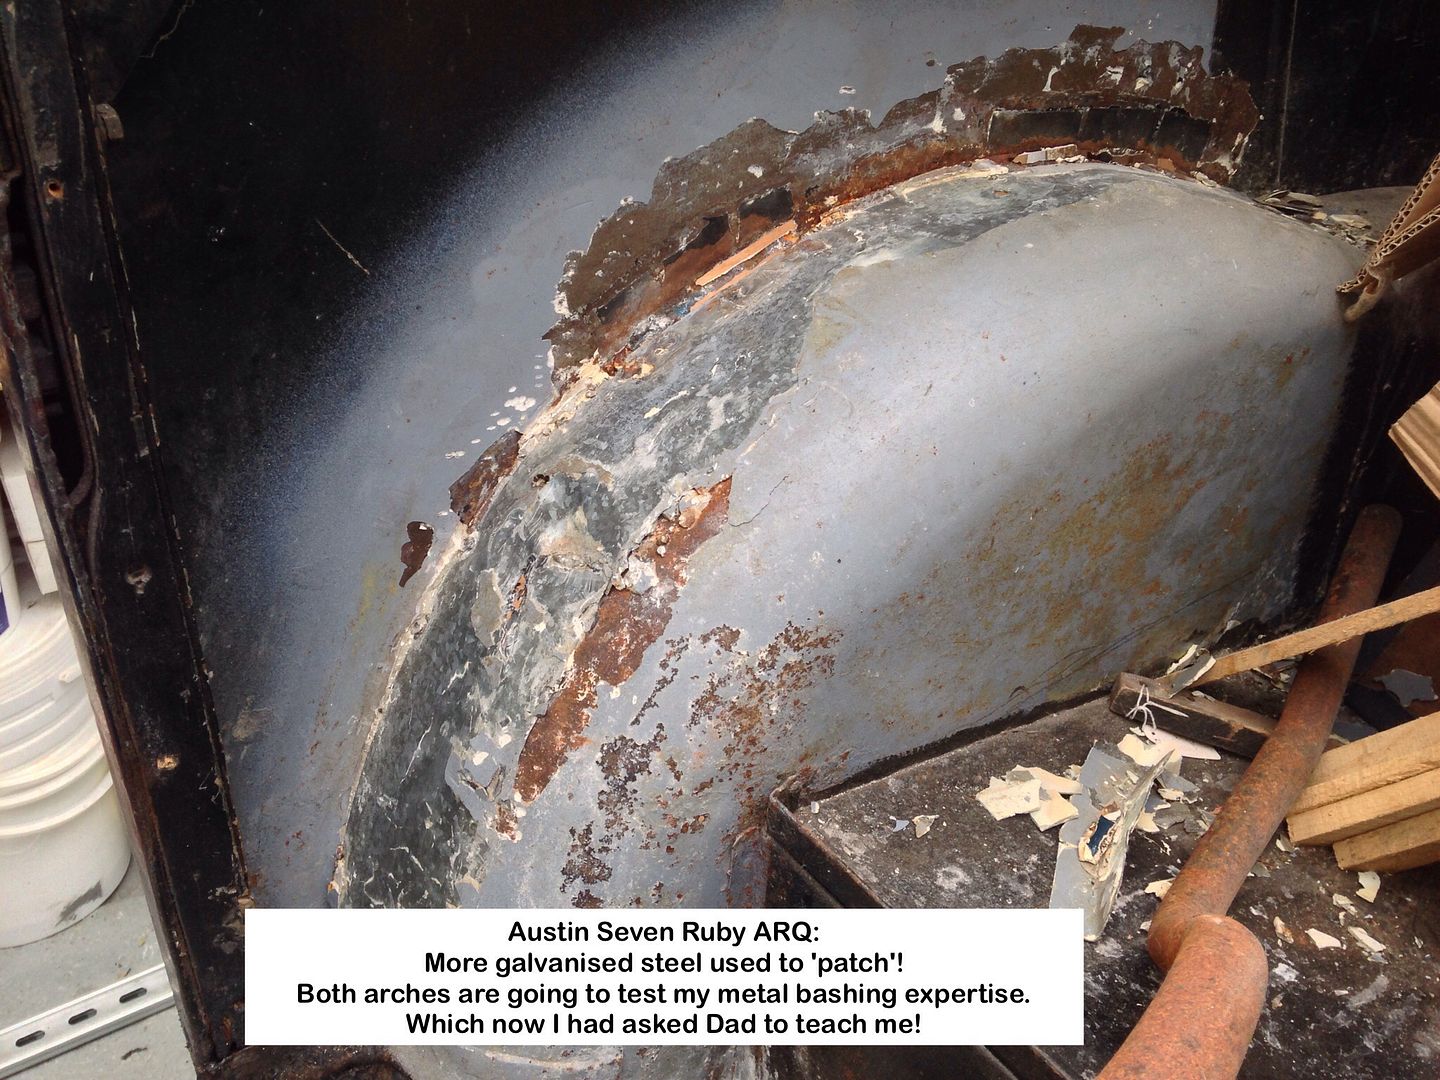
These are going to tax my ability at metal bashing, and I will be asking my dear departed Dad for help.
Geoff - Watching Dad, it looked so so easy
Location: South Norfolk - Next to Suffolk
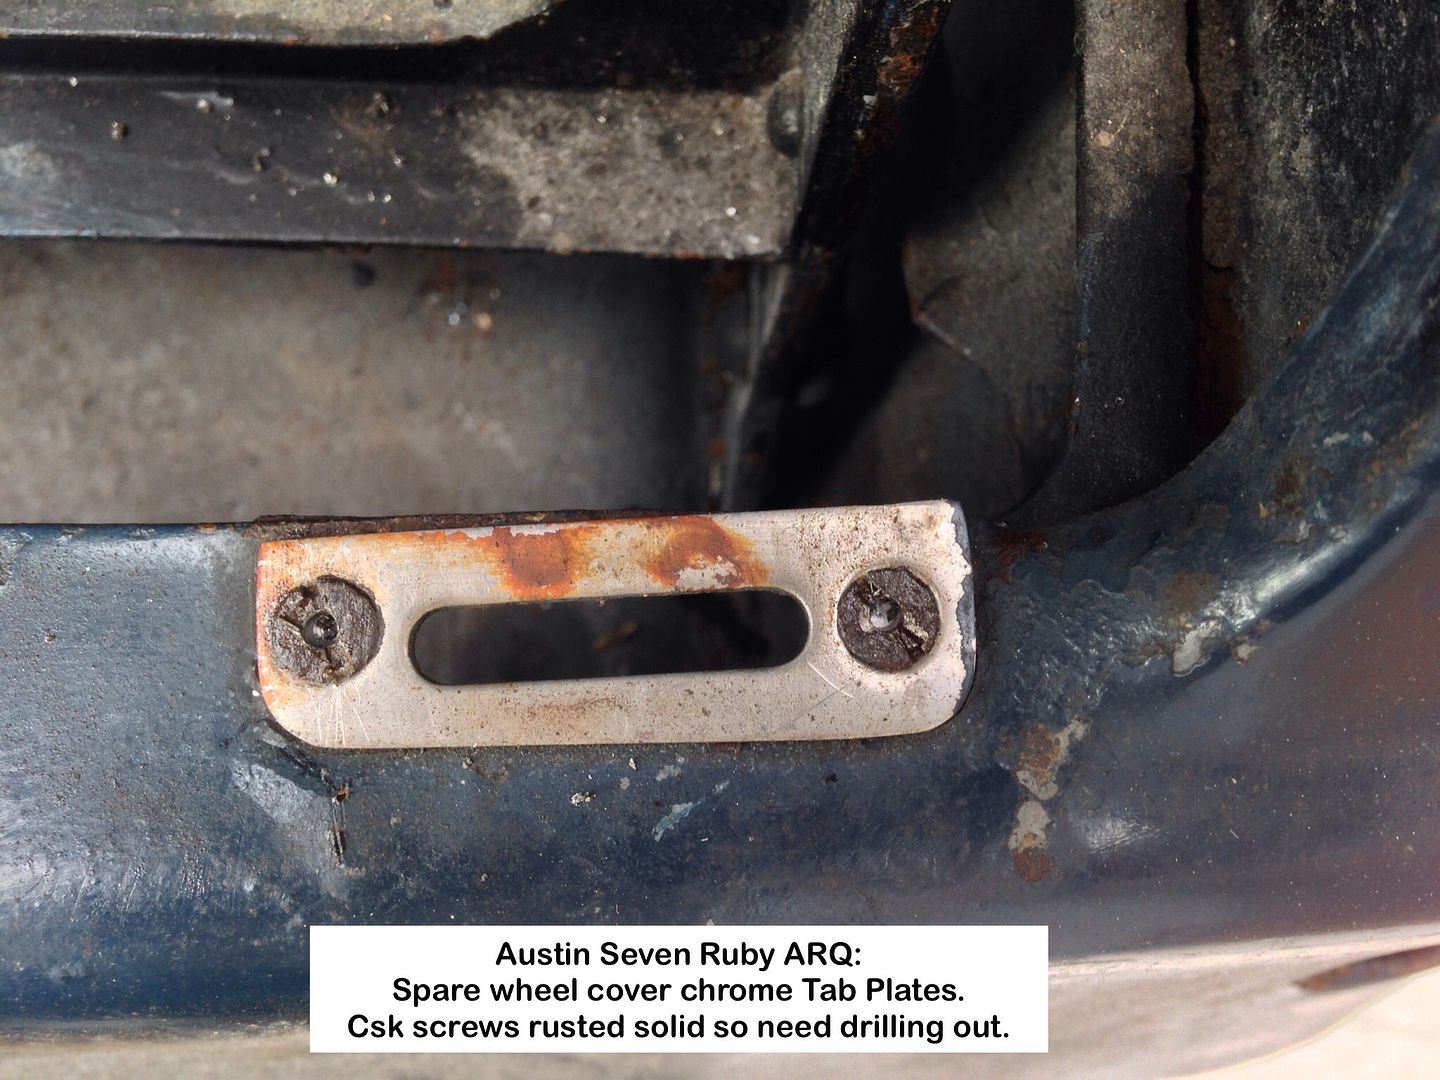
Saturday spent the day doing battle removing the 6 nuts and bolts that hold the Luggage Rack in place, with 4 shearing, so no great loss as they where all rusted to bu**ery.
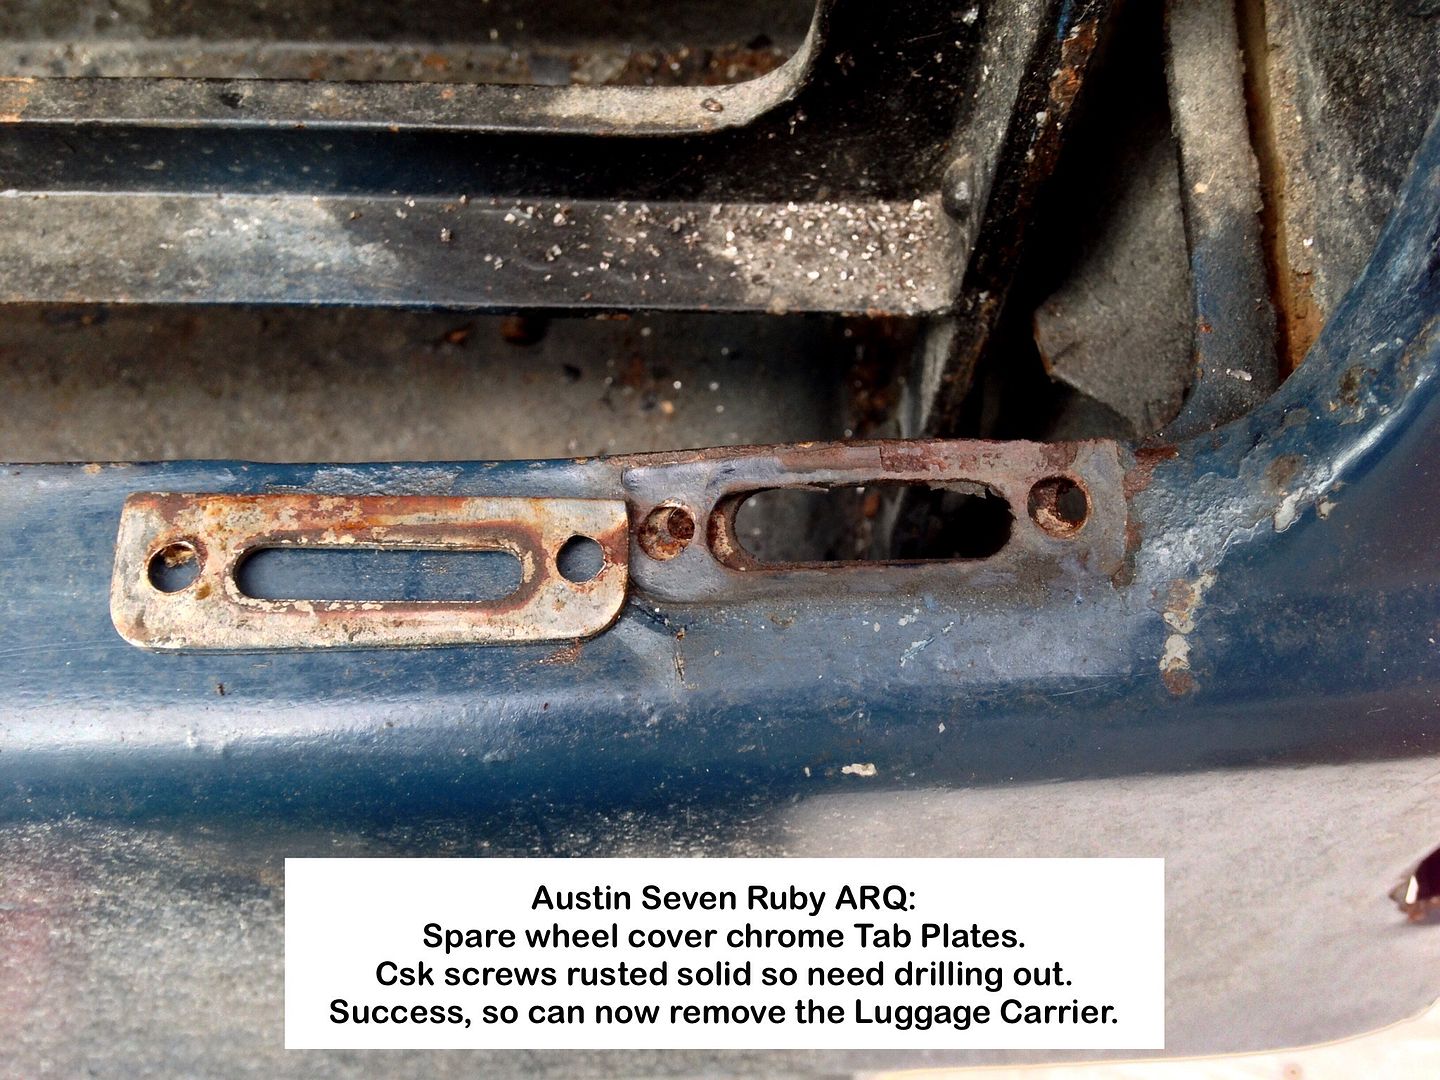
Then the two, one of each pair, that also held the 2 spare wheel cover chrome Tab Plates in place that needed drilling out as they where rusted solid.
Photo 19:
Soon had them drilled out and the Luggage Rack removed.
Photo 20:
Now time to start with the Body to Chassis bolts and this is when I really REALLY started calling the previous restorer all the  names I could think of and think up.
The previous restorer had used the same 2" long bolts and locknuts used for the engine mounts, and impossible to get at.
How they thought that this was either clever or useful beats me, as it would only take a couple of minutes to cut the bolts shorter and clean the ends up.
It just beggers belief.
No apologies for my language, as it really riled me no end, and once again just confirmed that my decision to remove the body was the correct one, as who knows what other abortions lie in wait underneath, body and chassis wise.
Photo 21:
No choice but to drill them out, but I will try the L-grinder on the other 4, as it was hard work even with COBOL drill bits.
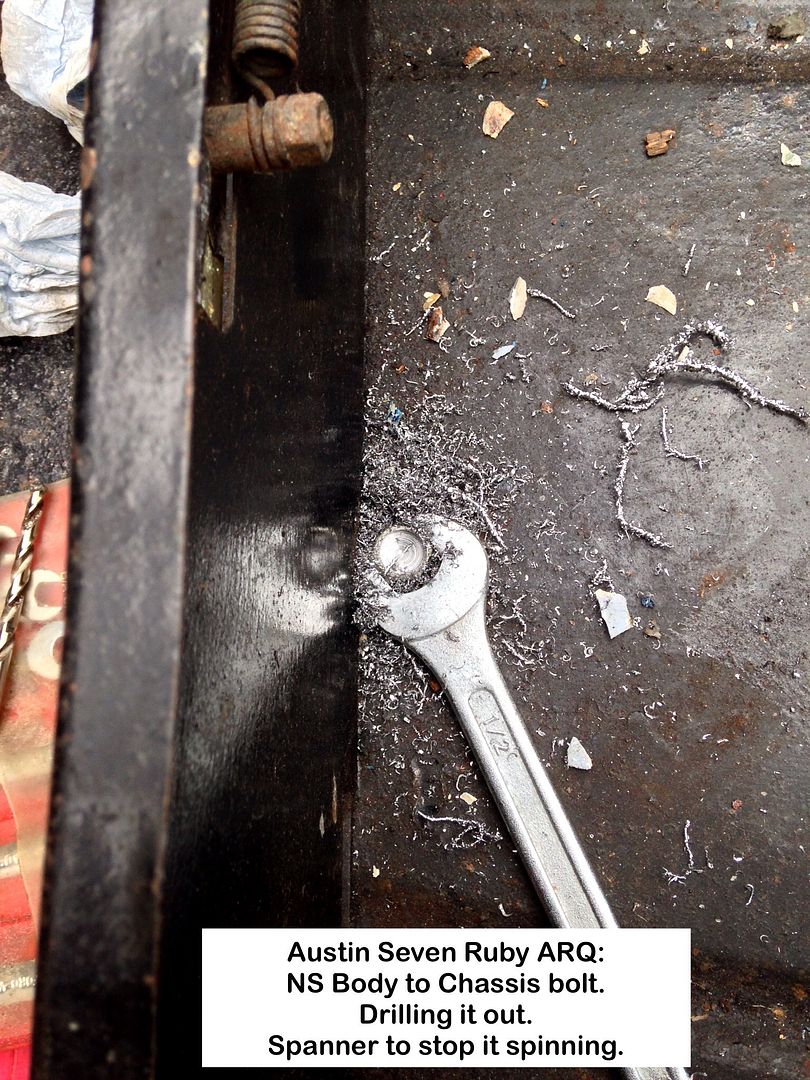
Photo 22:
This 2" long bolt really does take the cake/p1ss.
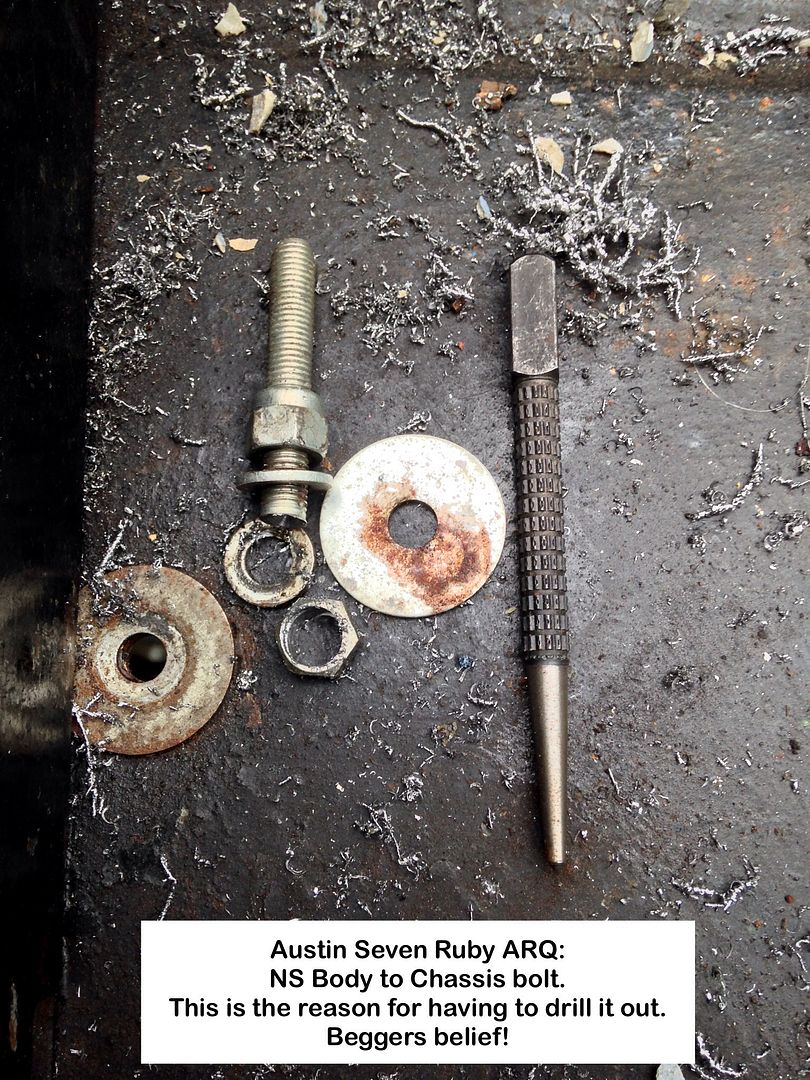
By the time I had drilled two of those bolts out, I had had enough for the day and packed up, and how some people can say they have restored a car is beyond my comprehension!
Geoff - Beginning to realise that they are king/s of bodge and filler.
PS:
Can you guess that I'm rather worked up and spitting and can't sleep 


Location: South Norfolk - Next to Suffolk
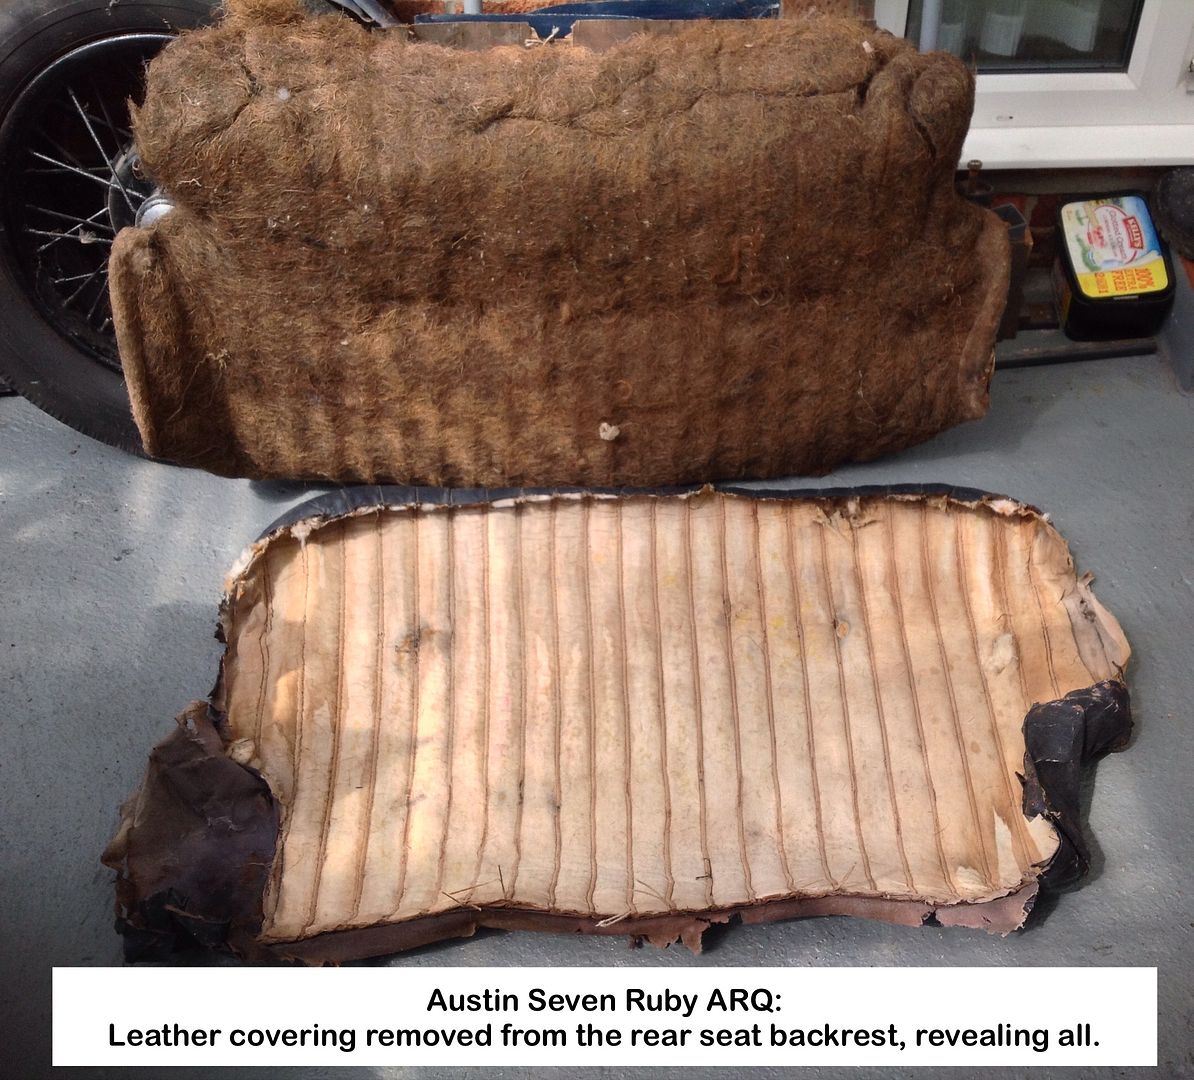
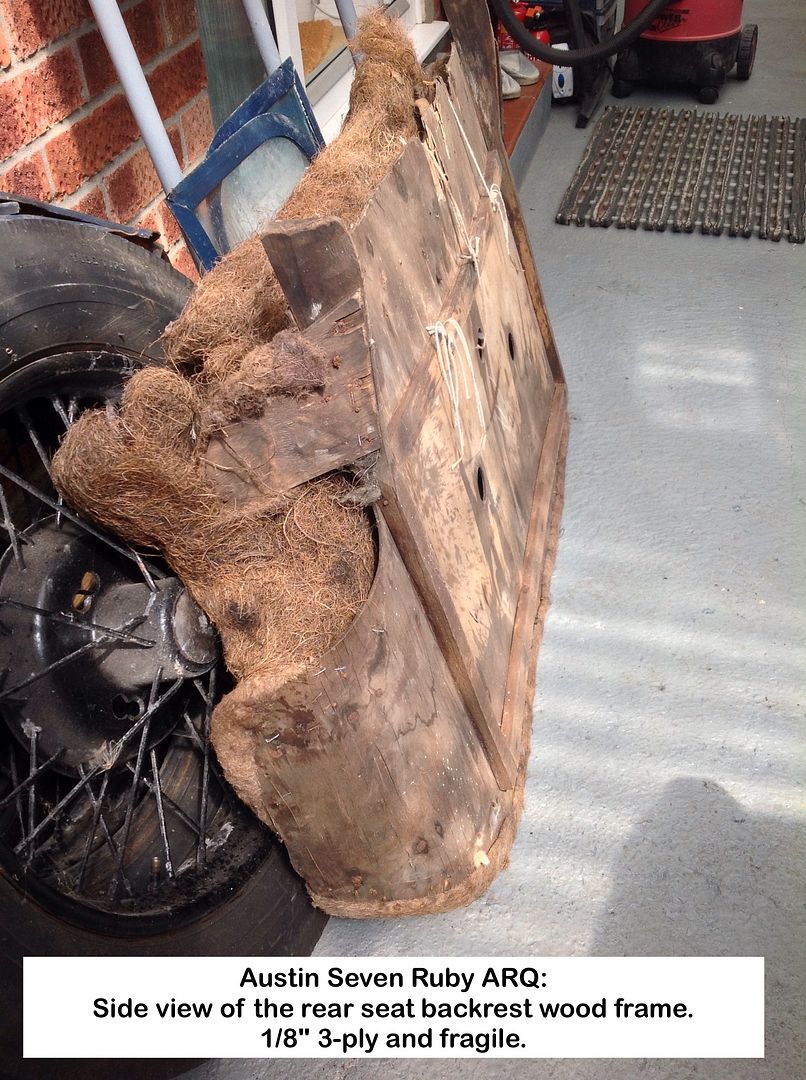
Further to my thread requesting help as to upholstery colours, here are three photos showing how the rear seat backrest is constructed.
The ply backing is bone dry and fragile, so a question of whether to replace or give it a good soaking of glue or varnish.
Photo 23:
PS:
The leathercloth side pieces are so fragile they just fall apart.
Photo24:
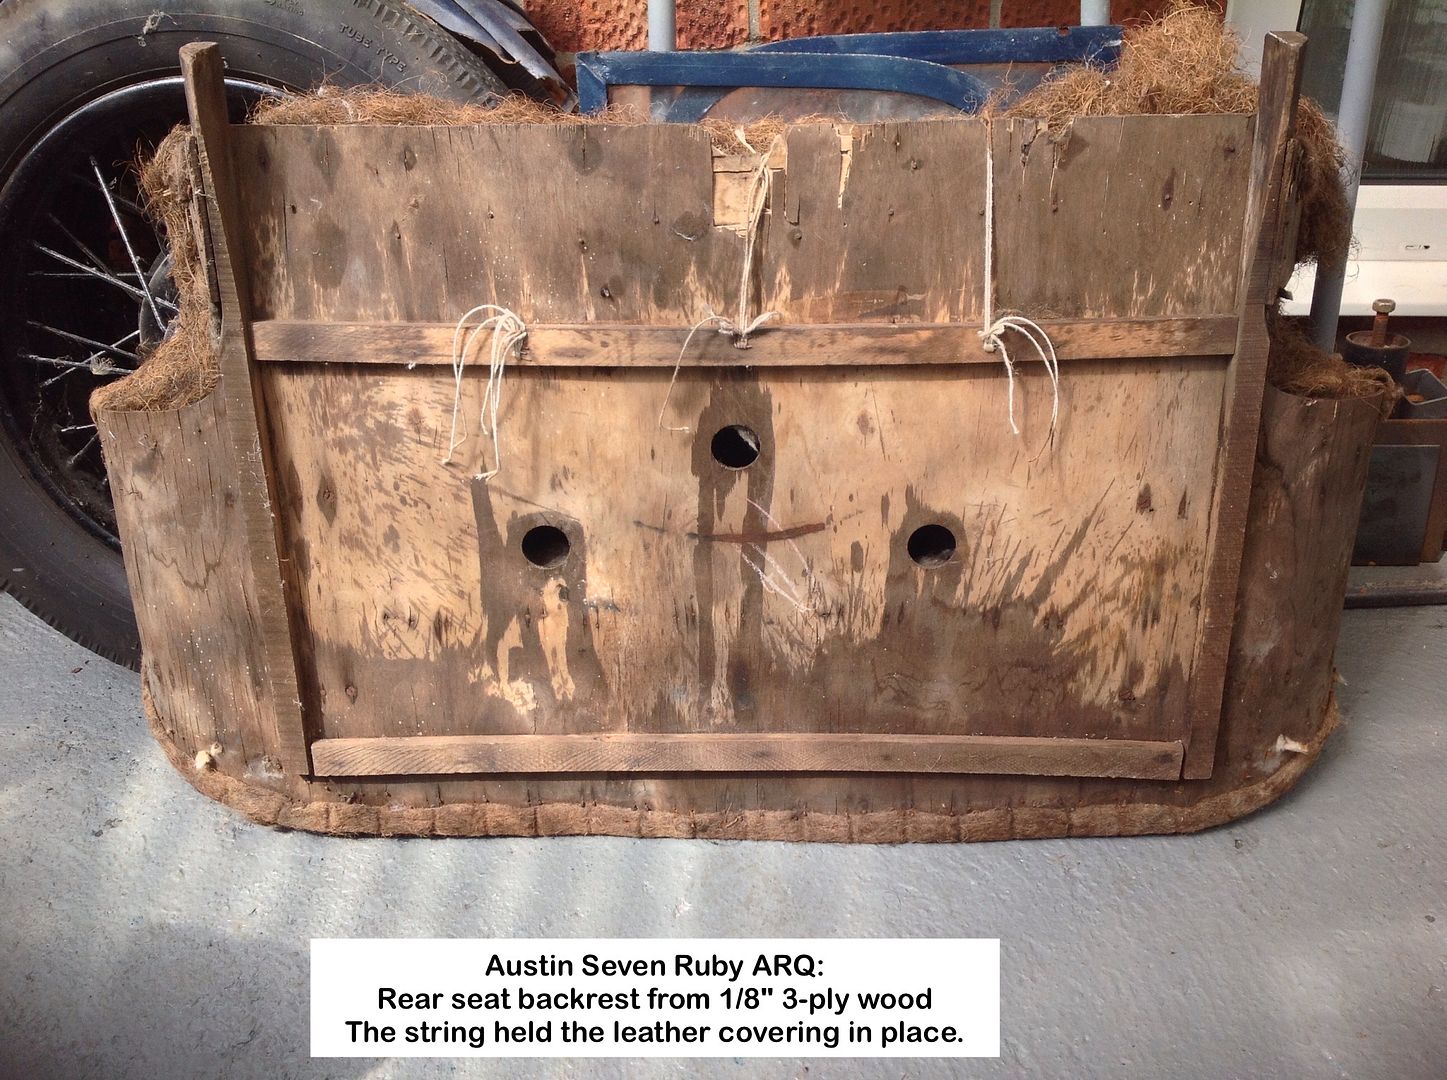
Photo 25:
Geoff - Hooray! Family house move done so I can get on with important stuff
Location: South Norfolk - Next to Suffolk
I'm just about to recover the seats on my type 65.
Whilst there isn't much wood on mine some was a bit fragile. I've reinforced some thin ply with a single layer of glass fibre and epoxy resin and this seems to have worked well. Where it's properly fragile I'd use the bits as templates and make new. Unless you're prepared to delaminate the ply completely resin won't get in to where it's needed and will probably be only close to the edges and will still be weak in the middle.
Hi Geoff , my back frame hade gone completely around the edges so lended up cutting a new one and reusing the rest of the wooden parts. If you go down this track make sure you get the flexible ply instead on normal plywood. Also looking at the photos you may need to redo the springs ( I assume that's what the bits of string are trying to hold back).
My seat lended up using foam and No springs
Bryan
1.5 (other thicknesses available) aircraft quality birch ply.
Very expensive but very useful in places where other materials will not do.
Two thicknesses, curved and laminated are strong and pleasin in an engineering sense, if you know what I mean?
Simon
Nick,
Had another look at the ply, and it's just the edges that break away so I may be lucky, but only time will tell.
Will take lots of photos and measurements just in case it behaves like an Egyptian mummy.
Bryan,
Springs look fine, but haven't tried removing that Coir yet. Talk about dust, so that must be original.
The string was looped through holes in the Rexine below the leather, thus holding everything in place.
The filling for the seat cushion comprises of a fat piece of foam
Simon,
Your mention of that ply reminded me that I stocked it in my hobby shop, for model aircraft use.
Will keep it in mind if needed.
Thanks.
Geoff - Champing at the bit to get the body off now.
Location: South Norfolk - Next to Suffolk
This company would seem a good source for the aircraft quality birch plywood that Simon mentions. Some very thin ply available here.
http://www.aircraftplywoodandtimber.co.uk/birch-plywood.html
Jeff.
Location: Almost but not quite, the far North East of England
If I can manage to put this pic here, it shows how I had the body on a purpose made trolley, supported by two horizontals across the floor of the Ruby body.
http://i1343.photobucket.com/albums/o798/andrew34ruby/Image005_zpsrxhwe8do.jpg
 [/URL]
Andrew,
Thanks for posting the photo
That's exactly what I have been thinking of doing, so good to see it works.
For mine, however, I will be using my existing wheeled CarTrolleys and just using extensions to get the height and fitting crossbars.
Edit:
Just looked at your Photobucket and see your stands are wheeled as well.
The photo of the underside is just what I've been looking for, and wonder what nasties have been done to mine.
Thanks.
I see you also have a small dent/hole in the metal of the spare wheel recess inside the car, caused by said wheel's securing brace's bolt.
Edit II:
How did you lift then turn the body onto its side on the trolleys?
Edit III (Last one with luck)
Could you post photos of the bottom of the NS B-post please? Photobucket would be fine.
Update:
The remaining body to chassis bolts where easy to remove, so didn't have to resort to the L-grinder and suitable disk, as the four inside still had captive nuts in the chassis, but the rear two where not used as that part of the 'floor', under the rear seat cushion, had been replaced with a piece of galvanised steel, lap welded in place as per the horrid wheel arch 'repairs', so who knows what horrors lay in wait, and just confirms once and for all my decision to remove the body.
The four nuts and bolts on the body 'stand-off brackets' (correct name?) to chassis under the car where also easy to remove.
I attempted to lift the body to see if it moves, but no luck and don't want to use the block & tackle or trolley Jack until I find out just how easy it is to do, so advise please.
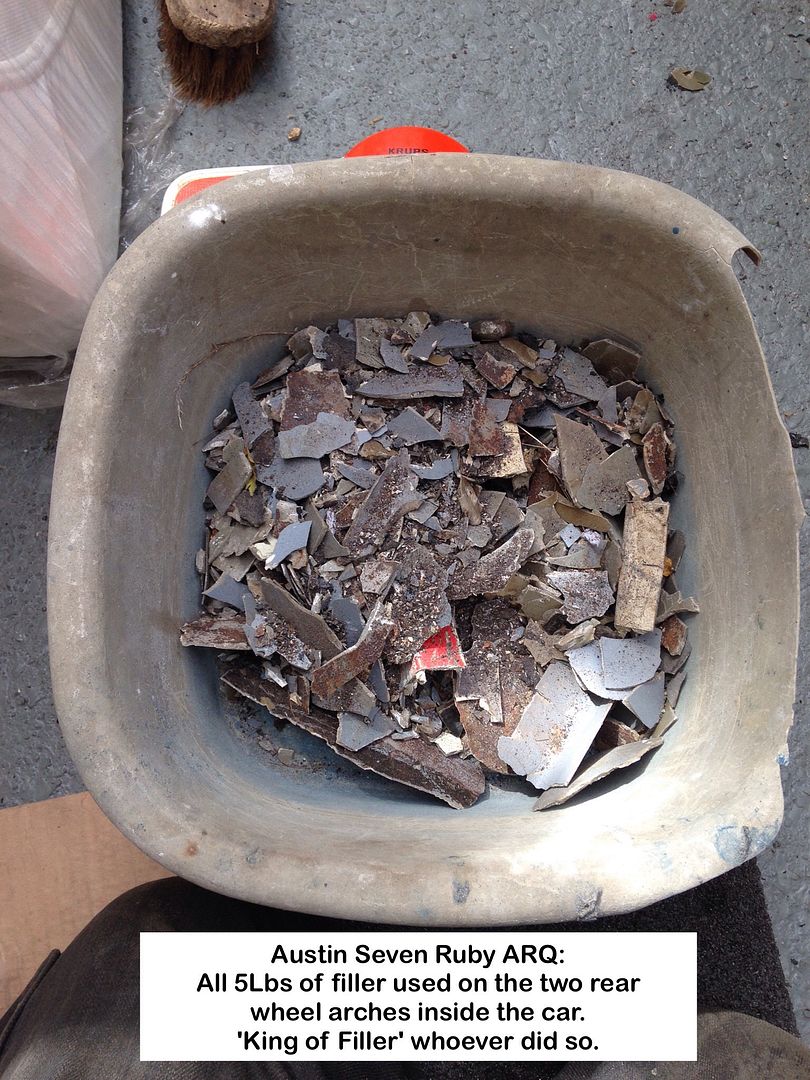
King of filler:
5Lbs from the rear wheel arches inside the car.
Photo 26:
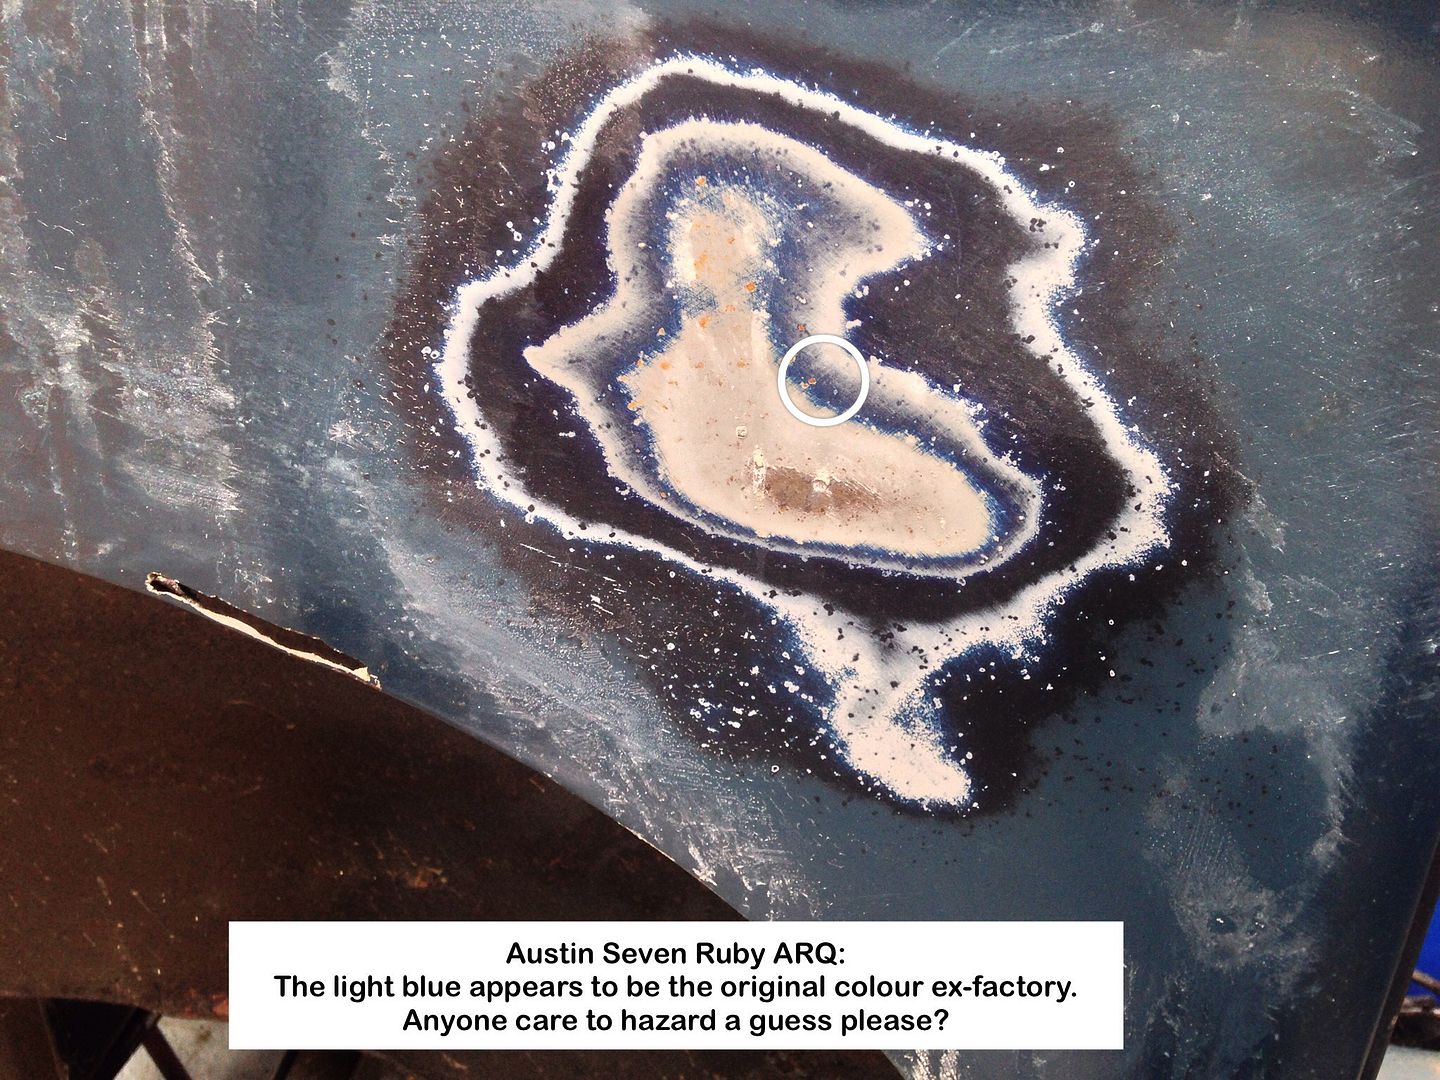
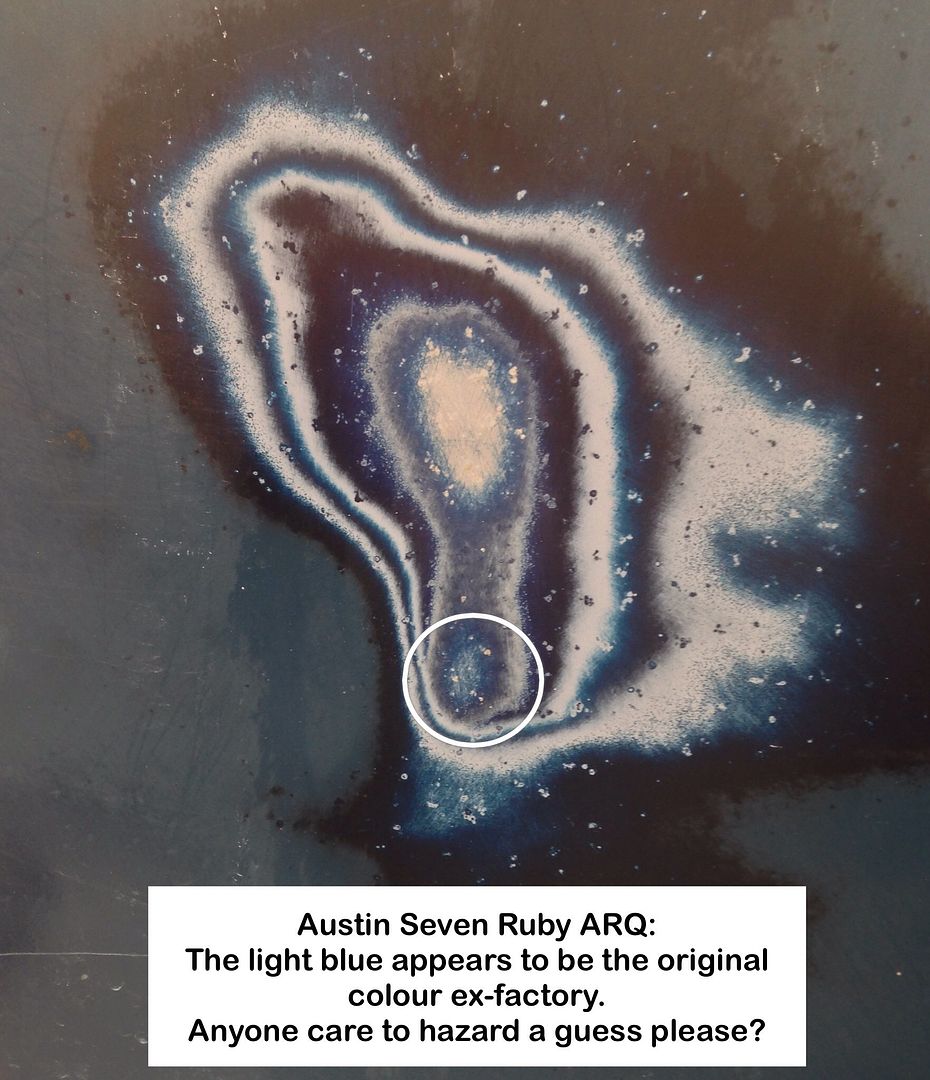
What was the car's original colour?
Quite a number of coats during her 80 years, the last being the worst I've ever seen.
OS rear quarter.
Photo 27:
Driver's door.
Photo 28:
The rear seat leather is starting to soften up and no longer feeling and sounding like cardboard now that I've been applying of Gliptone Conditioner twice a day since I posted the photos.
Nothing I can do about the cracks, but I am going to keep them, hoping they are original.
Geoff - Still waiting to do woodwork in family's new abode.
Location: South Norfolk - Next to Suffolk
Hi Geoff
I found my car's original colour on the inside face of the external door hinges, one had escaped any sort of painting, but what confirmed the colour as a matter of fact was the over-spray to the sun roof aperture, my Pytchley sunroof assembly had never been out, once I removed this, the factory overspray was very clear and matched the colour on the hinge and the new paint matched the original perfectly.
Check around the sunroof and hopefully, the original colour may be evident!
Good luck!
Gary
Location: Saltdean, Brighton
Hello Gary,
Not so lucky with mine, as it had been replaced with a piece of board, but no paint visible in the framework.
I have, however, scraped away some of the black paint in the spare wheel housing and it is light blue.
Doors off soon, so maybe I will be lucky as well, but I don't hold out much hope.
Geoff - Not getting anything done lately 
Location: South Norfolk - Next to Suffolk