Welcome to the Austin Seven Friends web site and forum
As announced earlier, this forum with it's respective web address will go offline within the next days!
Please follow the link to our new forum
http://www.austinsevenfriends.co.uk/forum
and make sure, you readjust your link button to the new address!
Resurrecting a 7 year old thread here....
We're in the process of building another single seater special using a '30 SWB chassis and a '30 crankcase with a '37 head, Phoenix crank, Honda pistons and a MAG blower driven off the nose. Every part used thus far with the exception of the Phoenix crank and new pistons came out of Dad's 40+ years of collecting and playing with Austin 7's. We have a '26 Chummy, '28 Top Hat and '33 Type "65' as well.
The intention is to use the new single seater for the Simola Hillclimb and the odd local event. We already have a period single seater special, built circa '49, also based on a '30 motor and chassis - you can see Dad & I about 4.40 into this video - https://www.youtube.com/watch?v=JuWD9g6oqks&t=324s
I need another Hillclimb car as my lovely wife has taken an interest and commandeered the Green Job. As the new motor will be blown at engine speed and reading what yea learned folk say about the crankcase-to-block joint, I'm keen to add additional hold down studs to the block & crank case - I've read about the Oz special with the extra stud inboard on the valve chest and also about the Pigsty mod to add extra studs at either end of the block. One picture on the 'net shows an extra tab welded to the back of the head to take an extra stud on the outside of the block above the flywheel.
We're starting with a blank canvas on this car, so all and any mod will be considered, especially if they help keep the oily bits together. The Competition Handbook has been invaluable, but there are no details on extra hold down studs...
What I can't find are any clear details of how these extra stud mods were done, close up pictures would help... Any additional advice would be gratefully received.
Cheers
Greig
Location: Port Elizabeth, Sunny South Africa
Hi Greig,I thought as no one has answered your questions on here I would.
The simplest way is blocks bolted into the tappet chest and down into the crankcase camshaft bush areas.My opinion is 8 5/16" studs isn't sufficient to hold the block and head on,and so must have Austin considering the engine failures in 1930 when racing them hard as they added 2 more studs.
The extra stud as 3 brg crankcase as only good when using a machined out 3 brg case as there is little metal in a 2 brg.
As previous threads have mentioned it is possible to extend the 2 tappet chest studs to bolt into a plate where the sump gauze fits but you have to grind radial grooves in the camshaft to clear them and they don't clear a counterbalanced crank.
It is also possible to extend the 2 studs next to the 1/4" bsf jet cleaning holes through the water jacket in the block and through the head,I only did this as the block had been linered and this leaves the base of the block weak.It isn't easy to do and difficult to seal.
Location: Channel Islands
The cars driven by Bishop and Hernandez all had small aluminium blocks bolted to the cylinder block ends with three extra bolts going down into the crankcase. When i asked why, they told me that a block had once lifted off on the brake due to the stronger valve springs they had fitted.
Ian Bennet's Pigsty supercharged engine has extra block studs somehow. He often contributes on here.
Dave.
Location: Sheffield
May I add my own ideas to this thread?
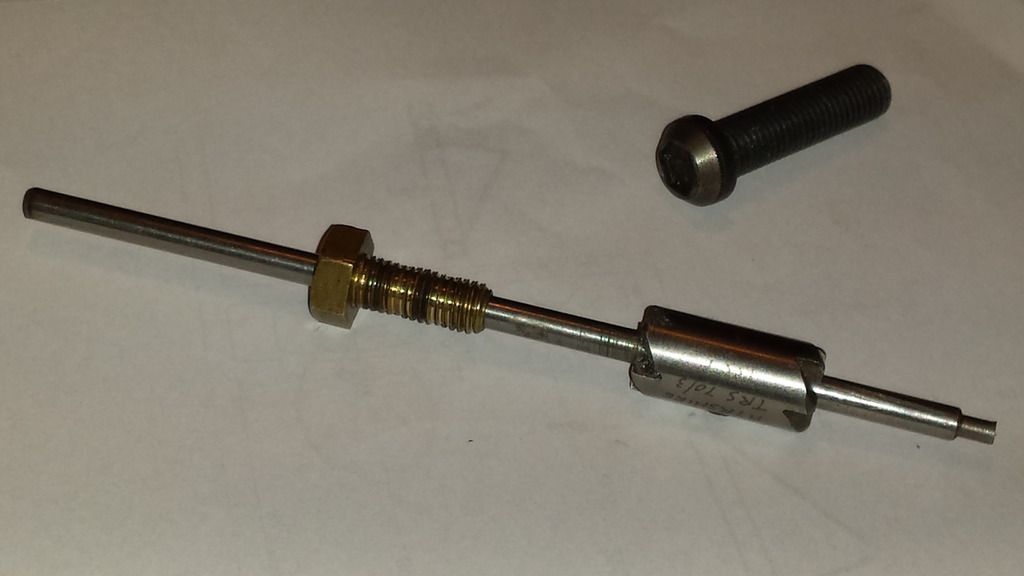
In the pursuit of strengthening the block to crankcase fitting I modify the crankcase to take 5/16 BSF cap screws fitted from the underside. The idea being that the stress is taken more on the cap screw shoulder rather than the limited thread in the crankcase face.
This is possible in five positions. I have a special counter-bore tool as shown in the picture. This works by screwing the brass guide into the stud hole and the fitting the cutter from the underside. Then an electric drill is attached to the outer part of the shaft and using a slow, reverse speed the cutter is pulled outwards until a clear shoulder is produced.
The crude part of the operation is that the 5/16 BSW tapped hole has to be re-tapped as 5/16 BSF to take the cap screw. It may prove necessary to chamfer the cap of the screw to allow clearance of the cam lobes etc (as shown in the picture). In extremis I have used a 3/8 BSF or BSW cap screw and turned down the outer part to be 5/16 BSF. This required a larger counter bore cutter and guide.
If I remember correctly the original idea came from 750 MC Special Builders Guide or Companion.
If anyone would like more details of the tool or even borrow it please let me know.

Location: Beautiful North Hampshire
Martin, as far as I can see both BSF and BSW cap screws are available, at least according to Google. If true, might avoid some angst next time?
Regards,
Stuart
Stuart
Depends if you want to use a BSW thread for the pull down nuts.
Another plus I forgot to mention is that cap screws are made of a much higher spec steel than normal studs.
Location: Beautiful North Hampshire
Hello Gents
Thank you for all of your valuable inputs, the various suggestions are all greatly appreciated.
We're currently busy with modifying the crankcase and block to take 5 cap screws from underneath. We're also making a pair of little blocks to bolt down either end of the block
The Phoenix crank is in and we've now got to align the double oil jet mod with the crank pockets and pump paraffin through them to double-check the squirt. Credit must go to Mike Forrest for this way back in the '60's I believe.
The oil pump has been bored out and hopefully we have decent pressure, I've got around 6 to 8psi hot with the Green Job and that's only running the conventional 2 jets.
I've got a bit more welding to do on the tube frame, then it's off to get clad in ally and then a lick of paint. I'm almost done with the supercharger mounting plate, it incorporates the front shock mounts - the plan is to lock one and use the alloy shock link on the other two eliminate axle movement sideways while still allowing axle movement.
We're really having fun building this little single seater, I'll try post some pictures for you.
Makes a change from rebuilding the 750/101 Giulietta's
Cheers
Greig
Location: Sunny South Africa

