Welcome to the Austin Seven Friends web site and forum
As announced earlier, this forum with it's respective web address will go offline within the next days!
Please follow the link to our new forum
http://www.austinsevenfriends.co.uk/forum
and make sure, you readjust your link button to the new address!
Rob
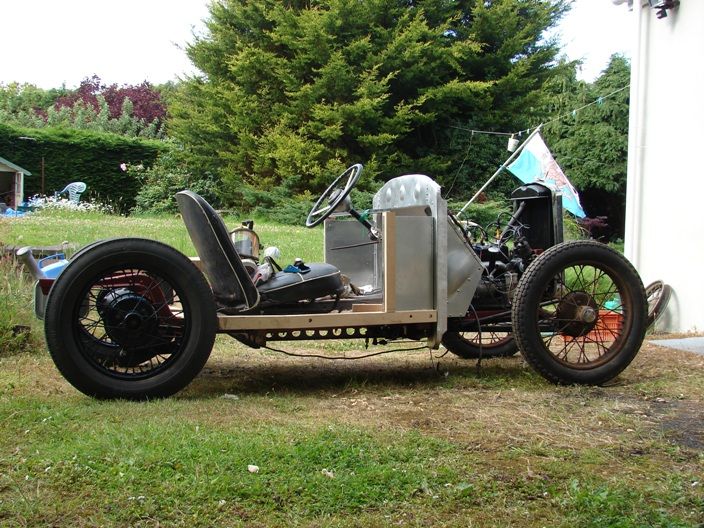
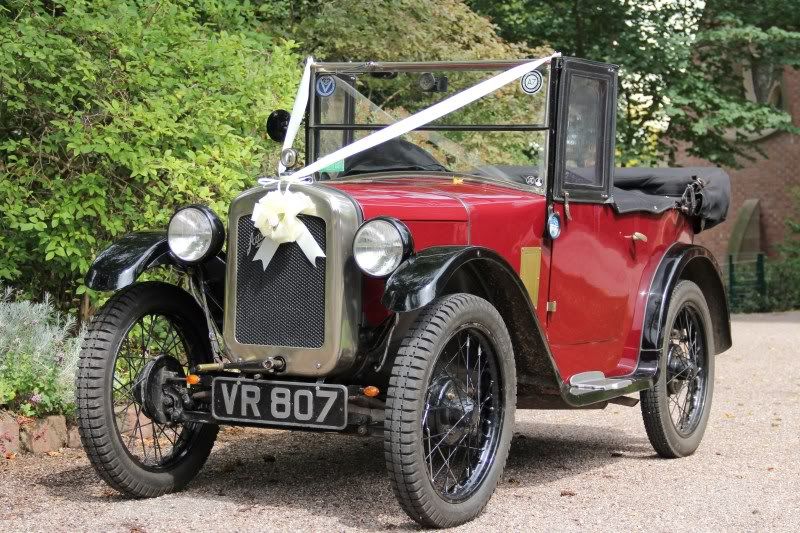
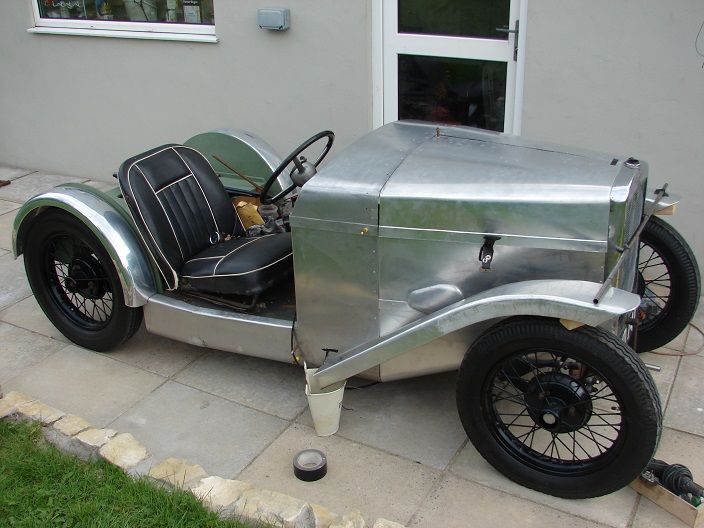
I've been thinking of what to do with it since I got the car, but it's not been plain sailing. You can see that their are lots of unfinished projects about.
We've been working on the rebodying since January putting in about 8 hours per weekend, only got the bonnet, wings and bit for my right foot to go.
Location: Suffolk, just
Rob, Phil who supplied us with the rear springs has a couple of flat fronts available. If you want them, I will pick them up at the next club night for your inspection. John
Location: porthcawl
Rob,
Post your email and I will send a pic
John. Thanks for the offer but I think I'm sorted. I've salvaged a flat front spring that only had 3 leaves and added the extra ones from the existing set. It now sits nicely with 3 inches of 'drop' available and it looks right (which is what it needed) after I lathed up some new bushes in the spring eyes. The hardest part was getting the centre bolt right through the stack of leaves!
Thankyou Derek. I'm at hfh200@Hotmail.co.uk. I assume that the original sits on the front of the bulkhead and pivots from the top?
I found a Morris 100 throttle pedal and decided to see if I could use it. The lever on the carb ran the wrong way but with a bit of lathe work I made it work correctly. It runs on 12 volts at the moment but I've found boxes containing 12 and 6 volt regulators etc and will need to decide which way to go. Probably best to start with 6, so long as I can work out the wiring. Which regulator usually goes on an ARQ? I have CF1s all the way through to RF95s. I Googled for photos of the wiring into the back of the switch and regulator. This bit will need some more thinking so that I don't screw it up!
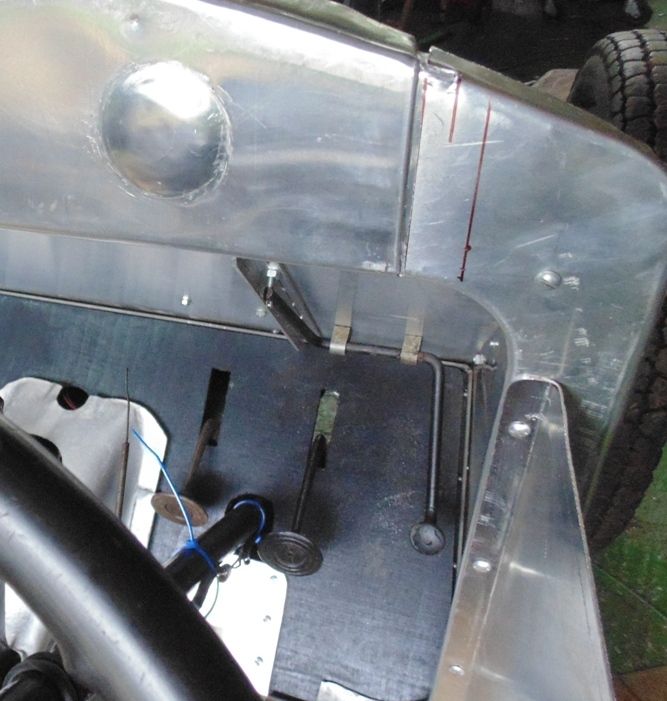
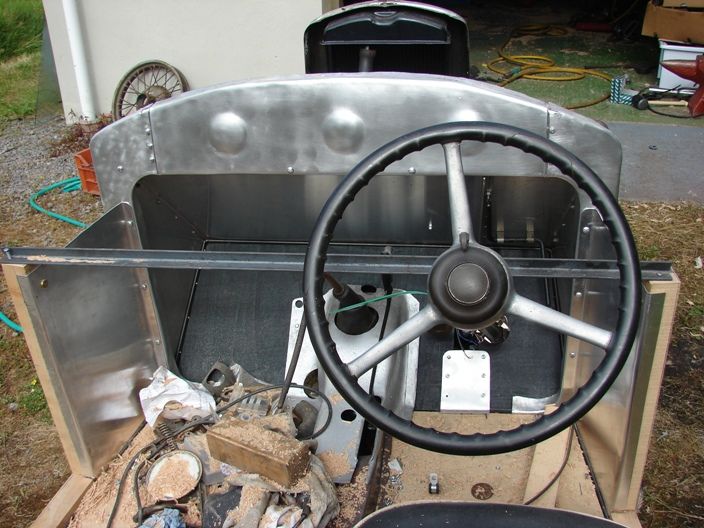
It took a bit of effort to form the top of the engine bay bulkhead and it has given me more back ache but I think it is almost finished apart from skinning the outside of the front half of the car, a job to save for last. When I shortened the exhaust manifold I took the chance to run the exhaust pipework inside the floor area and through a small formed hole below the door hinge area. Next week I should be in a position to ali weld the top piece of the bulkhead to the sides and then get out the Scotchbrite and the polish.
This is a lovely thread!
I built a Special a few years ago (not yet 100% finished) and I made my own acc-pedal from an aluminium bar pivoting from the top in the bulk head. I made a rod connected to the carb spindle by using very simple means, a threaded bar (M6) and it all connects with rod end- rose joints.
After exploring the length needed I calculated the stroke of the pedal and used the gearbox as a pedal bump stop. (Mind it's a left hand drive model, so the acc-pedal is actually next to the gearbox.)
I'd gladly post some pics of my build but not sure how to. Will look into this!
Thanks, Henrik.
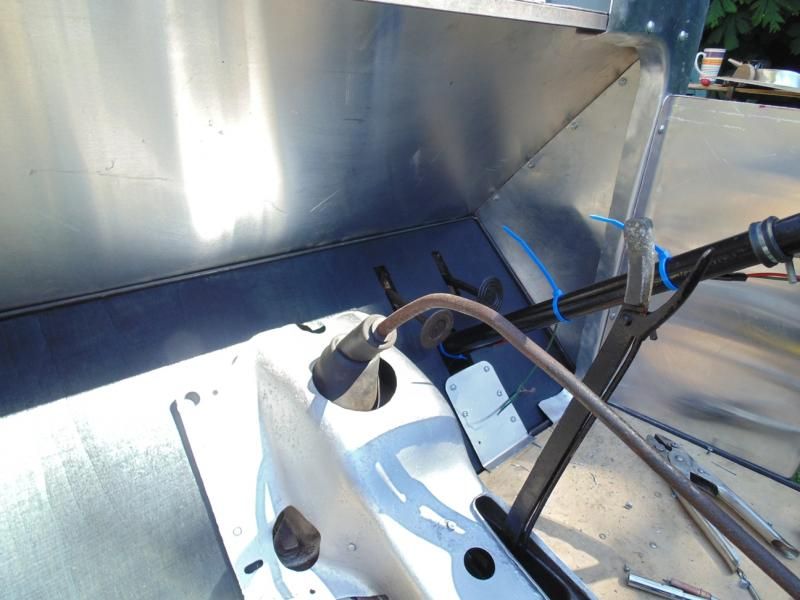
I tried to work out if I could use a rod but I thought I'd have to make the throttle pedal sit well below the brake pedal rather than in line with it. Using a cable I have got all 3 pedals to line up. From the photos I've seen it looks like the original car had the throttle pedal sitting closer to the ground than the other 2.
If you find any photos, I'm at hfh200@hotmail.co.uk.
Thanks.
Rob
So, hopefully it works.
The body was made up from 4 sheets of aluminium 2x1m. (1,2mm) The sides are sandwiched two sheets with square ali-profiles, very rigid! The floor and bulkhead were a 3mm thick aluminium sheet. The split between rear and front is deliberate, to prevent it from cracking.
It's actually glued down with a "space glue" into quite hack sawed pieces of thick hardbord-plywood profiles. No visible wood profiles nor rivets except in the engine bay.
Entire body weighs less than 20kg.
Dashboard is a 1/2 inch solid walnut board.
The paint is cellulose 12 layer with wet sanding between.
Your body is so very much more tidy than mine in details, when I see it I regret not being "smarter". If you have any thoughts about details, please let me know and I can email better detailed pics.


Here you can see the spindle and rod for the carb.


Thanks Henrik.
The throttle pedal looks easier to work out for the left hand drive cars but the clutch pedal looks weird!
Yesterday I bought some Ash wood to make the sides and the pillar for hanging the door from. It is bolted to the metal rails along the side and will also hold the dashboard in place. I might try to make a aluminium dash and then make those nice swirl patterns (Machine turned???).
It looks really really good Rob, ash is the way to go, oak contains some kind of acid that kills the screws.
Not sure about the metal swirl thing as I think it might be tricky to get it evenly, but give it a go. Please keep posting updates!
Location: Sweden
Thanks, Henrik. I've got a supply of Ash now, so I should be alright.
Top of the dashboard cut, folded, wired and drilled. Lots of opportunities to screw it up but it seems to have worked. Only major problem is that somehow it has grown by 1/4 inch on one side. How???? Oh well. It will have to do. Not sure if I should use solid 1/8 inch rivets or pops but those Cleco clips are working well enough for now.
I was thinking about the doors and fortunately some handy photos have just been posted on another thread. They don't look tooooo complicated (in theory only!) although mine will need to taper from front to back. Some more Ash will be needed. Hinges are also a problem so I might need to buy some brass sheet to form some.
Any suggestions would be gratefully received. I only have 3 weeks left to go before it needs to be finished.
Ta
Rob
The throttle pedal looks easier to work out for the left hand drive cars but the clutch pedal looks weird!
Yesterday I bought some Ash wood to make the sides and the pillar for hanging the door from. It is bolted to the metal rails along the side and will also hold the dashboard in place. I might try to make a aluminium dash and then make those nice swirl patterns (Machine turned???).
[/quoteHI ROB
YOU MIGHT FIND THE INFORMATION ON THE FOLLOWING WEB PAGE HELPFUL IF YOU GO DOWN THE TURNED DASH ROAD
Go to www.bugattibuilder.com then GO TO BUGATTI WIKI ON MAIN PAGE,GO TO BUGATTI maintenance ,GO TO METAL FINISHES, GO TO ENGINE TURNING.
LOOKS GREAT ON GP BUGS BUT CAN LOOK OVER THE TOP IF NOT DONE WITH GREAT CARE
ANDREW
Location: Hereford
Thanks, Andrew.
I might need to use crackle-black on the dash since it seems to have too much ali on show and needs something else on the dash. The vinyl doesn't really do it for me, if you know what I mean. I've watched the website by Nigel for quite a while. Very good for 'tips'.
[65 hours to go before the Hospital!]
OP went well but quite a lot of collateral damage to sort out. Only look at the picture if you have a strong stomach and are not going to be eating Chilli in the next few hours.
http://s82.photobucket.com/user/foggythomas/media/DSC00237.jpg.html?sort=3&o=376
Rob,
I'm glad we aren't having raspberries for pudding.
Dave.
Location: Sheffield, the home of Hendersons Relish.
As I'm not an orthopod Rob, I have to ask, I presume that is a couple of your vertebrae surrounded by the fixator ??
Ian Mc.
Location: Shropshire
Not sure, Ian. I had my eyes shut at the time. Something like 3 vertebrae cut away, spinal cord freed off and then the bits bolted back together in one solid piece.
PS Strawberry sauce, not Raspberry
Thanks Rob, as I thought. Best wishes for a 100% sucessful outcome.
Ian Mc.
Location: Shropshire
Hi Rob,IF YOU WANT TO GO DOWN THE ENGINE TURNING DASH ROAD YOU MIGHT FIND THE FOLLOWING USEFUL
ww.bugattibuilder.com go to Bugatti wiki,on main page go to Bugatti maintenance ,go to metal FINISHIES,go to engine turning.
I am at the moment ageing an aluminium dash hope to give it a gossamer finish (old watchmakers finish)
Andrew
as usual a bit late picking up threads
Location: Hereford
Thanks Andrew.
I won't have the ability to do anything for a while and, whilst beautiful, the turned look might be just too much Ali on show and too much work for me to manage. I did a crackle black dash on my aeroplane a few years ago and it worked alright. I'll give it a try. I seem to remember that the Europa catalogue sold sheets of engine turned ali, didn't they?
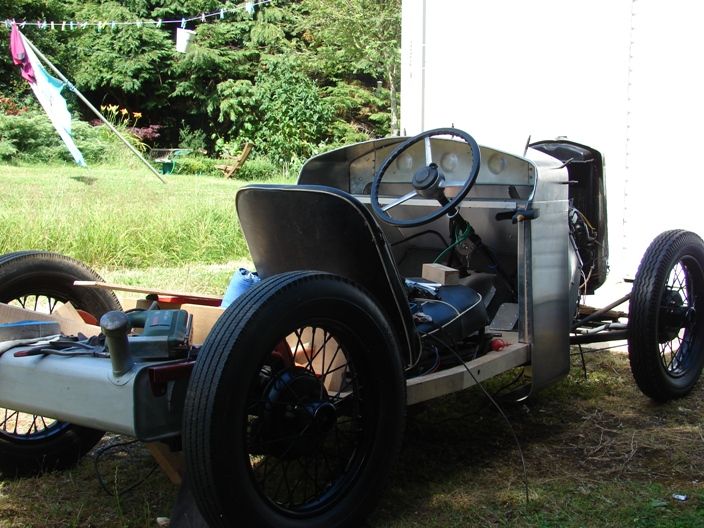
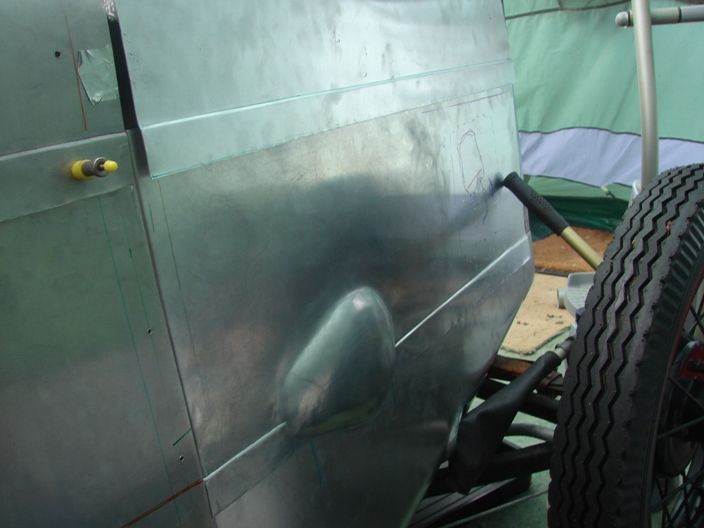
Since I can't get out to the garage at the moment I decided to get the old garage knocked down and rebuilt. What to do with the Austin in the meantime??? I wonder if it is jussssst small enough to squeeeeze into the tent? It would seem that I had overestimated the size of the car a bit. 
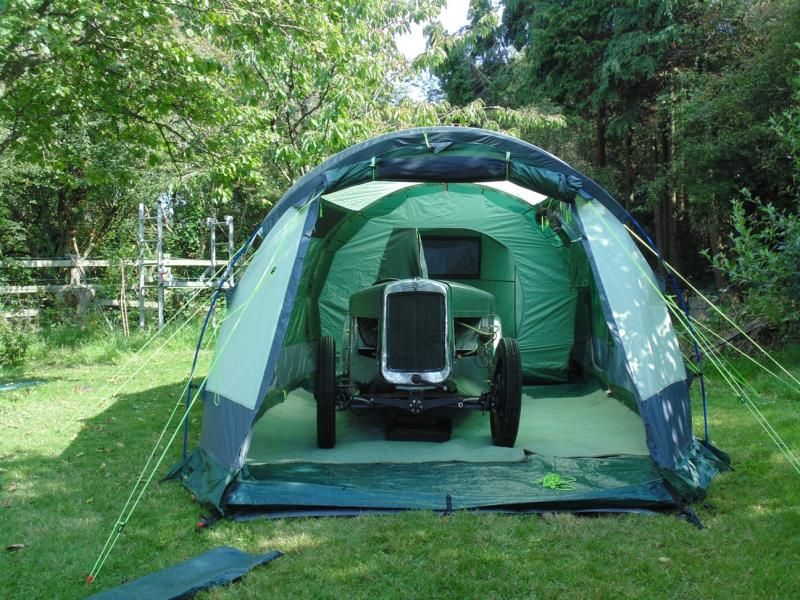
Y'know, it might make camping more fun if we took a garage along with our sleeping arrangements.
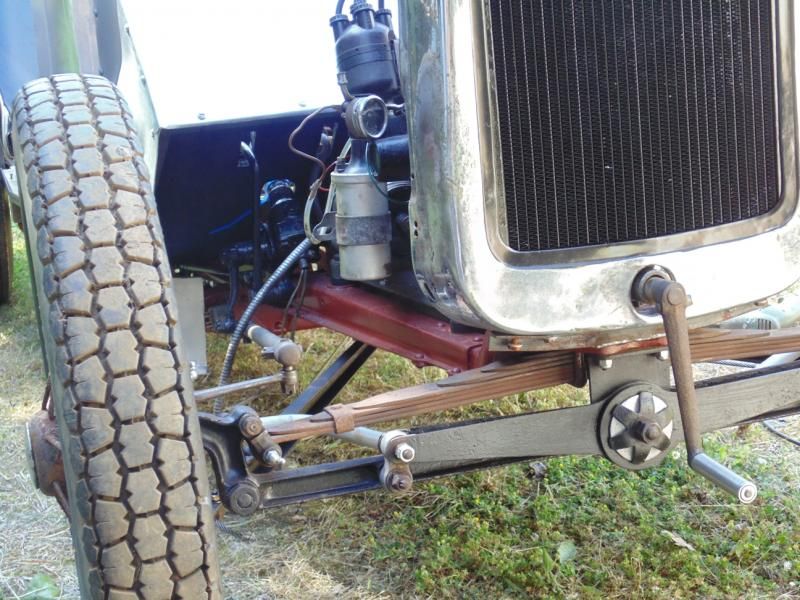
My back surgery went well enough that I'm now permitted to venture forth unto the garage again. I've been looking at the front wings and associated structure needed to hang a pair of headlamps. Does anyone have any 'tips' or any suggestions as to which methods to avoid?
I was planning to triangulate the front/top bracket from the radiator shell and for the lower part of this to go through the holes where the rad and the side valences join, in a similar manner to some of the Ulsteroids I have seen on Google. With alloy cycle wings, does the beam vibrate a lot? Should the rad shell (RP) be reinforced along with a bar of some sort between the 2 sides?
Thanks
Rob
(Now able to bend enough to almost touch his knees!!!)
Location: Cardiff, like, isn't it.
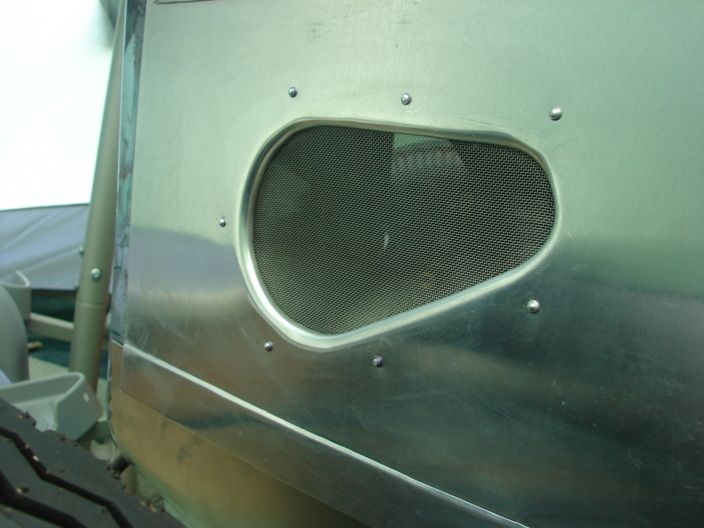
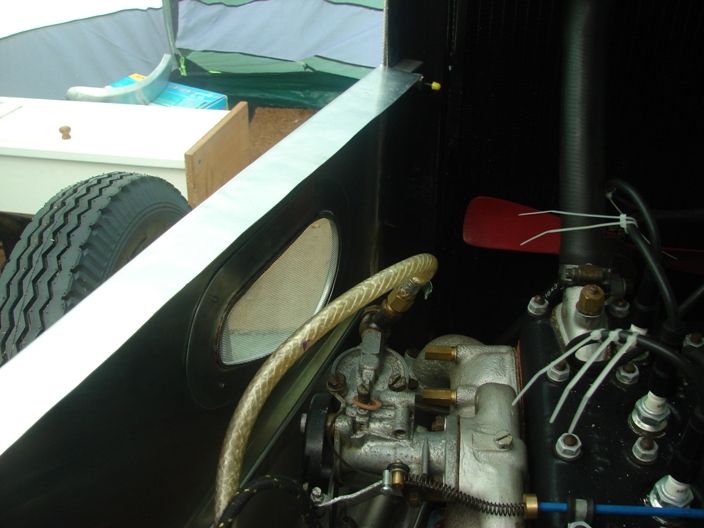
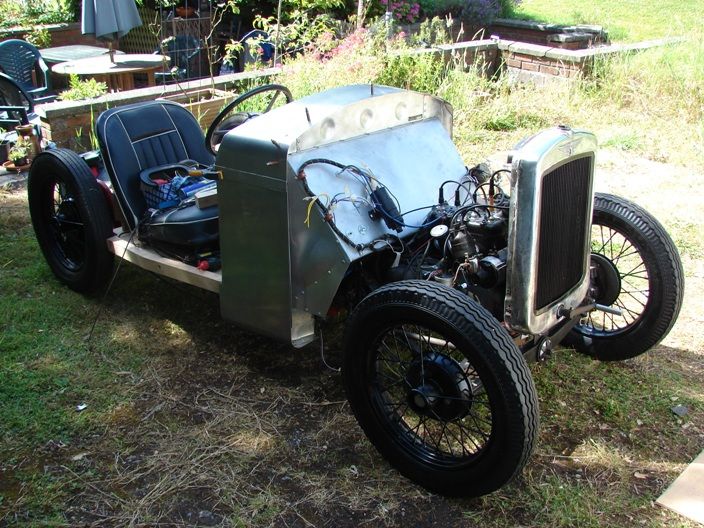
Bonnet sides made. One vent for the carb utilising a bent piece of old bonnet hinge to help roll the edge over. I added a reinforcement inside that also held the stainless mesh in place. Might not work quite as intended but it helps to break up the large slab area of the panel. The other side needed a small bulge along the very bottom to go over a bit of structure that unfortunately stuck out further than intended. I managed to knock the bulge in without it interfering with the line joddled along the bottom edge.
Location: Cardiff, like, isn't it.
Beautiful job that, Rob. I'm wondering what you have in the workshop as beating pannels equipment? I'm light on these matters (see my website about the "other" 7!) For example did you form that bulge on the right with a rubber hammer? And ; sorry, I didn't understood the "bent piece of old bonnet hinge"  .
.
Renaud
Edit:
Do you anneal ali?
Location: Brittany, down on Sandy's meridian
Thanks, Renaud.
I have a leather handbag filled with sand and I lay the aluminium on top of it so that when I hit the aluminium with a round faced wooden mallet it will push the aluminium into the sand. I think they call it a 'Bossing Mallet'. Lots of good videos on Youtube. I also have a large piece of tree with a bowl cut into it with a wood chisel which makes the same shape but faster.
To fold those edges nicely you need a piece of wire to make the edge of the fold the same size all the way round. Use one long piece to the curve you need or move the wire along.
http://www.youtube.com/watch?v=Zv_ZpDDKkPw
http://www.youtube.com/watch?v=rJVaHEJxDH8
Location: Cardiff, like, isn't it.
One of the more elegant and successful designs for front wing stays are used on Cup Models. They don't incorporate any headlamp fixing as the rad shell is used on these models.
They affix through the cow horns and may give you some food for thought.


Here are the brackets in place with original wing and cycle wing setup....

Test
'CAPTCHA' has been keeping me out all afternoon.
Thanks for those GE pics. I hadn't thought about mounting the lamps on the rad shell until then. I'll have a look into it.
Renaud. I only anneal if it needs lots of hammering. I use 1050 grade ali that is both very soft (until hit lots of times) and is corrosion resistant.
Location: Cardiff, like, isn't it.
Renaud. If you look on Youtube for a man called Lazze from Lazze Metalshaping) you'll find lots of good videos on metal bashing.
Location: Cardiff, like, isn't it.
I used 1050 too for my "other 7" (Lotus!) but I believe there are different qualities of 1050 sheets on the market.(Annealed or not) Annealing mine was always a great help because they were quite hard as I received them.
Thanks for the links.
Renaud
Location: Brittany, down on Sandy's meridian
The DVD this guy has is also very good: https://www.youtube.com/watch?v=IGElSHzm0q8
Simon
Location: Auckland
Well I've fit my rear mudguards fitted this weekend

Latest development.
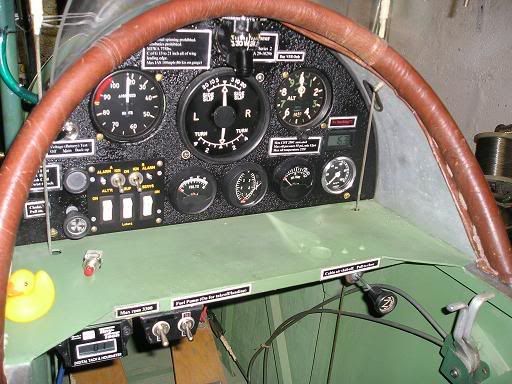
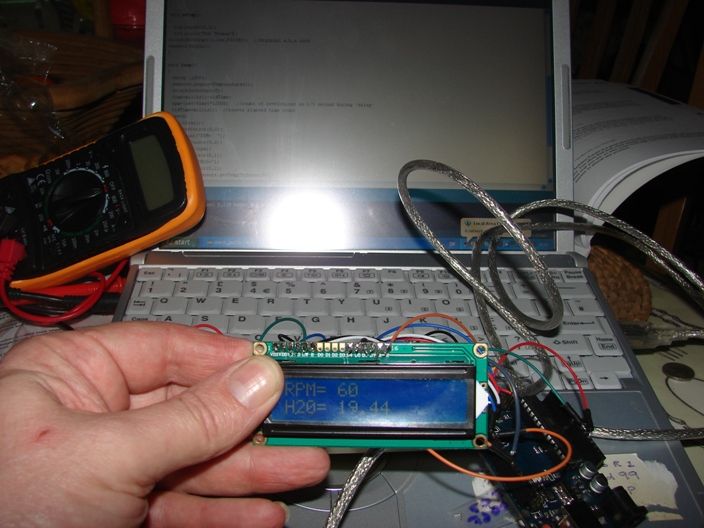
Whilst convalescing from that back surgery I have been working on a new dashboard. Using a Arduino (credit card sized computer board, circa £8) I have been working on a revcounter with warning lights that come on at certain rpms (2200-2400), a water temp gauge, oil pressure gauge and speedometer. All are displayed on a small LCD screen. Obviously not standard fit in the 1930s but it is all removable and can fit inside a standard BMC speedo casing.
Total cost for parts, including sensors, will be under £60. Power is 6V or a 9V PP3 battery.
Not a single component made by Smiths, other than the casing!
Location: Cardiff, like, isn't it.
Hi Rob. My Austin is fitted with electronic flashers, assisted contact ignition and a tachometer all to my own designs. I used discrete parts for these, but am also a fan of Arduino which I am using for a different car related project.
One of the potential snags with A7s is the tremendous level of electrical noise, both conducted round the wiring and radiated from the copper plug leads. Using an independent battery DC supply helps, but I also found it beneficial to use suppressor resistors at the plugs to avoid spurious glitches. I "hid" 4.7K 2 watt wire-ended resistors inside heatshrink sleeves at the plug ends. To achieve a smooth cylindrical shape before the heatshrink went on, I filled the gaps by winding with plumbers PTFE tape. You could always use proprietary suppressed caps of course. Hope this might save you from the Gremlins !
Location: New Forest
Thanks John. Good advice.
If I can get 'Plan A' working then the next logical step is to avoid the distributor completely and use the same hall-effect trigger and a map to create a computer controlled advance curve. I have the same thing on my aeroplane engine and it fires 40,000 volts at all rpms, never runs out of sparks at high rpms, never loses timing, never shows any spark scatter, etc, etc. At 40,000 volts I can use suppressed caps (or carbon leads..Yuk) and open the sparkplug gaps to 35 thou.
New water temp probe and wiring loom arrived in the post from Shanghai yesterday. 99p, including the postage via airmail. 
Easier starting with electronic ignition...
https://www.youtube.com/watch?v=xqw8ZcI0eEw&list=PLBnaW8WNlTyHZ09I5KMF2ml1CxuD-9_XJ&index=7
Location: Cardiff, like, isn't it.
Have a look at the rusefi project on the web.
Crazy Russian guy making up diy engine control systems.
Think I might have seen a reference to arduino on there?
Steve
Location: South East Cornwall
Revcounter software all finished, speedometer software under development, oil pressure monitoring/warning system still under investigation to find best transducers and finally yhte water temp system with "about to boil" warning lights" is complete. All this stuff can be removed from the car in minutes and only costs about £50 for everything so is cheaper than buying a used Ruby speedo from Ebay.
The speedo kit will be instantly calibrateable with a laptop plugged into the main board. All I need to do is work out exactly how many wheel revolutions are required for 1 mile, done with a tapemeasure and a piece of chalk.
Location: Cardiff
Thanks, Steve.
That website is a bit above my level at the moment. I only started reading about these Arduino things from a book I received for Christmas. His piece of kit will run fuel injection as well, so my version only needs to cope with perhaps 1% of all of the stuff his does.
I want mine to be portable so I'm planning to borrow an ideas from someone else and fit it all inside a 4" Smiths speedo from a Mini or similar.
First running prototype on a small LCD screen...
Location: Cardiff
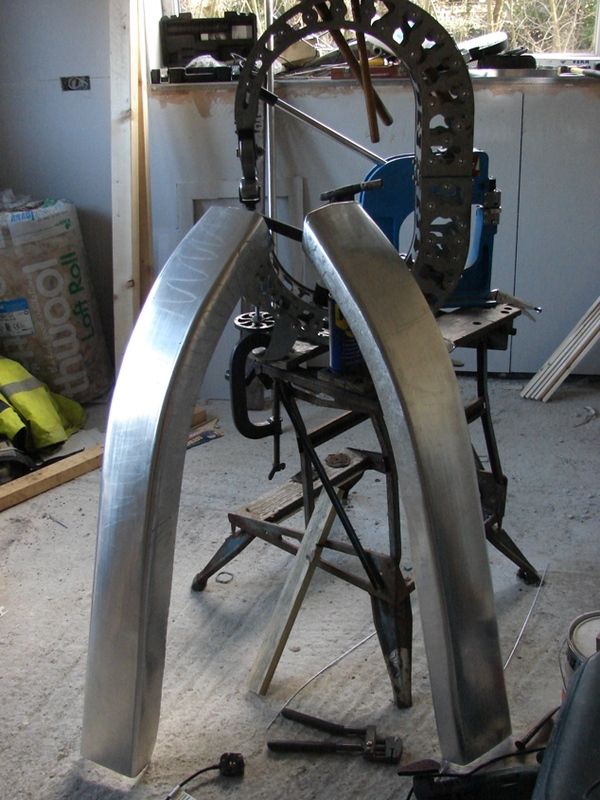
Front wings under construction. I think I'll probably form some panels to weld on that bridge the gap between the wing and the bodywork, a-la MG P-type.
Not sure how to shape the leading edges of the wings.
Location: cardiff
Looking good.
Might I suggest that you mount your English wheel on something more substantial than a B&D workmate? It will make using it much more pleasurable and less irritating. The first one I had was bolted to the floor and back-mounted to the wall.
I use a wheel regularly and have found that I wish mine was bolted down rather than on a fabricated stand. To take advantage of the wheel's ability to "move a wave" it really does need to be set up on something relatively rigid.
Crack on!
Location: Ripon N. Yorks
I can't get in my workshop right now because we're in the middle of having our house rebuilt (hence the building materials in the background.) The Wheel usually gets held in a chuffing great big bench vice but there is a ton of stuff clogging the workshop up. In another month I should be able to start getting the workshop cleared out....hopefully.
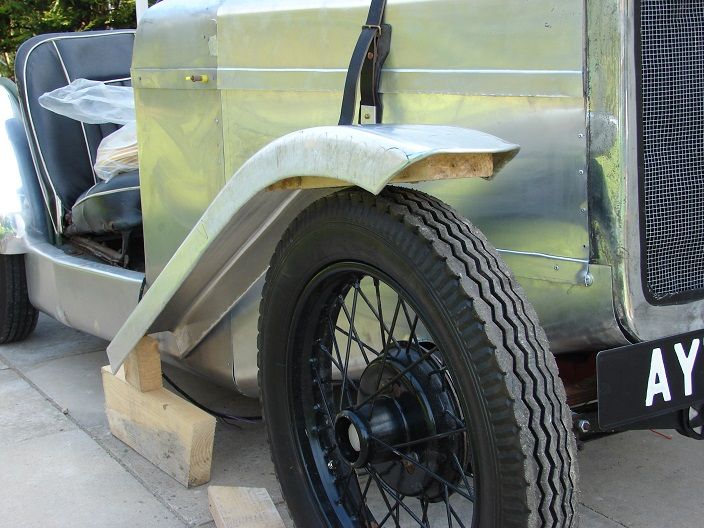
Front wings all 'wired' up round the edges. What an awfully complicated job to do! You need several sets of flexible wrists and at least another few fingers to get the little anvils in the right place to bend the edges over. Still, from a distance it all looks quite reasonable.
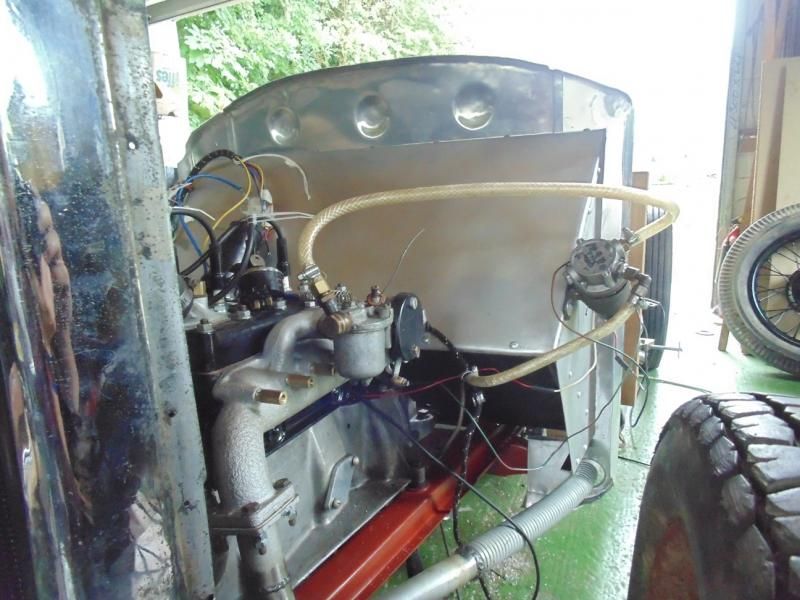
Next job is to fabricate the stays between the rad shell and the wings. The engine has decided to take a break from running and stoutly refuses to fire up. It might be a blocked jet but the previous owner of the carb had graunched the jet hole from a nice square to a near perfect circle. That jet won't be coming out without a fight.
Location: Cardiff
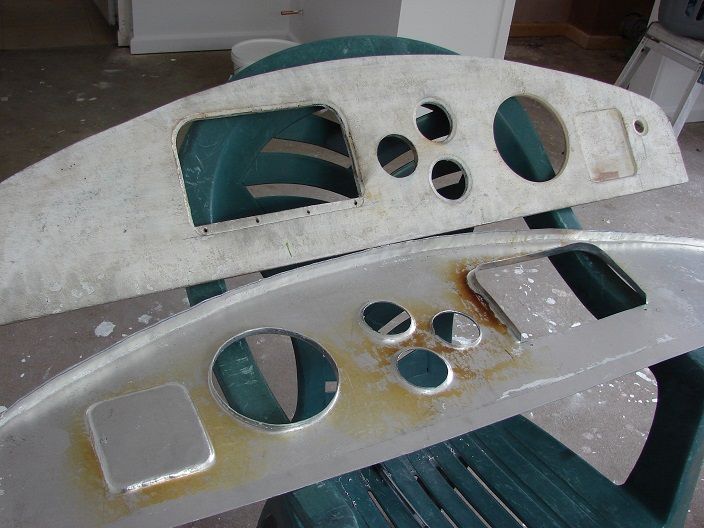
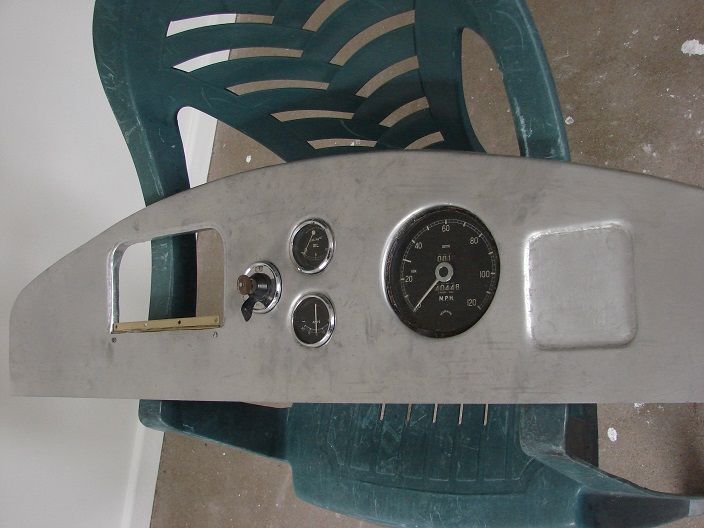
Dashboard version 2 under construction. Plywood former with holes cut out with a jigsaw, routered edges, 1050 grade cheapo aluminium skin annealed and battered round into shape. I'm not sure where the smaller dials came from but the speedo seems to be an early Jaguar one (1080 tpm). Slightly optimistic on the top speed, I think.
I've got to make the cubby-hole lid so that it folds out horizontal to hold a coffee cup and close so that it is flush, hence the recessed lip round the top and the sunken hinge. The bit at the far right is to hold the LED readout of rpm, water temp and warning lights. I've got some switches from a Bristol Blenheim (aircraft, not car) to go in.
Location: Cardiff
Whilst convalescing from that back surgery I have been working on a new dashboard. Using a Arduino (credit card sized computer board, circa £8) I have been working on a revcounter with warning lights that come on at certain rpms (2200-2400), a water temp gauge, oil pressure gauge and speedometer. All are displayed on a small LCD screen. Obviously not standard fit in the 1930s but it is all removable and can fit inside a standard BMC speedo casing.
Total cost for parts, including sensors, will be under £60. Power is 6V or a 9V PP3 battery.
Not a single component made by Smiths, other than the casing!
Hi Rob,
I've been considering using a VW Passat dash - not my pic. You'd need to add CAN to your arduino, but I think the dash has been sufficiently hacked to allow you to drive it (the gamers are using them). It'd need new clock faces printed to age it, and parts of it hidden, but all the clocks are of the servo type, so you can use them for anything.
Andy
Location: Oxfordshire
One of the many features I like on this car is the fuel gauge - a basic multimeter with some numbers scribbled on with a sharpie. Its not the right look here but it might be some inspiration. Perhaps convert a period voltmeter to read whatever it is you want to know.
https://www.youtube.com/watch?v=ZcjpXbMiCtg
PS - nice work on the dash - an inspiration.
Also...out of interest...how much of a radius did you put on the ply? How thick was the ply? Just sits flat on the bench? Did you need to clamp the ali or sandwich it between ply sheets?
It took me a while to work out you had it one way up for the holes and flipped the former for the raised section.
Thanks, David.
It is about 8mm ply with holes cut with a jigsaw and the edges either carved with a knife and file or with the aid of a router that has a bit that comprises a cutter with a small bearing below it that permits you to follow a curved edge. This allows the ali sheet (1050 grade, 1.2mm, £5 per m2) to be 'recessed'. I glued the sheet onto the ply first so that I could start the bashing with 2 pieces of 4x2 and a bench vice keeping it fairly flat. Once part-formed I annealed the sheet again for the finishing touches which also cooked the glue to death.
Making sure it was going to be possible to separate the pieces was always hard. Once the hinge is finally screwed in I'll be able to glue the ali permanently into place.
I'm tempted to 'crackle black' the dashboard. Good idea?
Location: Cardiff
Where do you get 1.2 1050 at £5.00 per squ. metre? My last lot was almost twice that per full sheet, delivered by ASD metal services.
Location: Ripon N. Yorks
Is the router bit to "round over" the edges or a way to cut a clean edge to a template?
Gluing the ali to the ply before forming is a neat idea.
Do I understand correctly that the ply is going to be glued back on again for the finished dash? If it was me I'd resent the weight. If you need it to mount the hinge and dials how about cutting out the bits you don't need to leave just a skeletal frame?
To anneal do you do the "coat in soot then burn it off" trick or do you have another method?
Keep at it!!! MUCH enjoyed.
David
Classic method of annealing aluminium is to rub soap or paint soap solution on it. Then heat until the soap turns dark brown but stop before it goes black.
Location: Ripon N. Yorks
Hi,
Just what I do. Use "savon noir" here which is plain liquid soap. Works a treat.
Renaud
Location: Brittany