Welcome to the Austin Seven Friends web site and forum
As announced earlier, this forum with it's respective web address will go offline within the next days!
Please follow the link to our new forum
http://www.austinsevenfriends.co.uk/forum
and make sure, you readjust your link button to the new address!
renaud
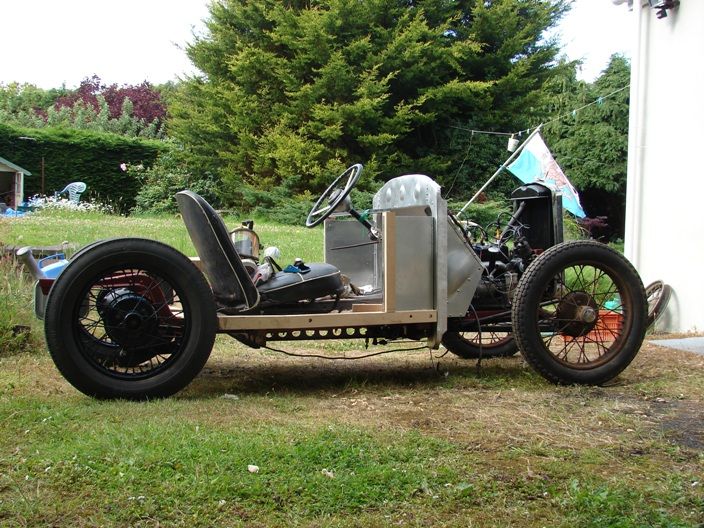
It's not been easy, if you click on the pic it should take you to my Photobucket and most of re build are on it.
The frame work seem to take ages, and the double curve panel needed more skill than we've got, so we had to try the fabrication route.
Location: Suffolk, just
Rob, Phil who supplied us with the rear springs has a couple of flat fronts available. If you want them, I will pick them up at the next club night for your inspection. John
Location: porthcawl
Rob,
Post your email and I will send a pic
John. Thanks for the offer but I think I'm sorted. I've salvaged a flat front spring that only had 3 leaves and added the extra ones from the existing set. It now sits nicely with 3 inches of 'drop' available and it looks right (which is what it needed) after I lathed up some new bushes in the spring eyes. The hardest part was getting the centre bolt right through the stack of leaves!
Thankyou Derek. I'm at hfh200@Hotmail.co.uk. I assume that the original sits on the front of the bulkhead and pivots from the top?
I found a Morris 100 throttle pedal and decided to see if I could use it. The lever on the carb ran the wrong way but with a bit of lathe work I made it work correctly. It runs on 12 volts at the moment but I've found boxes containing 12 and 6 volt regulators etc and will need to decide which way to go. Probably best to start with 6, so long as I can work out the wiring. Which regulator usually goes on an ARQ? I have CF1s all the way through to RF95s. I Googled for photos of the wiring into the back of the switch and regulator. This bit will need some more thinking so that I don't screw it up!
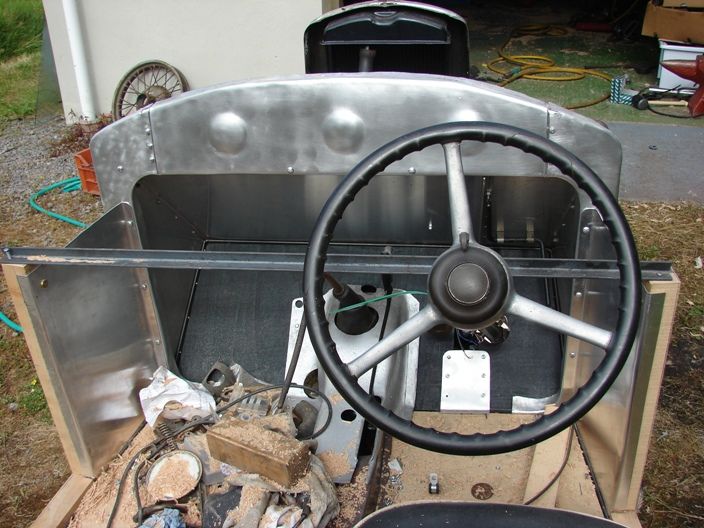
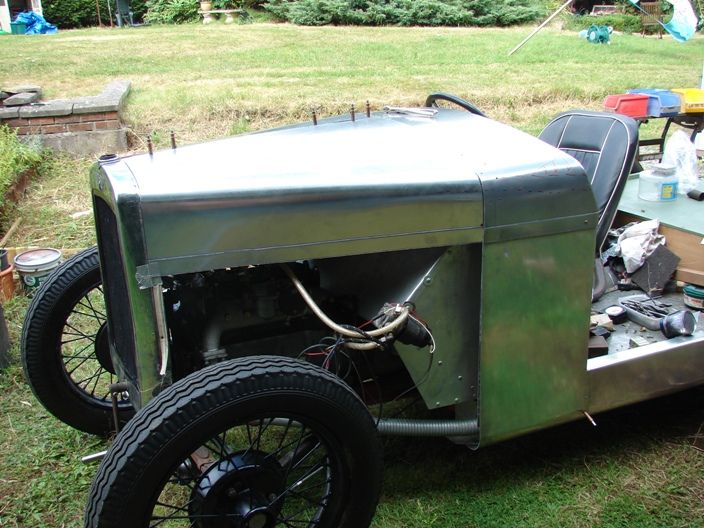
It took a bit of effort to form the top of the engine bay bulkhead and it has given me more back ache but I think it is almost finished apart from skinning the outside of the front half of the car, a job to save for last. When I shortened the exhaust manifold I took the chance to run the exhaust pipework inside the floor area and through a small formed hole below the door hinge area. Next week I should be in a position to ali weld the top piece of the bulkhead to the sides and then get out the Scotchbrite and the polish.
This is a lovely thread!
I built a Special a few years ago (not yet 100% finished) and I made my own acc-pedal from an aluminium bar pivoting from the top in the bulk head. I made a rod connected to the carb spindle by using very simple means, a threaded bar (M6) and it all connects with rod end- rose joints.
After exploring the length needed I calculated the stroke of the pedal and used the gearbox as a pedal bump stop. (Mind it's a left hand drive model, so the acc-pedal is actually next to the gearbox.)
I'd gladly post some pics of my build but not sure how to. Will look into this!
Thanks, Henrik.
I tried to work out if I could use a rod but I thought I'd have to make the throttle pedal sit well below the brake pedal rather than in line with it. Using a cable I have got all 3 pedals to line up. From the photos I've seen it looks like the original car had the throttle pedal sitting closer to the ground than the other 2.
If you find any photos, I'm at hfh200@hotmail.co.uk.
Thanks.
Rob
So, hopefully it works.
The body was made up from 4 sheets of aluminium 2x1m. (1,2mm) The sides are sandwiched two sheets with square ali-profiles, very rigid! The floor and bulkhead were a 3mm thick aluminium sheet. The split between rear and front is deliberate, to prevent it from cracking.
It's actually glued down with a "space glue" into quite hack sawed pieces of thick hardbord-plywood profiles. No visible wood profiles nor rivets except in the engine bay.
Entire body weighs less than 20kg.
Dashboard is a 1/2 inch solid walnut board.
The paint is cellulose 12 layer with wet sanding between.
Your body is so very much more tidy than mine in details, when I see it I regret not being "smarter". If you have any thoughts about details, please let me know and I can email better detailed pics.


Here you can see the spindle and rod for the carb.


Thanks Henrik.
The throttle pedal looks easier to work out for the left hand drive cars but the clutch pedal looks weird!
Yesterday I bought some Ash wood to make the sides and the pillar for hanging the door from. It is bolted to the metal rails along the side and will also hold the dashboard in place. I might try to make a aluminium dash and then make those nice swirl patterns (Machine turned???).
It looks really really good Rob, ash is the way to go, oak contains some kind of acid that kills the screws.
Not sure about the metal swirl thing as I think it might be tricky to get it evenly, but give it a go. Please keep posting updates!
Location: Sweden
Thanks, Henrik. I've got a supply of Ash now, so I should be alright.
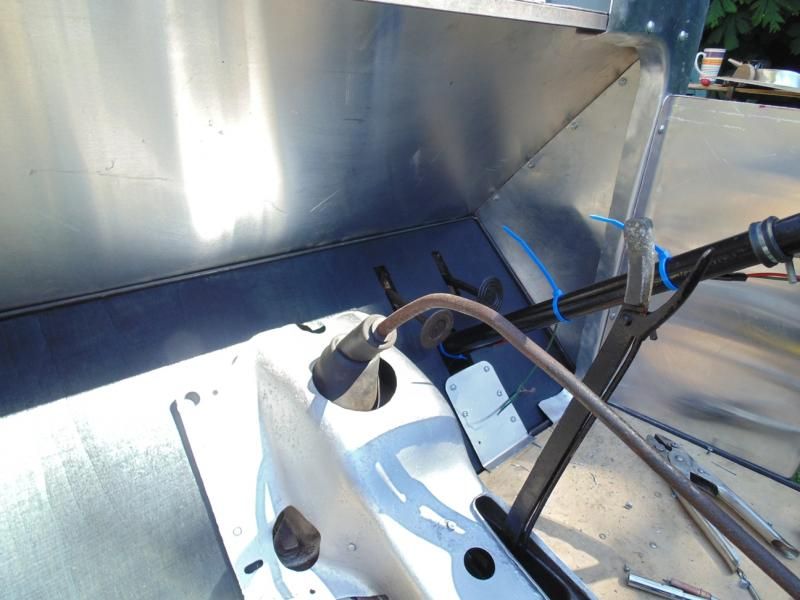
Top of the dashboard cut, folded, wired and drilled. Lots of opportunities to screw it up but it seems to have worked. Only major problem is that somehow it has grown by 1/4 inch on one side. How???? Oh well. It will have to do. Not sure if I should use solid 1/8 inch rivets or pops but those Cleco clips are working well enough for now.
I was thinking about the doors and fortunately some handy photos have just been posted on another thread. They don't look tooooo complicated (in theory only!) although mine will need to taper from front to back. Some more Ash will be needed. Hinges are also a problem so I might need to buy some brass sheet to form some.
Any suggestions would be gratefully received. I only have 3 weeks left to go before it needs to be finished.
Ta
Rob
It would look good pulling an Airstream Caravan!
Thanks, Leon.
You must have spent a bit more time on research before you started. I'm now finding that it would have saved a lot of effort if I had spent more time thinking through where the doors were going to be and what shape to make for the edges of them. I wanted it to be wide enough to fit my size 11 feet but the side effect is to make the body so wide that I need some rear wings in place before I can think any more about rear body shape. Running out of time! I've spent about 6 weeks on it so far from the bare rolling chassis stage but next time will be quicker.
Oh, and the squeak from the top of the steering column turned out to be the mis-shapen ball and socket on the axle end of the steering rod where the joint was dry. The sound travelled a long way! That wasted a couple of hours.
Leon. If you have any photos of the body/build then I'd be very grateful if you could show me, possibly via an e-mail?
Thanks
Rob.
hfh200 @ Hotmail.co.uk
Rob
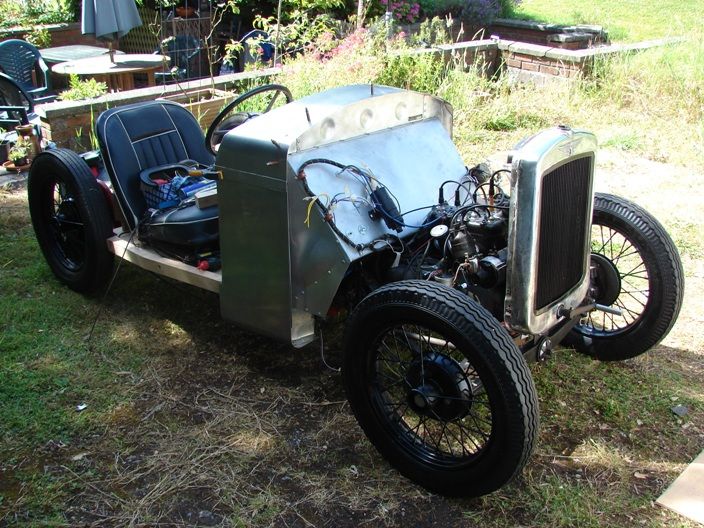
I've been thinking of what to do with it since I got the car, but it's not been plain sailing. You can see that their are lots of unfinished projects about.
We've been working on the rebodying since January putting in about 8 hours per weekend, only got the bonnet, wings and bit for my right foot to go.
Location: Suffolk, just
My friend doing his first sprint at Goodwood next month has some build videos on YouTube. This is the introduction. There's one on making doors, another on the dash and a couple of general updates along the way.
http://www.youtube.com/watch?v=JuuRnY01ulw&list=UUJrbFfWquVY--I8luse-oLw
David
Location: Lewisham, London.
Thanks, David. I've seen those before. Nice woodwork but I don't have the equipment to cut wood like that, only metalworking stuff and a few saws.
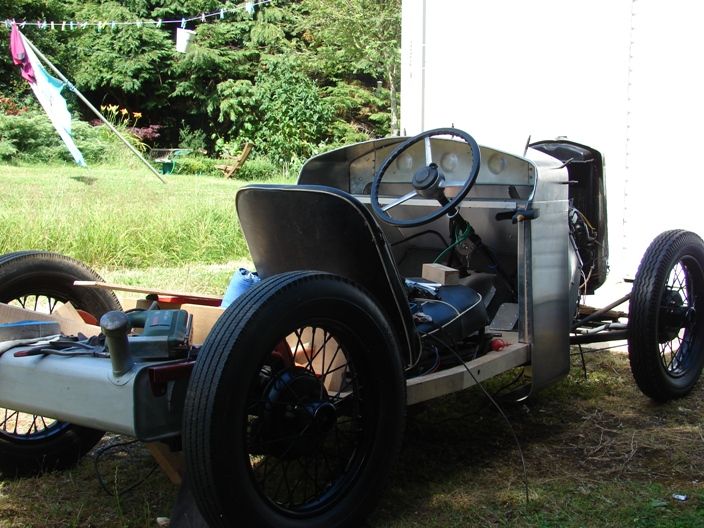
Anyway, I made the bonnet hinges and then the bonnet tos. I noticed that the bonnet 'hole' tends to 'lozenge' when the car goes over bumps, adjusting the shape and dimensions of the hole. Presumably this is a natural effect of a flexible chassis? How much gap should I leave between the bonnet skins and the bulkhead/Radiator cowl? I cut it so that there was just a 1mm gap but that seems waaaay too optimistic. What sort of gap is there on a Chummy bonnet to allow for lozenging?
If I were to sit on the passenger side then the rear edge of the bonnet at the lower end will move away from the scuttle by about 8mm and obviously will scratch the rad cowl by the same amount. The same will no doubt happen if the car went over a bump so I'm stuffed at the moment
What is the situation with the normal car or with Ulster replicas? Any photos or personal experiences???
Thanks
'Desperate' of South Glamorgan.
Hi Rob,
I'm enjoying your updates. Keep them coming. You're doing a great job.
When I made a bonnet, I overlapped the scuttle, by about an inch. It used to move all over the place as I drove along a grassy field, but I think it meant that it wasn't trying to push the radiator cowl around so much.
I hope you find a better solution than this, as I'd hate to think of you having to make another bonnet.
Good luck,
Colin
Location: Towcester
Rob,
Your bonnet top is quite deep sided which perhaps may magnify chassis movement.8mm still sounds far too much. Is the body to chassis mounting not fastened tightly or is it too weak? My pretend Ulster does flex about half that I would guess. The bonnet side panels on it are attached to rad and to scuttle by bolts and 20mm washers at the top corners of the panel with a rubber washer to stop metal to metal contact and works fine.The holes in the side panels for the bolts are slotted. You can hear the slight squeaking of the rubber when going over large bumps. Also are you intending to fit the rubber bonnet moulding as the pre-Ruby models which would disguise inaccuracy in the bonnet/scuttle bonnet/rad joint as the bonnet is able to dig into the curved exposed section of the moulding? Having said all this I don't think the chummy bonnets ever seem to fit accurately.I had to chop a small triangle of metal off my chummy bonnet and weld it on the other end. Anyway your car is coming along nicely,
Cheers,
Dave.
Location: Sheffield, the home of Hendersons Relish.
Thanks for the timely replies, Colin and Dave. I'm not great at internet etiquette so wasn't sure if I was posting too much or if these pictures end up getting in the way of something. Having them on Photobucket is alright, isn't it?
As for the body, I was advised to keep the tub from taking big loads by having it suspended from the chassis in a manner that would allow it to remain rigid whilst the chassis flexed. Was that wrong? (Gulp!) I can't imagine a standard early car is much more rigid so it might just be down to cutting the bonnet gaps that bit more wide and maybe employing that good idea about keeping the side panels 'loose', Dave.
What do these rubber bits look like? I've never owned a 7 before and have only every had a single ride in one so my entire knowledge of them is from books and Google. 
Rob, I have been watching your thread with interest and see you have a problem that may not turn out to be as bad when the rest of the cockpit is completed.
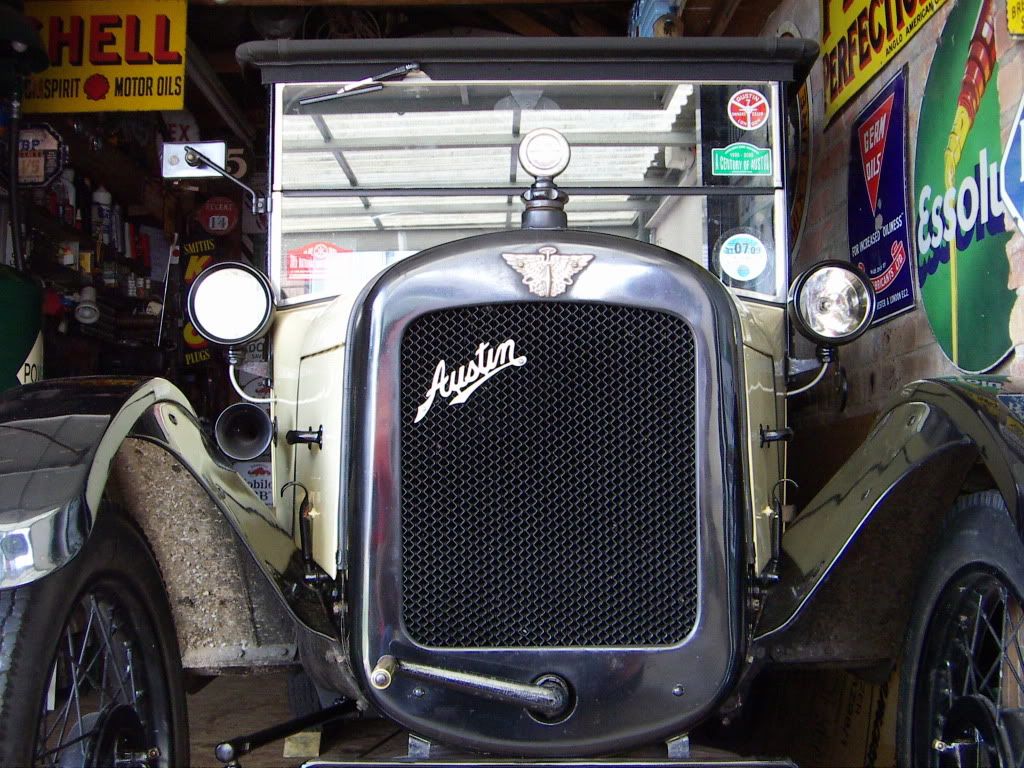
A standard Chummy does not suffer any problems with the bonnet moving. My bonnet is a good tight fit between the bonnet rubbers and has never shown any movement marking. If I put a finger on the joint where the back of the bonnet touches the scuttle and give the windscreen pillar a good shove there is absolutely no detectable movement.
On a Chummy the scuttle, bulkhead, petrol tank and dashboard effectively form a box, remove any one of these and you ‘would’ find some movement such as you have.
It’s a bit of a job to imagine your finished body from the photos, but I would study the finished design and work out if you will have a boxing effect such as the standard car.
Think of a shoebox with no lid and twist it, put the lid on and it will not twist, it needs that principle in the design I would imagine (I have never built a special and take my hat off to those that do). If you are having a dashboard maybe you could have a full width panel at the bottom of the dash going forward to the bulkhead (leaving a detachable but securely fixed access panel for the instruments). I would imagine that with the movement you have at present is not eliminated the body would soon suffer. All the best Ian M
Location: Bristol UK
Rob,
As mentioned above I think that you will find that completing the body structure and fitting the radiator support valances will help matters, the radiator would move slightly with the body flex. It would probably be an idea to finalize the design and shape of the remainder of the body, cardboard and ply are useful for mocking this up and ensuring everything fit's prior to committing to metal. The Bonnet would normally be one of the last parts that you would fit when building a body. Try to study how other cars similar to what you want from your design are constructed, doors weaken the tub so look at what Austin did on the Nippy and Speedy; Double skinned support valances incorporated into the bulkhead scuttle assy etc. Even so the door latches still held the two ends together to some extent.
Location: NZ
My car is made of little more than tin foil, it flexes a lot and I ended up with a wide overlap of the bonnet over the scuttle. At first I braced the middle of the radiator with a pair of alloy tubes from the top corners of the scuttle to the middle of the rad. The rad split so I removed one of the links. It feels weak grabbing the the rad shell and wobbles like a jelly jacked up. When I get back to working on it (its been off the road 15 years) I've various ideas to stiffen it up.
Trevor's car is built of plate and bolts. He has the standard "cow horns" and I think Ruby steel panels from the rad shell back to the scuttle below the bonnet sides (are these "valances"?). The front is amazingly stiff with the wheels on the ground. It remains stiff with a jack under the middle of the front axle. His bonnet fits tight to the rubber and has had no problems over London pot holes and speed humps and up and down kerbs. His first tip to my godson building up his special was to get cow horns and steel valances (if that's what they're called) and build round them.
Mine has a boxed chassis but the engine "loose". Trevor has a standard chassis and standard engine mounts so its absolutely these panels and the cow horns doing it for him. I'm fascinated that Austin put twin skin sections in there. Anyone got some photos?
Something I've seen on racers is a tie from the back of the cylinder head to the scuttle.
Which Lotus had tubes over the engine?
David
Location: Lewisham, London.

Rob, I am having trouble with both Photobucket and Captcha,hence half a photo!If you click on the image,you can see the bonnet side panel has a chromed screw with a 20mm dia steel washer brazed onto it. Behind the washer is a rubber washer 20mm dia which is trapped between steel washer and bonnet side panel through a slotted hole in the side panel.The screw/steel washer/rubber washer is screwed to the bulkhead using a steel nut welded to another steel washer which is then riveted to the bulkhead.It would be easier to understand if you looked through my Photobucket library where you can see a side elevation of the car and somewhere in the library is a view with the bonnet side removed and the steel nut/washer riveted to the bulkhead.
Dave.
Location: Sheffield, the home of Hendersons Relish.
If making your own then a curve under the bottom edge is going to help. I think they also have a joddle to go under the bonnet edge which will give some strength.
Mounting mudguards have an enclosed hole not a slot through an edge.
My favourite "structures" demo is a card tube from a kitchen roll or toilet roll. Try twisting it, then cut down the length and try again. You'll understand box sections after that. Another one to try is to flap a bit of A4 about, then fold into a "V", then try a "W".
My priority (25 years ago) was weight. Having suffered patter in high speed cornering (one wheel comes off the ground then down then the other up and then down at approx half second intervals) I'm thinking again.
David
Location: Lewisham, London.
http://www.asciimation.co.nz/austin7/?p=354
http://pub25.bravenet.com/forum/static/show.php?usernum=2099944454&frmid=5&msgid=919161&cmd=show
I look at those cow horns and remember the weight - they are mighty bits of metal.
Location: Lewisham, London.
Hmmmm. Last night I re-read the little green book, especially the bit about building 'Simplicity. Tying up with the notes above I wonder if I might be well served by slackening the rad shell from the chassis nose-piece and instead tying it to the scuttle area. The whole body tub is very, very rigid but is slightly separated from the chassis rails by having all the body/floor and floor/chassis bolts spaced apart to allow the ply a small amount of flex. The rad shell, by comparison, is bolted to a 12-inch steel angle that is also bolted to the nose piece. 'Simplicity' is said to have the rad shell loosely fitted to the nose piece by a simple rubber 'washer' and then tied to the top of the scuttle area, thus allowing the rad shell to move in harmony with the body instead of with the chassis (as also mentioned above). There is much logic in there!
On the standard pre-Ruby, how is the rad shell fixed to the chassis? Is it tied solidly to the nose piece casting or does it hang from the body somehow?
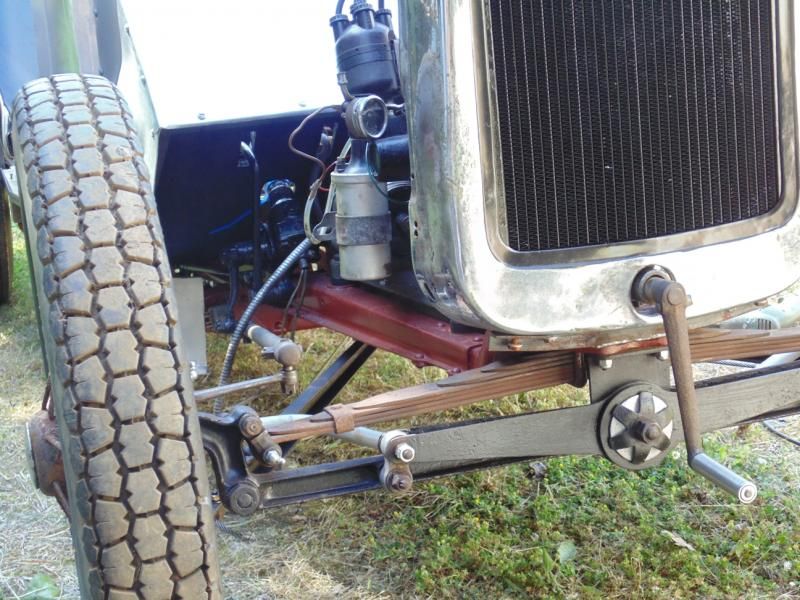
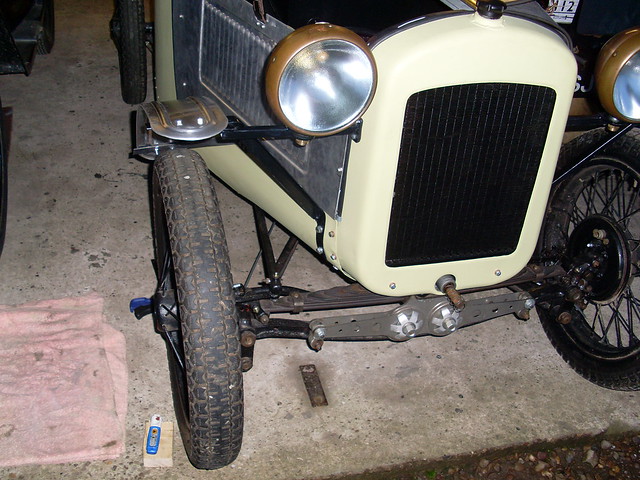
Below is a pic that shows the angle iron that ties the rad shell SOLIDLY to the nose piece. Bin it in favour of something more squidgy???
All the early cowls and associated radiators are firmly held with bolts in a short extension of the two flitch plates which in turn are bolted to the two 'cow horns' which are bolted rigidly to either side of the chassis nosepiece (except in the very early cars where the 'cowhorn' is in one piece).
Tony
Location: Malvern, Melbourne, Australia
Thanks, Tony.
I've been going over the photos from our Mr Jansen which, as you say, show that the rad cowl is not quite 100% rigidly fixed to the chassis. I'm going to try to reduce the number of bolts holding mine down and also sit it on some rubber to see if I can permit a little wobble that will hopefully allow the rad cowl to move in harmony with the scuttle and bonnet.
I've also found a picture of the rubber seal used on the back edge of the bonnet. Might be worth trying if I can't solve it the other way. At the moment you can rock the car by pushing the rad cowl without the cowl flexing away from the chassis. Too tight, I think.
Rob
My 2nd special had a steel floorpan/scuttle construction with steel flitch plates going forward to the cowhorns and then the rad shell.
The advantage of this is that everything at the front is tied together and will move in unison.
I would now always use flitch plates going forward bolted to the cow horns as it makes the front much stiffer.
I agree that the body will flex but I think the real problem there is more likely to be at the doors and the join to the back if you have them?
I made deep sills on both specials, the truck I made was particularly strong in this area.
Great looking special by the way!
Steve.
Location: patrolling the border

Rob, I have to agree with Steve, when I built the "Chummystein" I made some hefty cowhorns out of ¼" steel and fitted the 18 gauge steel flitches and mounted the radiator shell to that.
The bonnet, which was bent out of 18 gauge half hard aluminium sheet hardly moved at all. I think you need stiffening up a bit!
Good luck with the op, by the way!
Location: Near Bicester.
Sorry, started a new job this week so have been busy and slack checking here!
On mine the cow horns are pretty hefty. The are holding up the flitch panels, which are made from steel, and the radiator surround then bolts to the front of the panels just in front of the cow horns. That's all holding the weight of the radiator. The cow horns will also hold the mudguard support brackets and the headlight mountings I think so they do need to be pretty strong. Mine are 10mm or so steel.
I don't know how much twist there will be in my body yet. Not much I imagine. The chassis has been boxed, including the rear crossmember and the nose piece. And the body was constructed with steel side rails that run above the wooden floor and that should also help stiffen it.
I won't really know how effective all that is until I make the bonnet and as Ian mentioned that's usually done last and made to fit. The chassis itself is definitely much stiffer with the boxing done.
I'm using that P shaped rubber between the bonnet and the body. This stuff:
Simon
Location: Auckland
I think it is unwise to have the rad cowl bolted directly to the chassis. The rad cowls on all the pre-Ruby Austin 7's are bolted to the steel flitch plates which are the pieces under the bonnet sides along the lower sides of the engine bay. The flitch plates are bolted to the cow-horns at the front end, the latter being bolted to the chassis nose piece. The front end of the flitch plates extend about 22 beyond the cow horns and the rad cowl nestles inside the flitch plates, bolted in place with 1/4" nuts and bolts. The front ends of the flitch plates are curved to the shape of the cow horns and the radius of the lower corners of the rad cowl. Nevertheless, it is desirable if all the holes in the assembly are a bit large so that the whole lot can be loosely bolted together and finally tightened once the bonnet is in place.
The rad cowl, therefore, is fixed at the lower corners and also by the centre strut onto which the bonnet is fixed. This 3-point mounting allows a certain amount of twisting but even so the rad cowl will fracture over time.
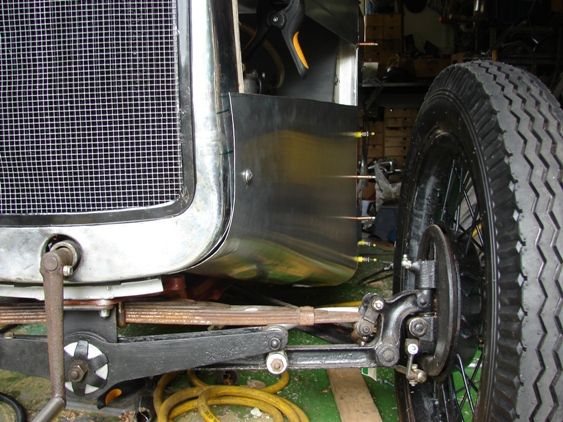
As Malcolm says, it's unwise to bolt the rad surround direct to the chassis nosepiece. The photos below shows how it's done on all pre-Ruby Austins. The Cow Horns bolt to the nosepiece with the flitch plates (sometimes also called the radiator support panels) bolted to them and projecting forward to take the rad surround. The bonnet doesn't move in use in relation to the scuttle or rad surround with this set up.
Steve
Location: Nr. Selby, North Yorkshire
Thanks, Malcolm and Steve.
I'll fabricate the flitch panels and then re-think the rad cowl mountings along the lines of what is in the picture. It is a Ruby chassis with an RP cowl (I think) so there will be a modicum of bodgery involved!
Rob
No need to bodge, Simons car has exactly the same chassis and radiator just look at his web site to see how it is done.
Location: NZ
Giving it a new try:
I've missed a few posts here and had to do some reading to try to catch up. Great informative thread!
When I made my body, I read the Williams book 100 times and the green book 100 times. Especially the bits on Simplicity. Also there are a few thinner books out there, can't remember their names now, but I have a blue and a red one containing small articles from the 1930s to 1950s.
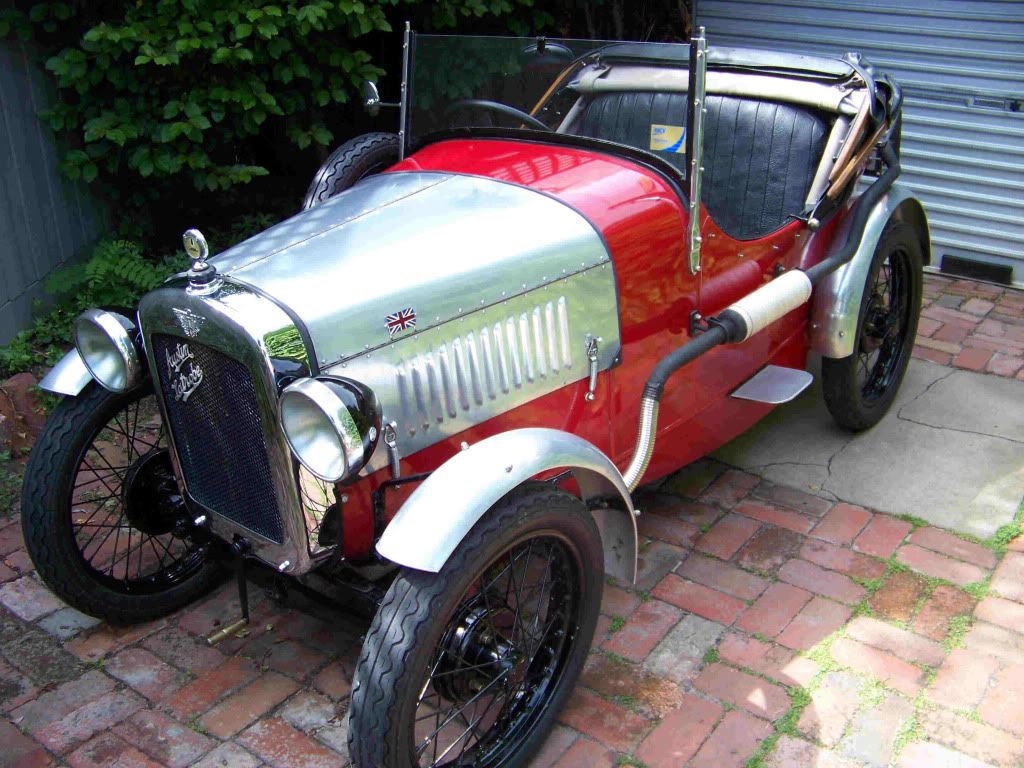
I attacked the cowl/rad issue from another point of view. I used a tall cowl (box saloon) and a Ruby rad and positioner it a lot lower than original making the top level actually lower than an original Ulster would be.
This is the way I did it iirc...
Nose cone cut off as the rad needed lowering. Radiator held by two flat iron brackets bend downwards. Brackets bolted in chassis where cowhorns are originally bolted making the rad lower and actually closer to engine. (No fan and radiator lowered, is this possible? So far so good, been driving along countryside roads with no overheating in temps above 20 deg C.)
So the rad is very rigid from the two lower bolts, and also the upper hose gives good rigidity.
Cowl: box cowl fits perfectly over the ruby rad! It even snaps in place! The lower passenger side is also bolted to the body by a panel going from cowl back to bulkhead. (Maybe visible in the pics...) The cowl is also held in place by two square aluminium profiles running from each upper corner of the cowl back into the body, so these where included in the body itself. Then the side panels are held by four screws/nuts, easily removed if wanted. The bonnet is a one piece lift off thing held down by four hatch locks and one single leather strap.
I have a few clips on youtube, this being 6-7 years old taken from an early short test. Yes I have managed to find a tecnique to get in the car without removing the steering wheel... :)
Unfortunately youtube clips are reported as spam? What a shame... One clip is very detailed with photos and info on the engine. Search for Austin seven special and you might find them, the green LHD one...
Location: Sweden
Ian. I know how to do it, just don't have the time to drive off to get the right material so a bit of bodgery in the form of slicing up a Morris 100 bumper bar might be in order. Hospital tomorrow for a final blood test and then in for surgery on Tuesday morning. That'll be it for the next 3 or 4 months.
Henrik. http://www.youtube.com/watch?v=M2pQr_YqWUU Is it this one?
I like your idea of 2 rods for the top of the radiator. I have just one in the middle so if I use 2 on the sides it will help to hold the rad shell in line with the body. I'll try it and let you know. Thanks!
Yes Rob! I never managed to link... Ofcourse our solutions are different but if my clips give any ideas it's great!
Location: Sweden
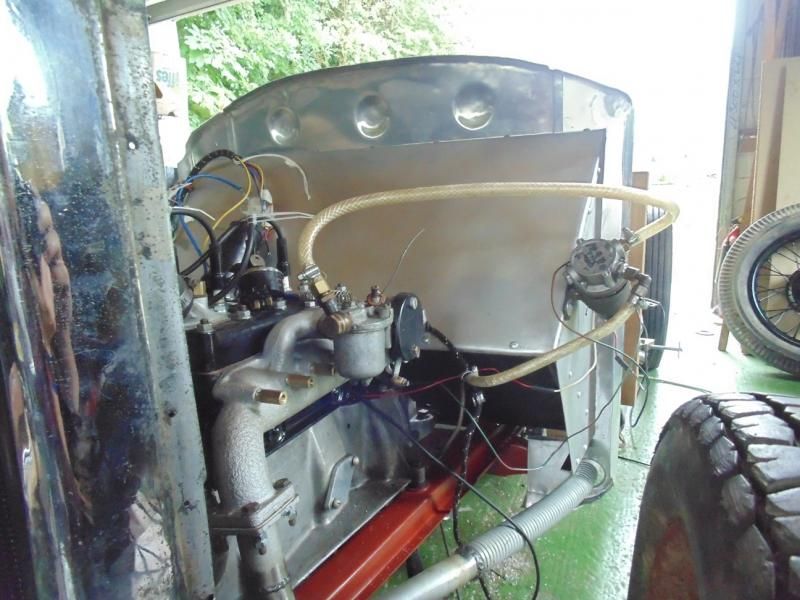
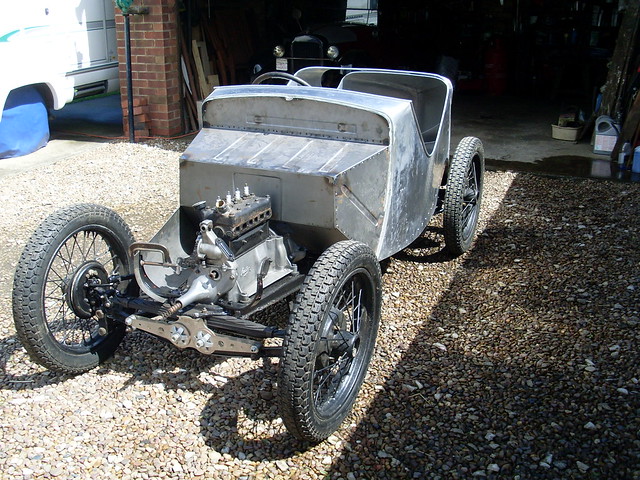
This is what we did to mount the rad and shell.

Location: Suffolk, just
I ran some 20mmx20mm L-section pieces of 3mm alloy from the body tub to the rad shell and almost all of the flex has gone. Looks like it will work.
Too wet to go playing in the garage right now but I did take delivery of some 3ftx2ft pieces of ali sheet to make the flitch panels.
Rear wings now in position and screwed down (apart from the screws too low for me to reach!)

Ebay, for about £39 (45 Euros?) each plus postage. Made in the UK by Wassell for motorbikes.
Designed for 18/19 inch wheels, they have a 16 inch outer radius and a 6 inch width. False wired edges make them strong and very, very light.
From here...
http://stores.ebay.co.uk/Vintagebike-Online?_trksid=p2047675.l2563
The throttle pedal looks easier to work out for the left hand drive cars but the clutch pedal looks weird!
Yesterday I bought some Ash wood to make the sides and the pillar for hanging the door from. It is bolted to the metal rails along the side and will also hold the dashboard in place. I might try to make a aluminium dash and then make those nice swirl patterns (Machine turned???).
[/quoteHI ROB
YOU MIGHT FIND THE INFORMATION ON THE FOLLOWING WEB PAGE HELPFUL IF YOU GO DOWN THE TURNED DASH ROAD
Go to www.bugattibuilder.com then GO TO BUGATTI WIKI ON MAIN PAGE,GO TO BUGATTI maintenance ,GO TO METAL FINISHES, GO TO ENGINE TURNING.
LOOKS GREAT ON GP BUGS BUT CAN LOOK OVER THE TOP IF NOT DONE WITH GREAT CARE
ANDREW
Location: Hereford
Designed for 18/19 inch wheels, they have a 16 inch outer radius and a 6 inch width. False wired edges make them strong and very, very light.
From here...
http://stores.ebay.co.uk/Vintagebike-Online?_trksid=p2047675.l2563
Found them, thanks Rob. They look good.
Location: Brittany

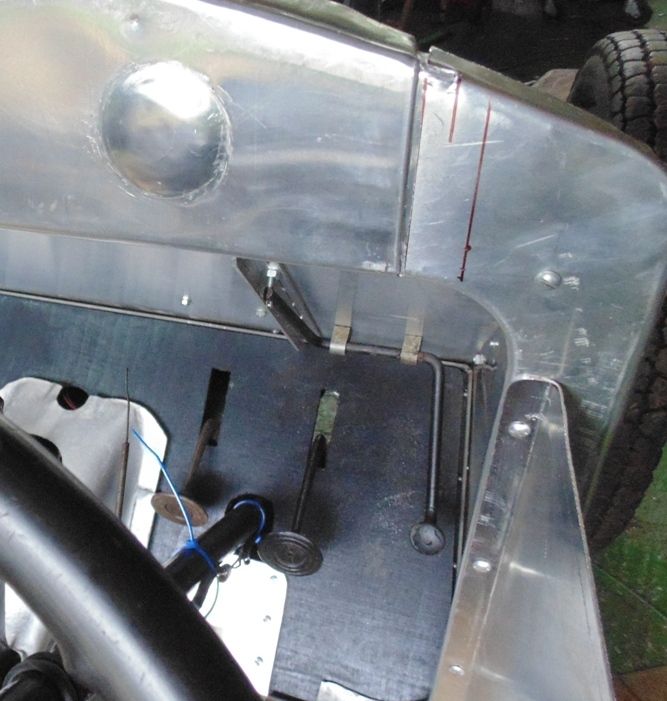
Flitch panels made and rad support modified to use a soft mounting rubber pad rather than lots of rigid bolts. Much less slack so I get 1 or 2mm of bonnet slop when I bounce myself hard on the door sill.
I had to add a little bulge under the left flitch to miss the exhaust pipe (again, bad calculations on my part)
Some more trimming required and then I need to cut a hole in the right side for the steering arm, a miserable job, I'll bet!
Thanks, Andrew.
I might need to use crackle-black on the dash since it seems to have too much ali on show and needs something else on the dash. The vinyl doesn't really do it for me, if you know what I mean. I've watched the website by Nigel for quite a while. Very good for 'tips'.
[65 hours to go before the Hospital!]
OP went well but quite a lot of collateral damage to sort out. Only look at the picture if you have a strong stomach and are not going to be eating Chilli in the next few hours.
http://s82.photobucket.com/user/foggythomas/media/DSC00237.jpg.html?sort=3&o=376
Rob,
I'm glad we aren't having raspberries for pudding.
Dave.
Location: Sheffield, the home of Hendersons Relish.