Welcome to the Austin Seven Friends web site and forum
As announced earlier, this forum with it's respective web address will go offline within the next days!
Please follow the link to our new forum
http://www.austinsevenfriends.co.uk/forum
and make sure, you readjust your link button to the new address!
Hi,
I'm refurbishing the clutch on my Seven and can't figure out how to fit the moust trap springs.
When I dismantled the clutch there was no sign of any toggle springs, so I'm
at a loss as to the correct way to fit new ones.
If anyone has a drawing/scetch, to pass on to me, that would be most helpful.
My thanks in advance.
Location: Prestatyn, North Wales.
I have a 4 speed box and I will persevere,
but I want to get it right.
Please, if you are not willing to help do not reply
to this thread.
Location: Prestatyn, North Wales.
Hi Ray, I don't currently have a 4 speed box but my understanding of fitting the mousetrap springs is as follows.
Assemble the clutch and bolt up tight without the mousetrap springs. Then, placing a mousetrap spring over a declutching lever, insert the two bent up ends of the springs into the little holes either side of the lever from the UNDERSIDE of the clutch cover. Repeat for the other 2 declutching levers.
The whole purpose of the springs is to stop the levers being thrown out into contact with the release bearing by centripedal force.
The fitting of the springs is somewhat "fiddly".
Ian Mc.
Location: Shropshire
Thank you Ian, your instruction is very much
appreciated.
Location: Prestatyn
Ray,
Make sure that the bent up ends of the mousetrap spring protrude out of the clutch cover in order to prevent the spring sliding back down the holes.
Dave.
Location: Sheffield, the home of Hendersons Relish.
Ray, fitting of the springs is much easier if you are lucky enough to have a clutch with the linings on the driven plate. The toggle posts on these are held in by 'C' circlips and I find it easier to mount the springs first as Dave has said, then the fingers and posts in the cover plate. Squeeze it all up in the vice with 2 clamps, and fit the circlips last. THEN put the clutch together. cheers Russell
Location: oz
Good morning. According to the collection of service sheets that I have Austins produced a jig to facilitate the fitting of the mouse trap springs. (I would happily email a photo of said jig to those who possess the necessary IT skills to post it on this site.)
Not having said jig I assemble the components and using a spare friction disc ring against the friction lining carefully use three small 'g' clamps to compress the assembly before inserting the mousetrap springs and slightly bending the legs. (If ever the saying 'a picture paints a thousand words' this is it. Despite the instructions about posting photos am I alone in finding it very cumbersome?)
Regards from the creative county
Stuart
Location: Staffordshire
Not having said jig I assemble the components and using a spare friction disc ring against the friction lining carefully use three small 'g' clamps to compress the assembly before inserting the mousetrap springs and slightly bending the legs. (If ever the saying 'a picture paints a thousand words' this is it. Despite the instructions about posting photos am I alone in finding it very cumbersome?)
Regards from the creative county
Stuart
It is a little irksome, I agree.
If you email it to me Stuart, I will post it here later.
Ian Mc.
Location: Shropshire
If my had a 3 speed box with a clutch without
mouse trap springs, I wouldn't have asked for
help/advice!
Location: Prestatyn, North Wales.
Hello Ian,
Please accept my apology for my rather bad tempered comments to your
replies to my post, I wrongly thought you where being un-helpful.
I also realize now that initially I should have been more specific regarding the type of engine and gearbox box that I was working on and I shall try to be more careful with my comments and frustration in the future.
I'm still struggling with those pesky mouse trap springs!
Location: Prestatyn, North Wales.
Ray,
I will happily take some photos of a method I use that works very well and post them up for you, hopefully later today or tomorrow.
Hi,
A bit late to this, but I saw on an engine in Pig Stye that they had replaced the dreaded mouse traps with a small retaining metal clip that was screwed onto the cover either side of the leaver instead. Seemed to do the same job of preventing the levers from over opening...
This looked like a good solution, but I may have misunderstood it... I've got to have my clutch apart this winter and am dreading it already! last time resulted in a bad tempered day of retrieving the springs from various parts of the workshop... only to have to disassemble it again as it needed more adjustment!
Good luck
Ru
A bit late to this, but I saw on an engine in Pig Stye that they had replaced the dreaded mouse traps with a small retaining metal clip that was screwed onto the cover either side of the leaver instead. Seemed to do the same job of preventing the levers from over opening...
This looked like a good solution, but I may have misunderstood it... I\'ve got to have my clutch apart this winter and am dreading it already! last time resulted in a bad tempered day of retrieving the springs from various parts of the workshop... only to have to disassemble it again as it needed more adjustment!
Good luck
Ru
The little metal clips were used very successfully on the Aluminum flywheels mark Roper used to produce. The careful use of a couple of G clamps and fitting the mousetrap springs with some pliers as already explained has always been successful for me. Bind the ends of the levers together with some wire and you can release the clamps and fit the cover with out the whole lot coming apart. This is all covered in one publication or another, probably the Companion but I am afraid I cant remember for sure.
Location: NZ
I can't see a mention of the springs in the Companion, all around about page 140, though there is a side elevation drawing showing a spring within the clutch assemble.
Williams 'Austin 7 Specials' doesn't mention springs and 'The Manual' (Workshop) states something like Refit the Clutch Springs...
I know I've seen a diagram re. springs, but...
Even my favorite reference site - Cornwall A7 Club - here only says '.....I found it easier to thread the clutch withdrawal pin assembly through the mouse trap spring, then fit in the corresponding holes. Next job is to fit the two small half collars, which, when the G clamps are released, the half rings will trap the assembly.
There was a brief reference in a Topic on this Forum in 2012 at http://pub25.bravenet.com/forum/static/show.php?usernum=2099944454&frmid=5&msgid=936009&cmd=show
Location: The very edge of Europe - West.
Here is how I do them.
1. Clamp the whole clutch assembly together including the springs (I usually use three G clamps but could only find two for the purposes of this exercise).

2. Turn the assembly upside down and face the linings towards you. Place the new mousetrap spring in the position shown below and hold it there with your finger.

3. Using some long nose pliers place one point inside the coil and the other against the straight section, twist and use your finger to push the end into the hole as shown below.

4. Press down on the coil so the wire is almost all the way home but not quite.

5. Repeat (3.) on the other side.

6. Repeat 4.

7. Push all the way home so that the coils sit in the groove.

8. Turn the assemble over and check the tails are sitting through the wholes correctly as shown below.

Once all three are in place you can release the G Clamps and fit to flywheel.
The job takes me longer than a few minutes per spring
8. Turn the assemble over and check the tails are sitting through the wholes correctly as shown below.
or even, "through the holes correctly"

That is exactly how I do them, don't know where I learnt this but felt sure that I had read about it somewhere pre forum days. Although possibly not entirely necessary I tie the ends of the levers together so that when the G clamps are released the mouse trap springs don't get bent by the force of the clutch springs.
Location: NZ
Ian,
the springs hold the toggles in place perfectly so tying them together is not necessary at all (a very good idea on a three-speed however).
I tried several methods (one involving a carpet making hook - don't ask!) before sticking with this one, it works and is quick.
I agree that the springs hold the toggles but how many have you dismantled that are horribly misshapen from the unrestrained force of the clutch springs.
Location: NZ
Most of the assembled clutch plates I have here Ian are sitting out of flywheels, they seem fine when I come to fit them (so far!!). The one I took out today to do the photos has been in my shed like that for at least ten years and the spring was doing its job, I chose to fit a new one for the photos as that is what I presume most do. If you feel happier to tie them then you should of course do that, very little effort involved in doing so I guess. 
Fair enough, we all have our own subtle differences in the ways we do things, I was just sharing mine and trying to explain why.
Location: NZ
R,
As usual a very thorough and well illustrated instruction sheet - I have never had anything to do with these springs (or later clutches) but think even I could do it now
Tony.
Location: Malvern, Melbourne, Australia
Thank you for your kind words Tony.
"assemble" should be "assembly", can I claim the distraction of my two potty training daughters as an excuse? I doubt it!
A **** excuse if ever I made one!
Thank you Ruairidh for the instructional photos and I'm pleased to
tell you, that after a short study of them, I tackled the fitting of the
mouse trap springs and had the job completed in 3/4 of an hour.
It is such a relief to get that job completed satisfactorily and I am most grateful for all the help and advice I have received from this forum and it's contributors.
Best wishes.
Ray B.

Location: Prestatyn
Great news Ray!

Absolutely superb thread, it had all the drama of a good soap opera (if there is such a thing!) the baddie turned out to be the goodie, everyone made up, then Ruairidh posted a excellent set of pictures demonstrating exactly the way I, and many others do the job...and it all turned out nicely in the end because Ray's got his clutch together.
Lovely.
Now if that isn't the sign of a good forum, I don't know what is!
Location: Near Bicester.
Not having said jig I assemble the components and using a spare friction disc ring against the friction lining carefully use three small 'g' clamps to compress the assembly before inserting the mousetrap springs and slightly bending the legs. (If ever the saying 'a picture paints a thousand words' this is it. Despite the instructions about posting photos am I alone in finding it very cumbersome?)
Regards from the creative county
Stuart
Here is the picture of the jig Stuart spoke of. I seems to me that the primary function of the jig is to preset the operating fingers, with the clamping action allowing insertion of the mousetrap springs (using Ruairidh's method) being a secondary "spin-off" function.
Ian Mc.
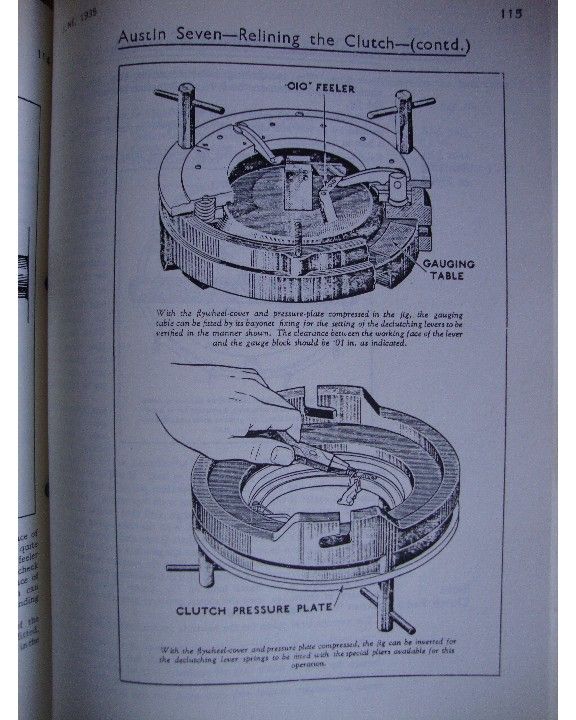
Location: Shropshire
This is a marvellous thread and I wish I had read it sooner! However, here is something which may prove helpful with respect to over-straining of the mousetrap springs when undoing the clutch cover bolts. I noticed when riveting the lining to my pressure plate that three of the rivet holes were larger, and closer inspection revealed that they were threaded 1/4" UNF (Bantam, remember). Why, thought I? Well, I thought that if I assemble the clutch in the usual "2 clamps and a vice" method, then insert 3 suitable bolts into these threaded holes, I could remove the clamps, fit the springs, fit the clutch to the flywheel, then remove the 3 temporary holding bolts. It all worked fine, although it means that the lining is held by only 9 rivets instead of 12. As I have some new linings with only 6 rivet holes I figured that 9 should be OK. Further, when removing the clutch, the temporary hold bolts can be inserted first, holding it all together. Good if you don't actually need to strip the clutch.
Location: Wellington, NZ