Welcome to the Austin Seven Friends web site and forum
As announced earlier, this forum with it's respective web address will go offline within the next days!
Please follow the link to our new forum
http://www.austinsevenfriends.co.uk/forum
and make sure, you readjust your link button to the new address!
Yesterday I did what I should have done ages ago.
Read through the Rinsey Mills book again and found this passage on page 55 and can do no better than quote it:
"Rubys and Pearls normally had leather trim to match the bodywork . . ."
Does that means dark Royal Blue body for me?
I'm sure the rear seat is original given the state of the leather when I got the car, but those layers of alternate undercoat then light and dark blue paint puzzle me.
With Mills saying 'normally', I'm back guessing again.
Studying those layers again, one thing that strikes me is that each of the undercoats, if they are, are followed by light then dark blue, and appears to be quite intentional.
Expert advise/thoughts please.
Geoff - Would appear the factory couldn't make its mind up, like me on occasion.
Location: South Norfolk - Next to Suffolk

Geoff
Sorry I missed your question, I think that it was around £350 to blast and etch prime. I was invited to see the car after blasting but had to be available immeadiately so that rust did not start. The company was Calmac ltd of Gosport.
Well pleased with the result, no rust anywhere
Location: Oakley, Hants
Thanks Derek.
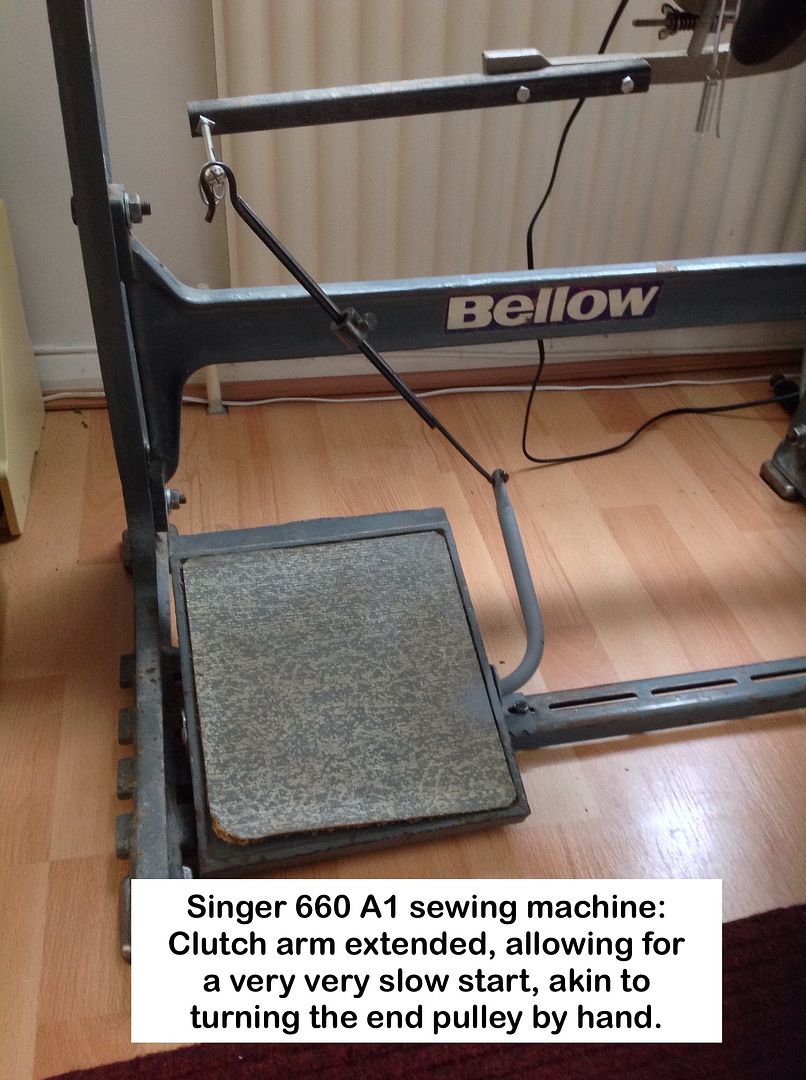
Yesterday I tamed the start-up speed of my Singer 660 A1 industrial sewing machine by simply extending the clutch operating lever.
This modification, together with the change from original 4" motor pulley to one of 2", means the machine now behaves as if it is powered by a servo motor.
I am now able to get the beast to start at a crawl and keep it at that speed, akin to pulling the machine pulley round by hand, thus making it easy to start stitching leather.
Beforehand, it was nigh on impossible no matter how delicate I was operating the foot pedal.
Geoff - Just need to find suitable dark blue leather now and I'm away 
Location: South Norfolk - Next to Suffolk
Video of the Singer 660 A1 sewing machine after my first modification to get it to start slowly.
I now need to drill more holes in that extension so that I can fine tune where to put that bolt, and then play around with the position of a tension spring to see if that will help.
Geoff - Winter not far off
Exit: Got long well and truly mangled
Location: South Norfolk - Next to Suffolk
Geoff,
your adaptation looks good, nice work!
I bought on of these recently: http://www.ebay.co.uk/itm/ADJUSTABLE-WALK-SPEED-SLOW-INDUSTRIAL-SEWING-SERVO-ENERGY-SAVING-MOTOR-/381336928729?pt=LH_DefaultDomain_3&hash=item58c973c1d9
It has transformed my machine and makes it so much easier to use, I can recommend it if your adaption proves difficult to control.
Nice one Ruairidh, I can imagine how it has transformed your machine.
Thanks for the link and comment.
What machine do you have, and is it a Walking Foot' variety?
Could you post a video of your machine in operation please?
I now fully understand why leather workers say a 'walking foot' is a 'good thing', as I found out the other day when practising and a loose top layer of leather refused to be pulled under the presser foot, but that was luckily soon overcome when I fitting a Teflon one.
If my mods prove fruitless, then a servo motor would also be my choice.
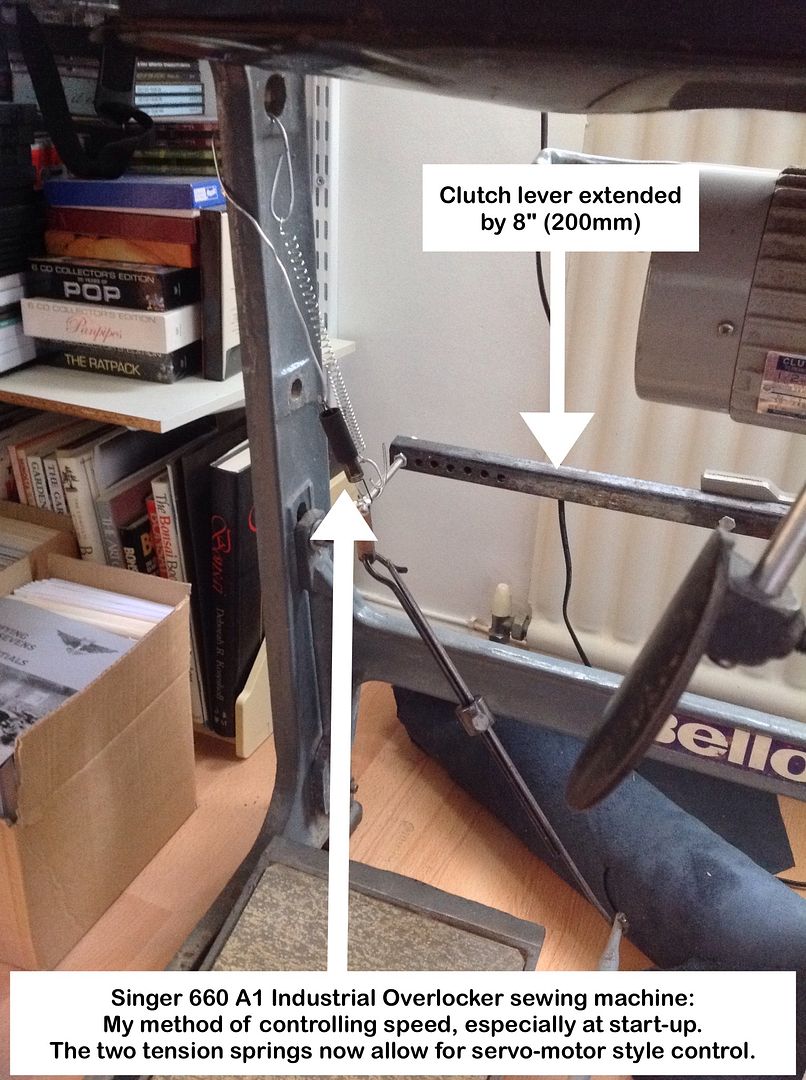
I have made a couple of changes as follows:
1) Drilled extra holes in the extension arm,
2) Added a proper way, of attaching the hook at the end of the foot pedal rod, to the long bolt,
3) Attached an auxiliary tension spring between the LH stand upright and the long bolt.
Number 3) is still in experimental mode, as is the position of that long bolt, but adding that tension spring has the machine now nigh on perfect, but no competition for a servo motor of course and its infinite speed control.
Will be making a start on another video today, more professional I hope, the first being done using my iPhone.
Need to do some bodywork on SHMBO's Ka whilst she is on a jolly over the water, so Ruby has to wait.
Geoff - Weather permitting for that last sentence to be carried out, but not holding my breath.
Edit.
PS. That 'long' in the Edit of my last post should have read 'link' as mind went blank when doing the link 
Location: South Norfolk - Next to Suffolk
Thanks Ruairidh.
Update at last on slowing the start-up speed of the Singer.
I am now able to get the beast to start at a crawl, but only time will tell if I've been successful with regards working with leather.
If not then a servo motor it will be from College Sewing.

Video/s
Waiting for more colour samples from Leather UK, to see if I can match the rear seat's dark blue leather, but trouble is, that leather is shiny whereas the samples I have are all dull/matt.
No the shine is not from contact with bums, but ex-factory.
Question is, is all Seven leather suchlike?
Geoff - Just need to het top thread tension back to what it was before I fiddled
Geoff -  at myself for not leaving well alone
Location: South Norfolk - Next to Suffolk
Oh dear! 
Brain f@rt at its best 
Leather supplier is UK Hide 
Received the other promised samples yesterday and found their VM3282 is as close a match as I can expect, except for the shine.
Geoff - There are days and there are days.
Location: South Norfolk - Next to Suffolk
Bolted the sheet metal bender to the Mobile Tool Trolley (MTT), and the rotary cutter to the Vice Stand (VS)
I can now make a start on repairing the bottom section of the NS B-post that was bodged.

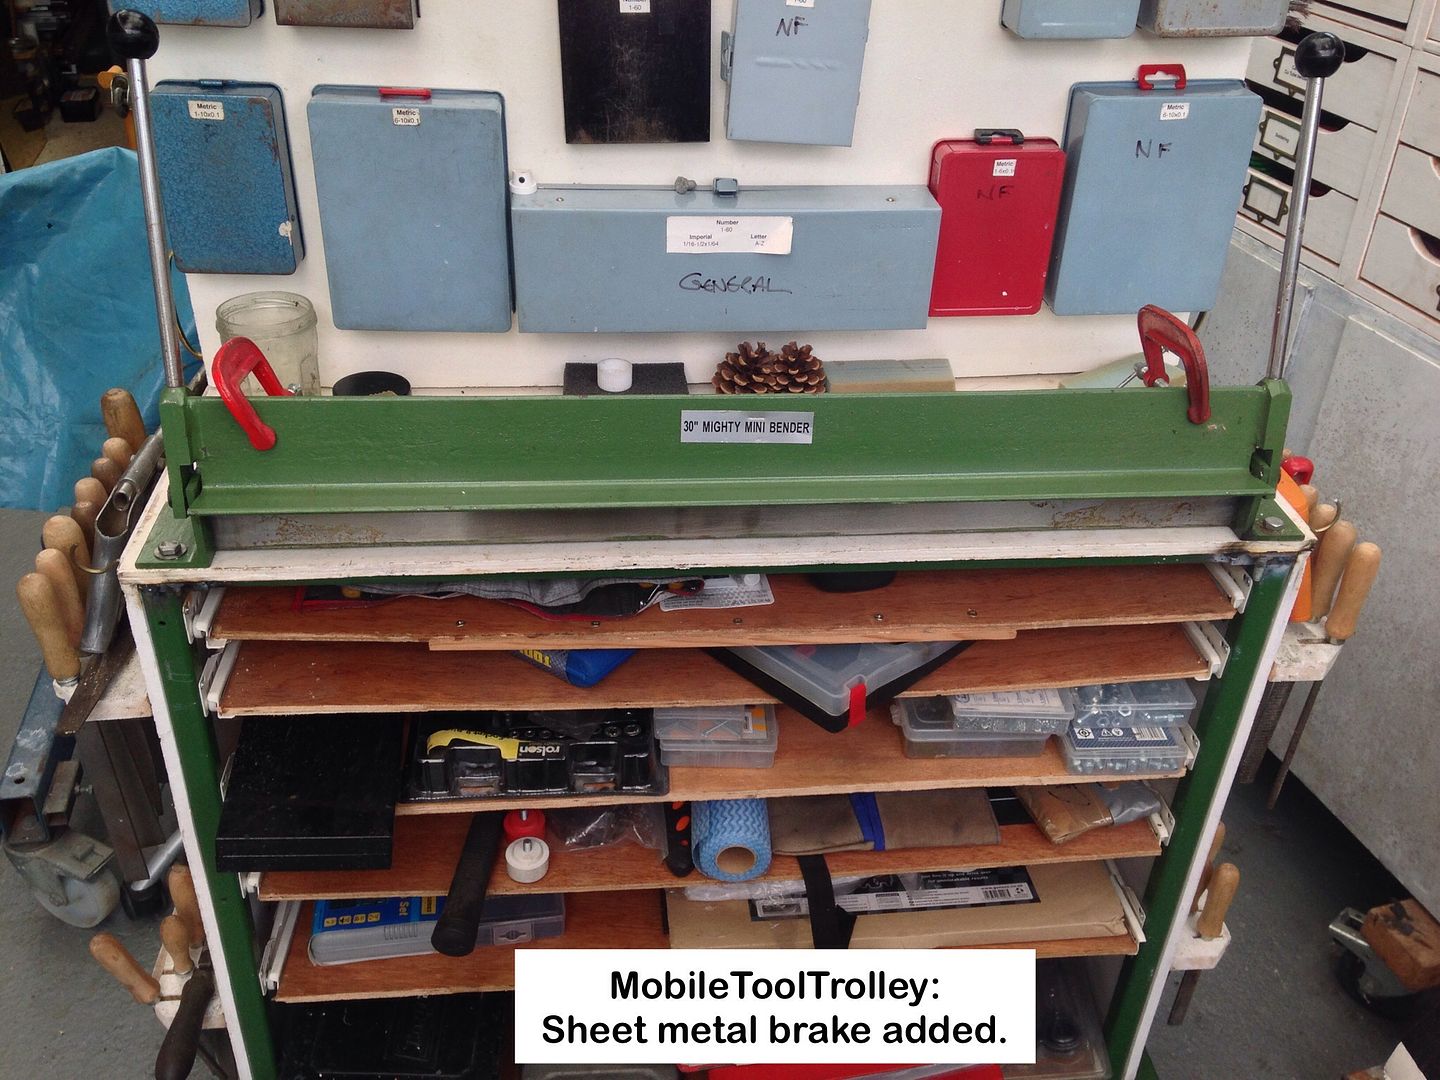
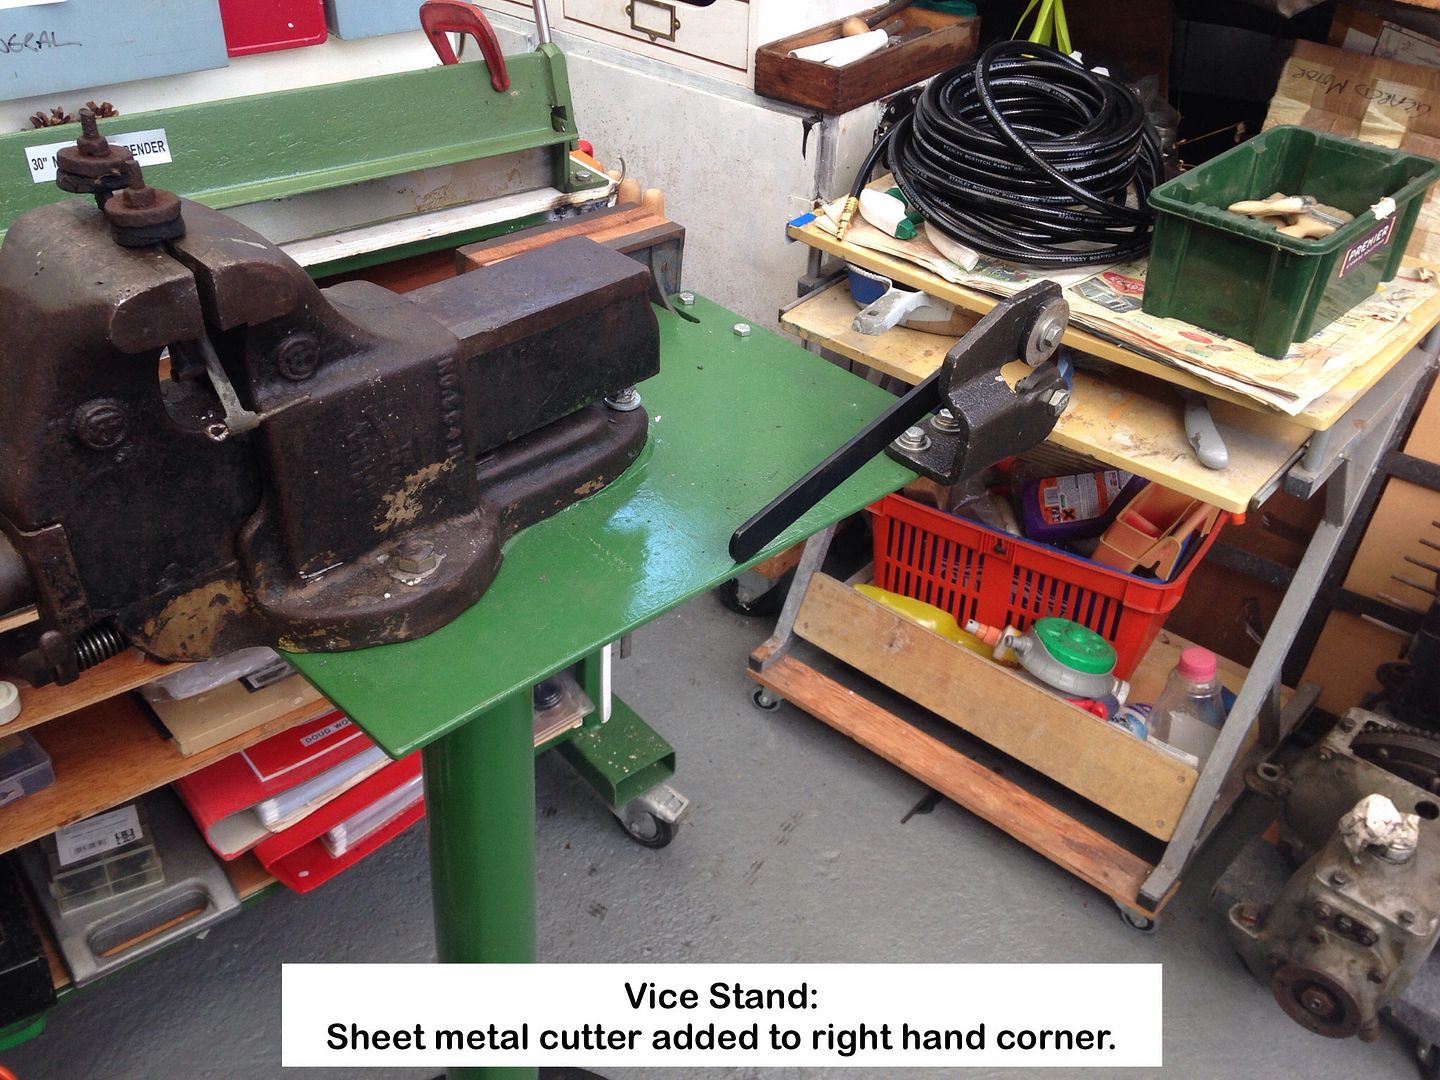
Geoff - Those two items held in the vice jaws should be familiar - quesses anyone?
Location: South Norfolk - Next to Suffolk
Geoff - Those two items held in the vice jaws should be familiar - quesses anyone?
These look like the door check/restraint arms.
Location: Saltdean, Brighton
Got it in one Gary 
I've been dosing them with penetrating fluid for a week now, but haven't put a spanner to work yet, but they look beyond salvage.
If so I will replace the threaded ends with brass rod, washers and nuts, then powder coat the steel section, but powder coat the whole lot if salvaged.
Geoff - Usual beverage time.
Location: South Norfolk - Next to Suffolk
Belated thanks Ruairidh, but I've managed to get them apart, after a couple of weeks squirting them with penetration fluid each day.
Just need to find suitable replacement rubbers.
Couldn't find mention on Tony's site though.
Update at last, but where the heck has the time gone 
The humidity has not been kind to me, so very little done on the car, except for strengthening the front end of the engine compartment, and finding rust in the NS A-post, just above where the bottom door hinge is bolted, so work needed there now.
If I get any terminology or descriptions of parts wrong, please correct me, as I know those with 'Ours' differ from the norm.
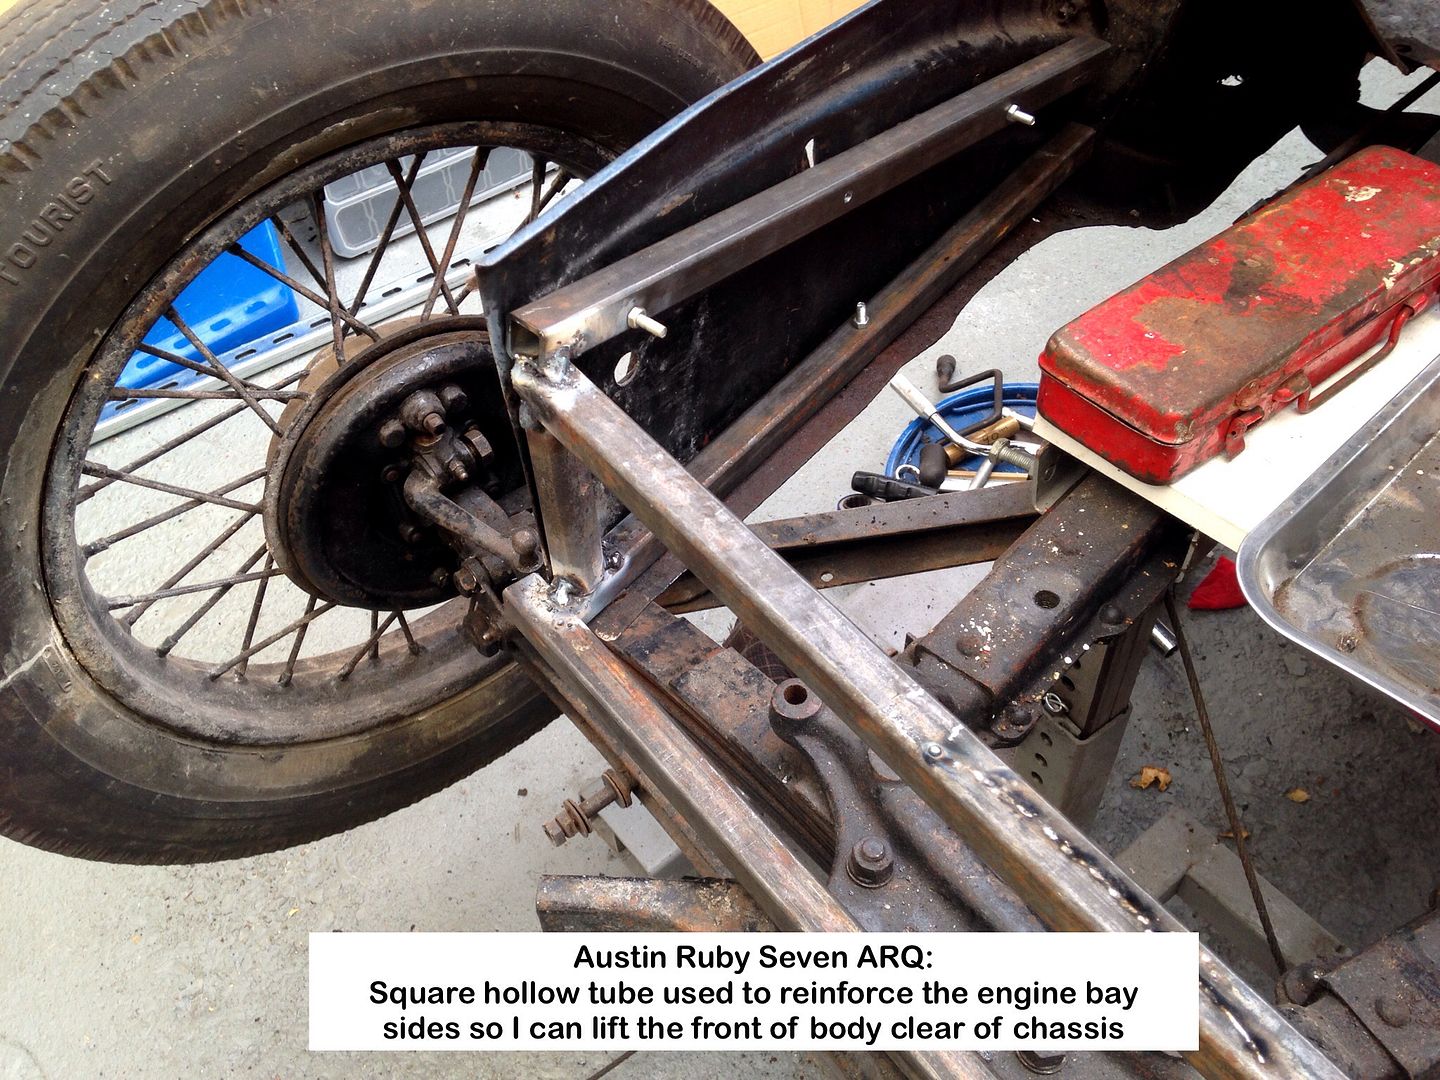
Engine bay reinforcement.
First thoughts about welding the tubes to he body:
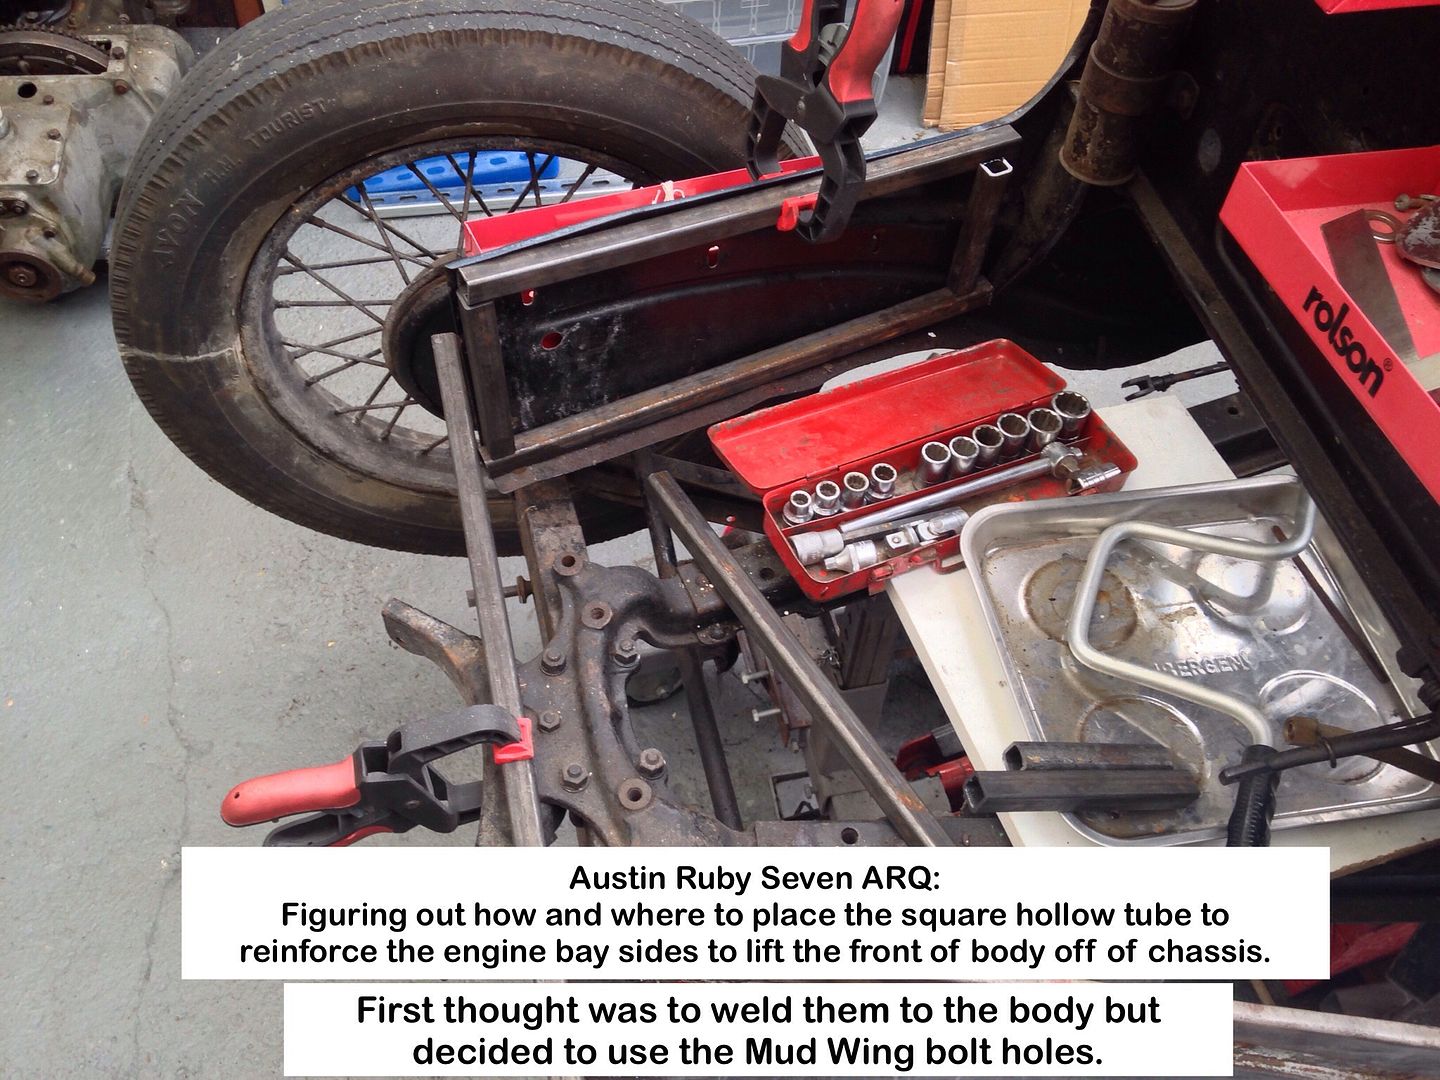
Final decision is to use the existing Mud Wing bolt holes:
NS A-post rust.
I just pushed the screwdriver through the metal it was so thin:
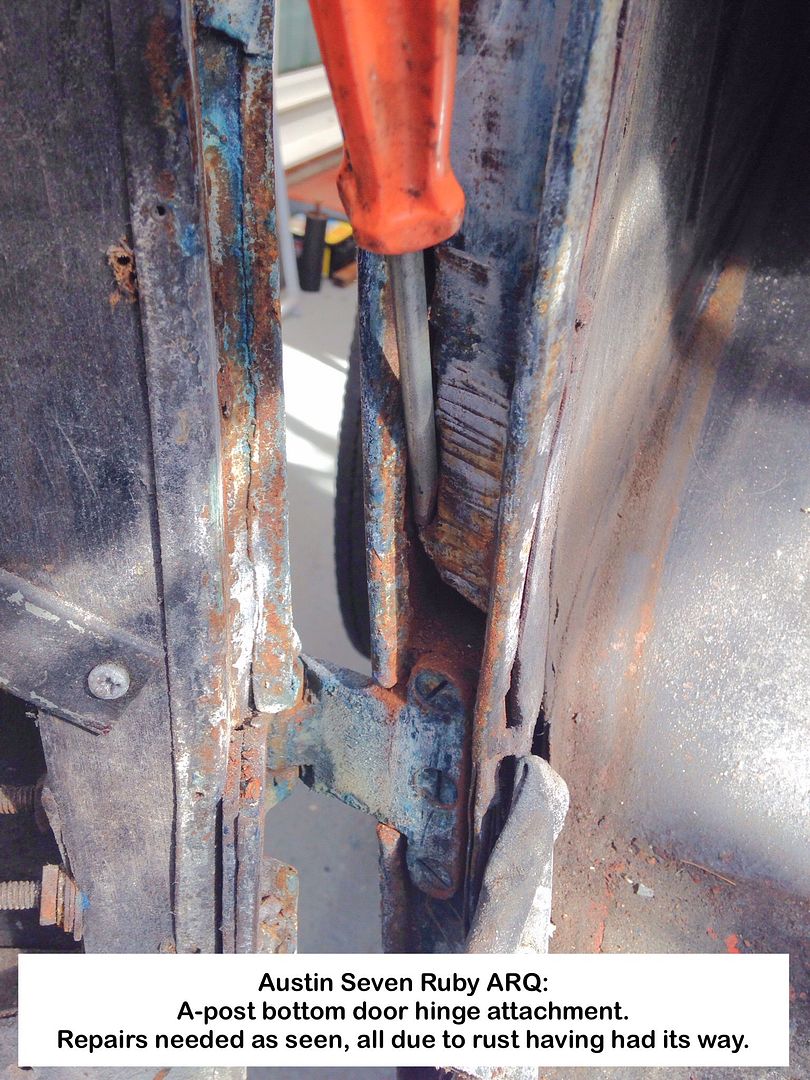
The heap of rust that I scraped out:
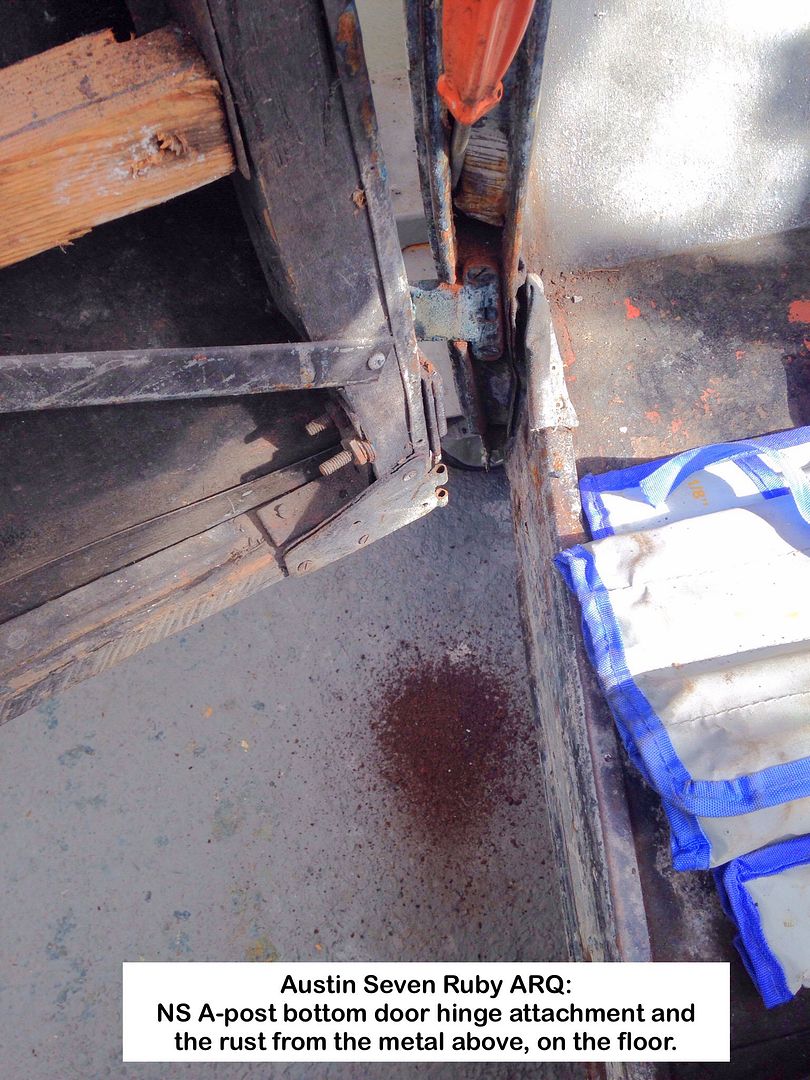
Both A-post interiors will need a good anti-rust seal applied.
Geoff - Carport is 30°+ and humid making it a No Go Area right now.
Location: South Norfolk - Next to Suffolk
Geoff, have you got the body off yet? When it is off you should find there is no need for those stiffening frames on the front panels. The whole body is light enough for two people to just lift and move around. I try to have 3 people, 2 to lift and one to put timbers/supports/trolley where it is needed. I have been known to turn it over on the trolley entirely on my own.
Not off yet Andrew.
Humidity has really floored me of late.
The reinforcing has been done, as I want to see if I can connect the rotisserie there, but will probably add diagonals just to be safe.
I've just about sorted out what to do at the rear, also for the rotisserie.
All this work is so that I can do the lot single handed as and when I want, and not rely too much on helpers.
I've tried heaving the front up, but it doesn't budge even though all securing bolts have been removed.
Block and tackle as soon as the Carport cools, or I will try in the evening.
Geoff - Independent old f@rt that I am 
Location: South Norfolk - Next to Suffolk
Geoff
I have been reading your thread from start to finish , my car is the same colour as yours and I have found that Oxford Blue is the nearest to original , I was lucky getting my body off (with steering column still on chassis ) I have a friend with a Hiab on his truck ,so no effort in removal , its going back on that way to !
Location: Dorchester
Nigel,
Thanks for the colour suggestion.
I bought Royal Blue from Craftmaster, It being the closest match I could find for the last factory? applied colour, but will have another look at their Oxford Blue now.
The multiple layers of those two blues on mine is confusing, the first being Oxford and the last Royal, but Mills' statement on page 55 making me decide.
I'm willing to be corrected though.
Reading my last post again, I may have given the wrong impression with regards to not appreciating help.
Not so, it's just that when I feel up to doing something, I have to do it on the day or loose that opportunity, as has happened far too many times since '07 when my treatment started.
Ashes retained
What is it with Umpires no longer calling 'No ball'
Technology making them lazy?
Geoff - Biscuit making morning 

Location: South Norfolk - Next to Suffolk
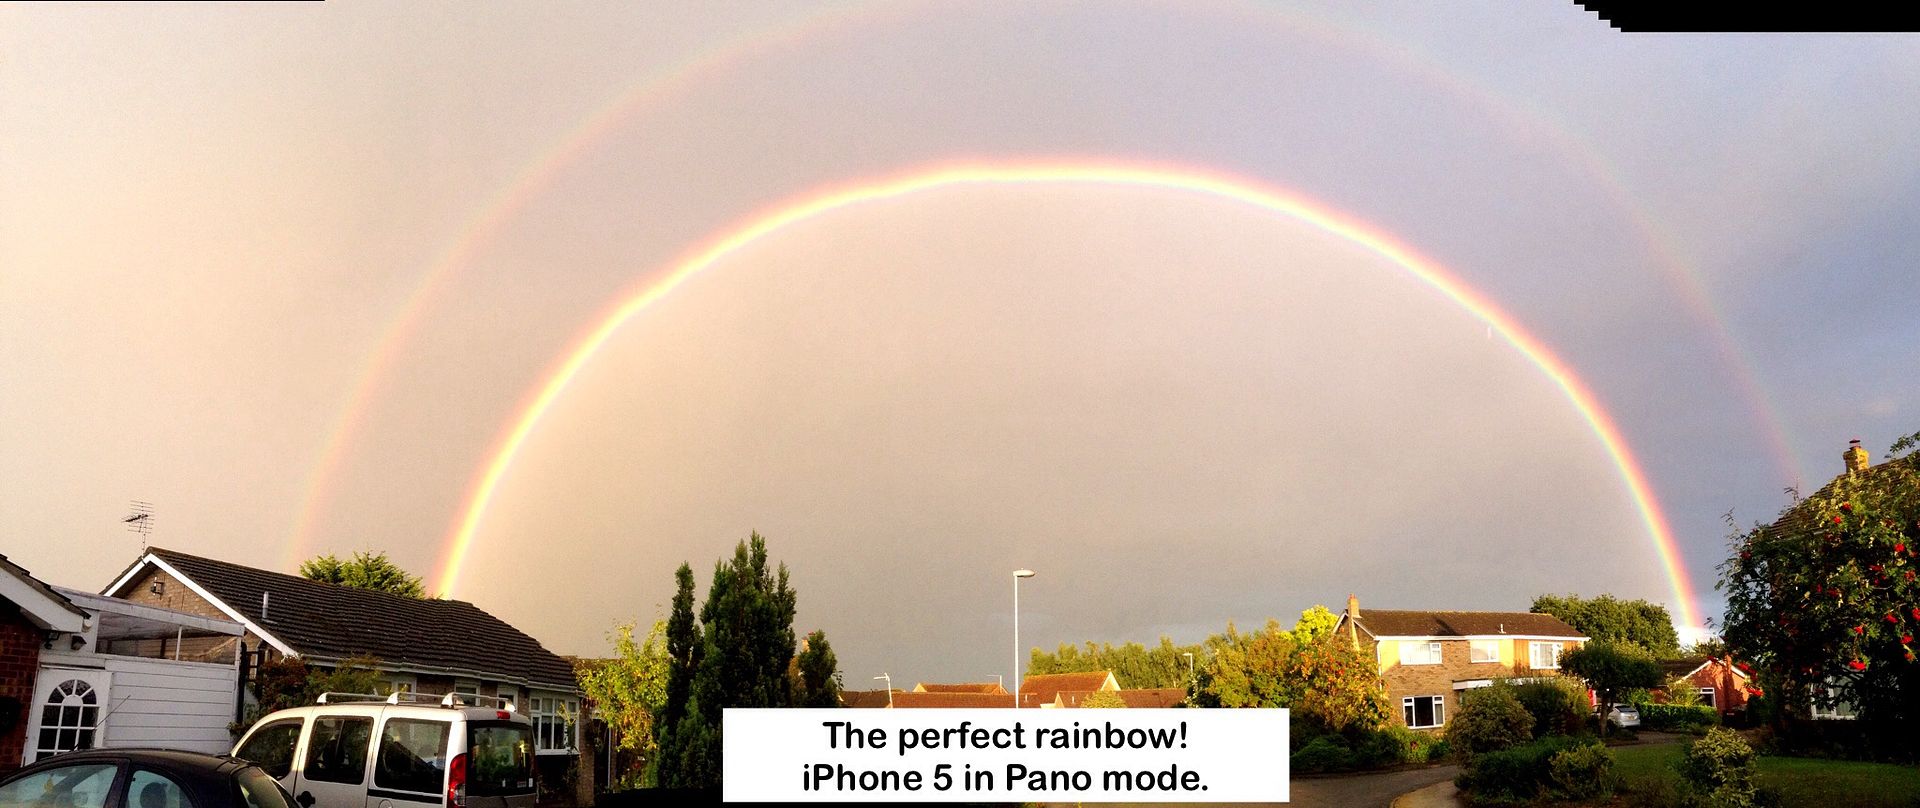
I've seen many, but normally from a distance and only partial ones.
Happened to me yesterday evening when I looked out the window at a passing rain shower and saw something that had be sprinting outside.
I grabbed the nearest camera to had, not wanting to miss what I had seen through the window.
The 'object' made me stare in wonder when I looked up and to the East when I got outside.
I couldn't quite believe what I was seeing and could only gape in wonder.
Photo does not do nature justice, and I wasn't taking the chance of getting my SLR, and then finding the marvel had gone.
A few photos taken, this being the best using iPhone 5 in Pano (Panoramic) mode.
Just had to post it.
Geoff - It made my year let alone day!
Location: South Norfolk - Next to Suffolk
Update at last.
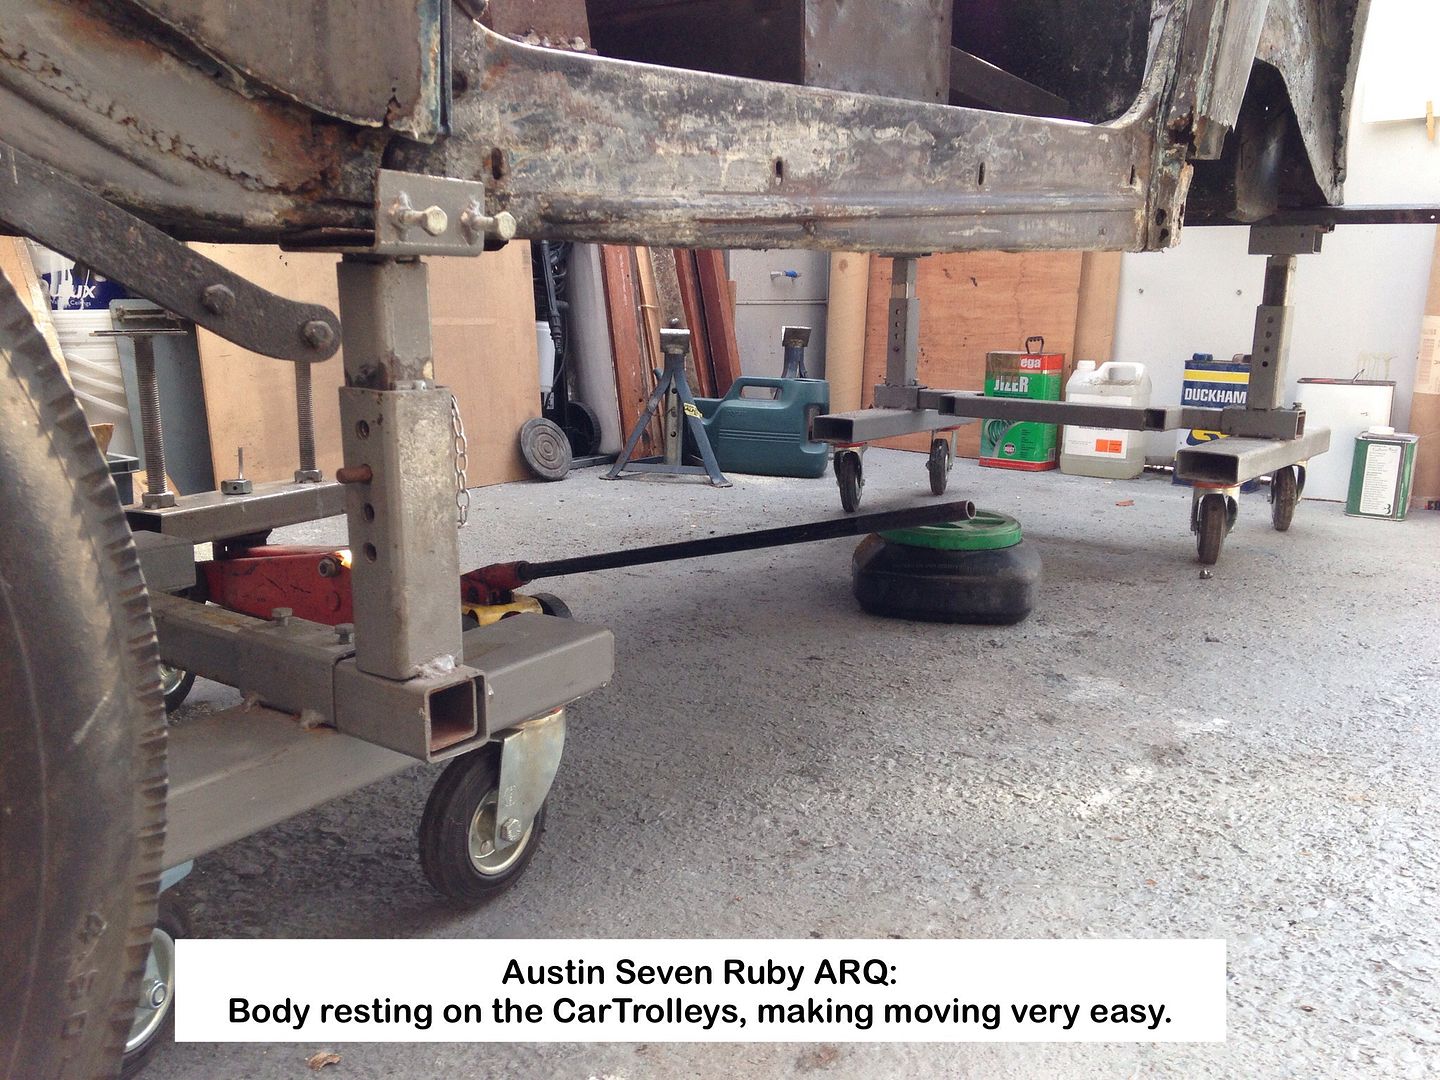
Need advise please on whether my solution on lifting the rear section of the body clear of the chassis and then resting it on the CarTrolley is adequate.
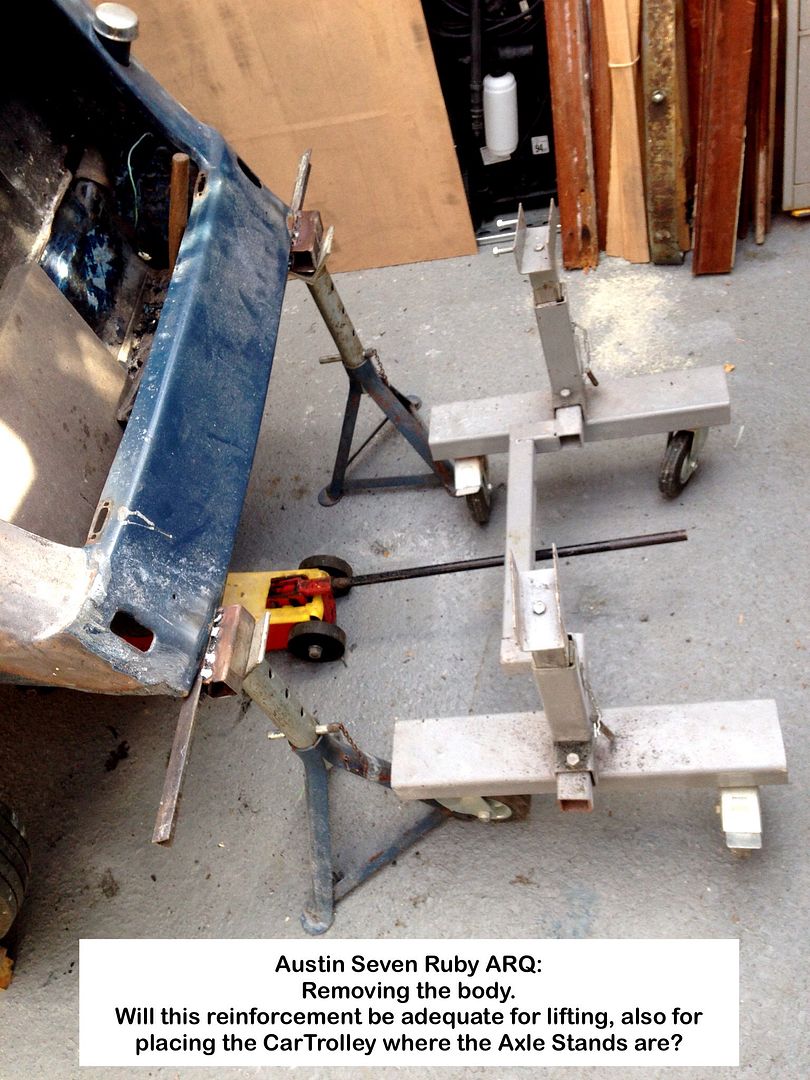
The L-iron is 1" and on the inside there is a length of 3/4" square tube bolted to it through the body.
Doing a trial lift yesterday, actually lowering the axle end of the chassis with the body supported as in photo, there where a couple of faint creaks but nothing went bang or buckle as the chassis came clear.
I did check the door gaps, but they where fine, but had an ' Oh f...k it!' moment, so got the lot secured and called it a day, to sort something out. Hopefully now done.
Will need to move the car back some in order to use the block & tackle to lift the front end clear, in order to place a cross bar resting on the other CarTrolley, then to lower the body onto it. Need to keep the front wheels connected so that I can push the chassis clear.
Geoff - Only now recovered from Monday's 0155h on off taxi duty delayed to 0700h due to Stansted luggage being 90min late!
Location: South Norfolk - Next to Suffolk
Geoff
Dont forget to remove the fuel filler from the fuel tank.
Location: Dorchester
Nigel,
Thanks for the heads-up
Luckily, however, as I was lowering the chassis, very slowly, movement of the fillet cap caught my eye, so I halted proceedings, and that was part of the 'Oh' moment I mentioned
Geoff - Need to do other things today, but filler tube off tomorrow with luck.
Location: South Norfolk - Next to Suffolk
Tom 'The Blacksmith' Boyd popped in on his way home from work on Tuesday evening, to give the Ruby and yours truly the once over.
When you meet someone for the first time, you know within seconds whether you like them or not, with Tom falling into the first category.
His eyes lit up when he saw the Ruby and was soon inspecting it, remarking that other than the bodges I had shown on the Forum, the bodywork was in fine fettle, expecting something much worse, so my posts may have given the wrong impression.
He shook his head at the inner wheel arch 'repairs' and just gaped at what had been done to the NS door bottom hinge attachment area.
The rear end reinforcement to help lift the body was passed as safe and strong enough.
Jacking the rear up, the short filler pipe with cap caught on the body and fell off, bracket with it, said bracket not bolted in place!
We then progressed to the front end, discussing the merits of single and double shocks, consensus being that double was better, something I had already decided on fitting.
I then mentioned that I intended to lower the Radius Arm Ball Flange and adding a Wedge between Chassis and springs in order to increase caster angle, something Tom said he hadn't been aware of.
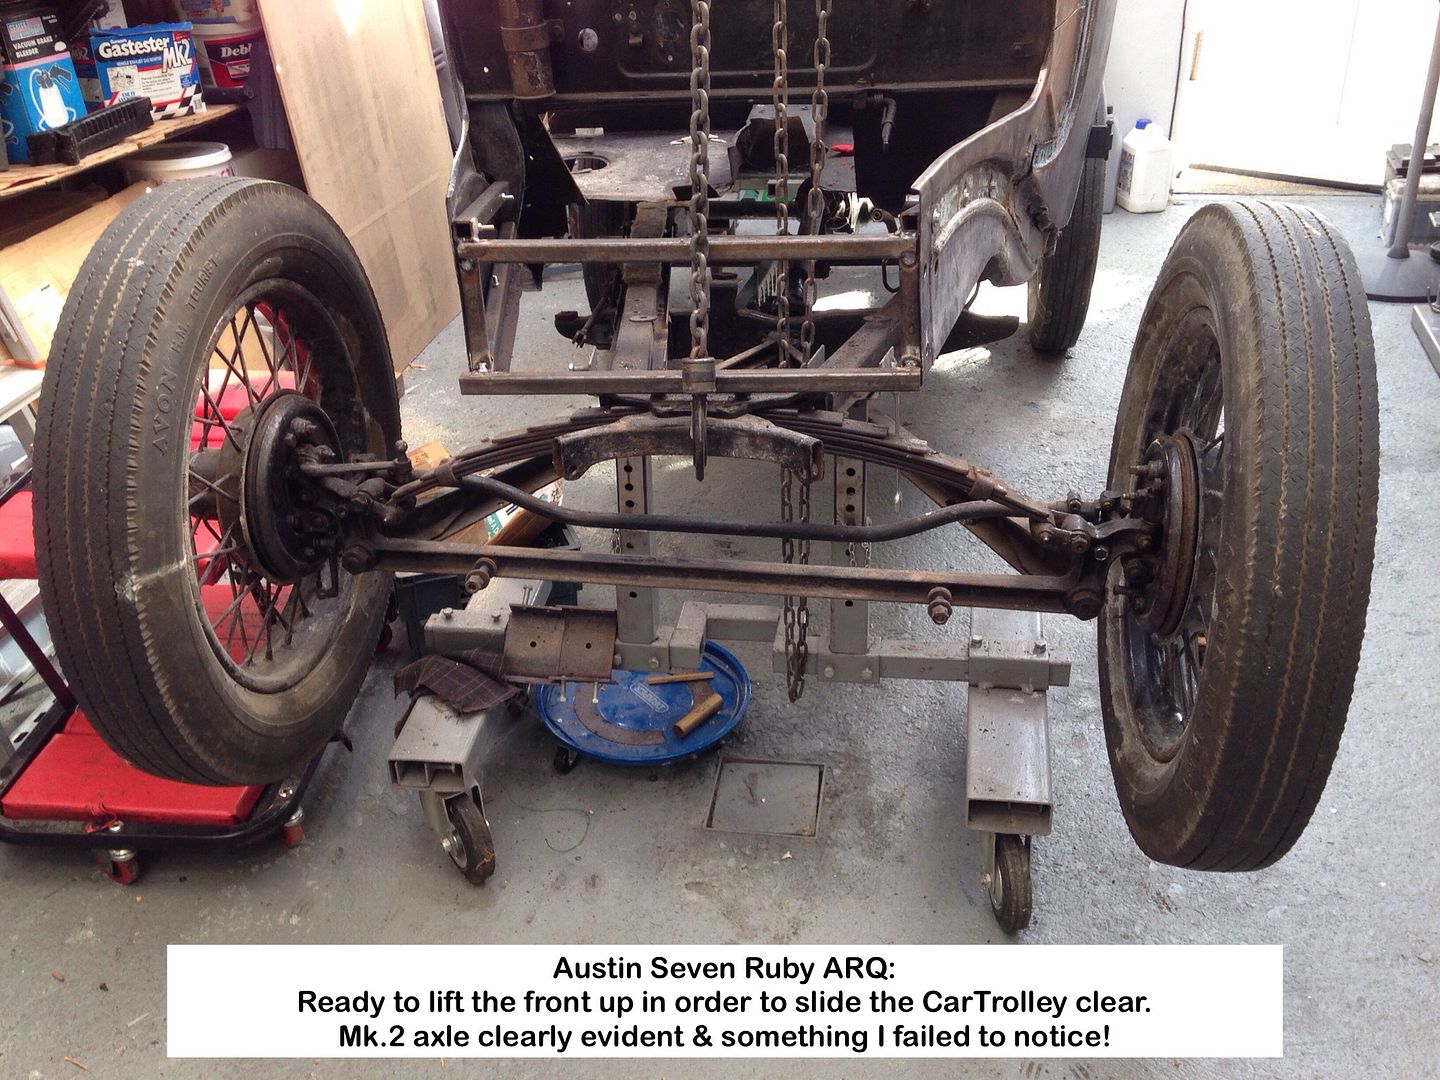
He then had a closer look at the front axle, and this is where I failed muster miserably!
"It's a later axle with stronger Radius Arms, and much sort after"
"What!" Said I, he then pointing out the extra top bolts on the Radius Arm Ends through the Axle.
 I just gaped like an idiot asking "How the h*ll could I have not noticed!?"
I could not believe it as, as I found out very early on that the Mk.2 axle was superior, and intended fitting one.
Reminds me of computer programming when you can stare for days straight at an error in the coding and neither see nor recognise the mistake, hence software causing computers to crash.
One reason the Ruby will have an MOT when finished, as a fresh pair of eyes will see things I don't, even though I consider myself competent, having built and raced my own car.
On asking if the 'cills' where strong enough to support the front of the body, Tom suggested that the cross tube support be placed across the body under the A-posts.
We then adjourned inside for coffee and a very pleasant chat.
Sorry about the coffee Tom, not my usual standard. Will be better next time.
He then kindly offered assistance whenever needed - Thanks Tom, much appreciated.
Nothing done yesterday, being one of my bad days.
 Cannot believe the progress I've made today, full details with photos soon.
So good in fact that at one point when 'Fox on the Run' by Sweet started playing, I just could not resist and started jiving! 
Geoff - On 
Location: South Norfolk - Next to Suffolk
Really good to meet you too Geoff and see the Ruby, I think you've got a very good starting point, far far better than the one we've been working on.
Don't apologise for the coffee, I thought it was good, don't often get the chance to have home roasted and ground coffee. I think I might have to start doing my own, nothing beats the smell of freshly ground coffee except maybe Castrol R, its a close call.
Give us a shout if you need a hand,
Tom
Location: Eye on the Norfolk / Suffolk border
Geoff - as a retired body-builder (amend that - motor body builder)and restorer I must congratulate you on one of the most comprehensive restoration "articles" I've seen - similar to Ruaridh's effort with his Chummy. I'm sure that for many years newcomers and long-time owners will be referring to it for guidance.
Re the paint/rust question, a general rule is that any non-gloss paint (etch, primer, undercoat) will absorb moisture (and you don't have to put the car out in the rain to find out). You can be confident that a final gloss paint will protect your car 'til you're no longer around, provided the base work is done properly. Of the two-pack primer, I know little as most owners go for a more conventional colour paint rather than have their Seven look over-restored.
Just be wary of treating Rinsey Mills as Gospel on all matters, as there are several errors in the book. I don't think Pale Blue body colour was standard, maybe an option for special order (and extra price). The Rubies were generally Royal Blue,Maroon, Westminster Green, Black or Ash Grey. Pearls were Cherry Red instead of Maroon, and didn't offer the Grey. What the various present-day paint manufacturers call Royal Blue these days is anybody's guess. (A bit like the changes to British Racing Green over the years). Good Luck and keep up the good work with your informative photos. Cheers, Bill in Oz

I've got agree with Bill, that this thread really is a great read Geoff and I'm sure it will be a form of reference for many more Ruby restorers in the future.
Bill mentions two pack and of course he is absolutely right, iuf you use two pack top coat, you've really got to knock it back to ensure the car doesn't look over restored, however, two pack primer is in my opinion a great idea as it is far more durable and today you can buy DTM (direct to metal) primers that double up as an etch primer and a primer filler.
As with all painting these days, I don't get a bucket of water or a sponge anywhere near the car until the topcoat is applied and dried!
Location: Near Bicester.
Thanks Ivor. In case anyone misinterprets my list of paint colours (above), Pearls were Royal Blue, Cherry Red, Westminster Green, Black, not just Cherry Red ! Cheers, Bill in Oz
Thanks for the compliments.
DTM paint is new to me Ivor and being water based should be a doddle to use, says he with confidence 
Will have to try some out.
I have a tin of Jotamastic 87 Aluminium, to paint the Rubt Chassis and undersides of the other two Classics.
Geoff - Write-up of the last two days to follow.
Edit:
Just realised that Jotamastic IS a DTM paint.
Geoff - Memory memory memory
Location: South Norfolk - Next to Suffolk
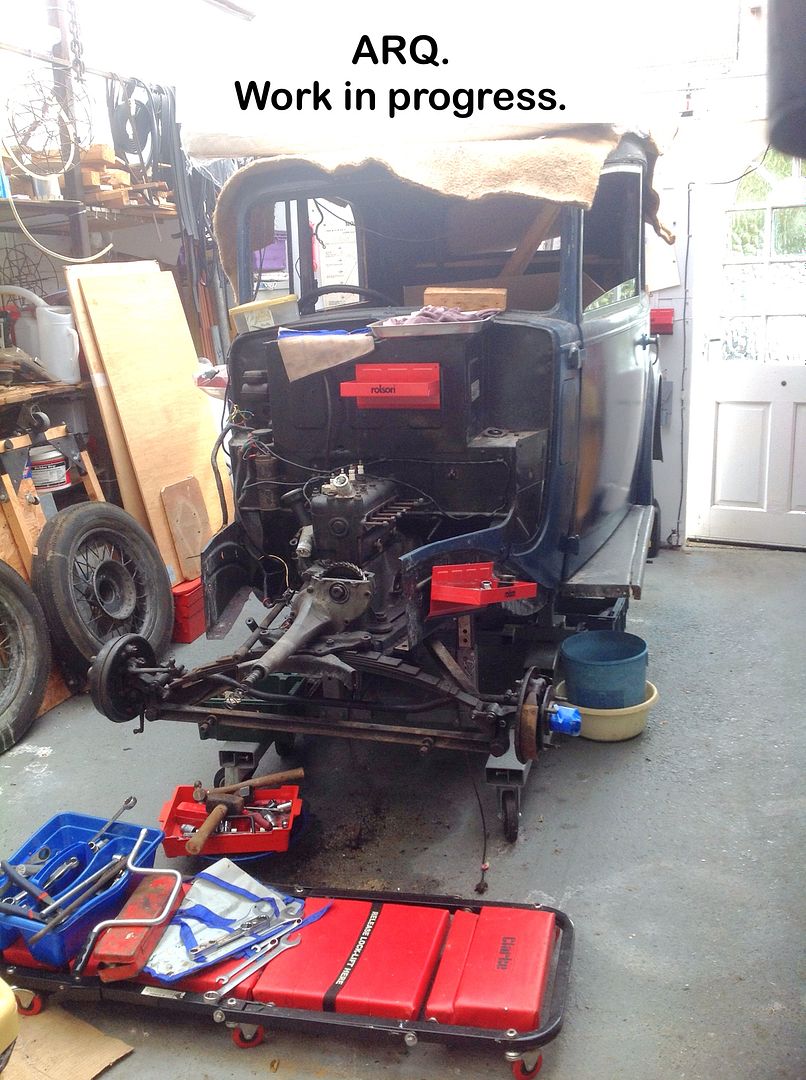
IT'S OFF!
Ruby Body that is.
Thursday 10th September 2015
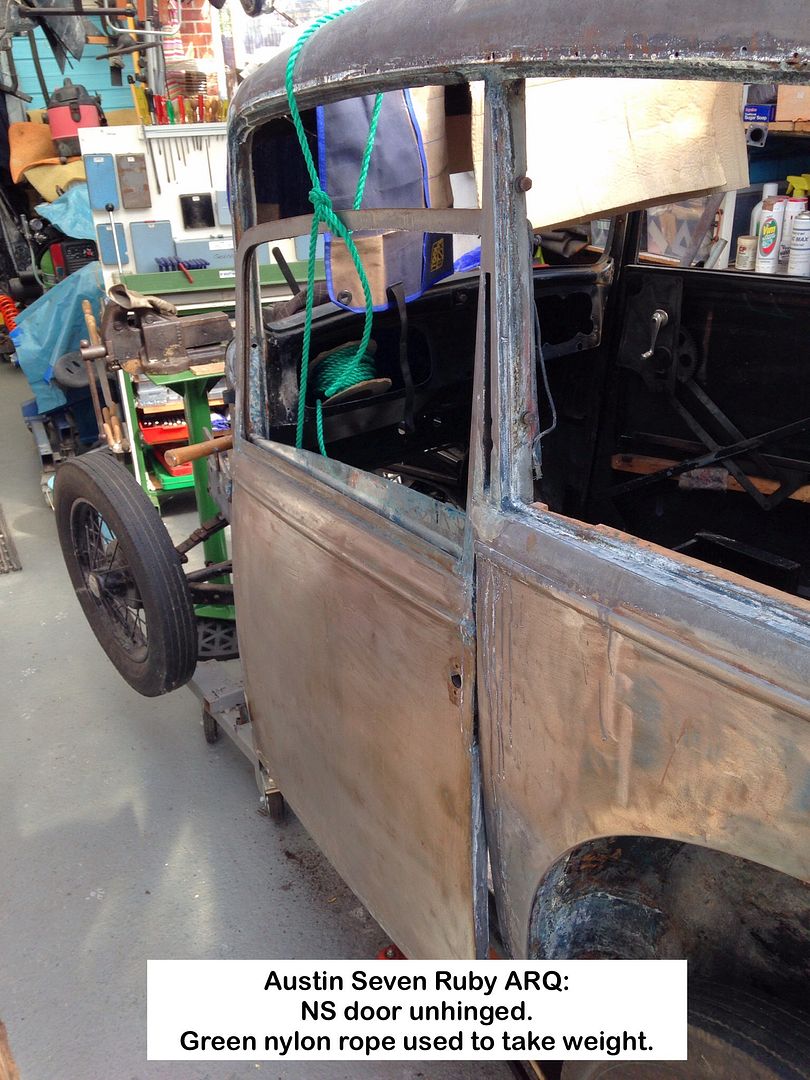
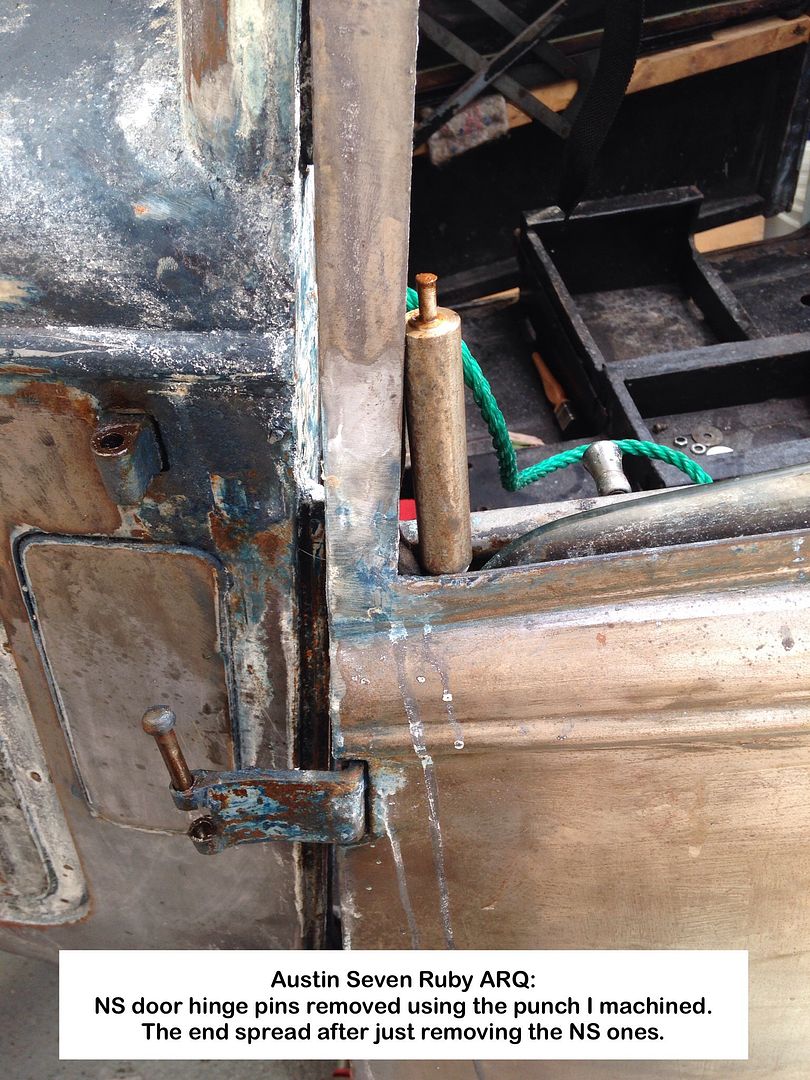
Doors off to lighten the body.
Had to machine a punch to knock the hinge pins out.
Used some nylon rope as a sling over the body to stabilise the doors as the pins came out, spraying penetrating oil onto them first.
NS bottom one really was tight and needed the use of a club hammer. It was oversize, so no doubt the original had worn
Top was standard 1/4" but only slightly easier to punch out.
The rope helped and door was soon on the floor
OS was much easier as pins where standard 1/4"Ø
Doors soon out the way, ready to put into the Ruby's interior once it's outside.
First door off:
Special punch:
Had a look at the bottom of the A-post where Tom said I should put the CarTrolley cross shaft, and saw that the brake pivot shaft adjustment was in the way, but will disconnect the rear brake cable and it may be able to swing it out the way.
If not then soon fixed by welding a bit of sq tube onto the CarTrolley cross shaft.
No need as the shaft is attached to the Chassis stupid!
Time to lower the Chassis so pumped tyres up and jacked the rear up, CarTrolley into position and lowered the body with the L-iron bracing onto the CTUprights and nothing seemed to break so jacked the rear axle up a little and placed axle stands under it then lowered the axle onto the stands.
Off came the TrolleyJackExtension (TJE) and a piece of wood, with hollowed out centre for the Diff plug to clear, placed on the Jack & up went the rear axle and out came the stands, and Chassis lowered until the tyres where on the floor, a few squeaks as the filler pipe scraped the body and petrol tank complained.
Then TJE back in place to get the back as high as possible to see if I can get the body clear of the rear wheels, but still not high enough, so will have to jiggle the Chassis for the wheels to clear.
Rear done.
Front end now.
Used the block & tackle to lift the front of chassis and body up so that I could pull the CT out, then slowly down till the tyres where on the floor, then hooked onto the engine bay bracing I added earlier and slowly lifted & as I did so the body started moving backwards without any complaints, so continued lifting until nearly level.
Now time to see if I have room to wheel the Chassis clear of the Body but as expected found that I needed to move the MobileToolTrolley (MTT) into the Workshop to make space.
Front end up:
Started pulling the Chassis clear and the rear tyres caught on the wheel arches.
Tried to heave the Chassis sideways but tyre grip too high, and I'm no longer as macho as I was, or think I was, so just pushed the rear of the body sideways and that allowed the NS wheel to clear with the OS wheel under the body.
Soon had the Chassis as far forward as possible, the Welding Table in the way.
Soon pushed the body backwards as far as possible and lowered the front and it cleared the petrol tank, but still hooked to the Block & Tackle.
Chassis clear of Body:
Had a good look at the bottom of the A-posts and there was of course no obstruction now of course.
Cut a length of 34" sq tube and realised that I could use clamps to hold the tube to the Cill using two small G-clamps.
Tube in place and front end lowered and just need to lower the rear as far as possible.
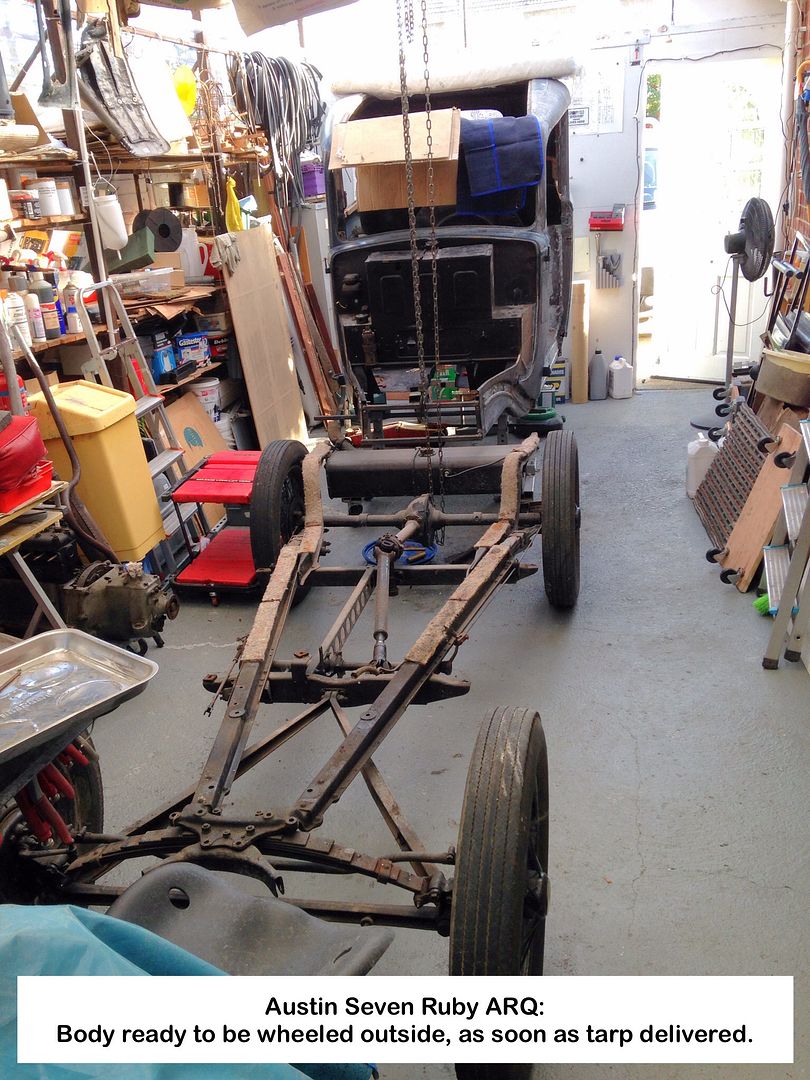
Finish tomorrow and see if the old Carport 'Door' tarp will cover the body & if not order a new one.
As I got the body clear of the Chassis, 'Fox on the Run' by Sweet started playing and I just could not resist doing what I did way back then - boogieing/jiving
Later that night had a thought so out to check and realised that I didn't need the cross tube as the channel sections at the top of the CTUprights would do the job by fitting round the Cills.
Friday 11th September 2015
Removed the cross bar and did what I thought about last night, moving the CTUs outboard and casters inboard.
The Upright channel sections fitted perfectly. Placed pieces of flat steel over their hold down bolts so as not to create a stress area.
Pulled the car as far forward as possible but not enough space at the rear to use the TrolleyJack with Extension.
Swivelled the front of the car towards the East and it nearly tipped over!
Ffs what's happened!?
Went to the rear and found the OS CTUpright was clear of the L-iron!
No doubt the driveway was the problem, it having slopes aimed at the centre drain hole.
Swung the rear towards the Side Door, being very very careful.
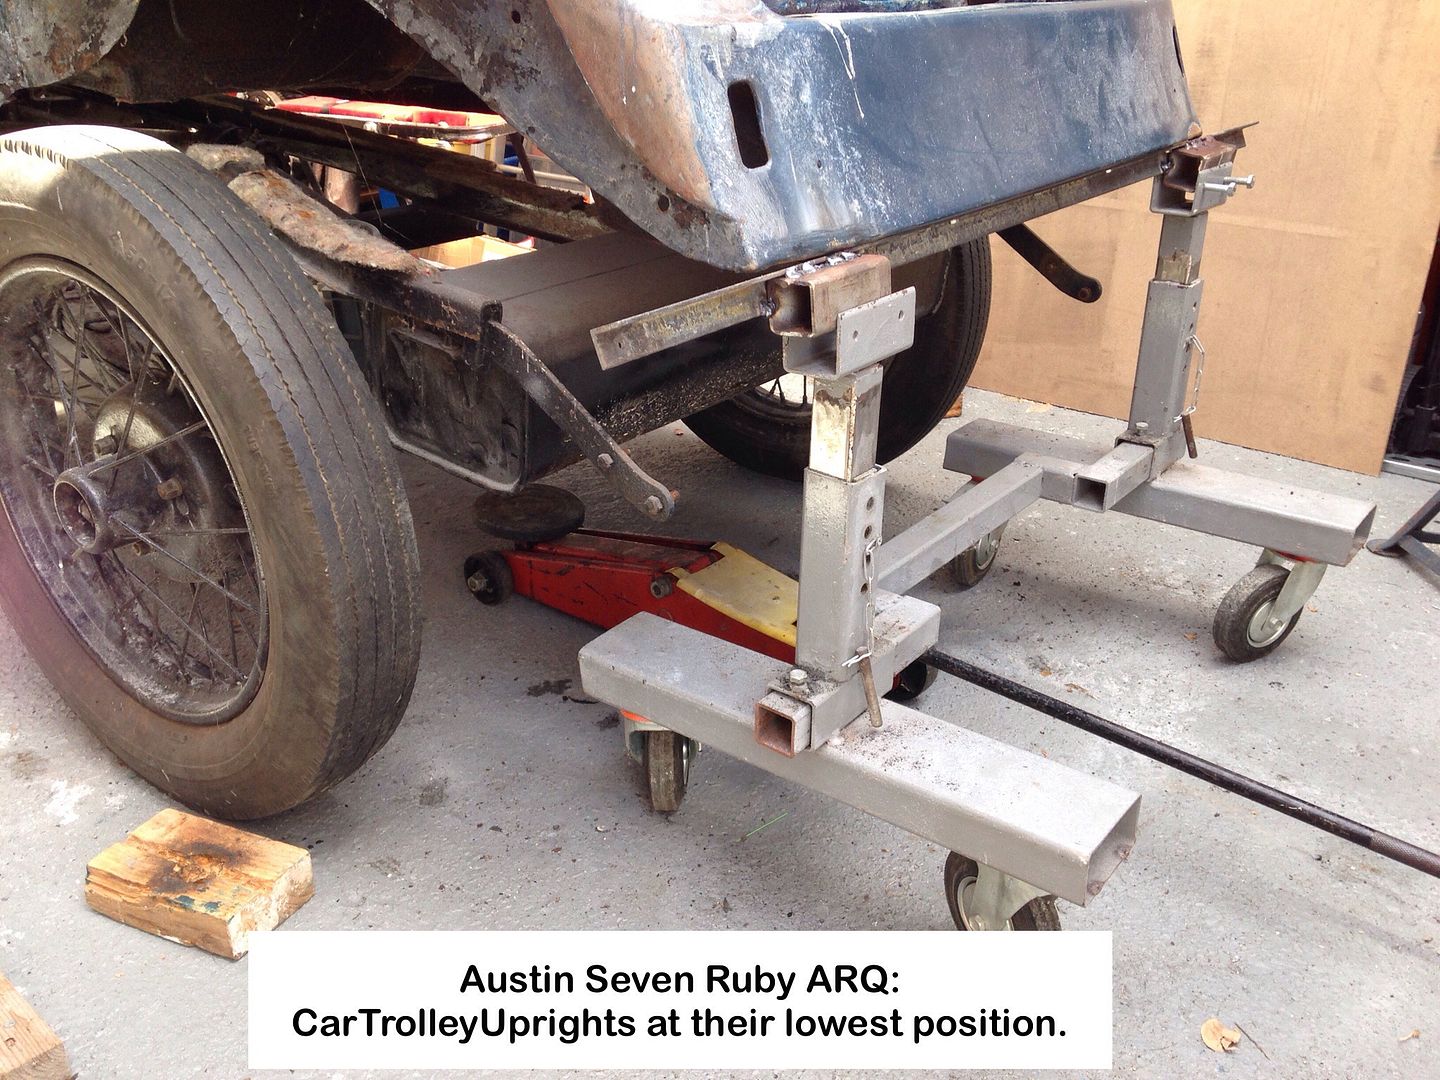
Opened the door to allow the TJ handle space then jacked the rear up as previously and dropped the CTUs to their lowest position and lowered the car but had to raise the OS CTU one notch before the L-iron rested on it, but will keep checking when the car is pushed outside onto the flat paving.
Got an old clear tarp out and draped it over the Ruby, but as I thought it was too small and torn in places, so ordered a bigger one off of eBay for delivery on Tuesday.
Body ready to roll out of the Carport:
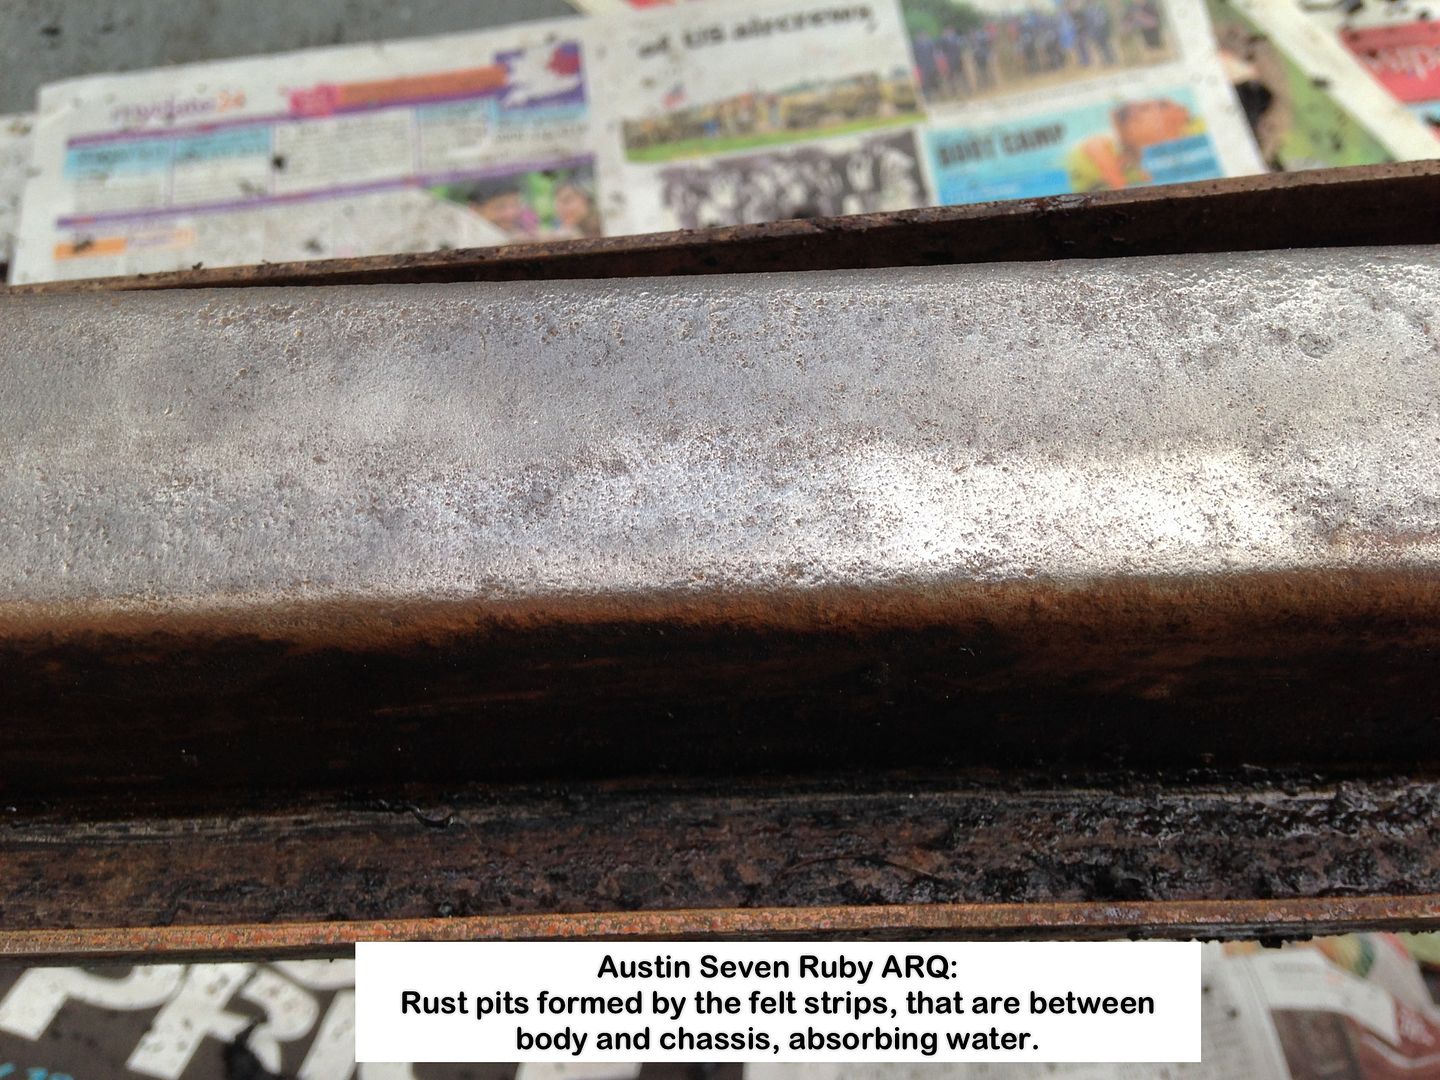
A quick look at the Chassis and it appears totally unmolested with only a few spots of rust and they are under the felt strips, so these either need replacing with non-absorbent equivalent or impregnate with lard.
I haven't as yet set up for video recording, but WILL have by the time I start on the Chassis.
Hope above 'Words and Music' are clear, but will gladly answer any queries.
Now champing at the bit to start on the Chassis, but whilst waiting for the tarp will use the time to catch up on some of the sideline projects I've ignored.
Geoff - Couldn't believe how well it went!
Edit:
Forgot to mention more photos here
Location: South Norfolk - Next to Suffolk
Hat off to you sir! Glad it went so well, not the most straight forward thing to do on your own.
Location: Eye on the Norfolk / Suffolk border
Geoff - You mentioned felt strips on the chassis. Don't replace them, as felt absorbs and retains any wetness encountered. Replace with rubber strips about 2" wide. In this country one can buy rolls of 1/8" thick rubber and which are self-adhesive. Apart from the anti-rust part of the story, you'll appreciate that when they're stuck down they don't wander around or fall off like felt does when mounting the body again. Hopefully you can purchase this rubber in UK. Best of Luck, Cheers, Bill in Oz
Thanks Tom.
It went far far better and easier than I was expecting, no doubt due to the months spent thinking it through.
Moral has to be 'Think a lot, do once'. 
Bill,
You've convinced me to bin the felt, thanks.
Was undecided, felt or rubber, but rubber it will be.
Thinking ahead now on getting the body back onto the Chassis, I will make up a threaded spike to screw into one of the rear Chassis holes and use it to swivel the body around, which should make it easier to get the other holes ligned up, then unscrew it.
Not sure about that exercise being done single handed though, but watch this space
Captive nuts where needed are a must, after what I went through.
Got a surprise mid-day yesterday, Tarp delivered!
Time to roll the body out so phoned family member and he was soon over, and we gently pushed the body out.
Another surprise at how easy and smooth it went - I could have done it by myself, but didn't fancy taking that chance.
Locked the casters down and unfurled the tarp, but somehow I got measurements all cocked-up as it was way way too large
I did measure three  times as well
Tucked as much of it out of the way as I could, yes it was that large, and bound it up tight using nylon string.
Chassis in its Birthday Suite:

Looks good.
Geoff - Making tweezers for the RSU today.
Location: South Norfolk - Next to Suffolk
Geoff, well done for getting the body off. I took mine off very easily just lifting it by hand, but 25 years on, the body is still off. Work is still progressing and it might well go back on during 2016.
Hi Geoff,
If you do decide to use rubber instead of felt I would recommend you go and see the people at Walker Rubber on Sweetbriar Ind. Estate, Norwich. If it's rubber you want they sell it, and if its unavailable extrusion they will make it if your up for the tool cost. You can buy adhesive backed closed cell rubber in varying thicknesses off a roll and they will cut it into strips for you.
I have nothing to do with the firm other than being a very happy customer.
Tom
Location: Eye on the Norfolk / Suffolk border
Being much lazier than Ruairidh, rather than soak felt in waxoil I have used Denso tape between chassis and body. It is early years yet to report on its effectiveness but I am optimistic.
Regards, Stuart
Thanks again for the comments and suggestions.
Herewith photos of the Torque Tube before I gave it a clean.
There is absolutely no adjustment left, but worst of all, the Adjusting Nut bolts are AWOL, indicating that that nut is tight up against the socket.
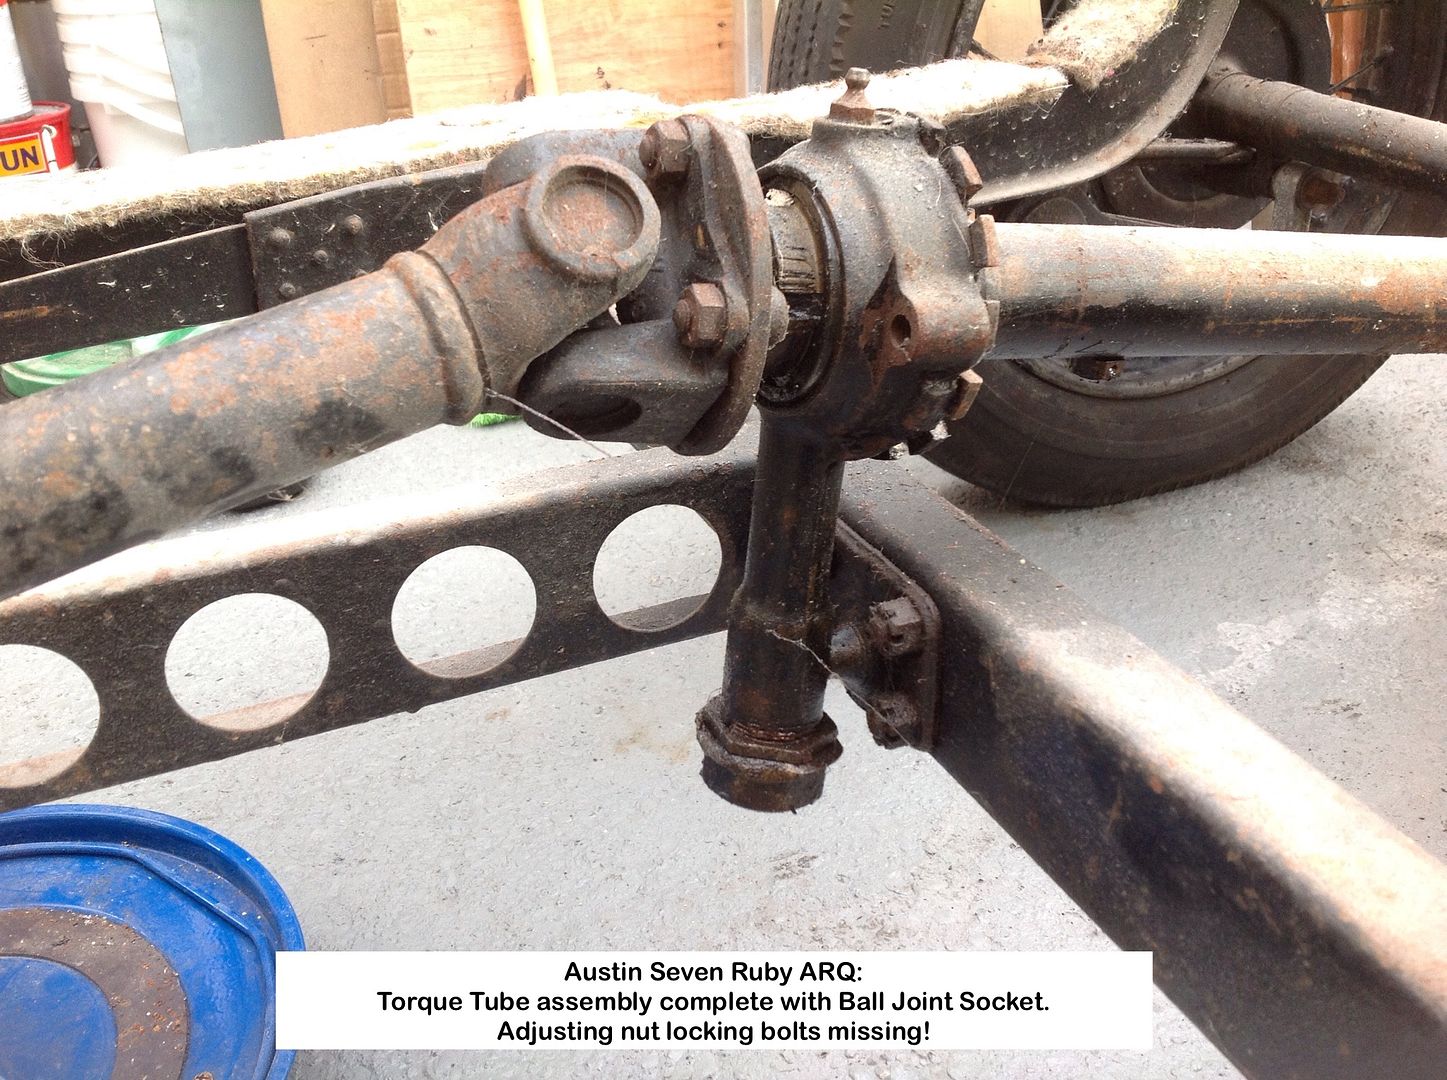
All adjustment taken up:
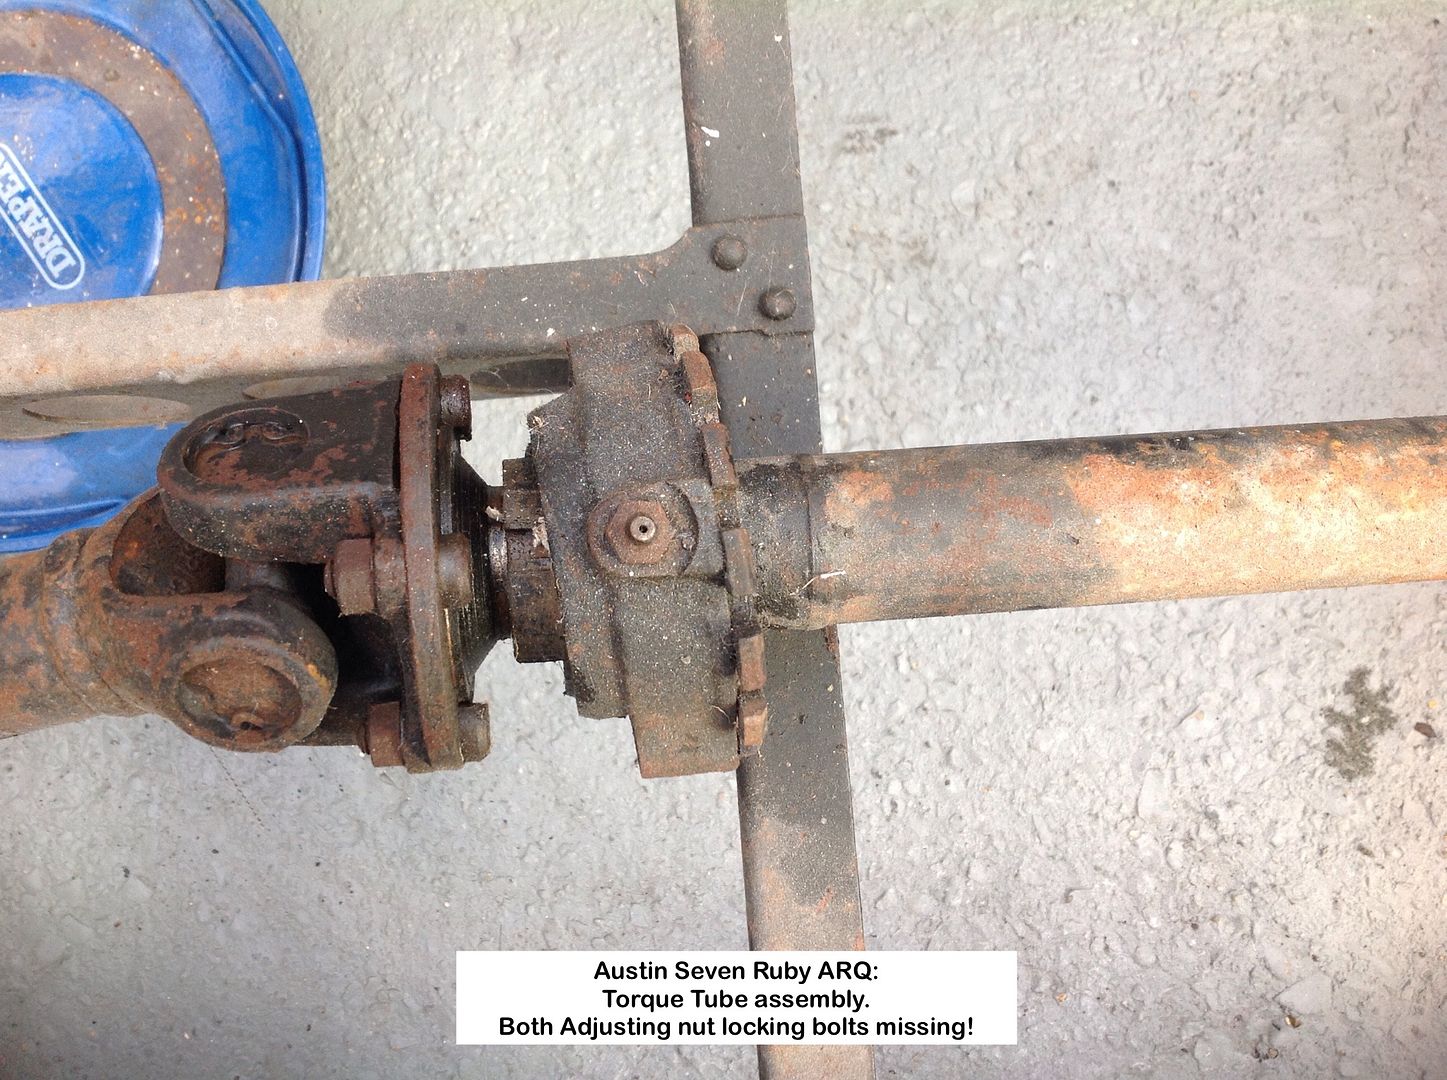
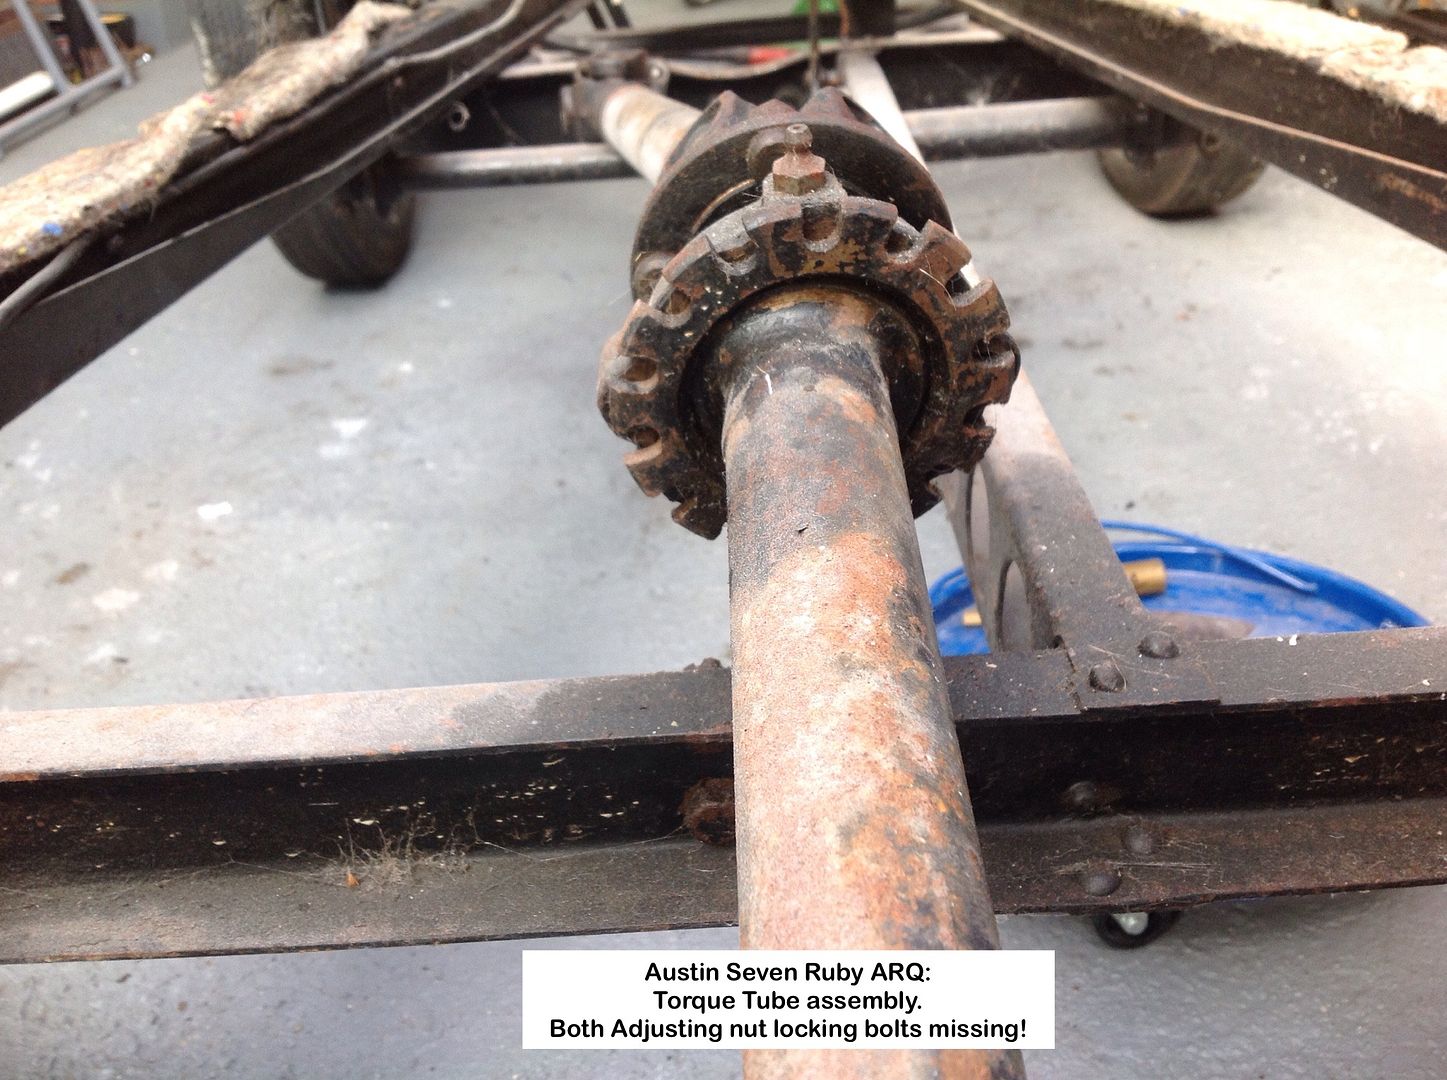
How easy is it to get a gun to that nipple?
I'm now at a total loss as to what to do next with this assembly 
Geoff - Heeelp!
Location: South Norfolk - Next to Suffolk
Correct Ivor.
See my response to Ian's post to my duplicate question in Torque Tube adjustment collar thread.
Geoff - Oh for being 20years younger.
Location: South Norfolk - Next to Suffolk
Previous restorers have made my blood boil with things they have done, resulting in the use of language of a matelot, something I'm particularly adept at, being ex-navy.
This one, however, takes the cake, and makes me wish most ardently/fervently that I could meet the one who decided that what they did was 'good', as I would hand him the 'Moron of the Decade' award.
Not content in using whatever bolts and nuts that came to hand, inch and metric on the body parts, this just beggars belief!
The photo shows what was used with one of the fuel line clips, all the others passing muster.
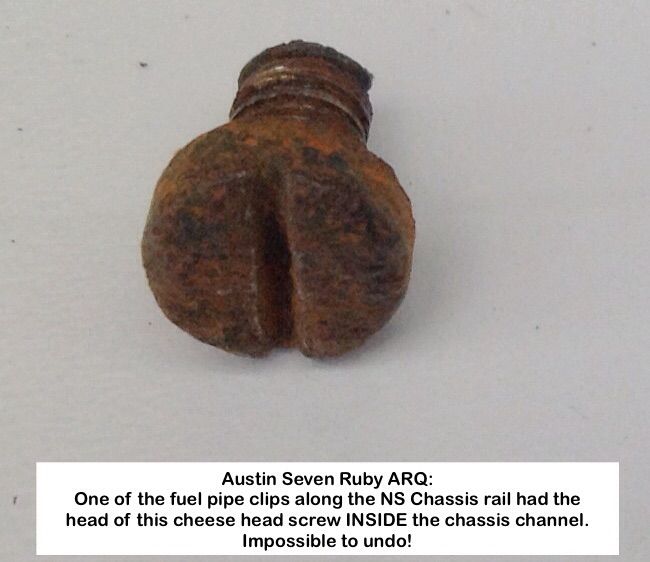
Geoff - To describe the air blue doesn't do justice to how I reacted.
Location: South Norfolk - Next to Suffolk
Yesterday finished making a copy of the upholstery patterns Colin kindly loaned me.
Had to wait for delivery of tracing paper I thought I had.
That remark reminds me of what Thought did.
Any takers?
Made a start but soon realised this was not one:
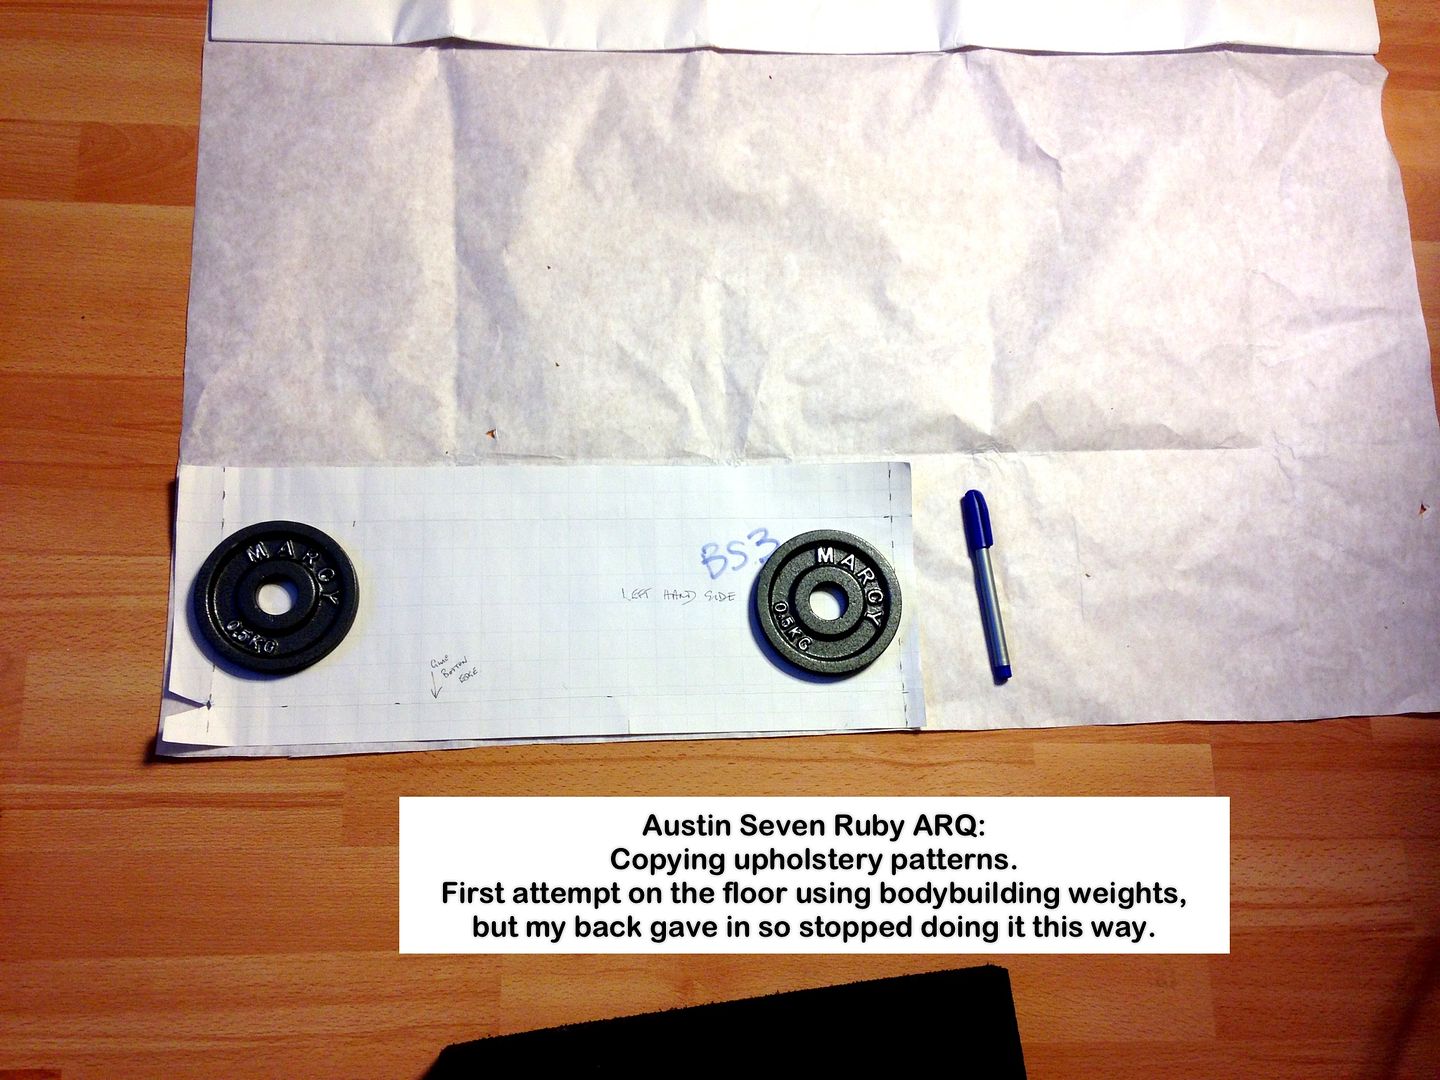
So did the sensible thing:
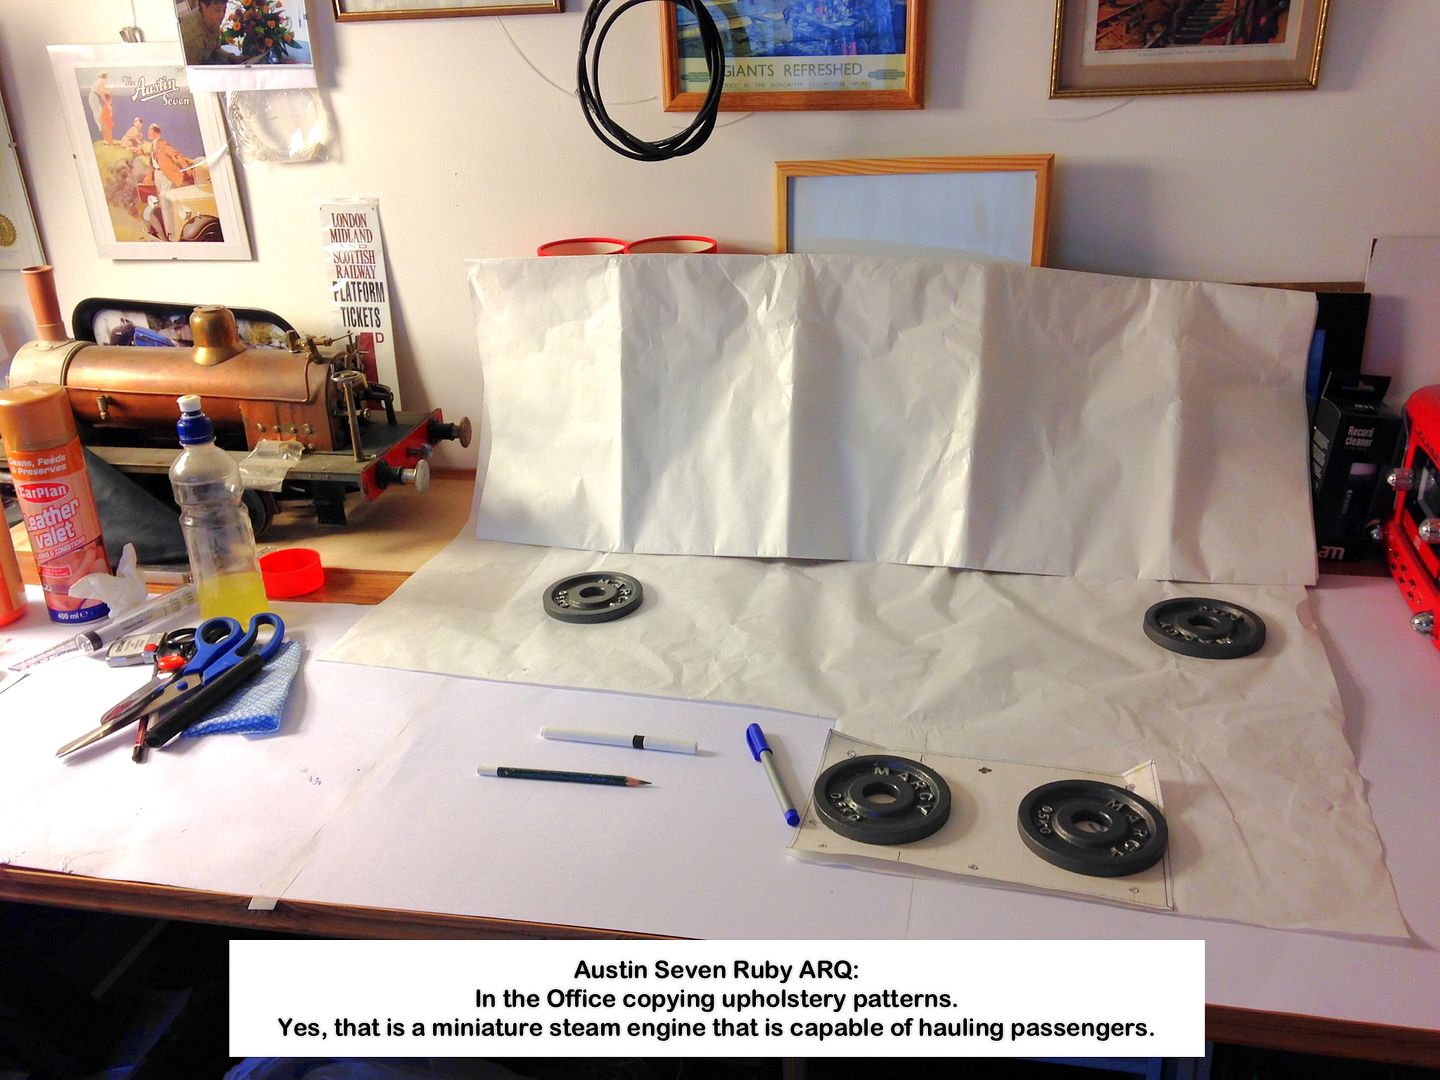
Have just made a pair of tweezers for my RSU that makes soldering of small parts a pleasure, as I found out whilst experimenting soldering wires to small DIN plugs and sockets. I gave up before as I kept melting the plastic that holds the pins, using normal soldering irons. Bliss!
Will use the tweezers IF I decide to solder and crimp when I do the re-wiring on the Ruby.
iOS9 has sent my iPad3 into a coma, so using iPad1.
Geoff - Apple doing its utmost to beat the Redmond company, at what it has excelled at.
Location: South Norfolk - Next to Suffolk
Apologies to those whom I promised that I was going to update my Thread last Sunday.
It didn't happen.
Been busy stripping the paint from the chassis the last two weeks, and not feeling up to doing anything else at the end of each day.
I have, however, updated mt Photobucket folder as to progress.
More details to follow when I'm up to it.
One thing that really made me use my Navy language, and something all you 'The Austin' officianados may be able to shed light on was the following:
All the fuel pipe clips where held in place by cheesehead screws, with the heads INSIDE the chassis, thus making it nigh on impossible stopping them from turning when attempting to loosen the nut, unless you possessed one of those special screwdrivers, one of which I have but cannot find.
Luckily I only one needs the attention on the L-grinder.
Did contemplate using Rivnuts, but I can only source metric so that's a no-no, did consider tapping the holes, but haven't decided yet
Proper 2BA hex bolts I do have so will no doubt use them.
Came across a few things that made me shake my head, all to be detailed at the proper update.
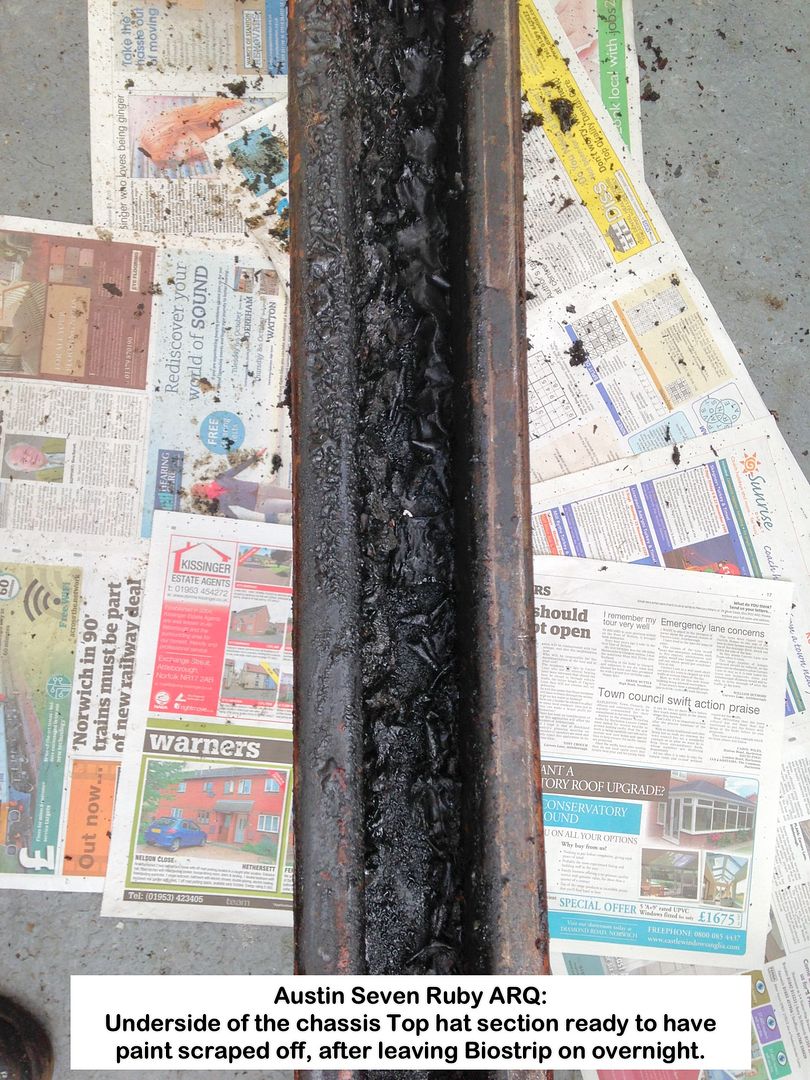
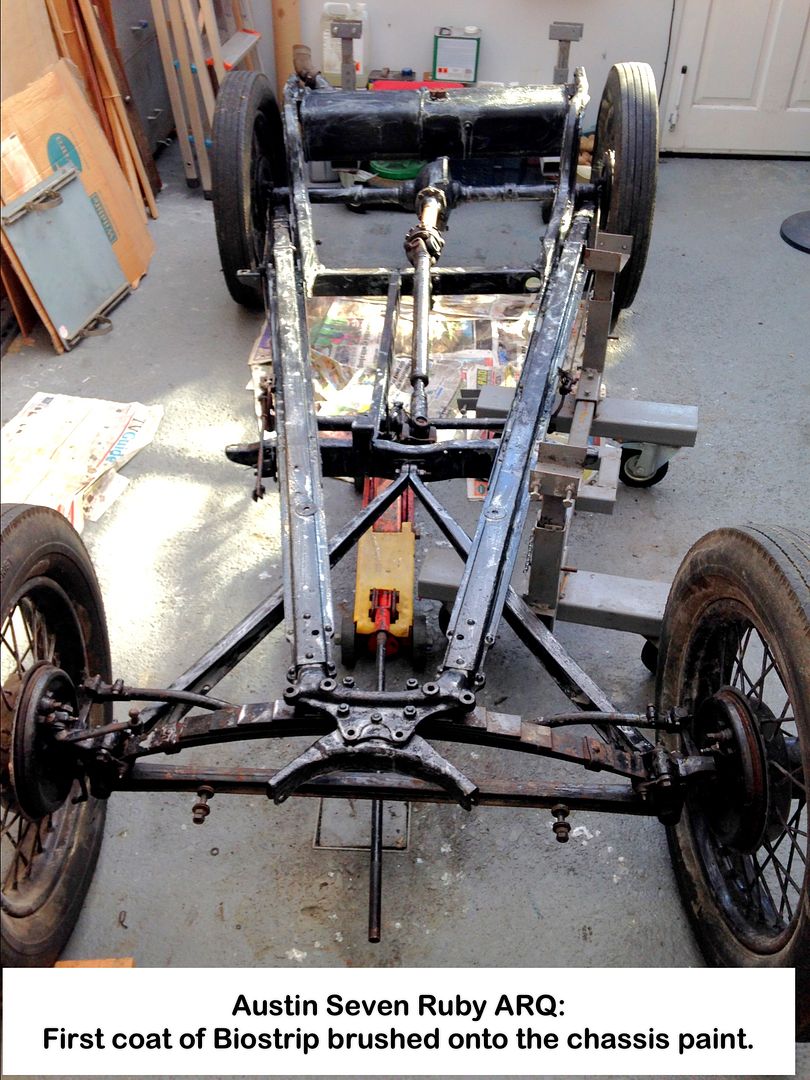
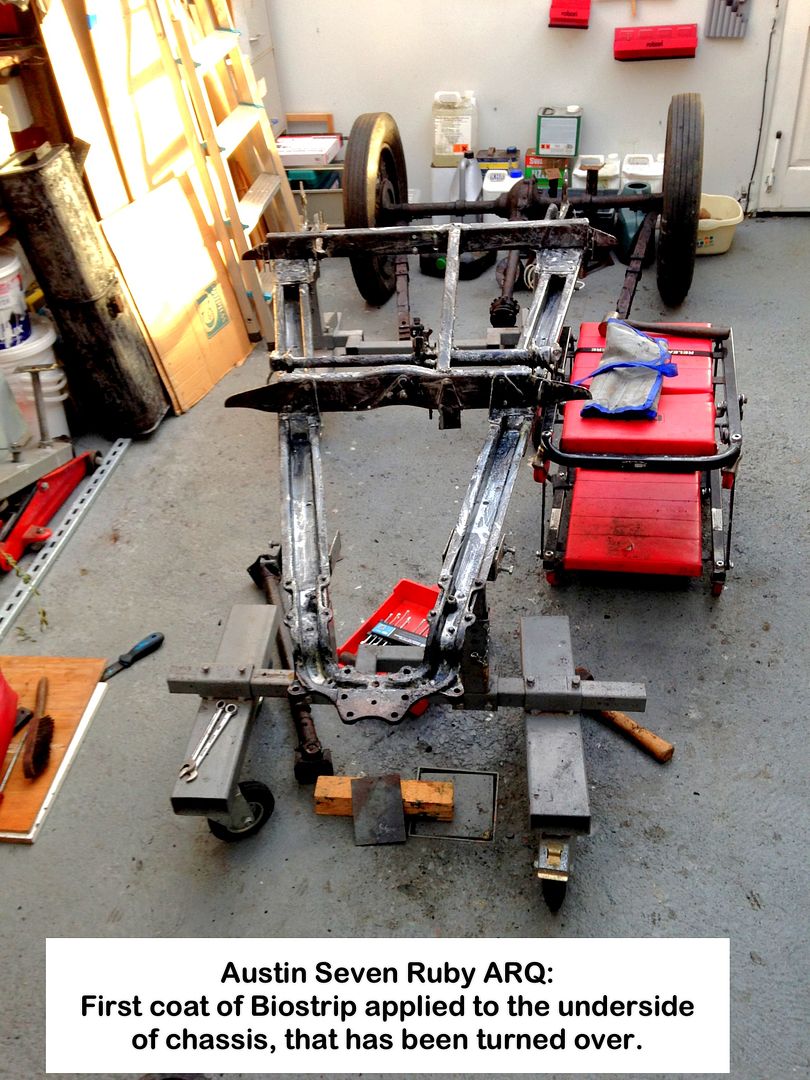
Chassis turned over yesterday afternoon and a coat of Biostrip applied.
The Biostrip paint stripper works an absolute treat, and a product I recommend without reservation. It dries out so the paint scraped off is easy to vacuum up, but bestof all NO smell.
Geoff - Not much doing today unfortunately.
Location: South Norfolk - Next to Suffolk
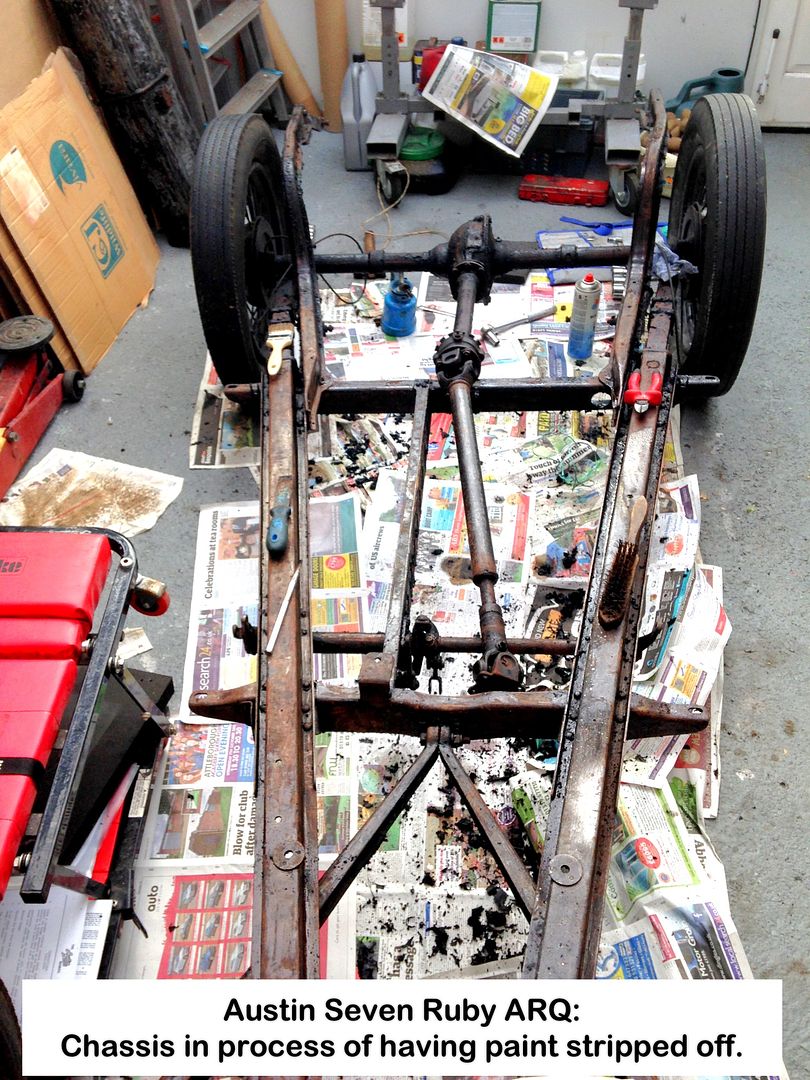
Much progress today, with the underside of the chassis now stripped of paint and ready to be attacked with various wire implements prior to painting..
Advise needed please:
1) What is the best way to clean out those sections of the chassis where the cross members and brake cross shaft have boxed it in?
Getting to the flat metal, where the abovementioned span the chassis flanges, has me somewhat flummoxed.
2) Sequence for removing the brake cross shaft and what to be aware of. May as well check everything as I won't be doing this again.
3) What paint to use on the chassis?
4) Anything else I should be doing on the chassis?
Geoff - Wire implements ready and waiting to join battle tomorrow.
Location: South Norfolk - Next to Suffolk
Hi Geoff,
First thing I do is check the rear spring sockets for cracks, just had a look at the chassis pics and it looks like LHS is missing the section aft of the u bolt?
Location: Eye on the Norfolk / Suffolk border
Hello Tom,
Budding Sherlock?
Correct, and the lack of that section has caused the Top Hat section forward of the 'U'-bolt to split along both sides up to the Crossbolt.
These cracks have been welded previously and from the looks, by a professional O/A welder, so obviously that piece has been missing for some time.
Does make one wonder why none of the previous restorers hadn't bothered replacing that missing part, as it's there in plain sight to see on the NS.
Geoff - Getting ready to remove the Brake Crossshaft
Location: South Norfolk - Next to Suffolk
HEEELP!
I don't think the brake cross-shaft has ever been off, as the centre bearing nuts and bolts have locking washers, and what I can see of the zinc bearings, they look original.
I've managed to get the OS rear brake lever off, but getting the cotter pin out needed the use of heat and brass drift.
The other two are SOLID even after applications of penetrating oil, Freese Rust and heat, then the hammer and drift.
Giving them a moderate biff has loosened the shaft and it now spins freely, whereas before it was tight, but no movement between the two.
Advise please 
Geoff - Now I could take a club hammer to them, but that will no doubt do more damage than good 
Location: South Norfolk - Next to Suffolk
If struggling to get cotter pins out I find it relatively easy to drill right through them with a small drill bit. Then gradually increase the size of drill bit until the cotter is a thin-walled tube. it should then hammer through fairly easily.
Thanks Andrew
Was hoping not to have to resort to that, but they are virtually welded in place, so have no alternative.
No great shakes..
Geoff - Carbide drill bits to the rescue once again
Location: South Norfolk - Next to Suffolk
For all of you suffering withdrawal symptoms due to lack of updates, herewith something to calm you down:
Bios trip doing as designed:
Brake Light switch:
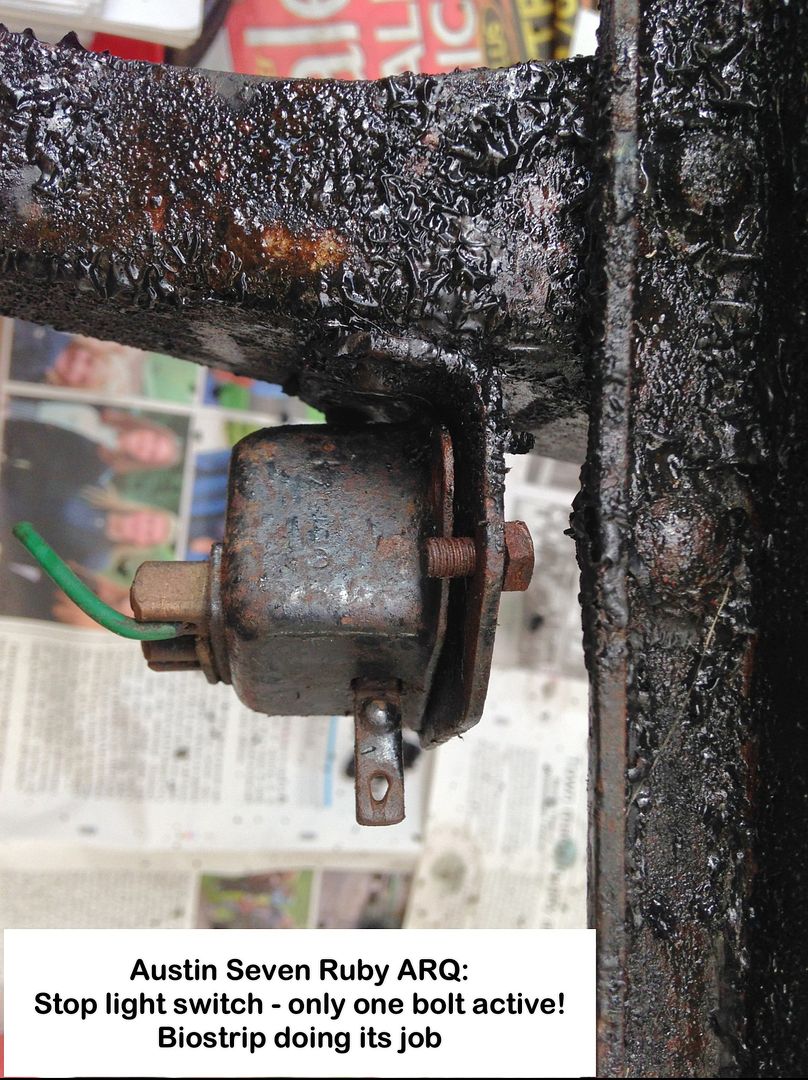
Biostrip applied:
Paint coming off:
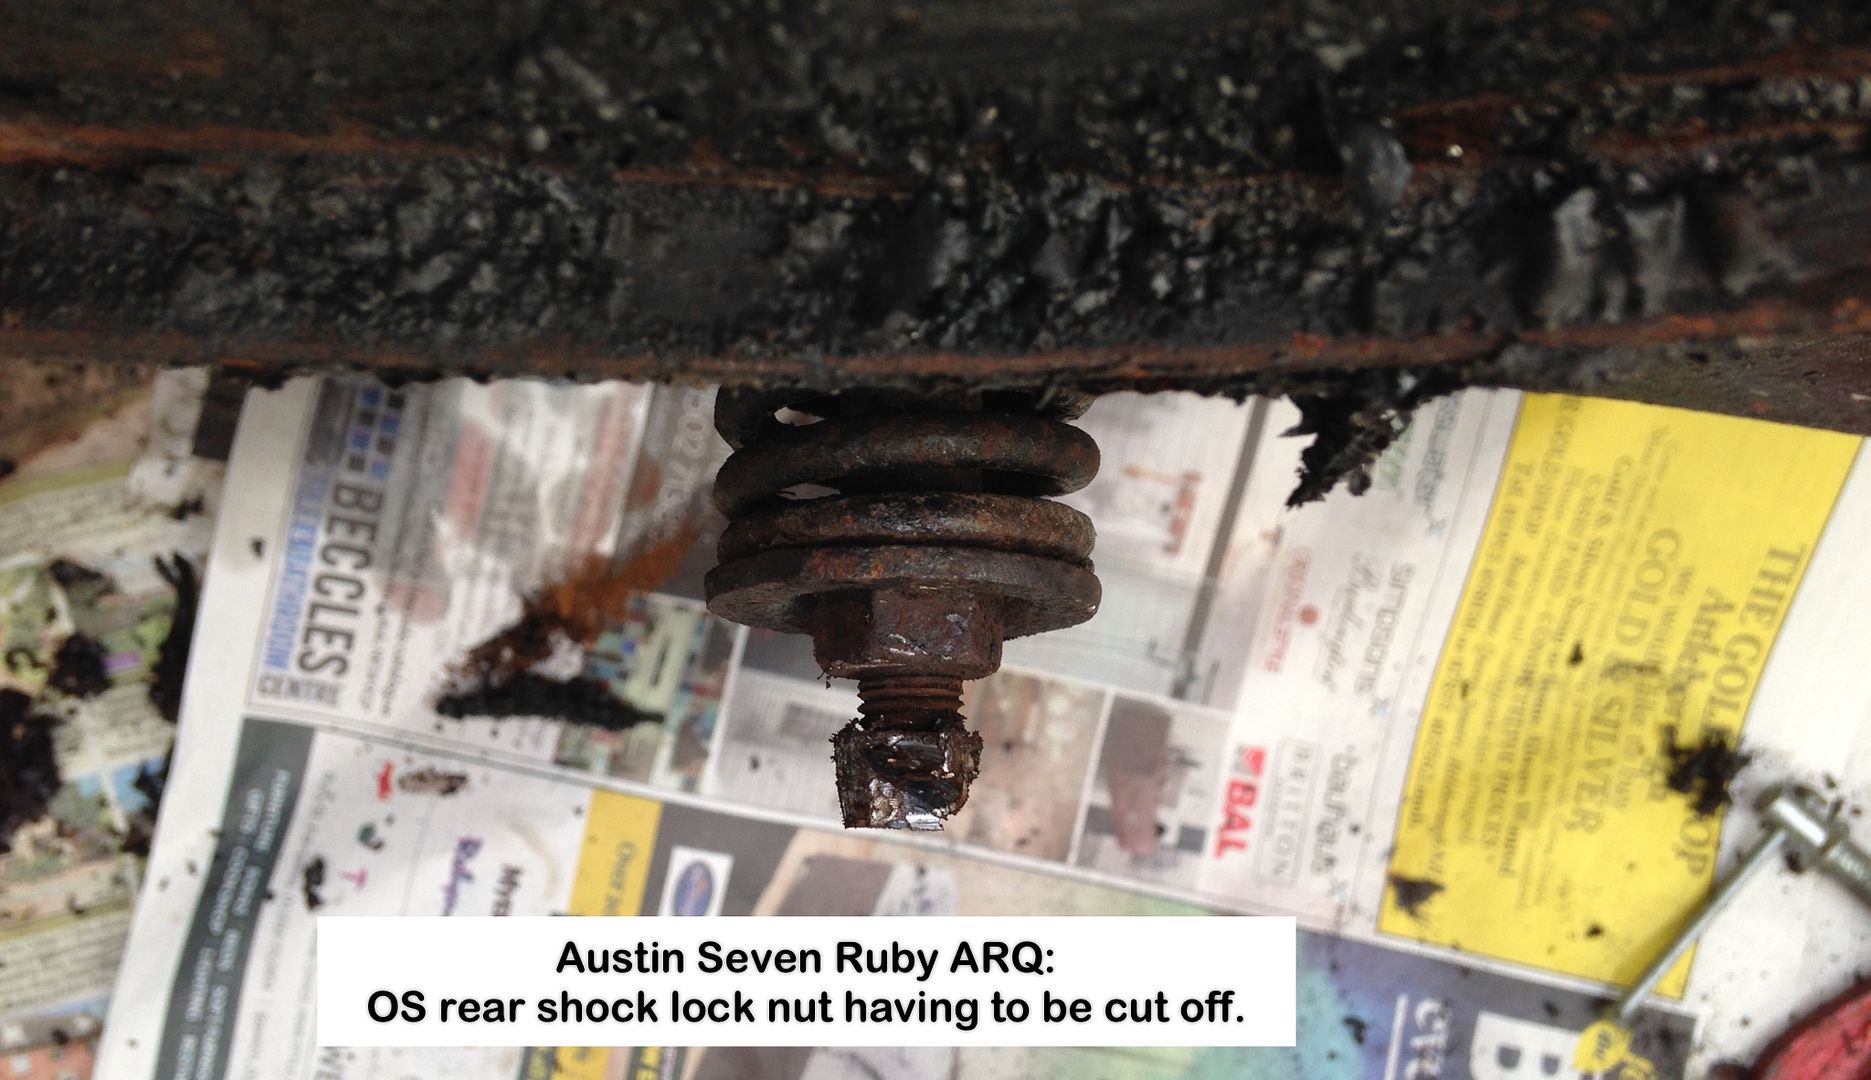
Removing rear shock absorbers:
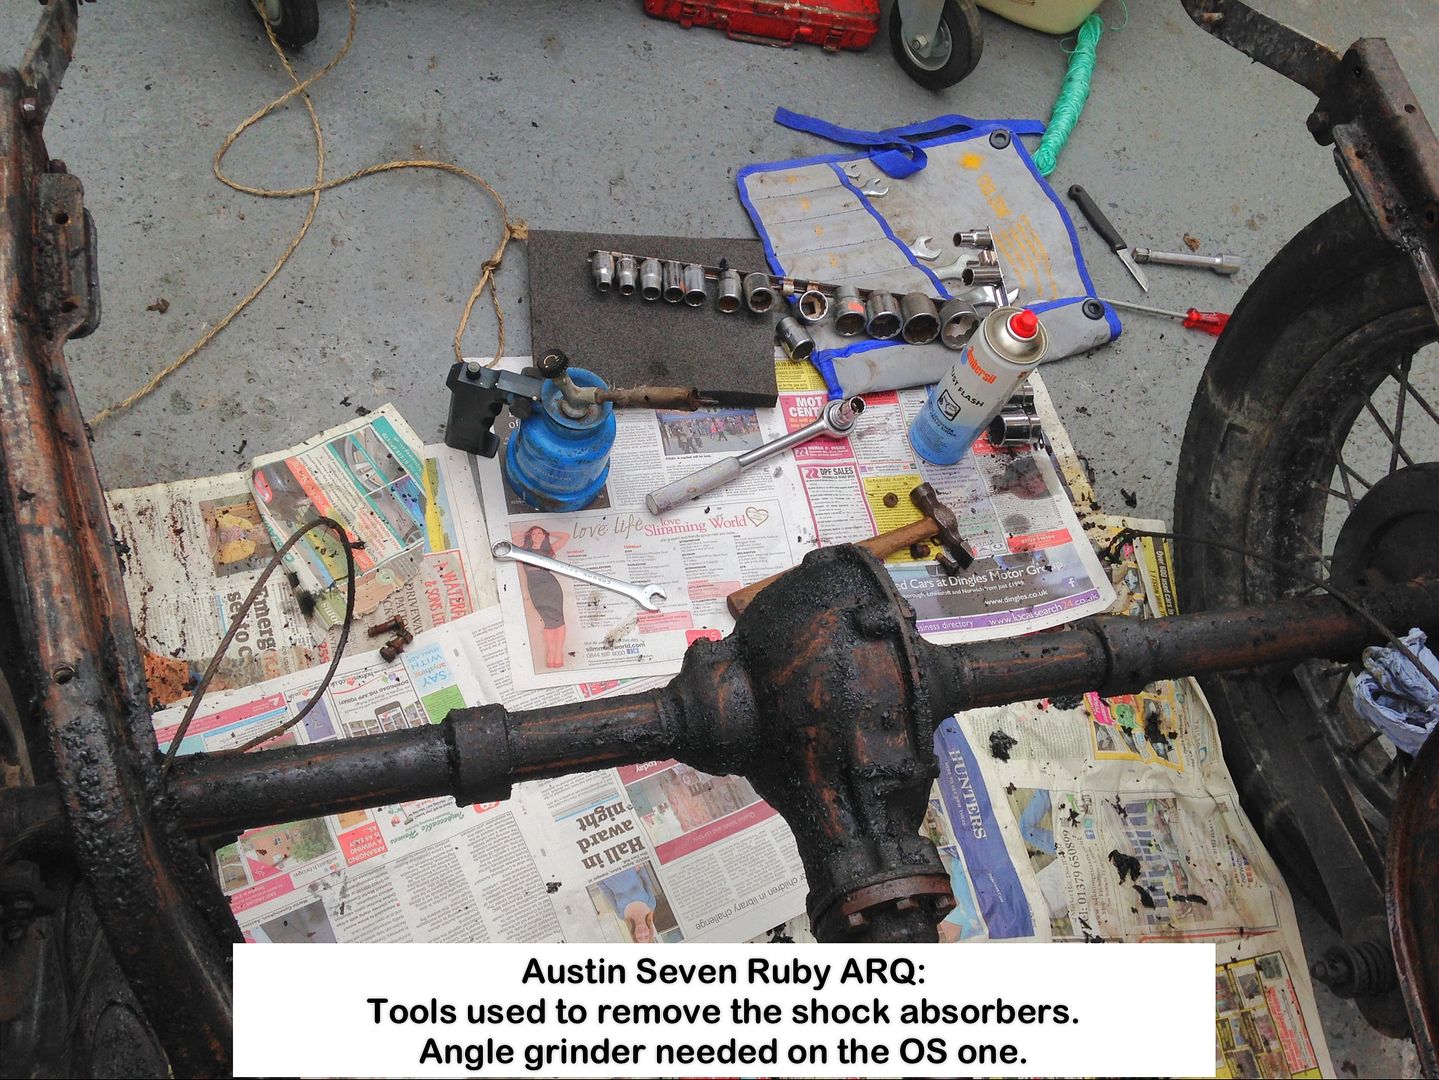
Recalcitrant lock nut:
Chassis and front axle have been stripped of paint and now just waiting for a dry day so that I can use the pressure washer to get into all the nooks and crannies to remove any oil/grease/paint bits prior to painting.
Photo annotations explain all, BUT just about ALL the cotter pins have either been mangled to greater or lesser degrees, or didn't have a nut in sight.
There was neither hide nor hair of any split pins accompanying the nuts holding either the Radius Arm or Torque Tube Ball Flanges to their Cross-shafts, which made me shake my head once again, something that is becoming a serious habit of late.
Rust pits under the felt strips:
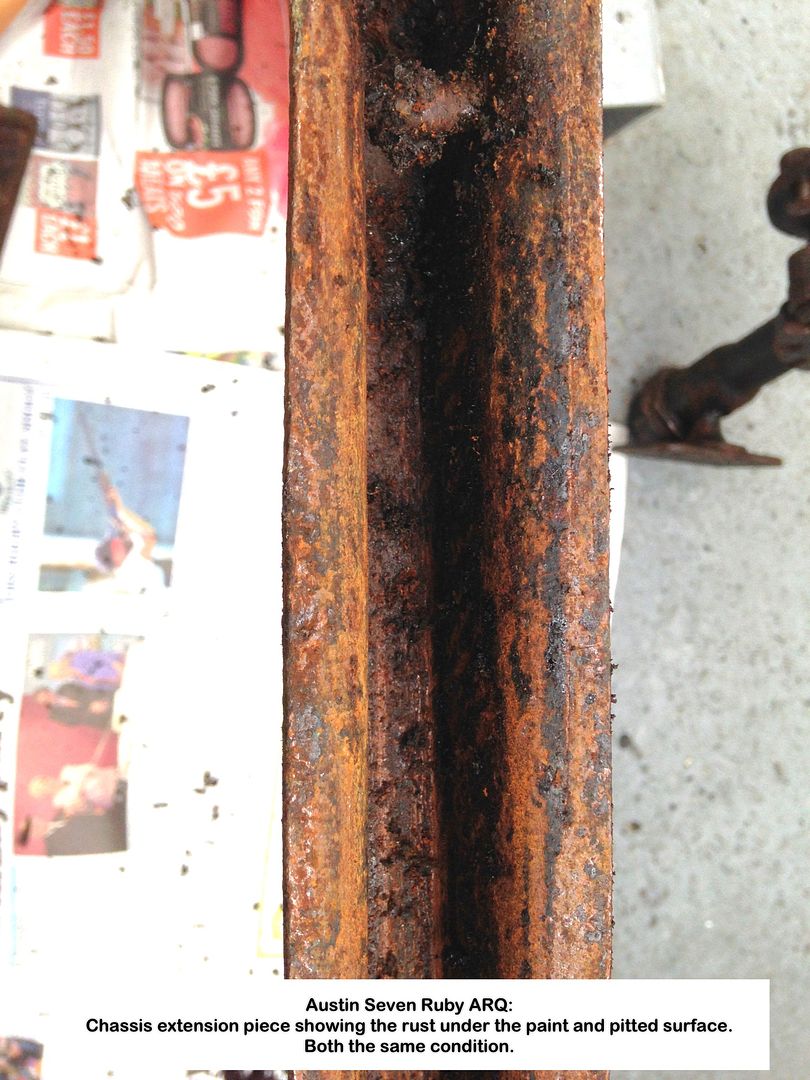
Rust on both rear Chassis Extensions:
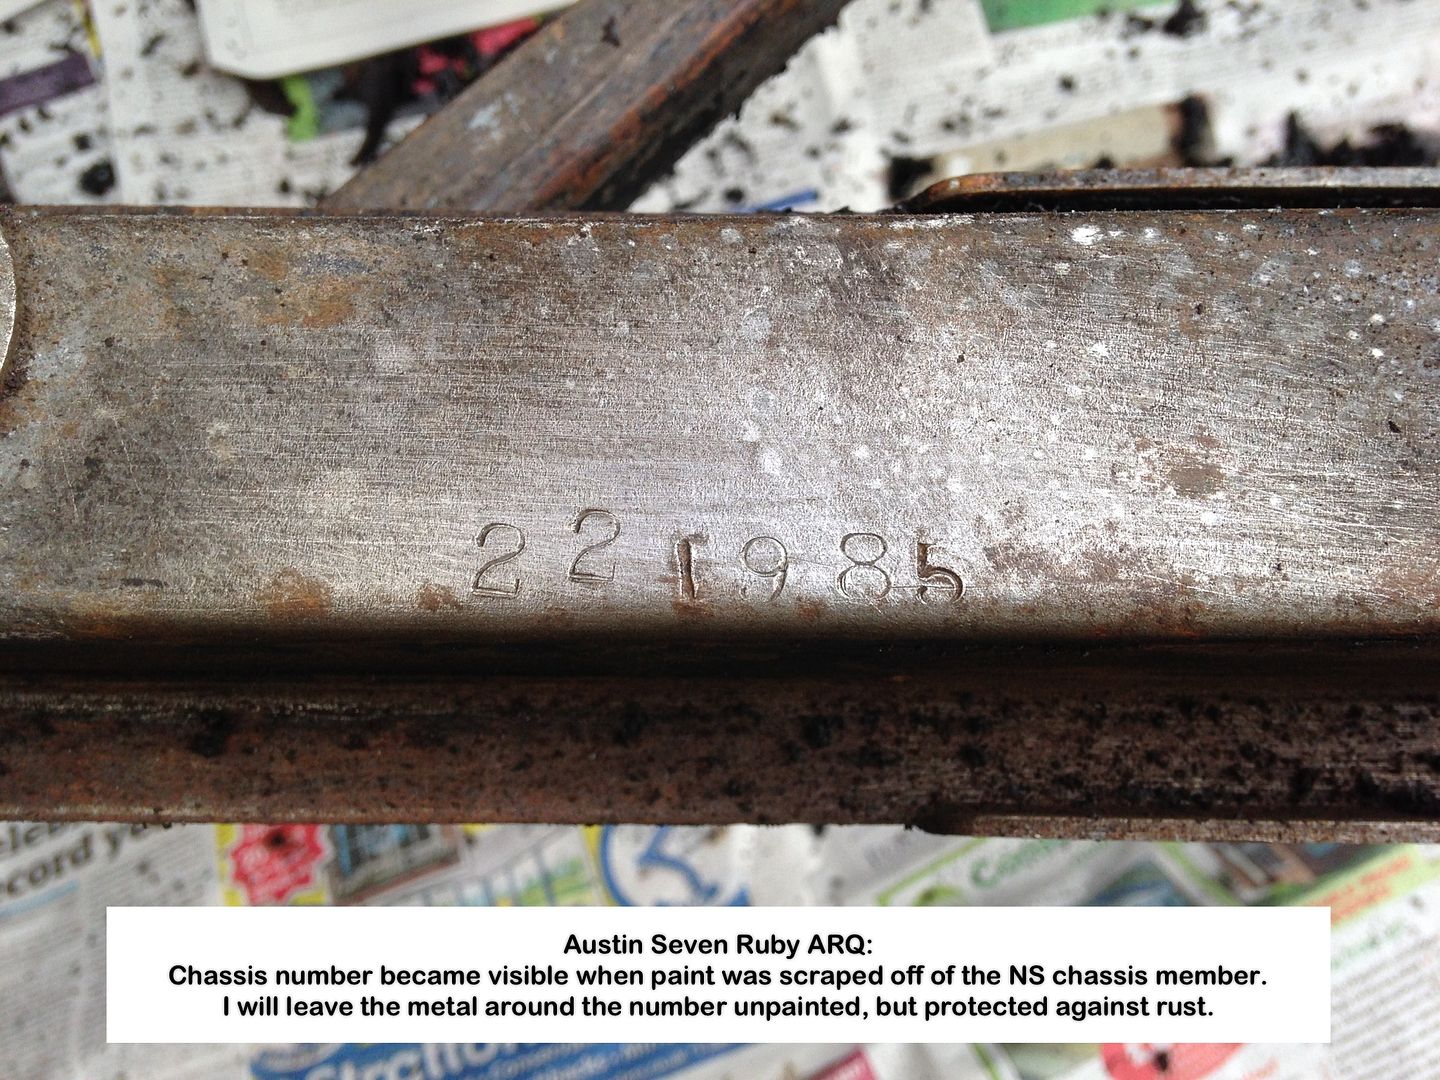
Chassis Number on NS:
Chassis underside devoid of axles and road springs:
Brake Cross-shaft, more details and photos to follow.
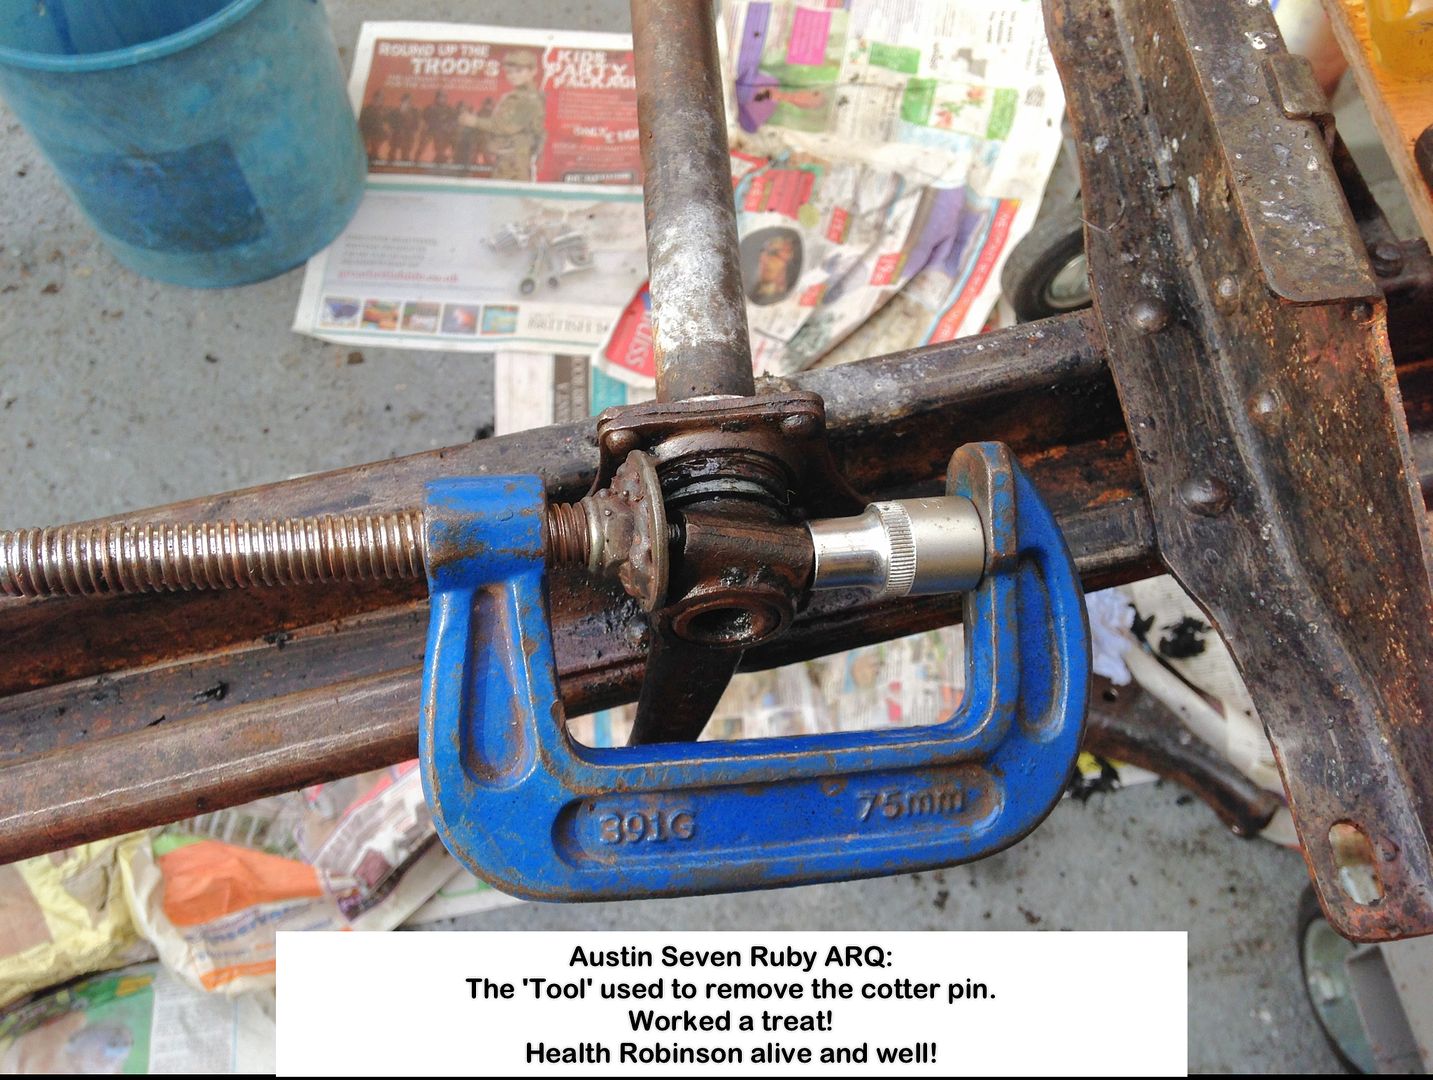
Removing a cotter pin, I tried heat and every release liquid I had, then hammer and punch, but gave up and tried this as a last resort, with success:
It was pretty easy to get the remaining parts loose and extract the shaft, the centre swivel bearing coming out after the two side plates where unbolted, the NS swivel bearing coming free after a few buffs of a small hammer, but the OS is well and truly stuck so unless I manage to free it at some point, I will need to slice the top rivets off, spread the bearing housing then free and clean the bearing, then bolt them back together, with details if I have to do so.
There are no felt washers in sight, so not sure if they where fitted as standard but doubt it.
I will see if I can come up with a way to stop gung getting onto them seeing that they are open to the elements.
Can now see why some plates are welded to the ends of the shaft and grease nipples fitted, so something to do.
Looking down the inside of the shaft, there is a pin across the centre some 9" in from the OS and at 45° to the stud that the return centre spring hooks round.
There is no sign on the outside that it pins the inner and outer tubes together, and neither are they welded, but have read that there is only slight movement between inner and outers.
Will post more photos when I get round to cleaning them up properly.
Stub-axles:
Only one Welsh plug was fitted properly, two being held in place by the grease alone and came away as I was scraping paint off, with one top one missing!
One King Pin slid out easily, but no play, the other only needing the use of a brass drift and gentle taps from a hammer. The cotter pins where just about the only ones so far that have not been molested in some way or other.
Radius Arms:
Have decided not to remove them, as see no reason to do so.
I have no doubt forgotten some of the 'features' I came across, as I took parts off, that made me use language that would have had my Dad's eyes popping and jaw dropping, but I've come to expect nothing else now, 'feature' wise that is.
Geoff - Class dismissed.
Location: South Norfolk - Next to Suffolk