Welcome to the Austin Seven Friends web site and forum
As announced earlier, this forum with it's respective web address will go offline within the next days!
Please follow the link to our new forum
http://www.austinsevenfriends.co.uk/forum
and make sure, you readjust your link button to the new address!

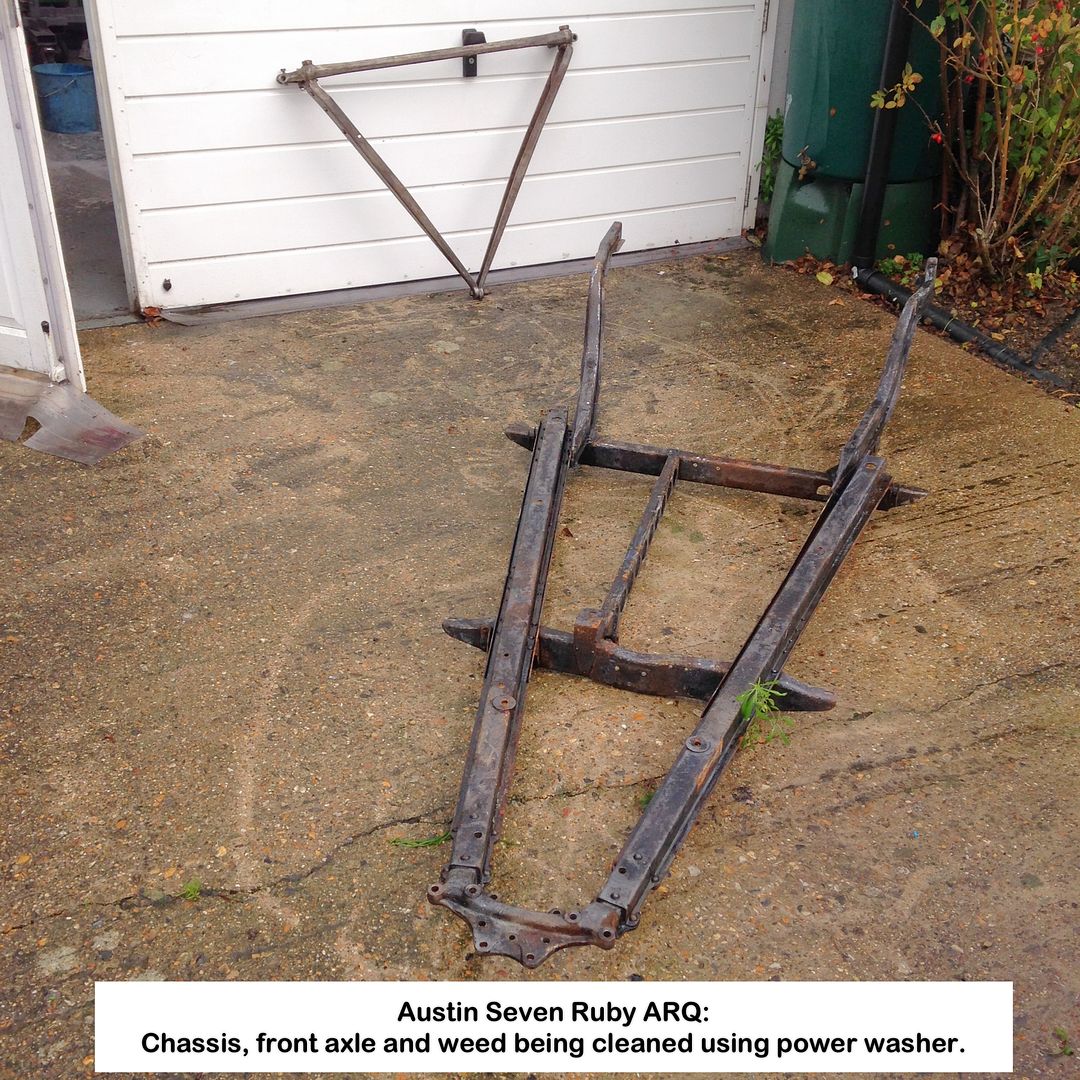
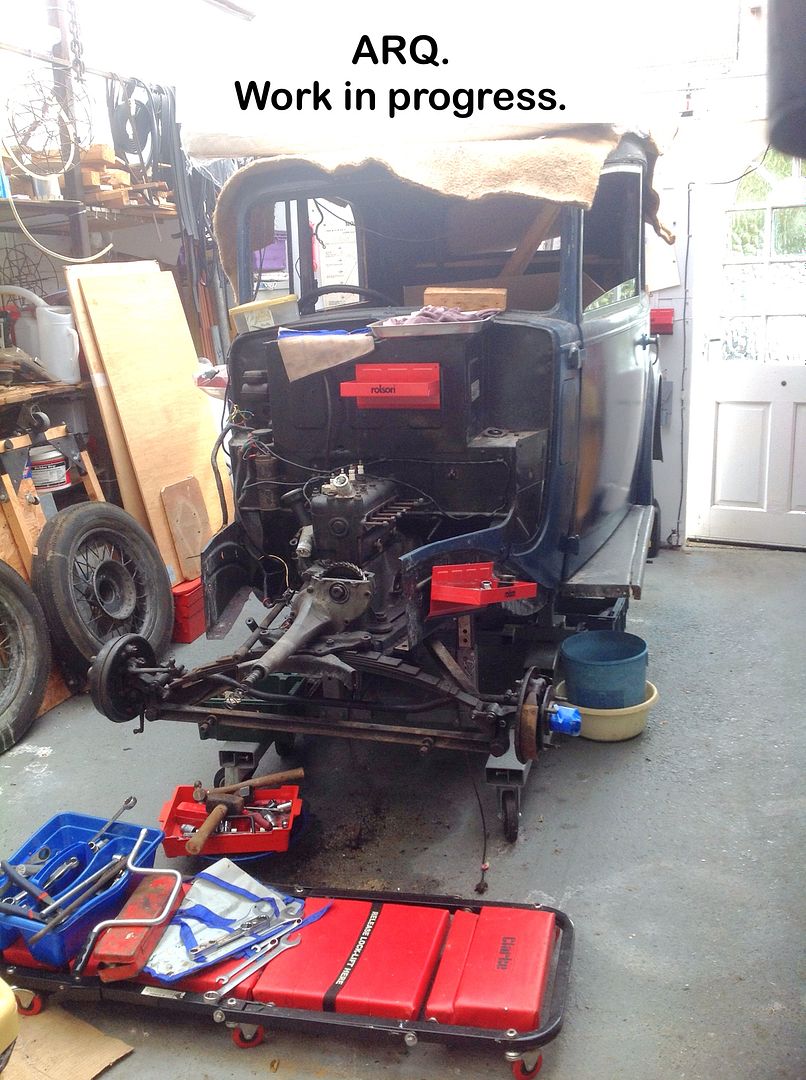
Dry day today so no excuses.
Chassis and front axle out onto the driveway and both given a coating of pink heavy duty cleaner, neat, getting it into all the hard to get at areas.
Power washer out, hosepipe and 220v connected and away I went.
That cleaner certainly did its job, as the water coming off of both parts was a dirty brown colour.
Used a 'pencil' stream of water and they both came up nice and clean, other than the few small areas of paint I either missed whilst scraping or couldn't get to.
Packed everything away and left the axle and chassis out in the open to dry off.
Chassis and front axle being cleaned:
The Carport floor was not looking as pristine as it did after I gave it a new coat of floor paint before starting on the Ruby, so what better time to give it a scrub!
Carport floor being scrubbed clean:
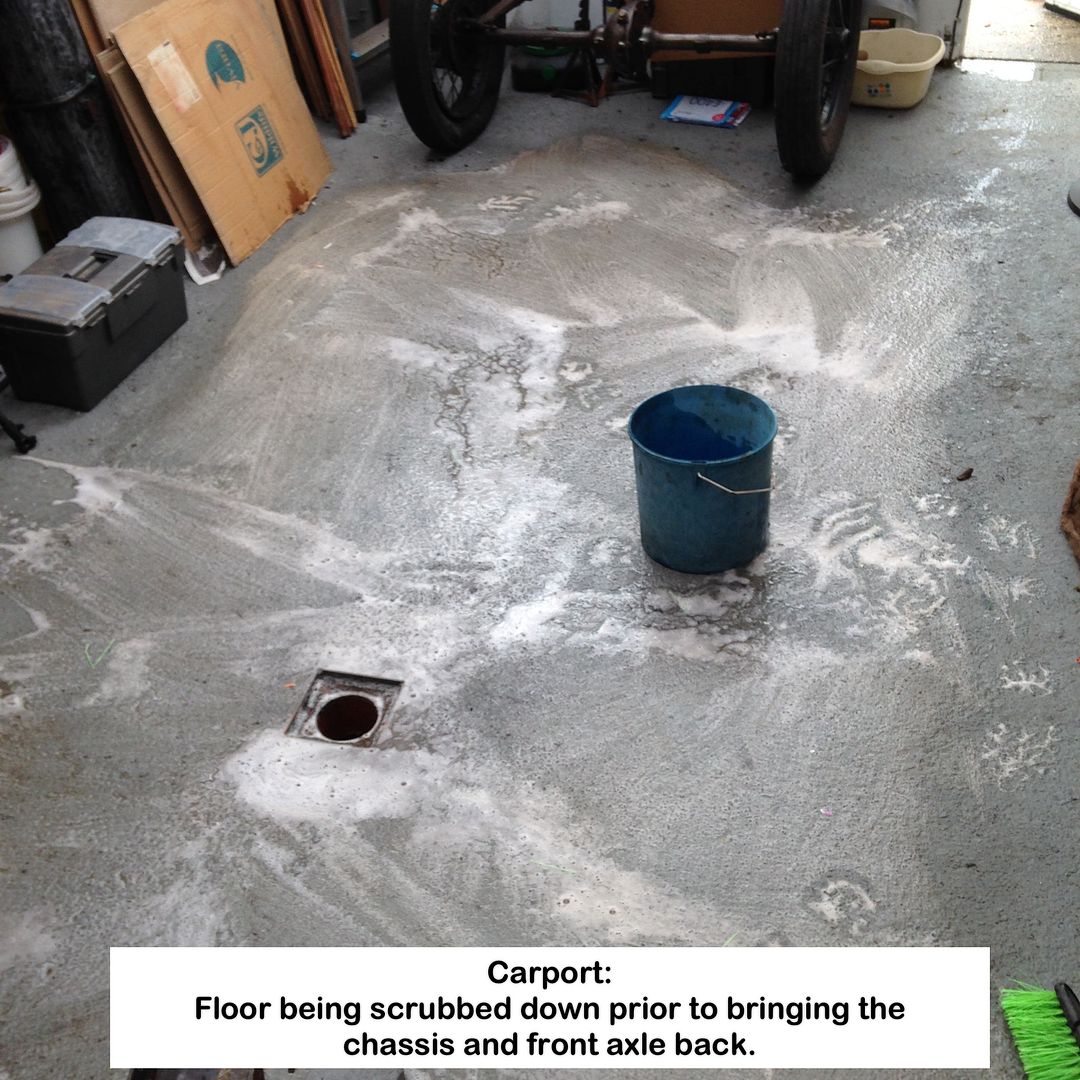
This time used a slightly dilute mix of the pink cleaner and a broom as scrubbing brush.
Oh yes, the dirt parted company with the paint
Newspaper down:

After sluicing down, I swept as much water as possible into the drain then newspaper down to soak up the remaining water.
Newspaper up and parts back under cover later, then ready to give them a coat of paint, AT LAST!
Geoff - Dread to think how long it's taken to reach this stage.
Location: South Norfolk - Next to Suffolk
Two updates in one day!
Must conserve energy though.
Coffee finished so time to get back into the Carport to make way for the Ruby chassis.
Newspaper up:

Then heaved the chassis back into the Carport and onto the CarTrolleys, ready for painting.
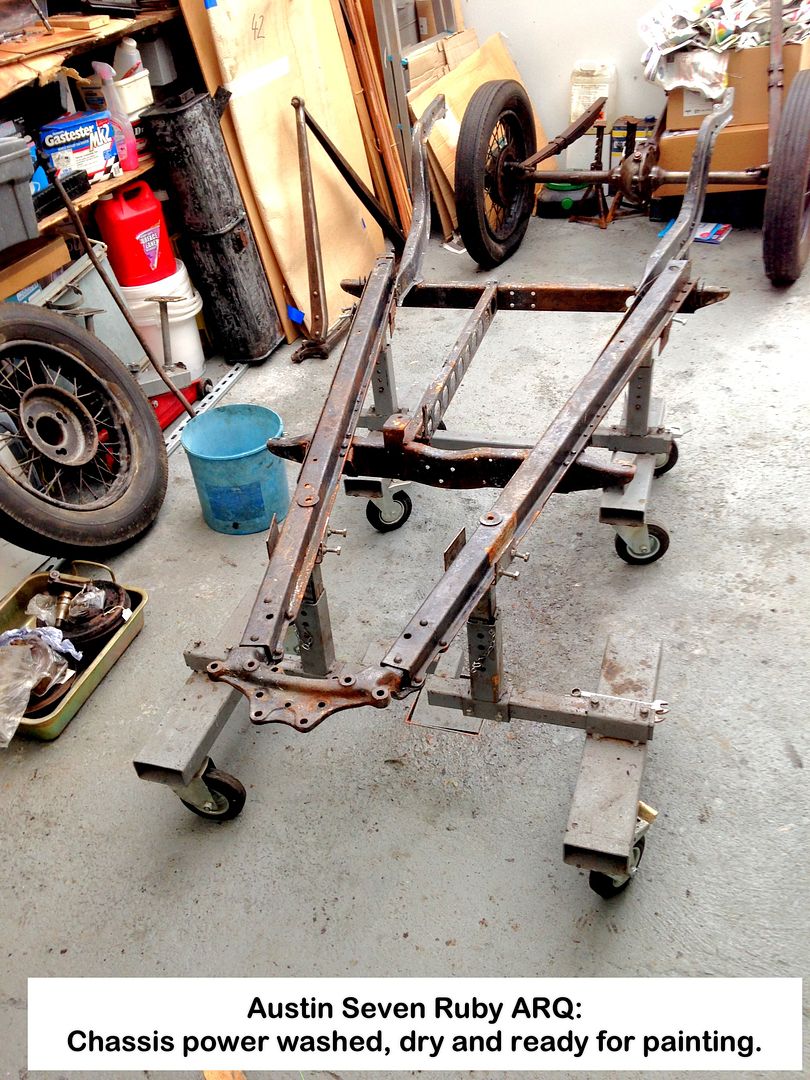
Never thought I would be able to manhandle a chassis as I have with the Austin one.
No doubt there will be surface rust on both axle and chassis, but no great shakes, as I have/had every intention of going over both using wire brushes, both hand powered and L-grinder powered, the last with face shield on of course.
Will give the bright steel a rub over with Gibbs Brand protective whatsit.
Tomorrow is Management's day, so progress will have to wait till Monday.
Geoff - Need to lie down now 
Location: South Norfolk - Next to Suffolk
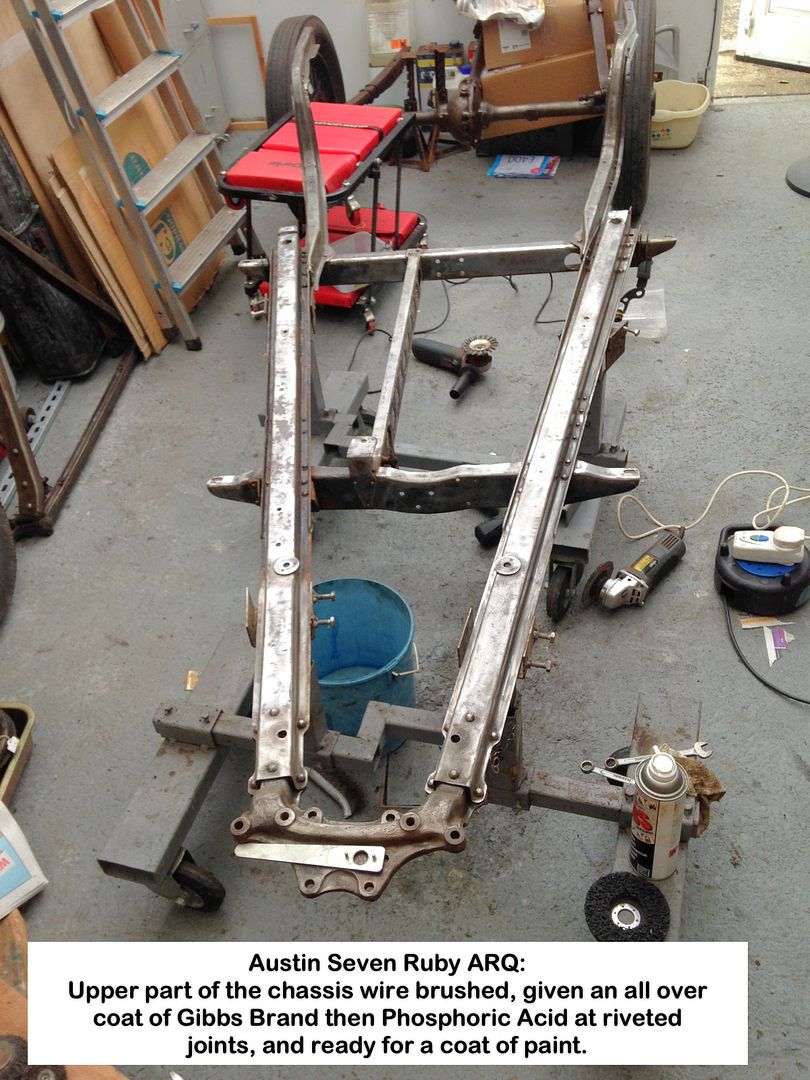
Fairly busy day yesterday in attacking the upper section of chassis with wire wheel.
This is what I used to give the chassis as good a 'Birthday Suit' as I could:
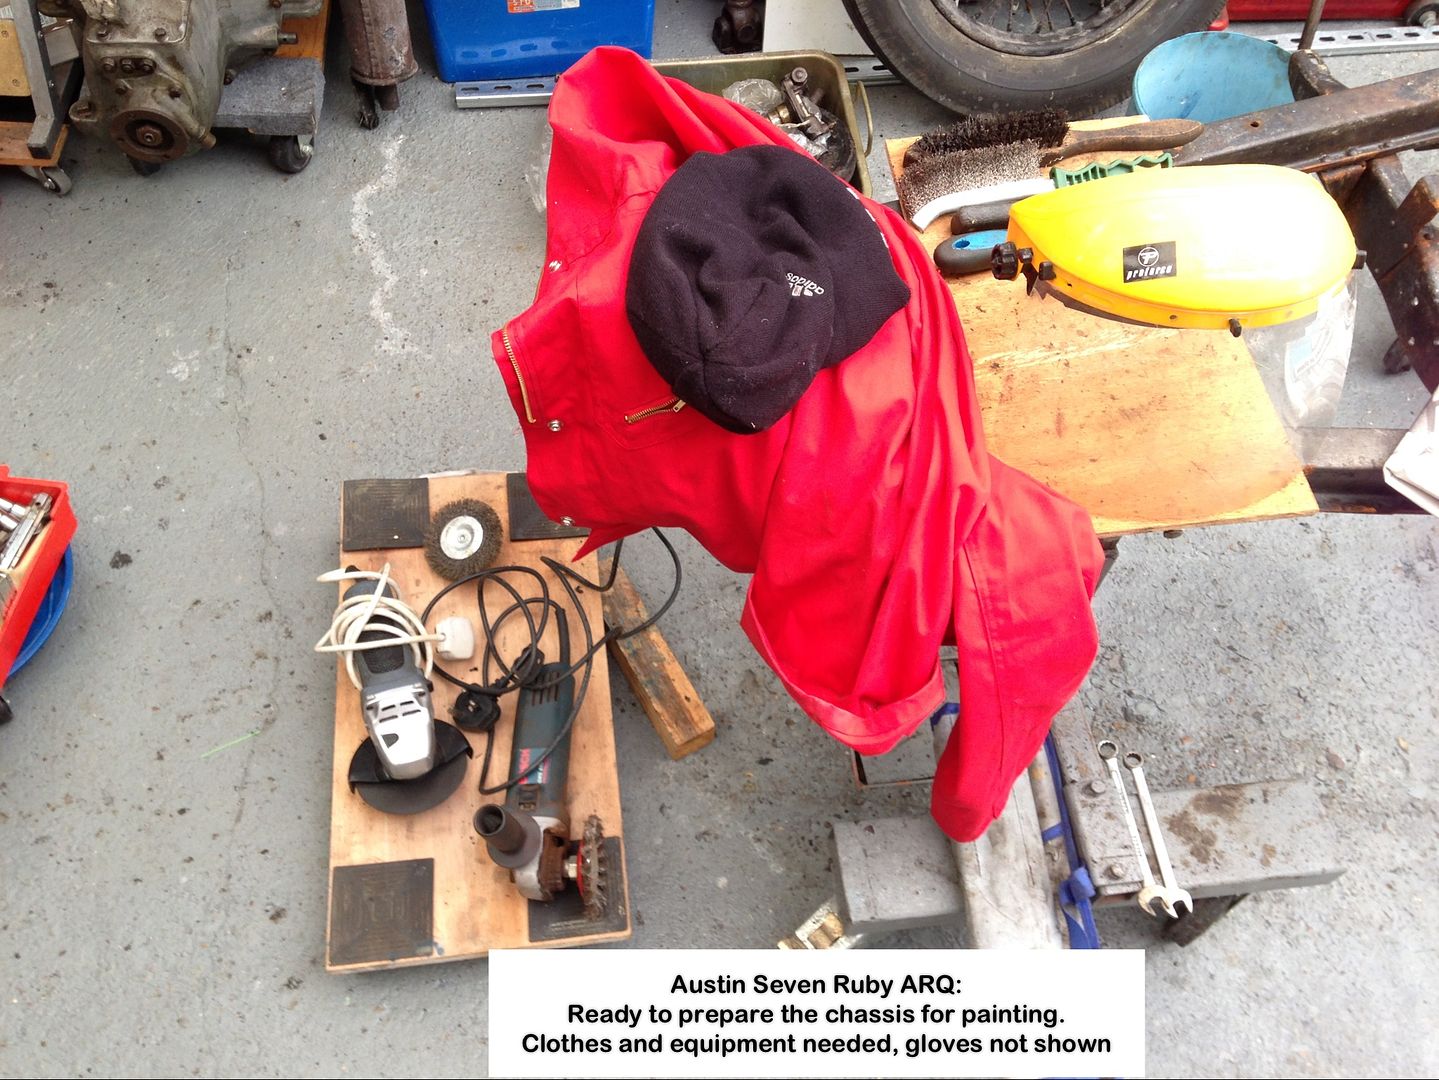
Gloves are missing, and that full-face shield had bits of wire wheel pinging off of it on occasion. Hate to think where they would have imbedded themselves without, and a salutary warning to all.
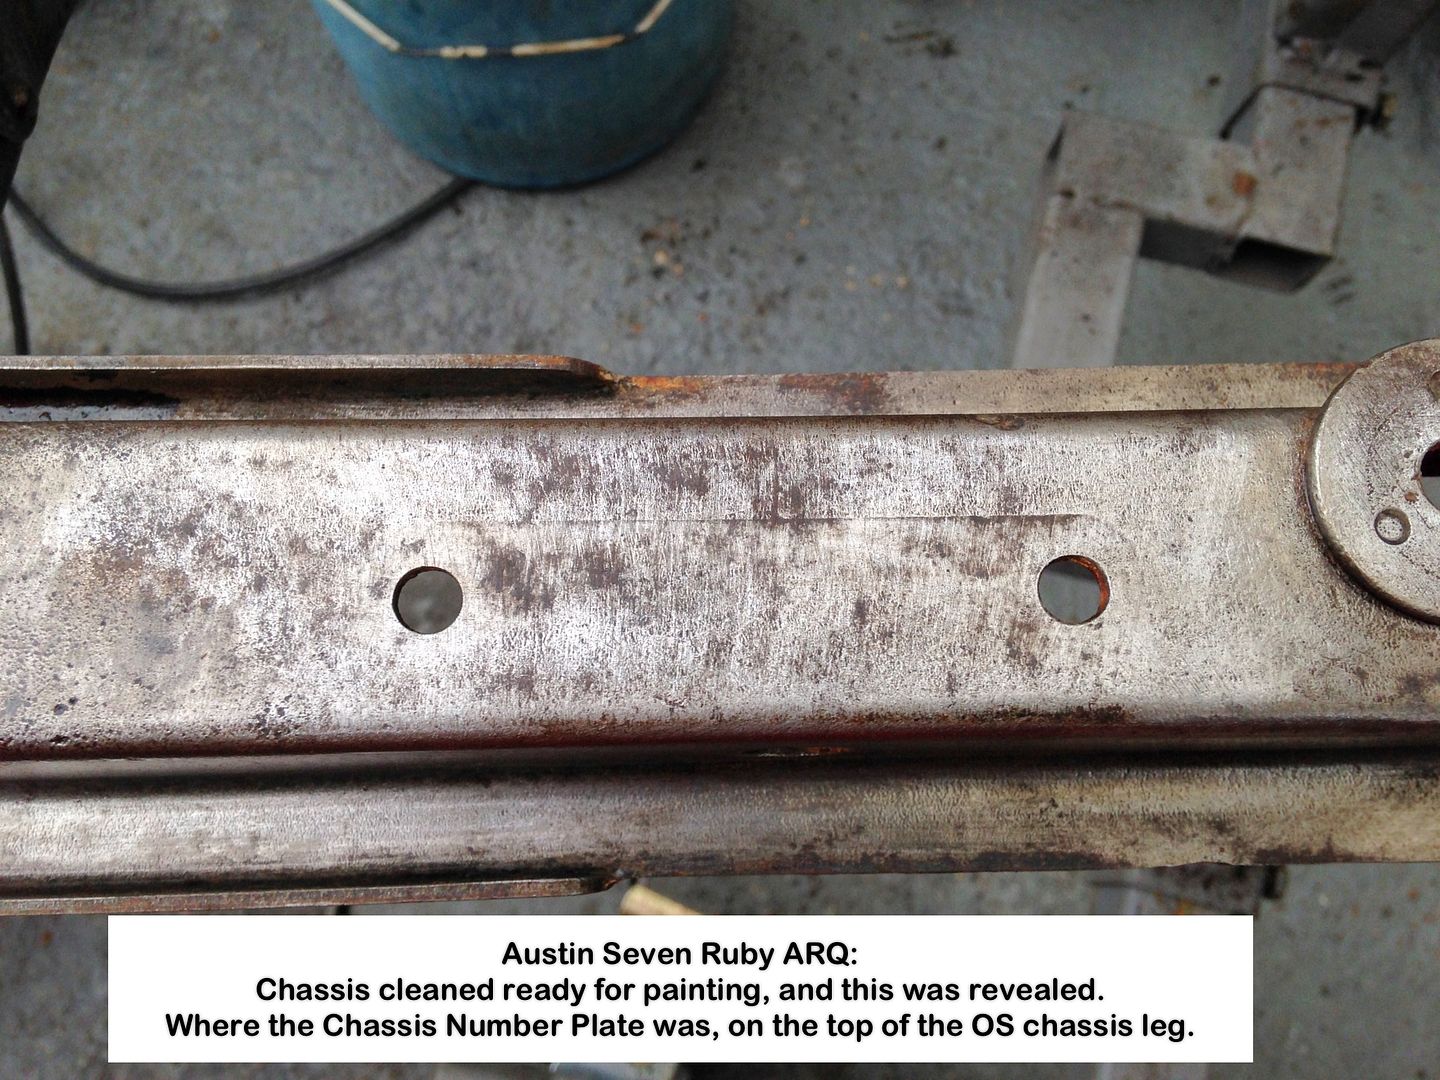
The following photos show the condition of the chassis with additional information where needed.
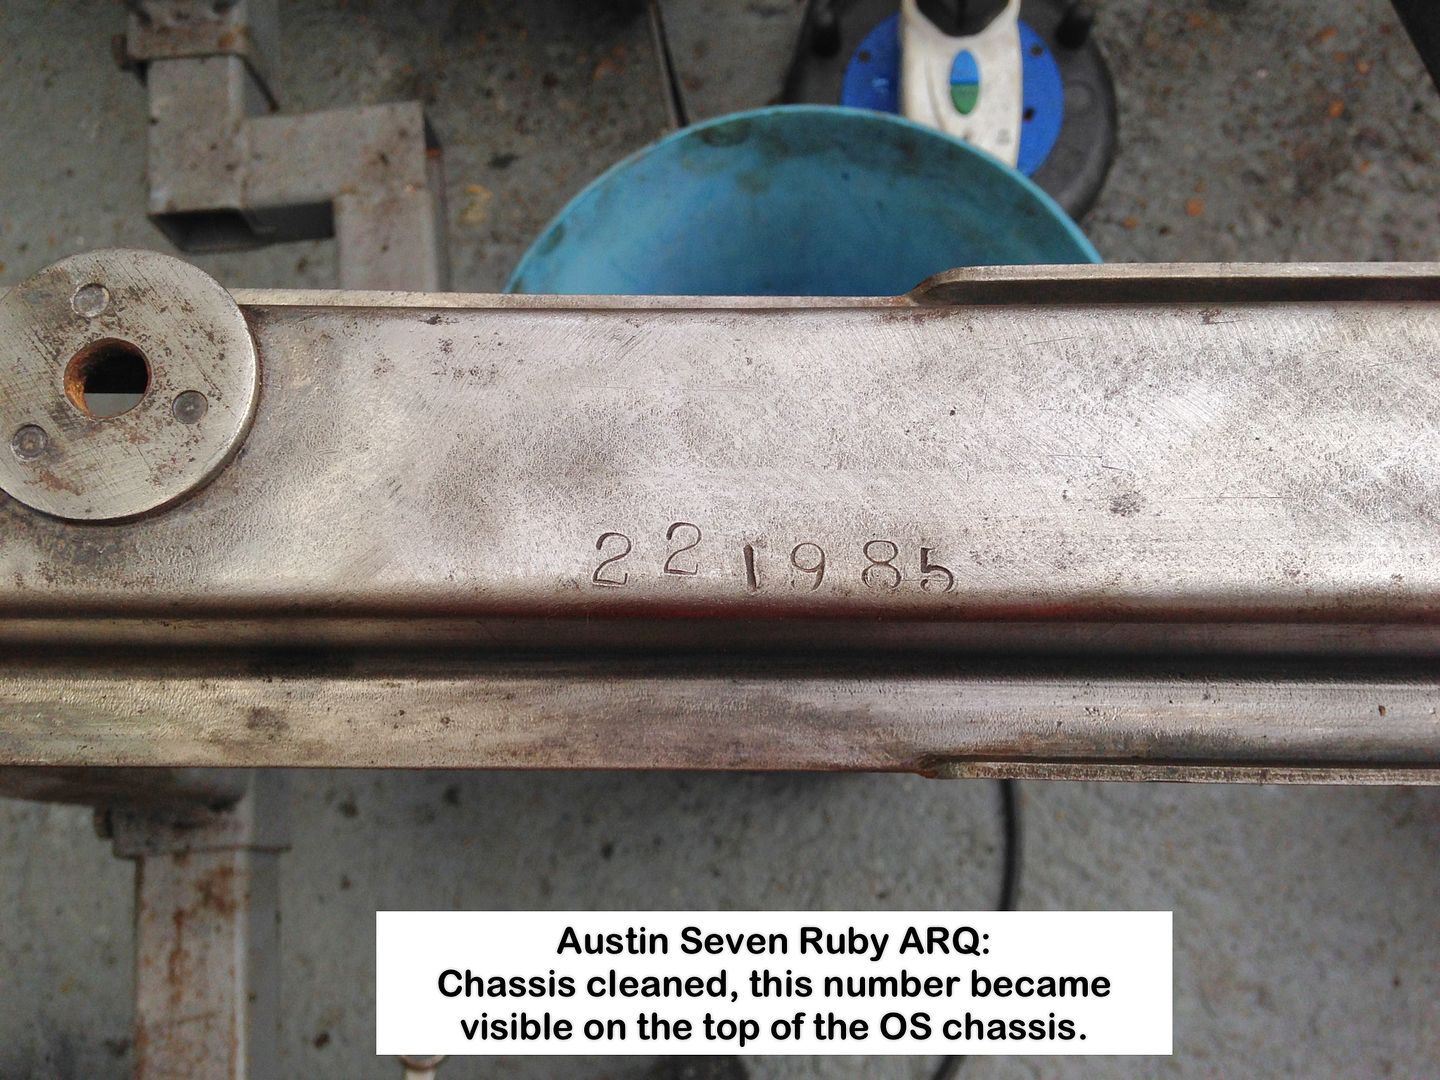
Why was the chassis number plate removed and not replaced?
It has left quite an impression in the steel, and that surprises me!
Warning to all about leaving felt untreated:
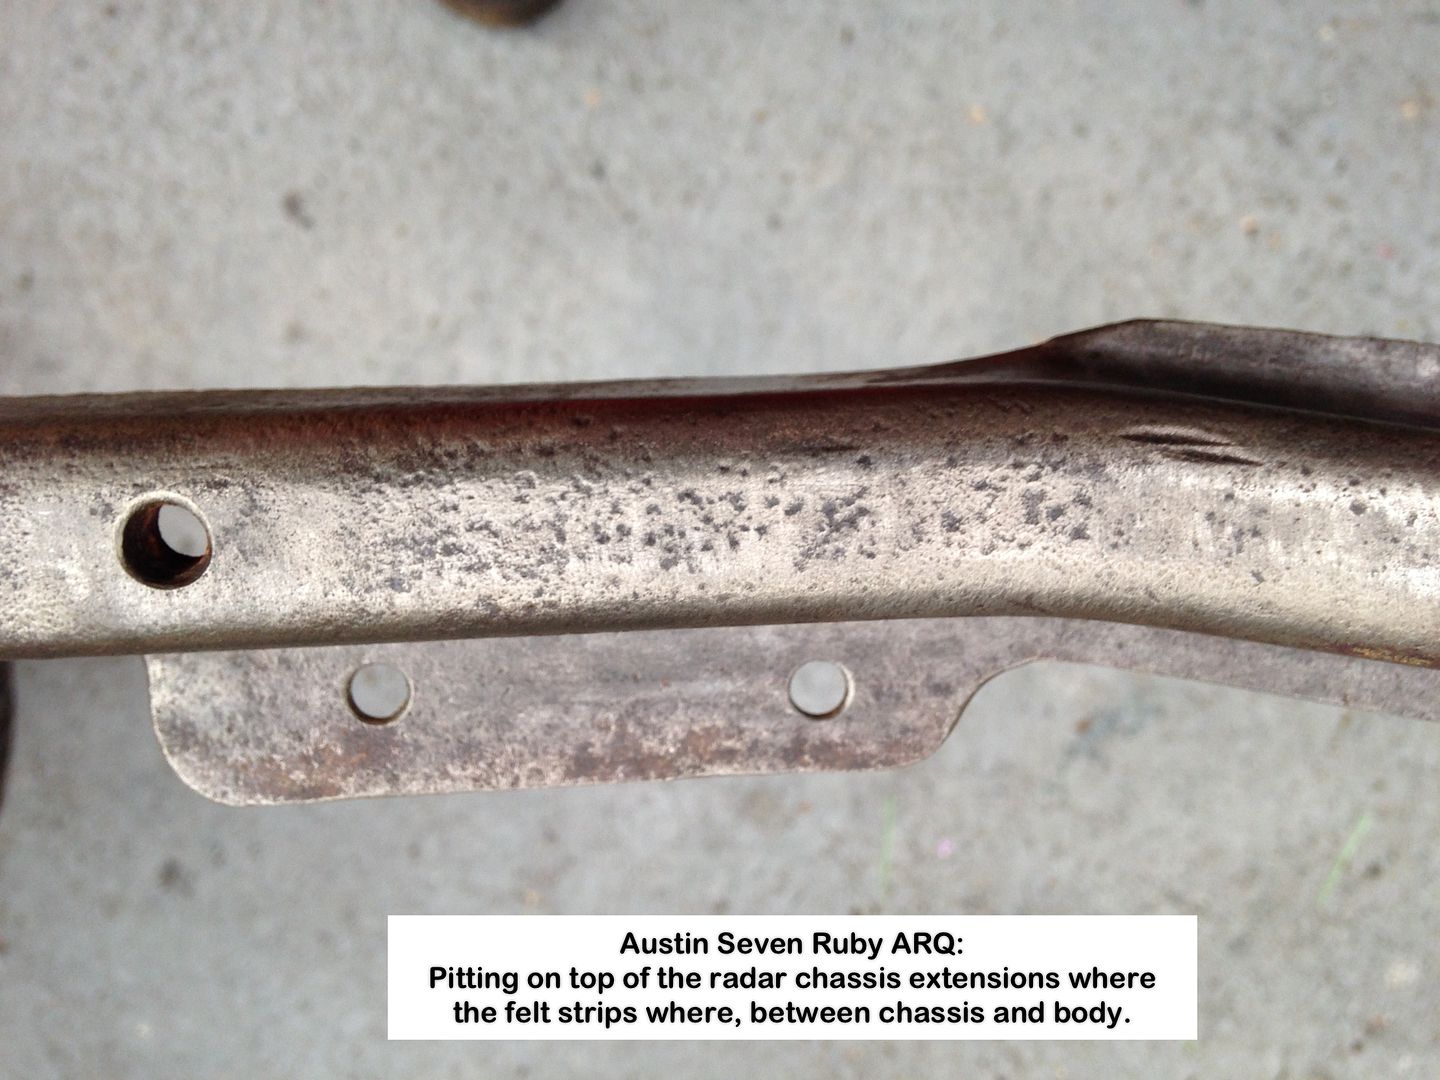
This is the worst section found under the felt:
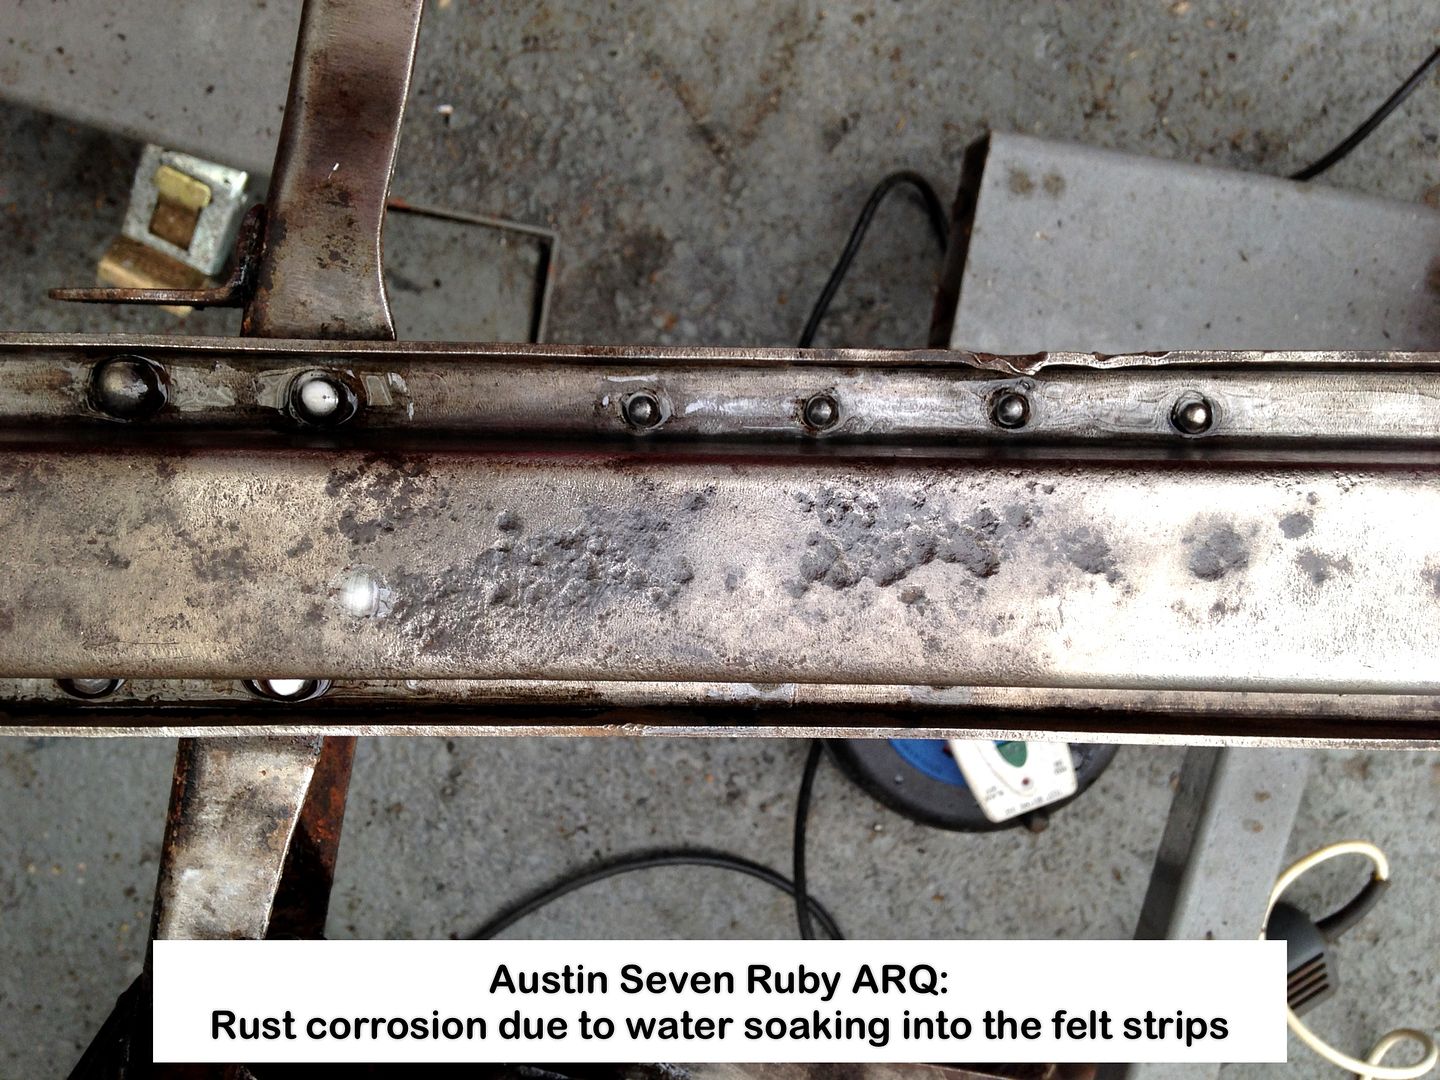
The felt will be replaced using rubber strip.
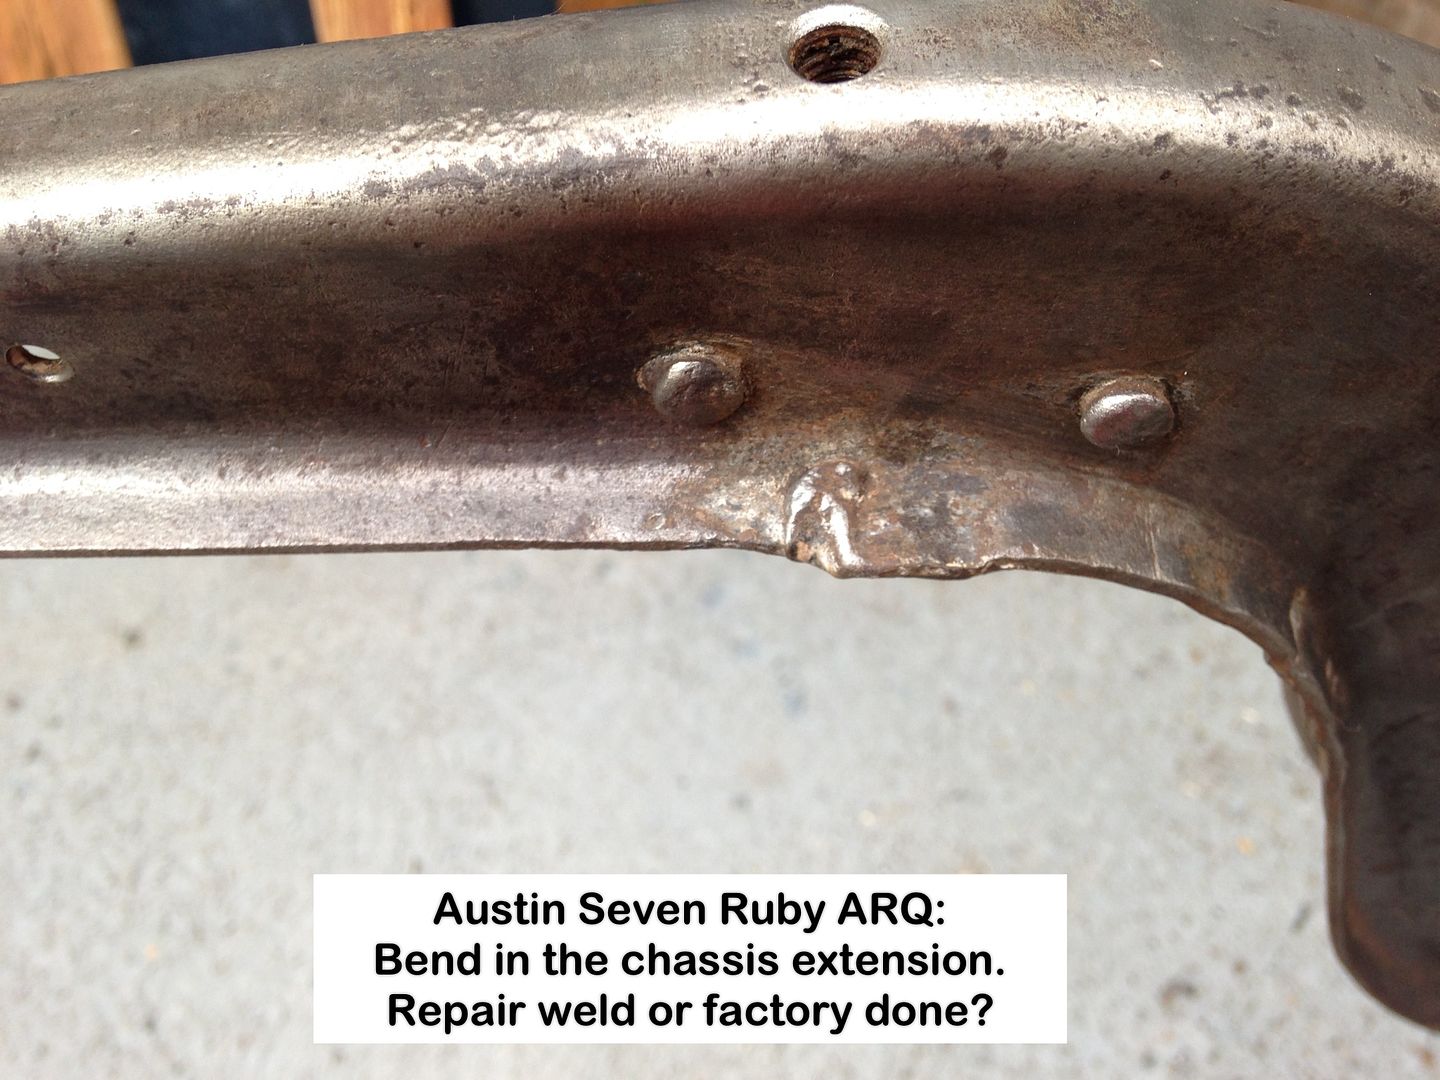
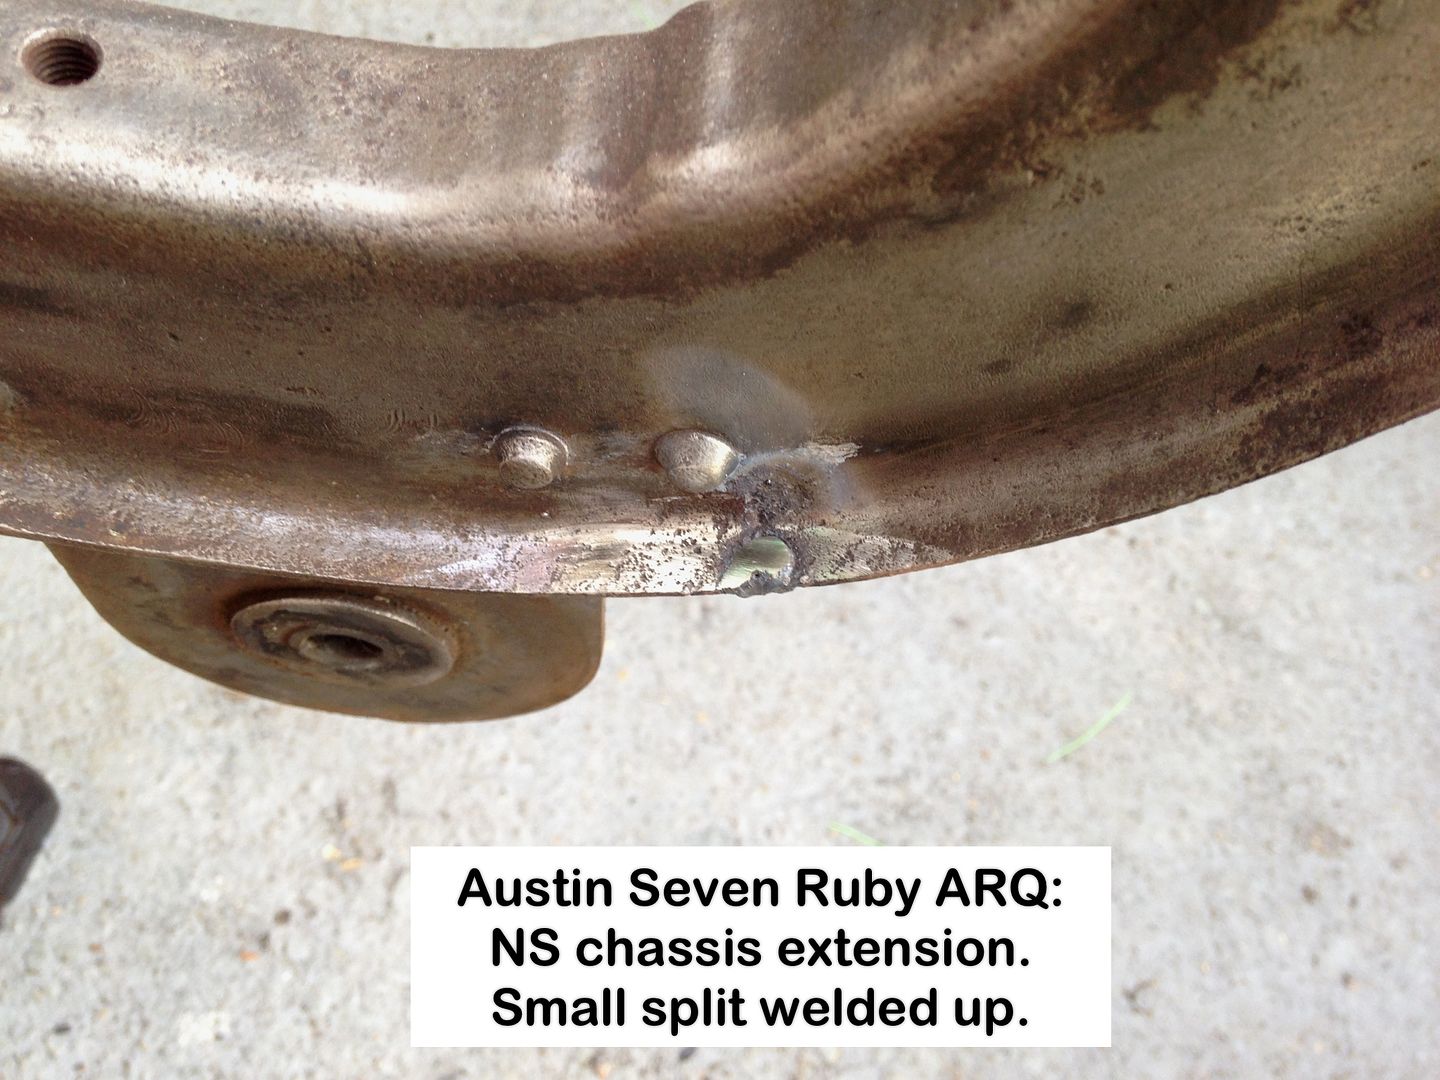
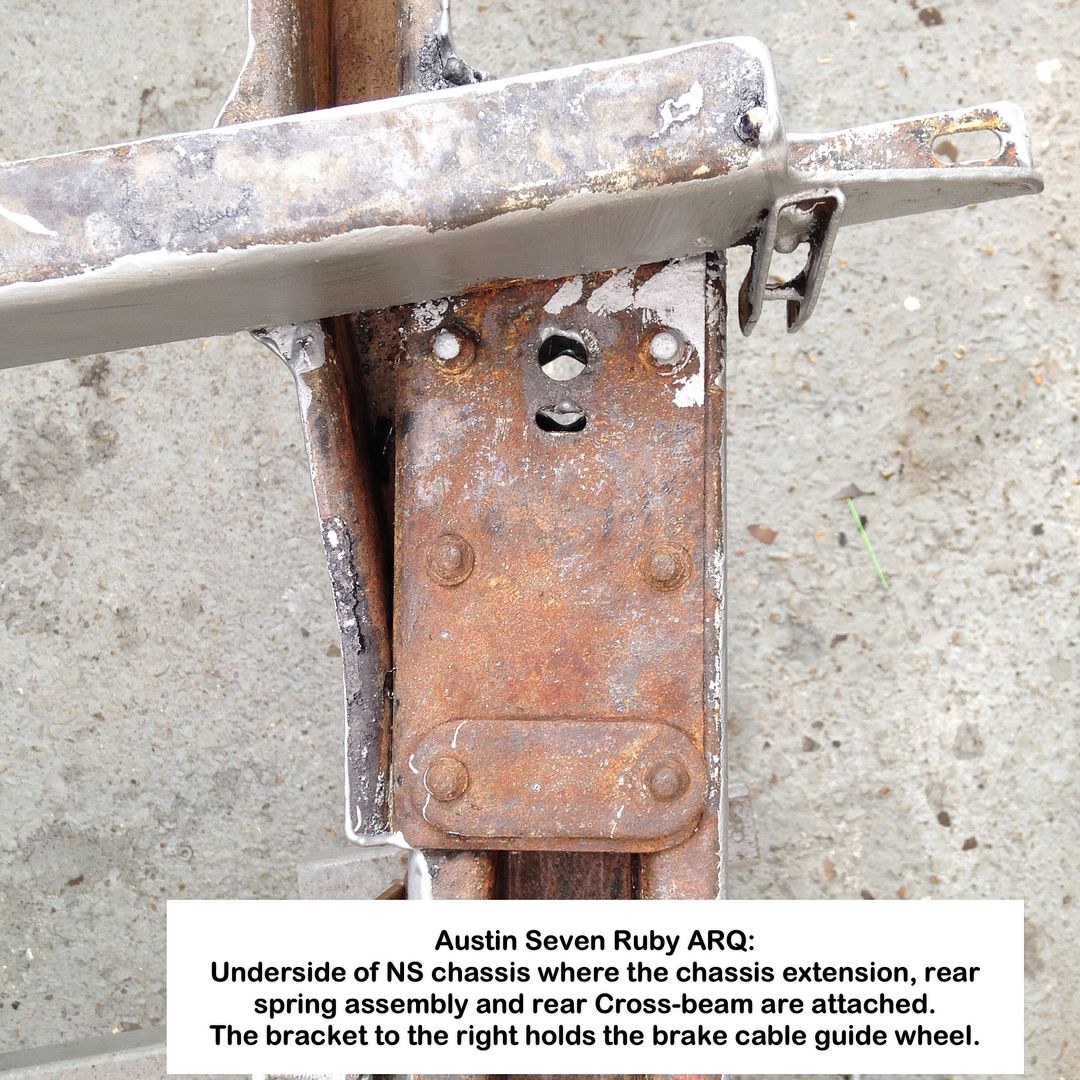
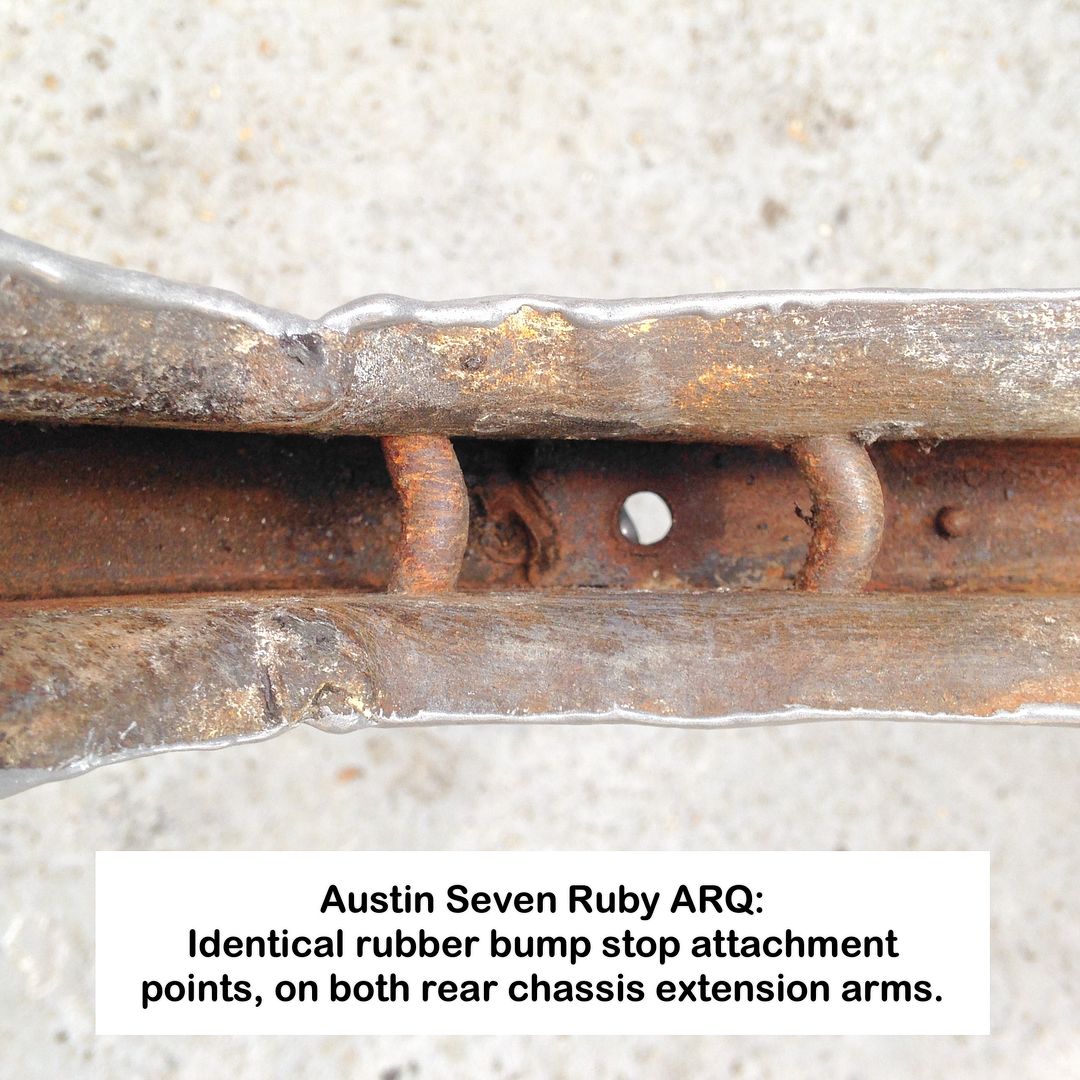
Chassis extension:
The following are for Tom the Blacksmith 
The metal only bent up as I was removing the rear axle, and had been professionally welded in the past when split.
Now Tom, please put me out of my misery and explain how the 'bleep' you realised that that front section was missing?
I forgot to take this photo previously, and those on Photobucket, until now, just don't show this, so you either have incredible eyesight or . . .
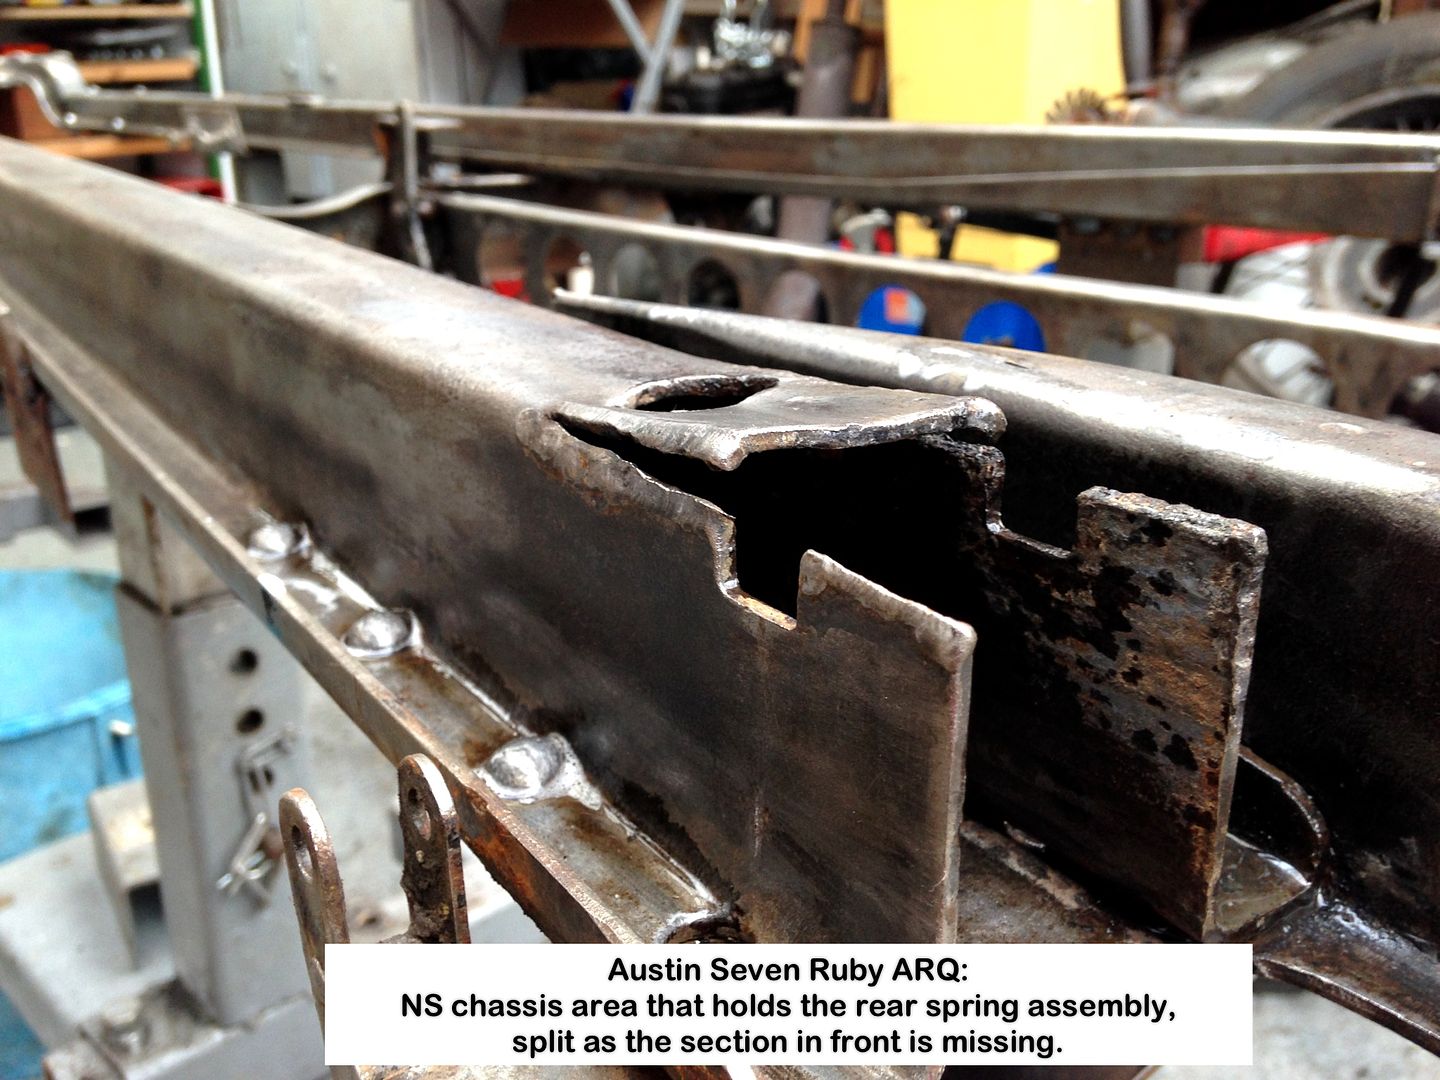
This is the section that Tom somehow deduced was missing, hence my remark about he being a Budding Sherlock:
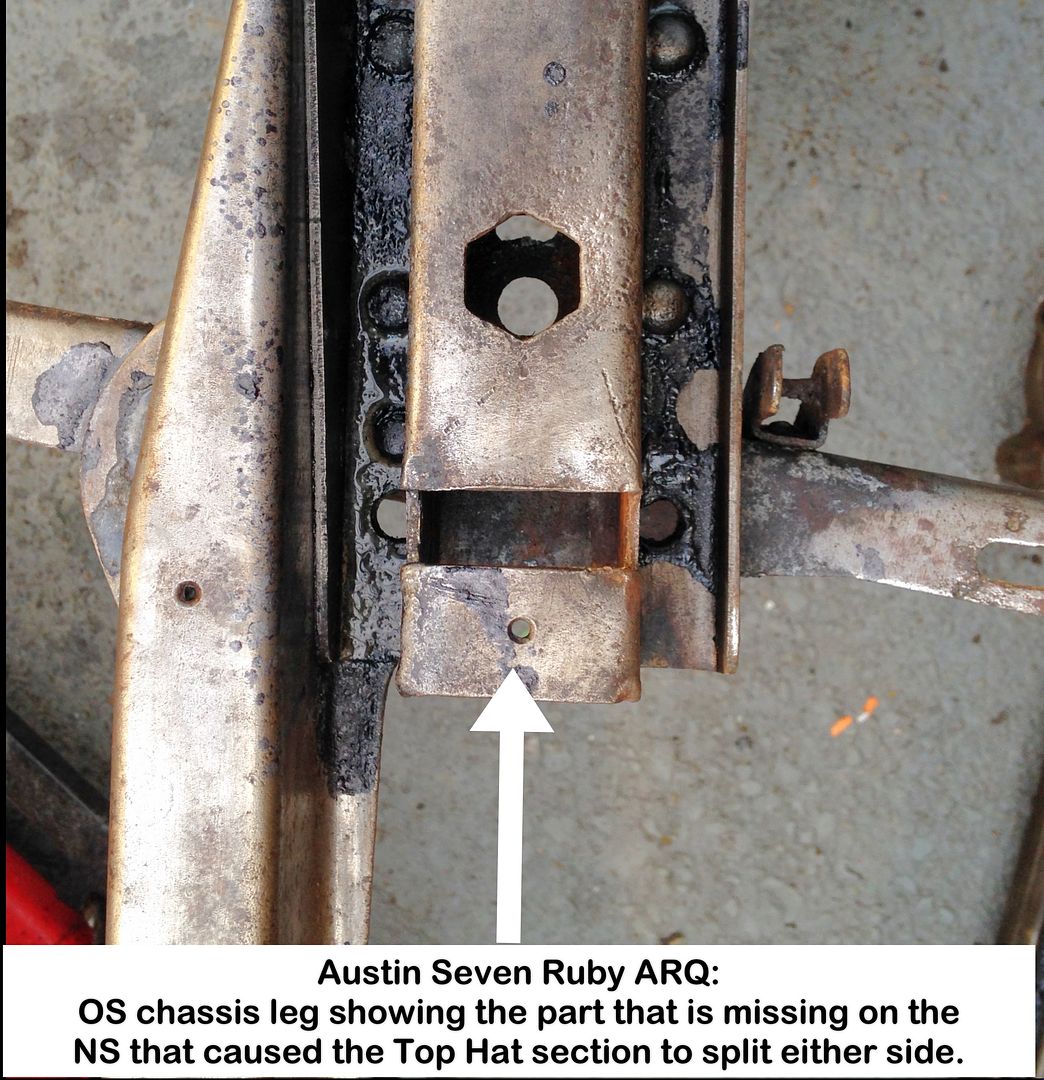
Repairs done to the other side and by a professional from appearance:
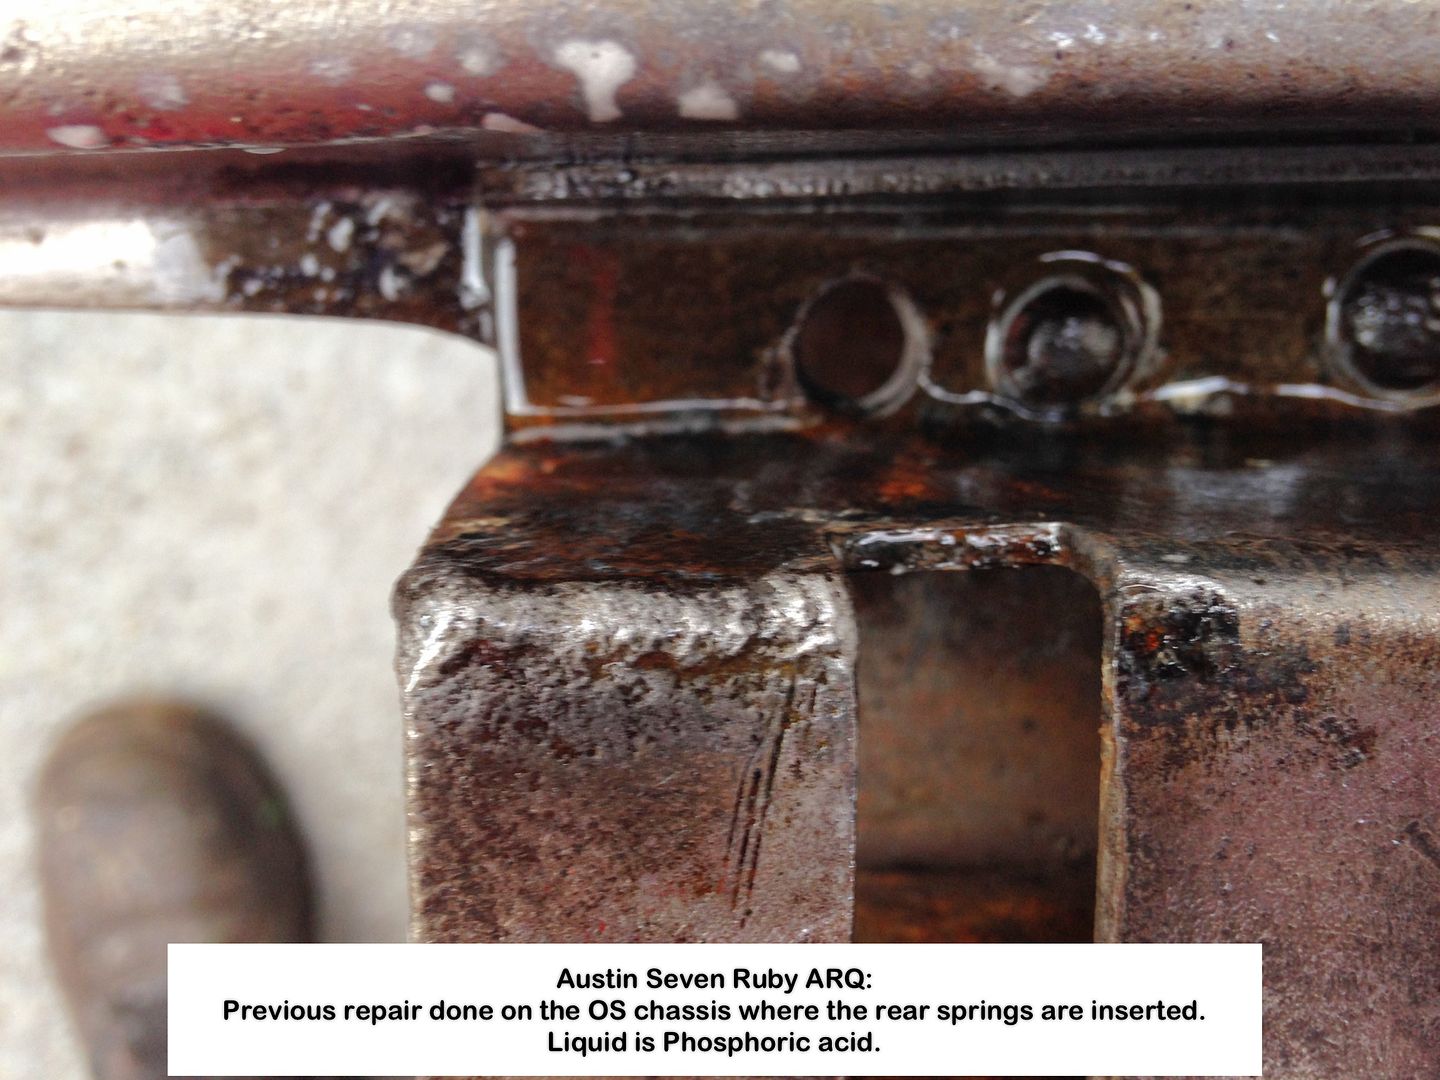
A weak area?
Owners with cars that have these chassis extensions please take note.
Chassis top in a rejuvenated Birthday Suite ready for an appropriate covering of DTM epoxy paint:
Although I have one of those Garage Creepers that convert into a seat, and was thus able to sit for most of the time whilst wielding the L-grinder, I was, however, still bent double for a while after standing up, until that is I could unbend myself.
The face shield precluded the use of a good mask, and those surgery type just had the inside of the shield misting up, so I was blowing dust out or nostrils afterwards for some time 
Suggestions please on a suitable mask to use with those full-face shields, something I will especially need when the time comes to strip the body of paint.
Still unwinding myself this morning 
Geoff - Getting old definitely has its drawbacks 
Location: South Norfolk - Next to Suffolk
Coming thick and fast today.
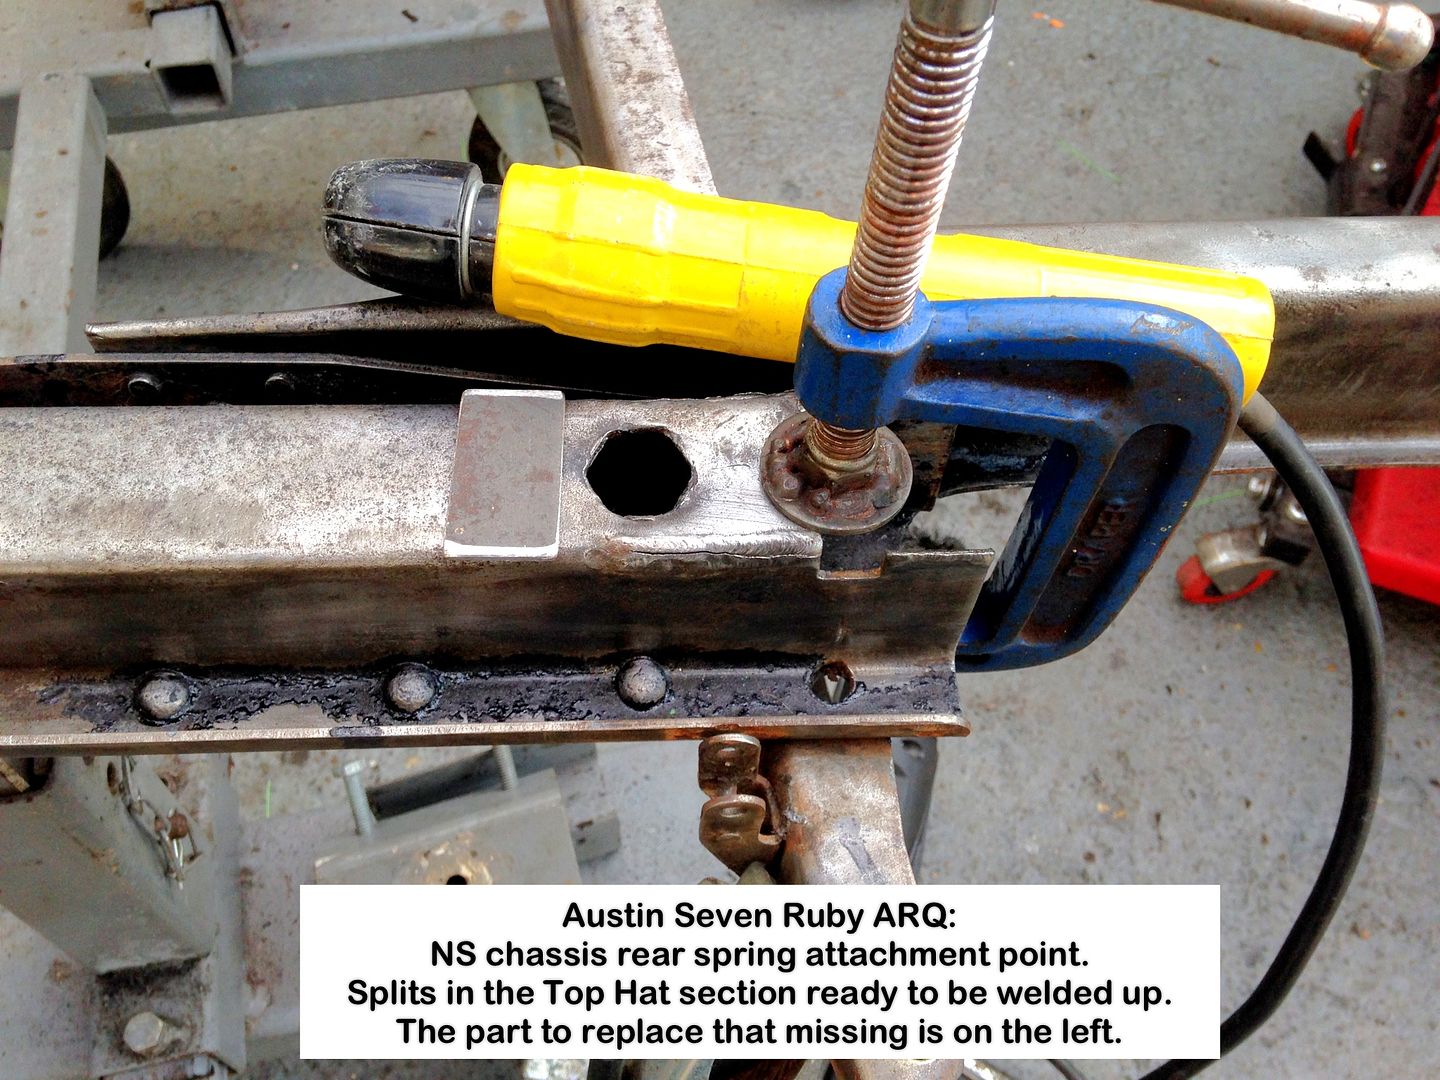
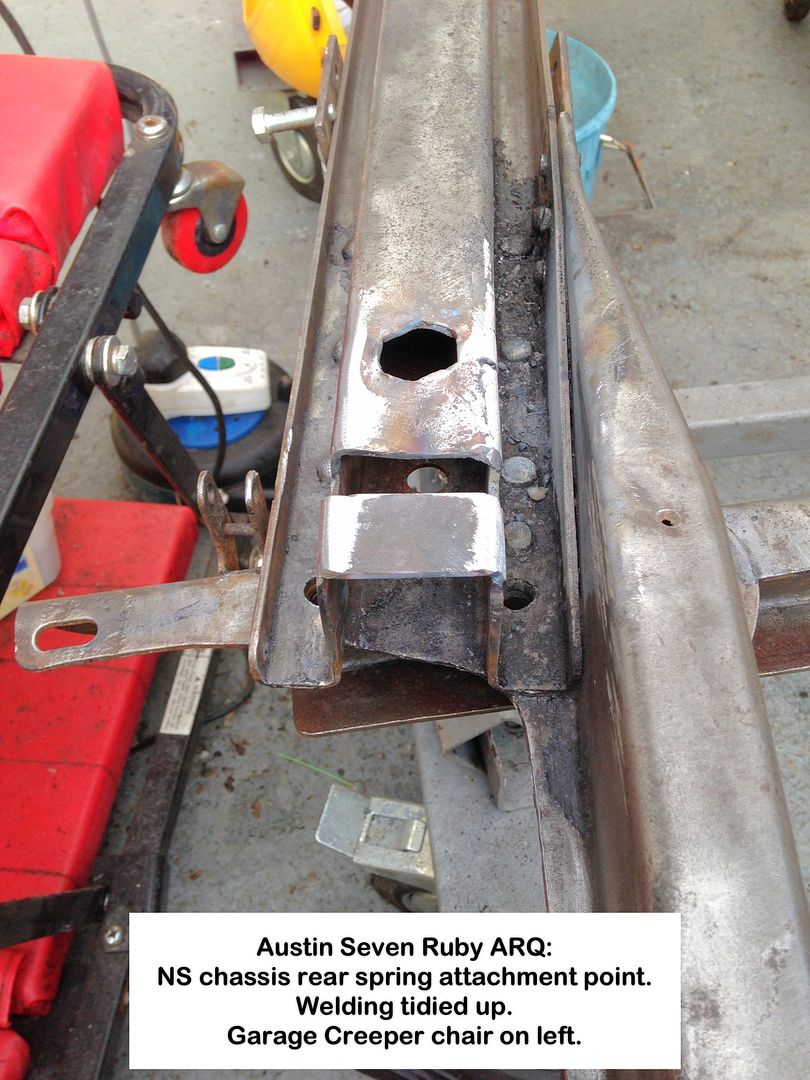
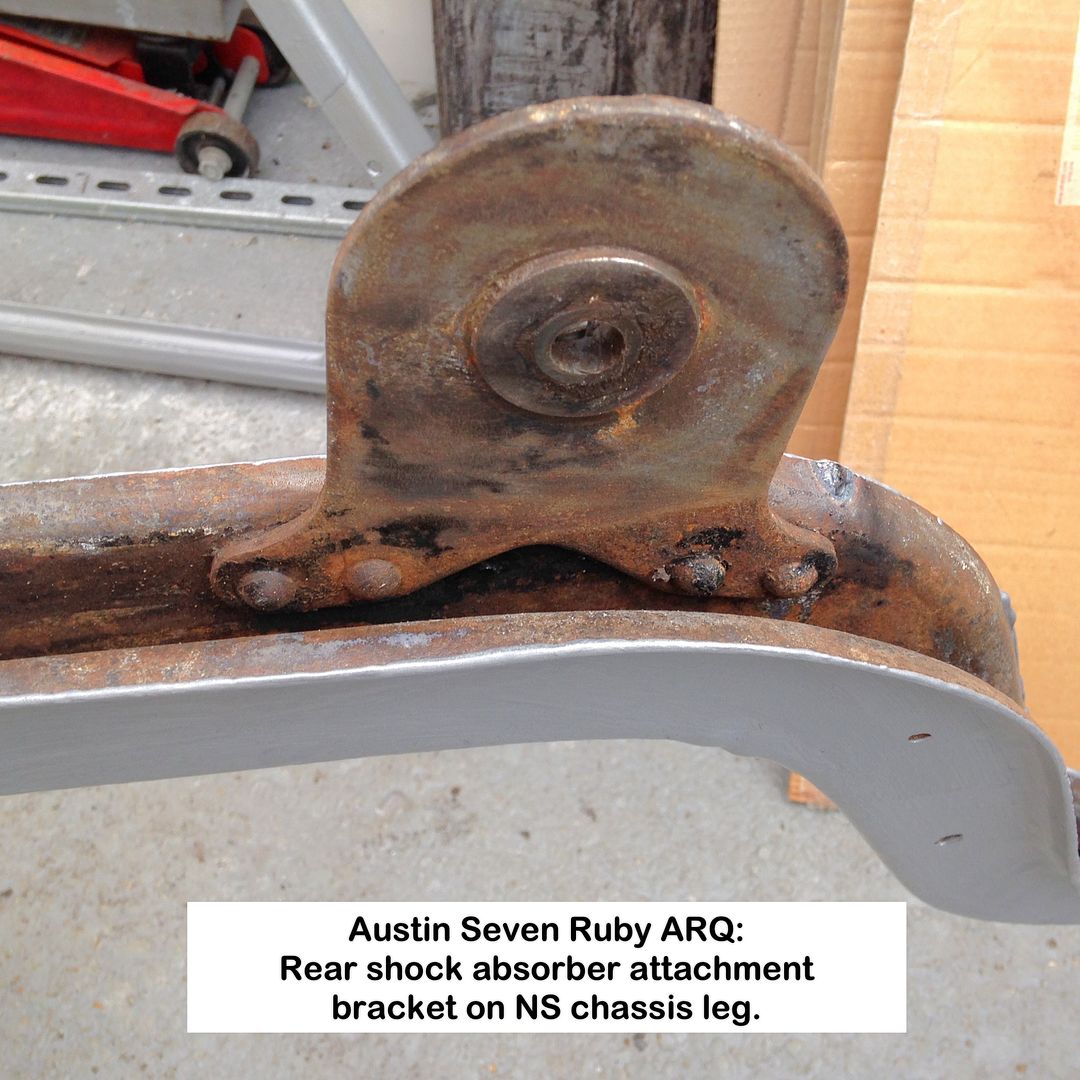
Did the welding repairs to the NS rear spring attachment point this morning, so now need to read up about using the Jotun DTM epoxy and how much activator to use.
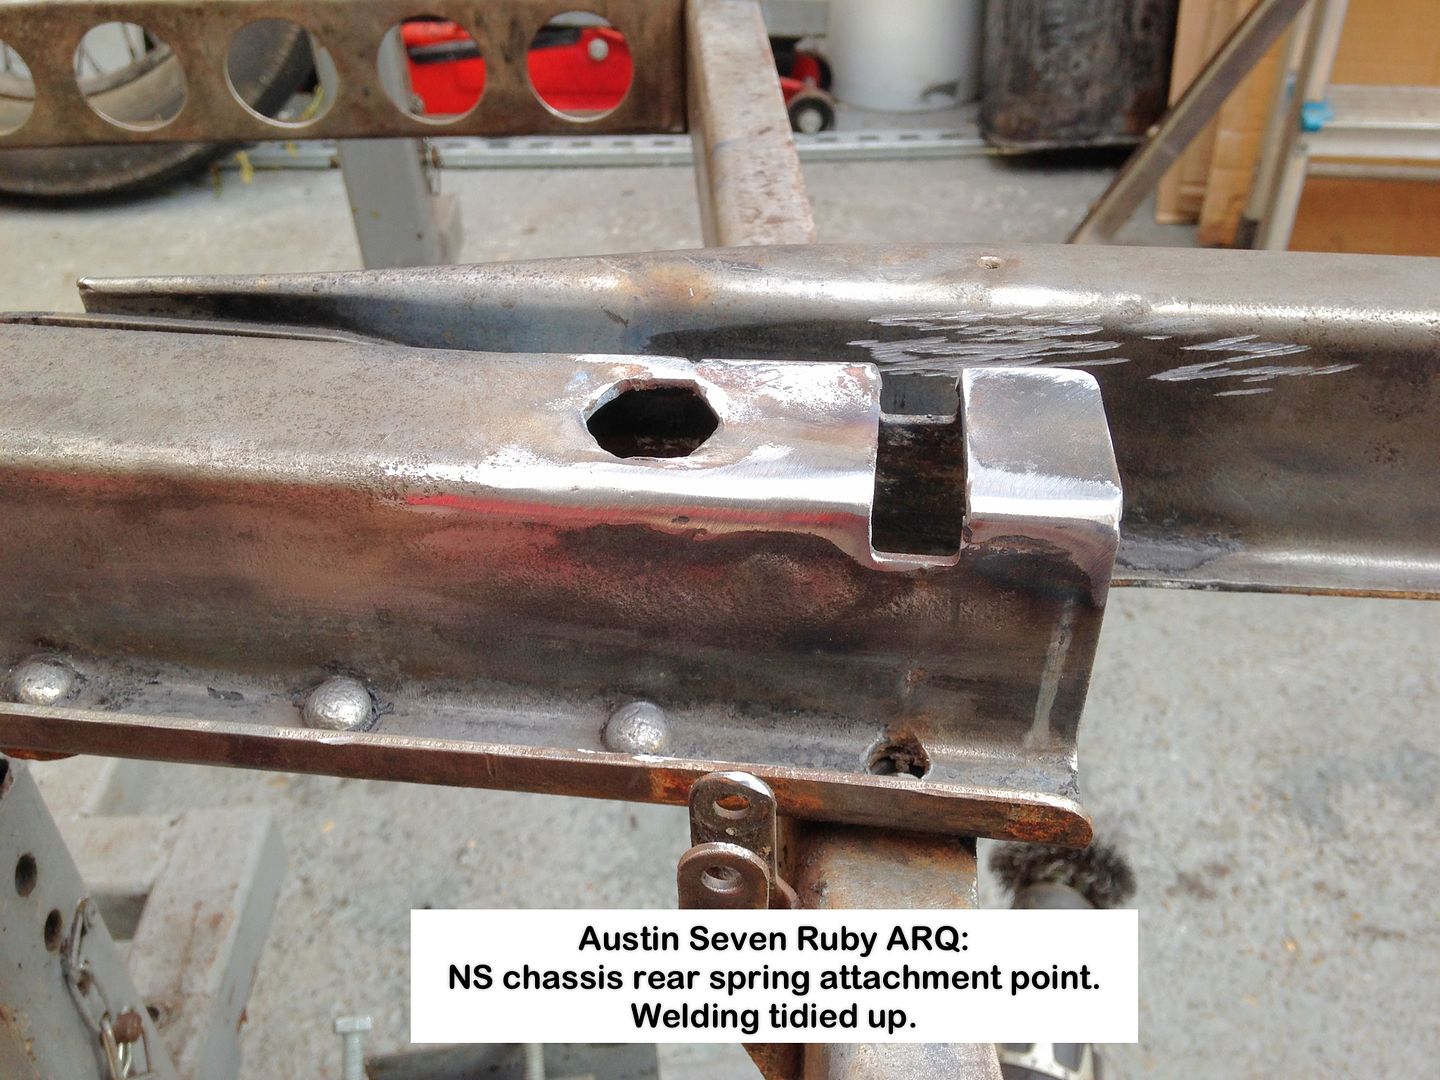
Measured the chassis material at 1/8" thick and found a piece of metal the correct width that just needed a slice the correct length cut off.
Ready to start welding:
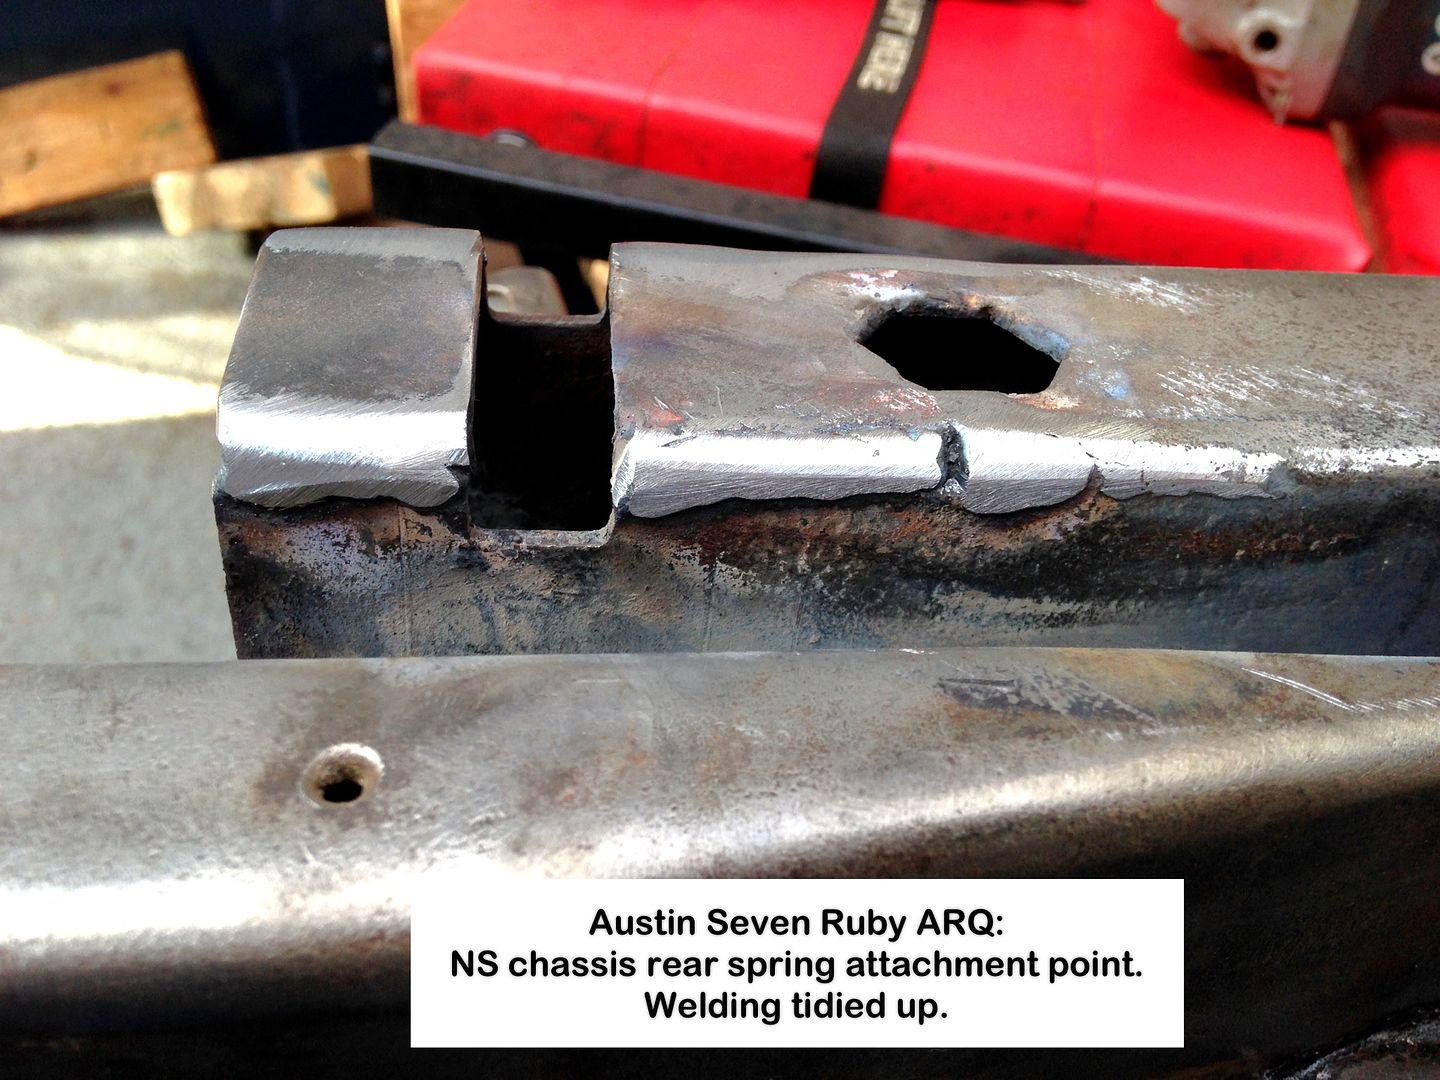
Set the stick welder to its maximum of 125A using a 4.5mm rod.
Welding the outer split was no problem, but kept blowing holes on the inner split so reduced power to 95A then used my O/A experience to fill said holes up, the rest of the welding going without mishap apart from an inclusion of flux on the inner split weld.
Splits and replacement done:
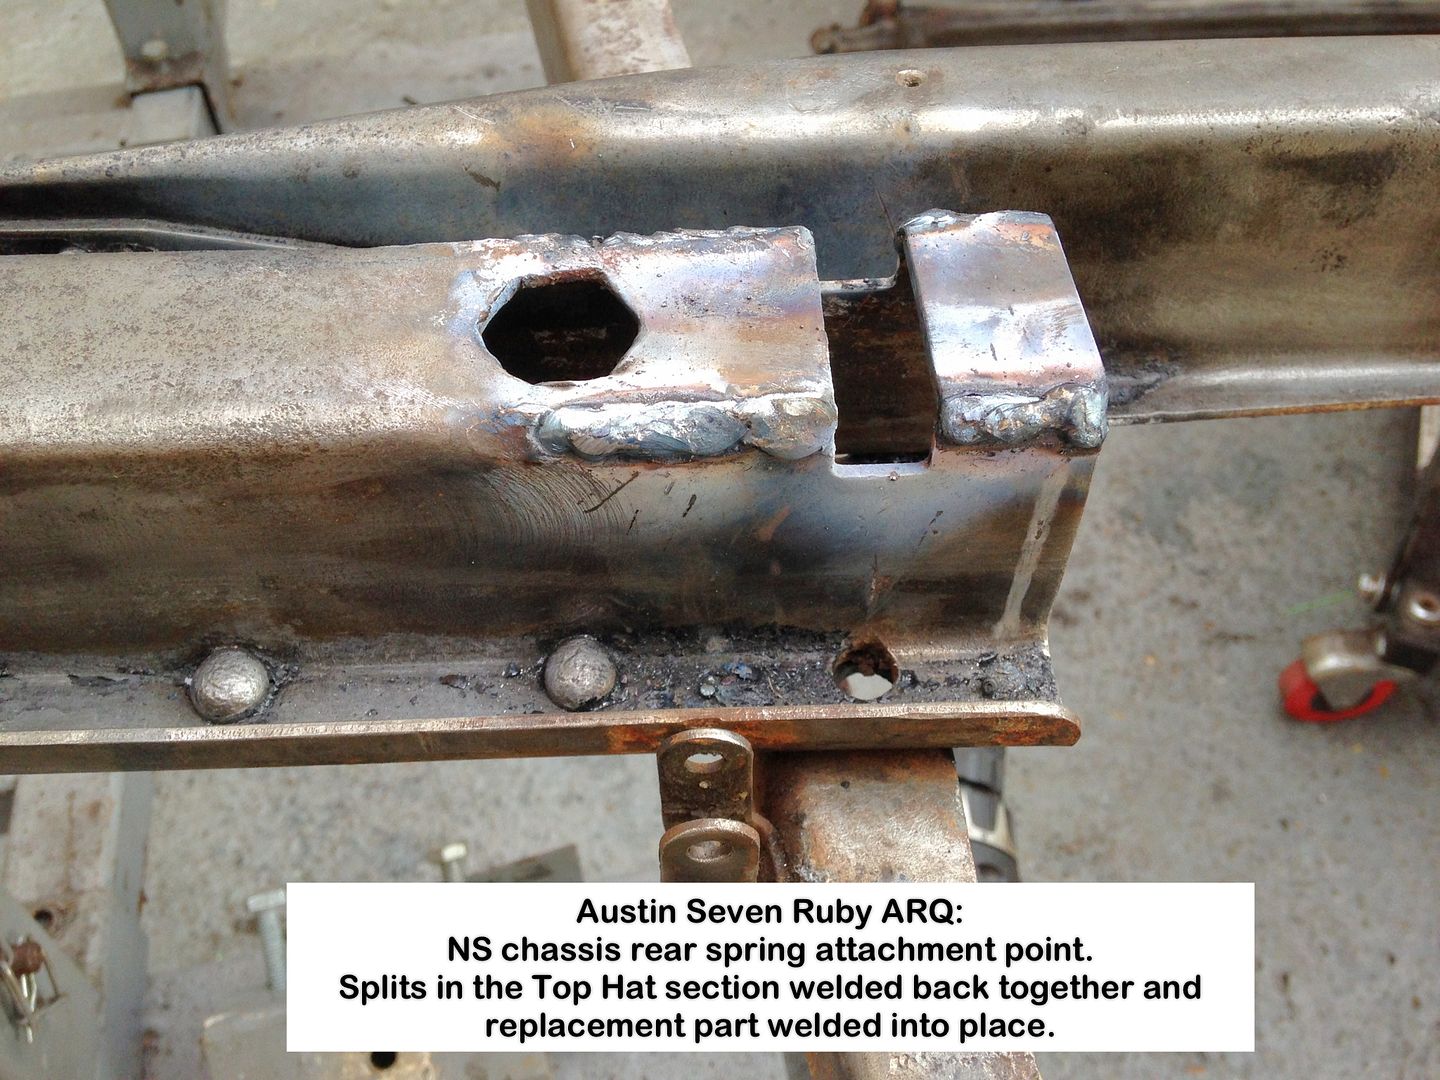
The replacement part was held in place by finger power, after giving up on using the G-clamp, just long enough to get a tack weld done. The rest was quick.
Welds tidied up:
Small split on the Extension welded up, at a previously repaired point:
Must say my stick welding has improved beyond recognition from its previous bird sh1t appearances, something I can only put down to previously welding too 'cold', but now with power upped, the weld is behaving itself.
Next will be painting chassis top section then front axle with radius arms attached.
Geoff - Just about walking upright again!
Location: South Norfolk - Next to Suffolk
Fell asleep in the armchair last night whilst listening to an audiobook of Mark Twain's 'The Innocents Abroad', so effing up my chances of sleeping later.
Decided to stop tossing and turning and do something constructive, so here it is.
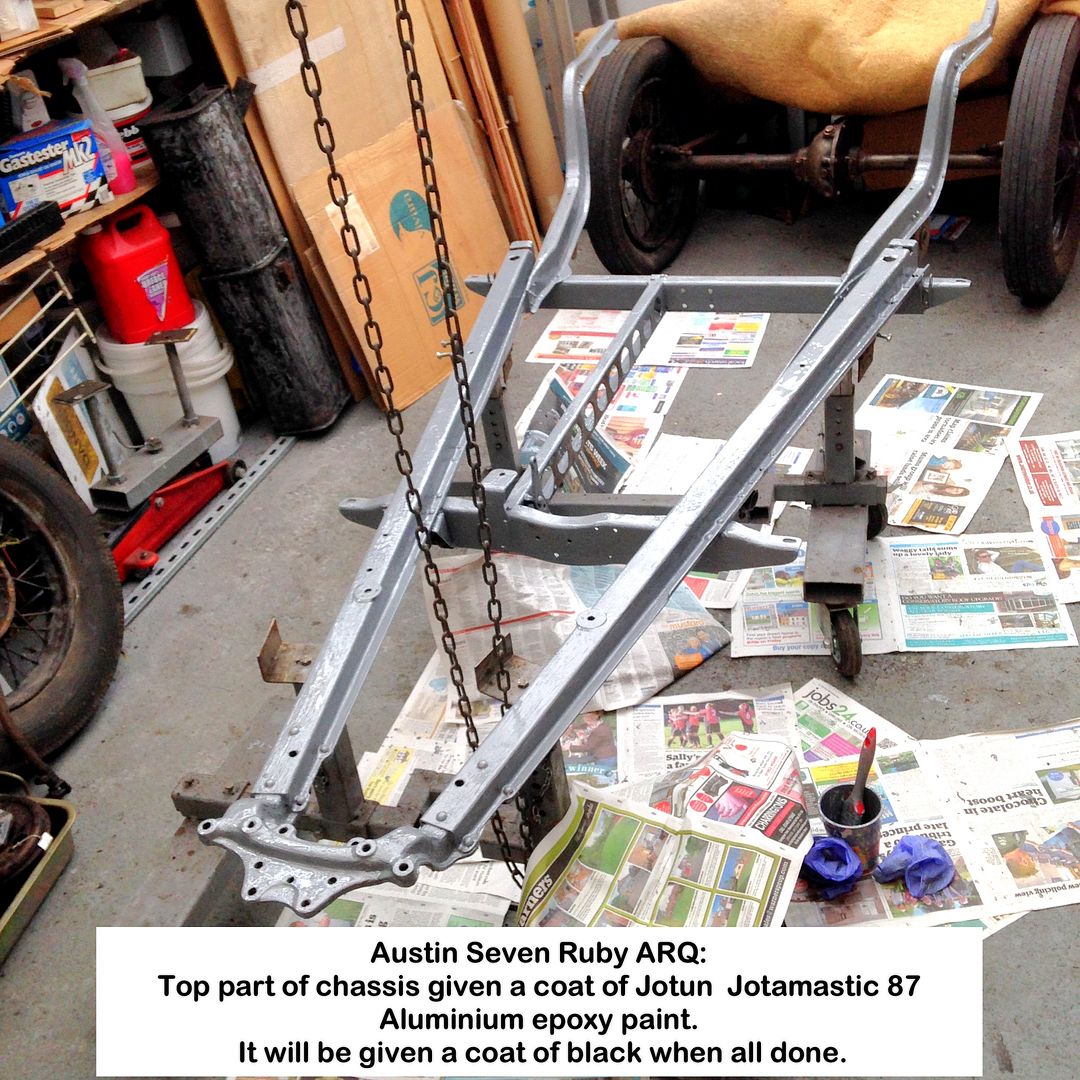
Top side of chassis painted after doing the welding.
Used Jotun Jotamastic 87 Aluminium epoxy paint, which took two days to cure using their Summer mix of 6:1 (paint:activator), so may well have to resort to the Winter mix of 4:1
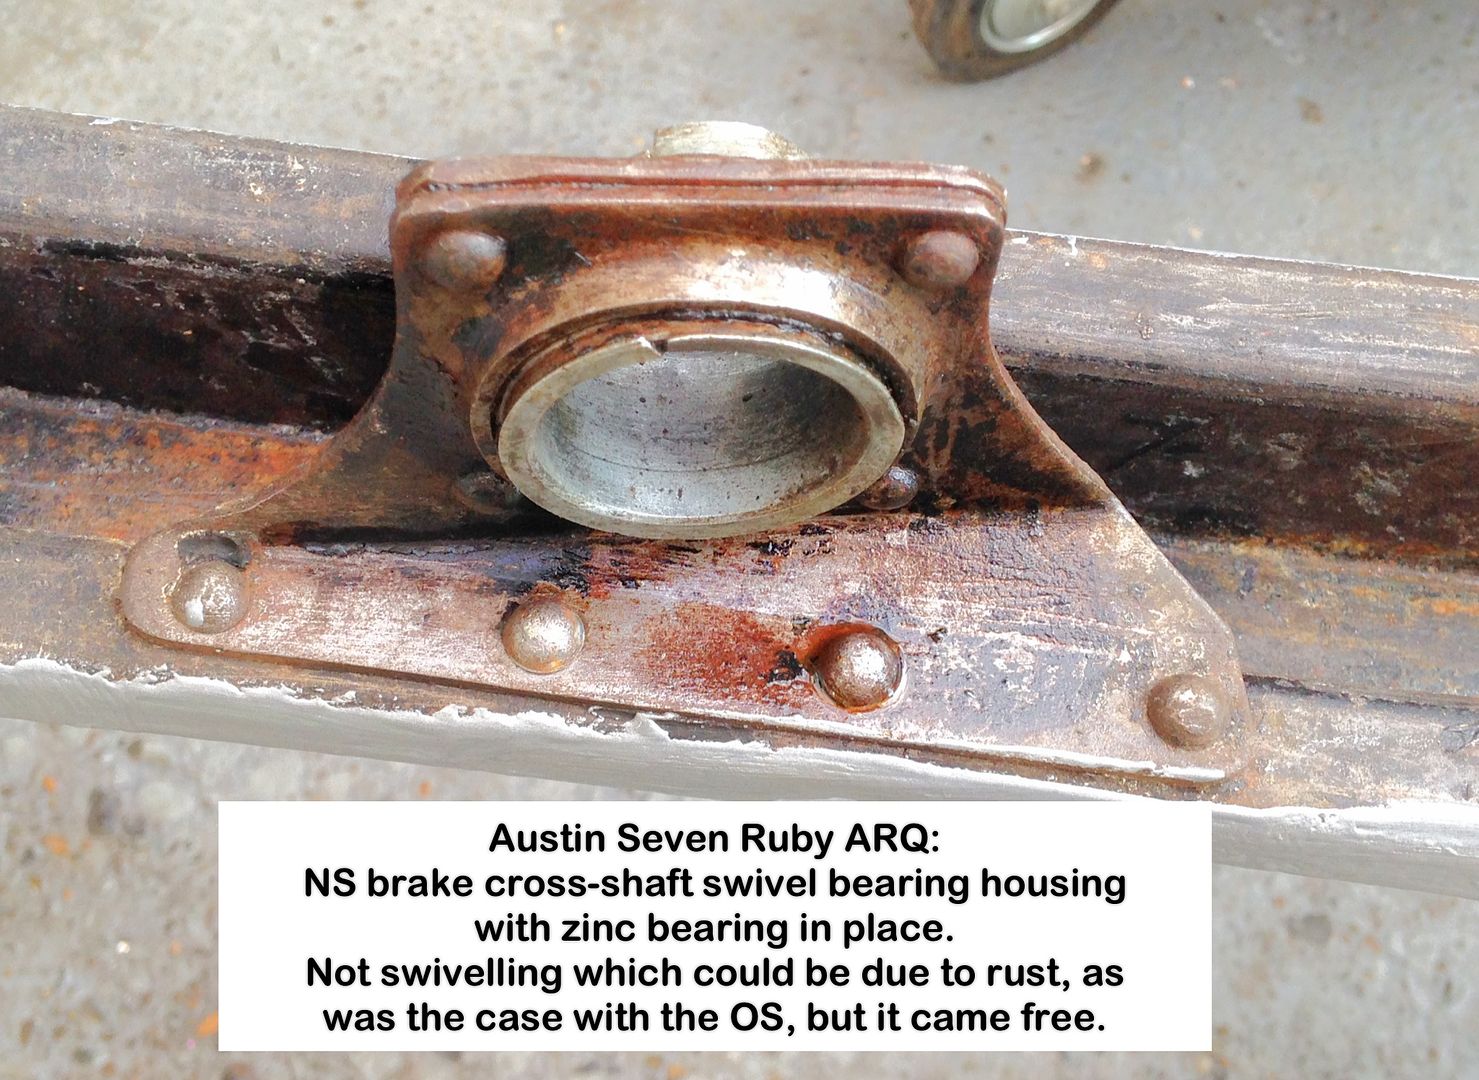
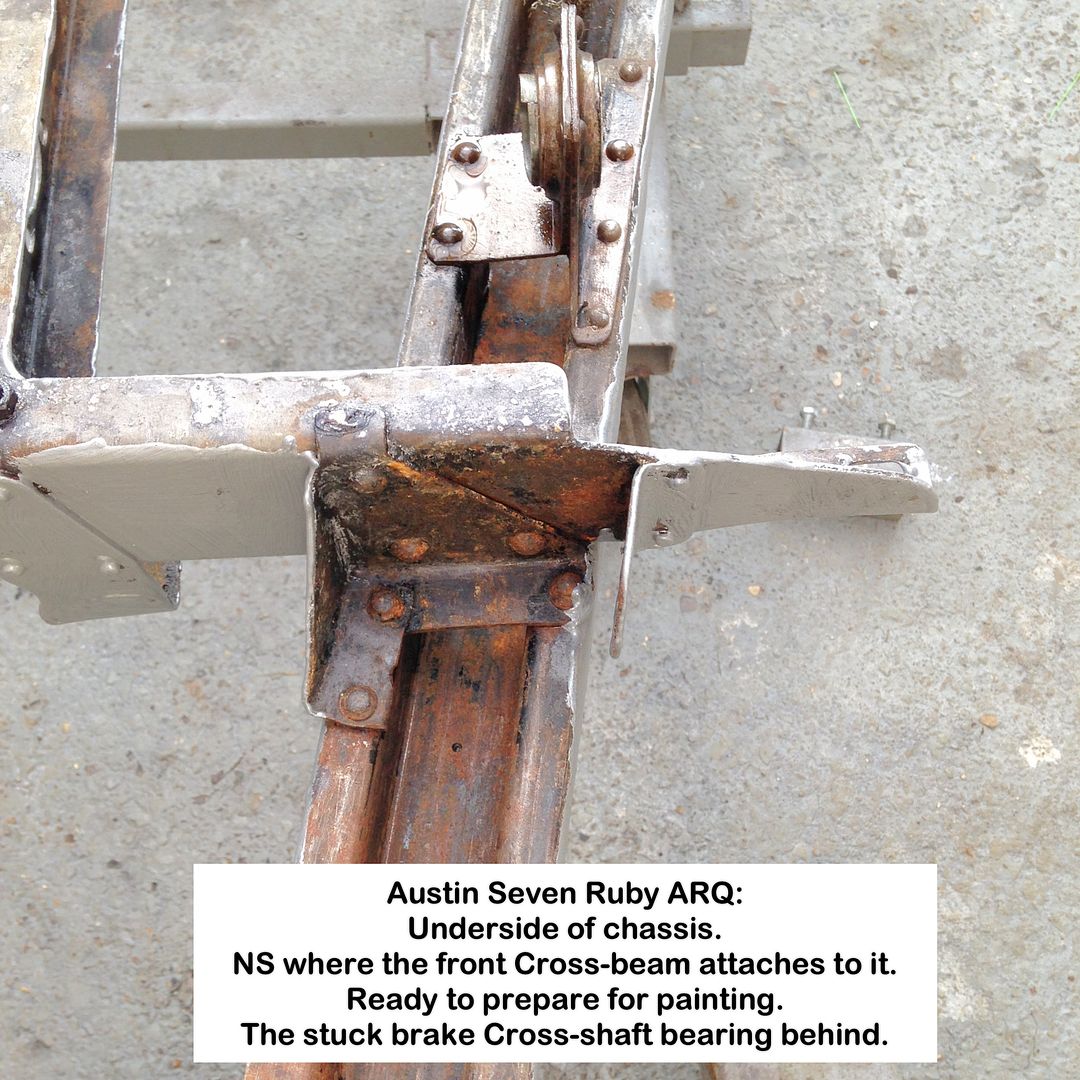
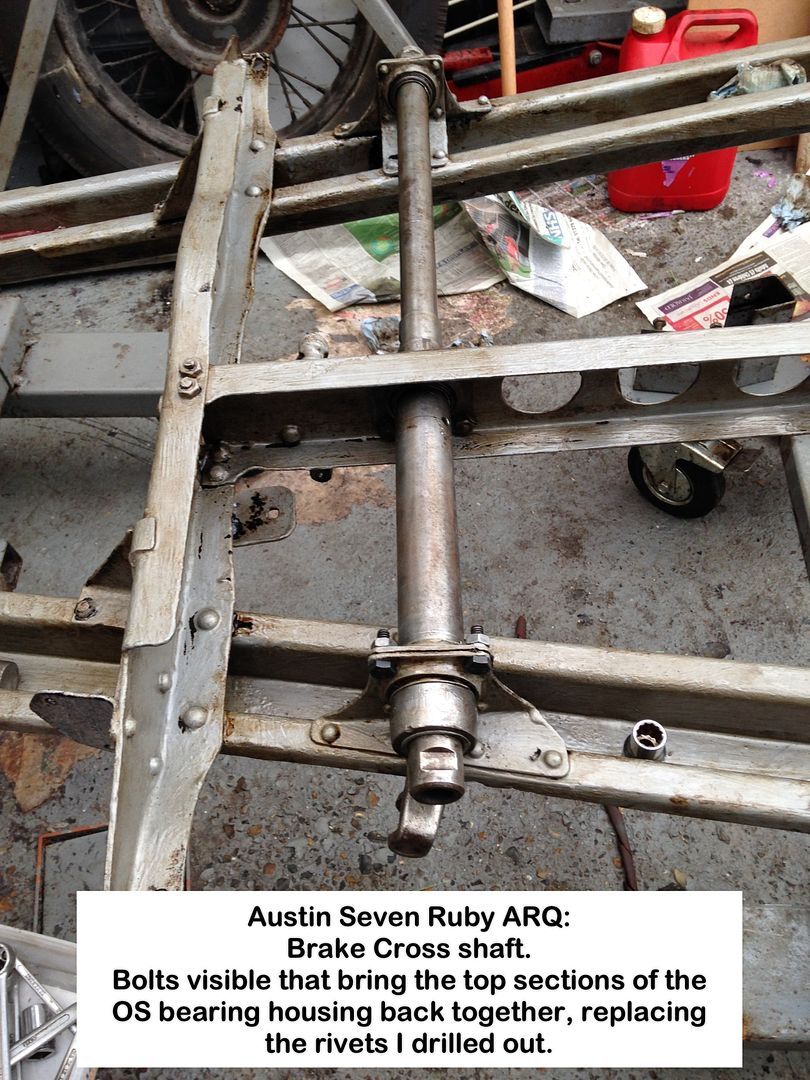
Chassis turned over and before doing anything else, needed to free the OS Brake Cross-shaft bearing as it would not swivel as did the NS.
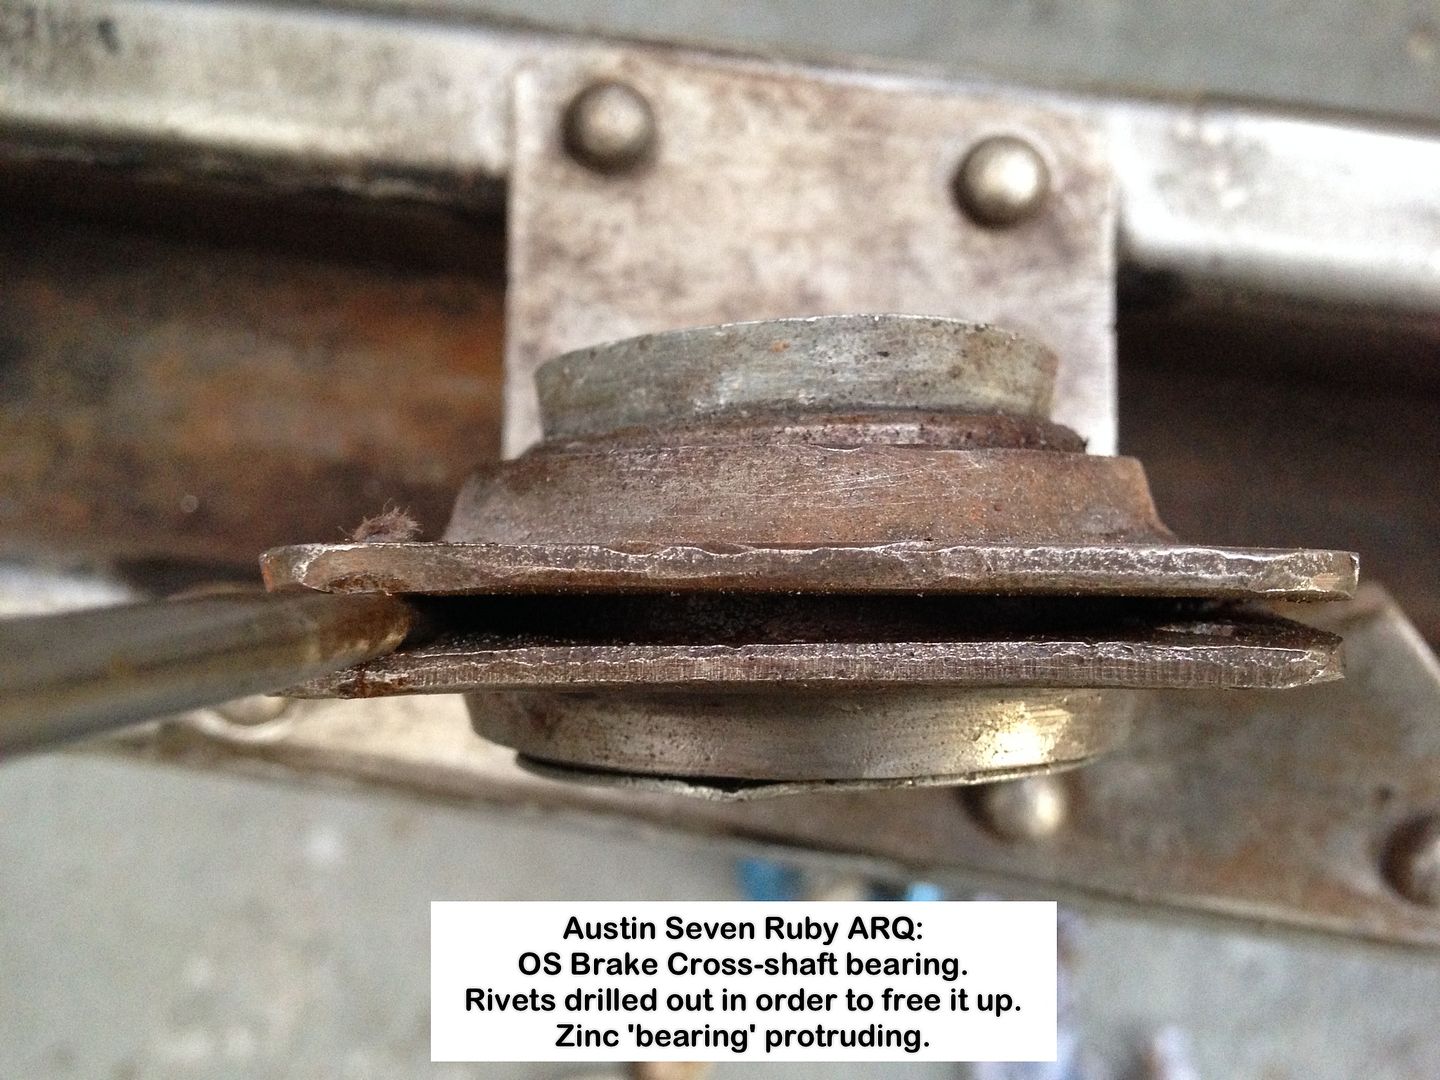
Tried everything I could think of to free it, but had to resort to grinding the heads off of the lower rivets and drilling them out:
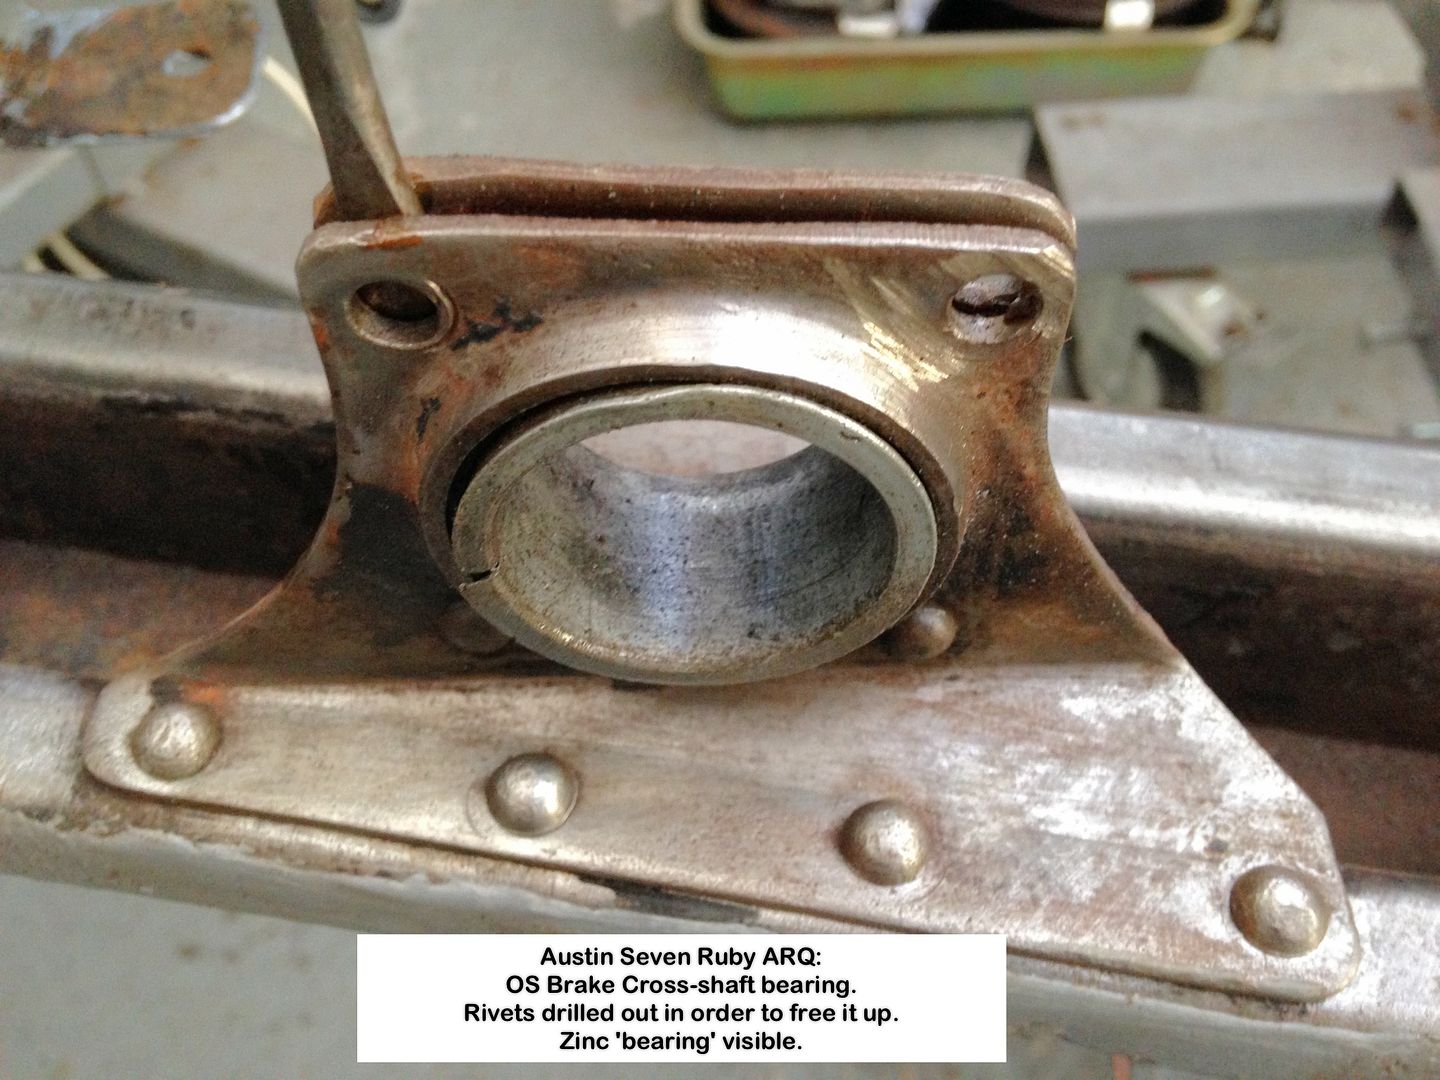
Had to prise the two housing halves apart before the bearing would move.
Cleaned the gunk out and got some movement, but nowhere near as much as the NS bearing has.
Removed the screwdriver, clamped the two parts together and the bearing locked solid with no movement at all.
It would appear that this bearing is not meant to swivel as the NS one does, but it can be made to move when the shaft is fitted, so aligning with the others.
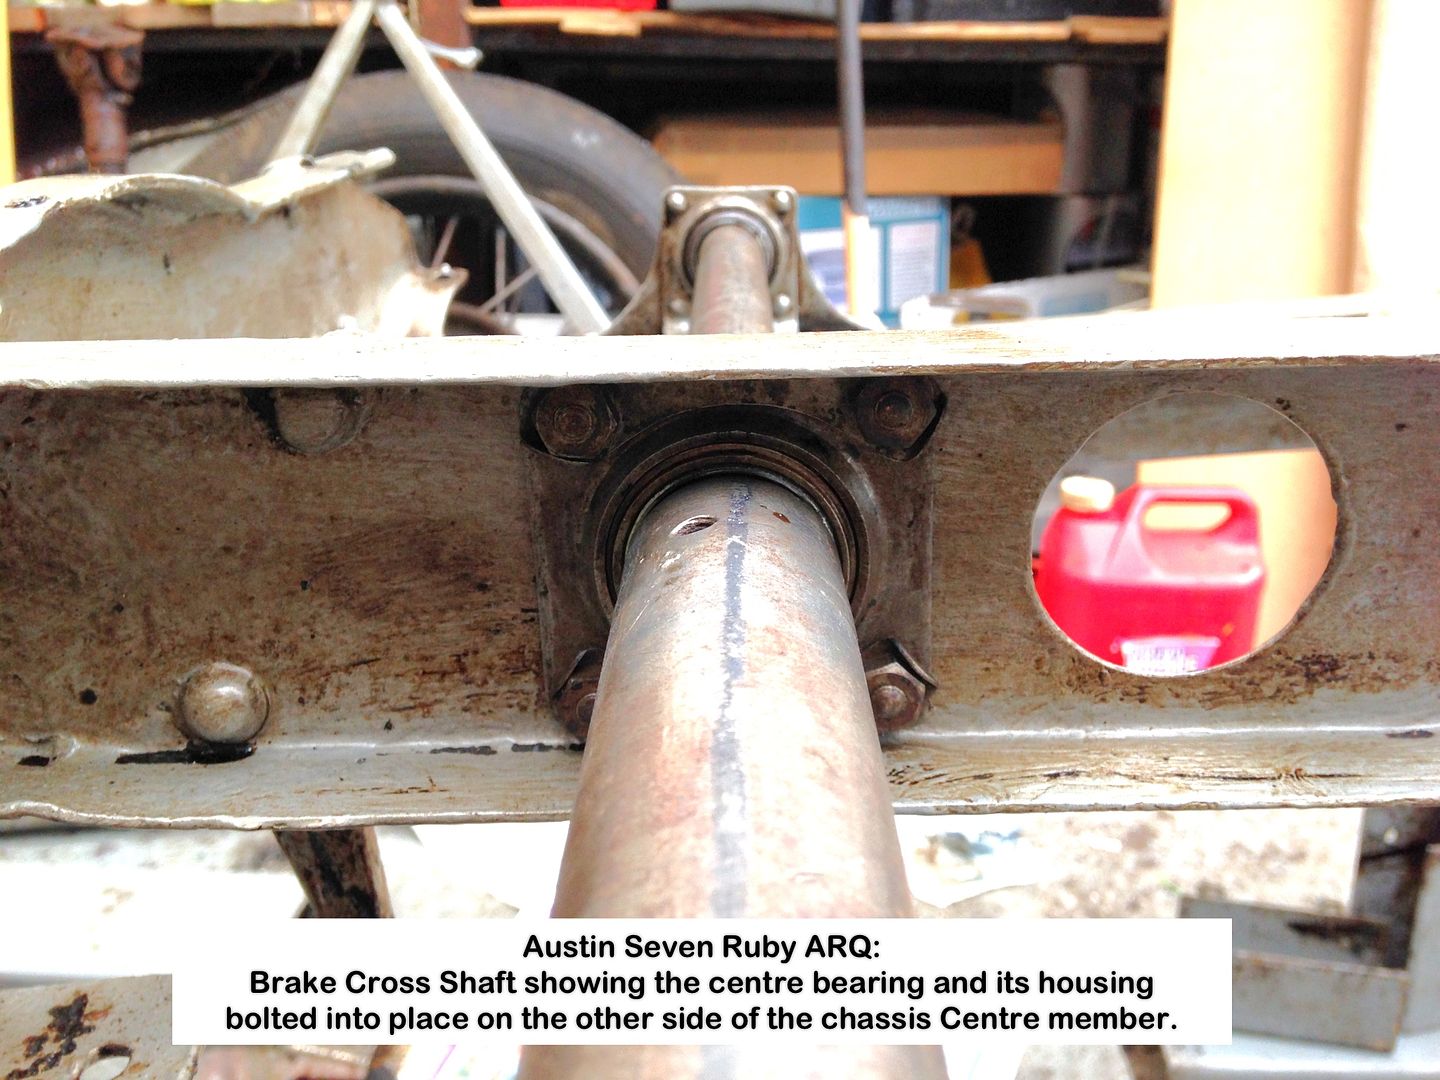
Brake cross-shaft bearings:
Video
The NS bearing was also stuck, but it soon freed up after applying heat, penetrating oil, then a few 'taps' with a hammer. The brown gunk that came out made be realise that they need protection of some sort from the elements.
Zinc 'bearing' material:
The centre bearing splits apart so easy to clean, but all three bearings need some easy way of getting oil or grease to them.
Zinc is excellent for high load low speed applications.
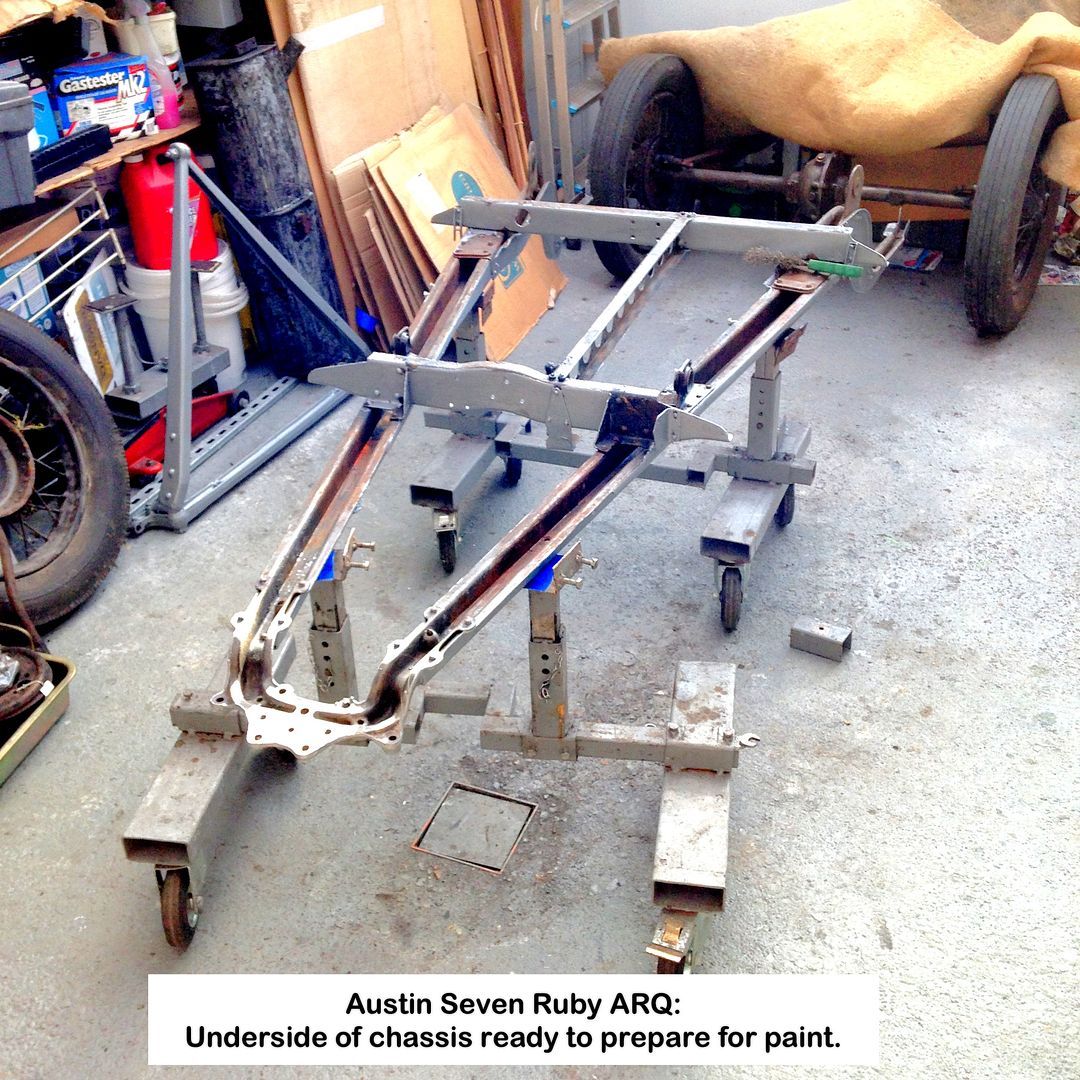
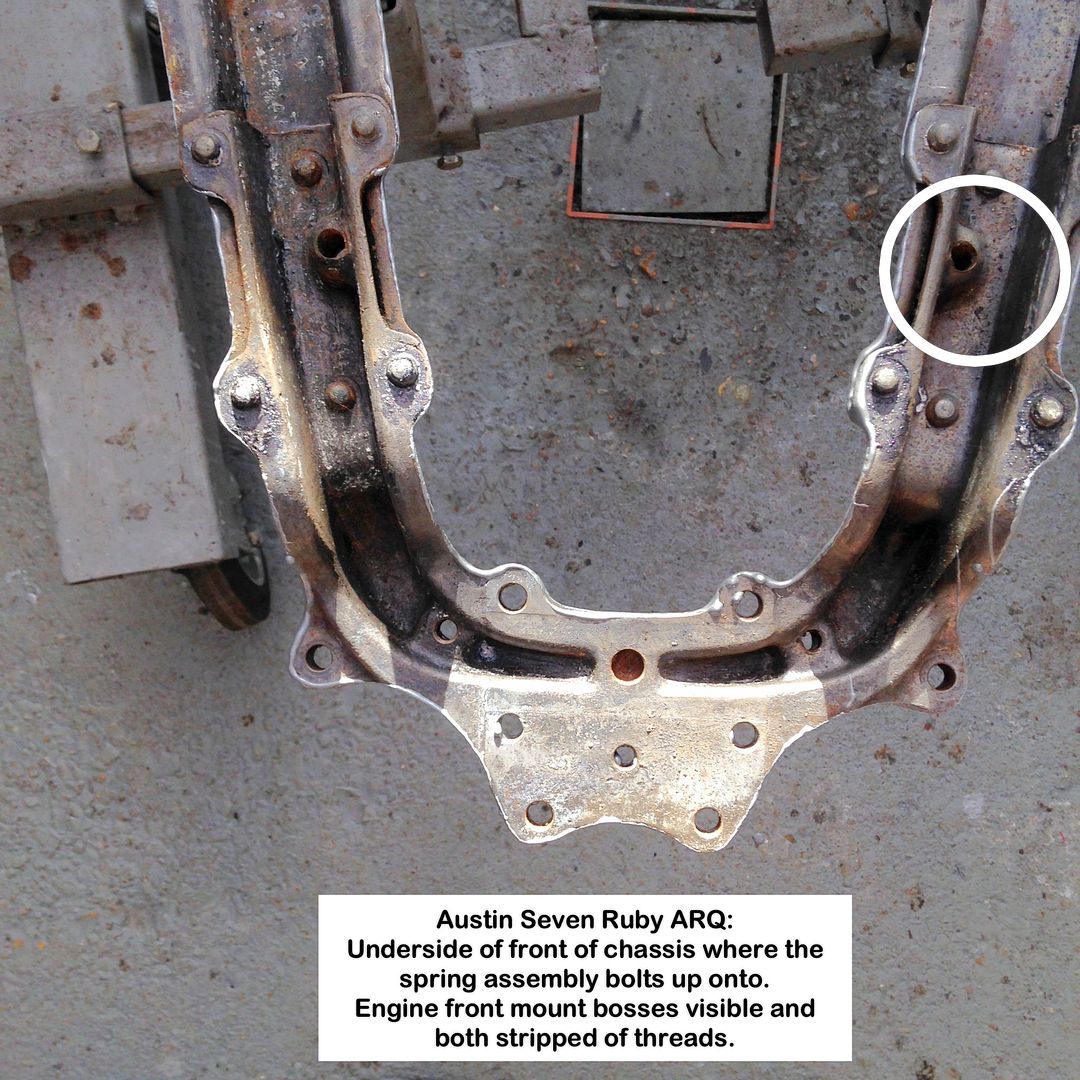
Chassis underside:
Geoff - Waiting for a 5" wire wheel.
PS:
Forum clock needs resetting, as I do 
Location: South Norfolk - Next to Suffolk
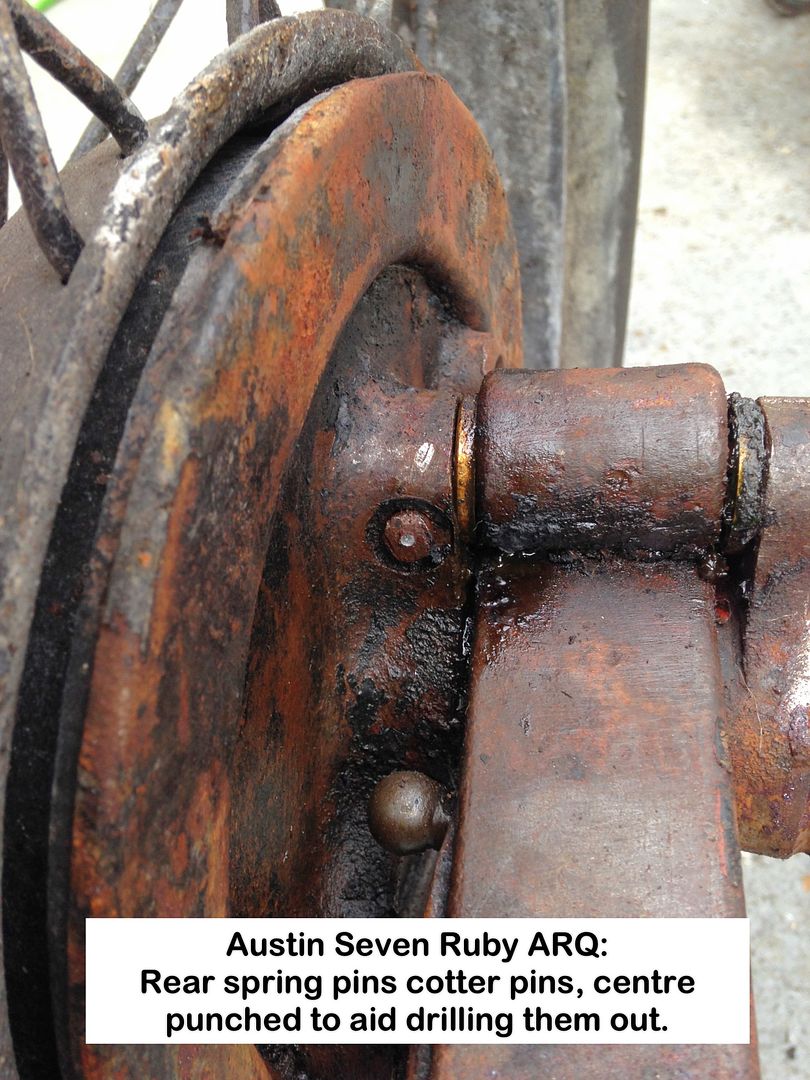
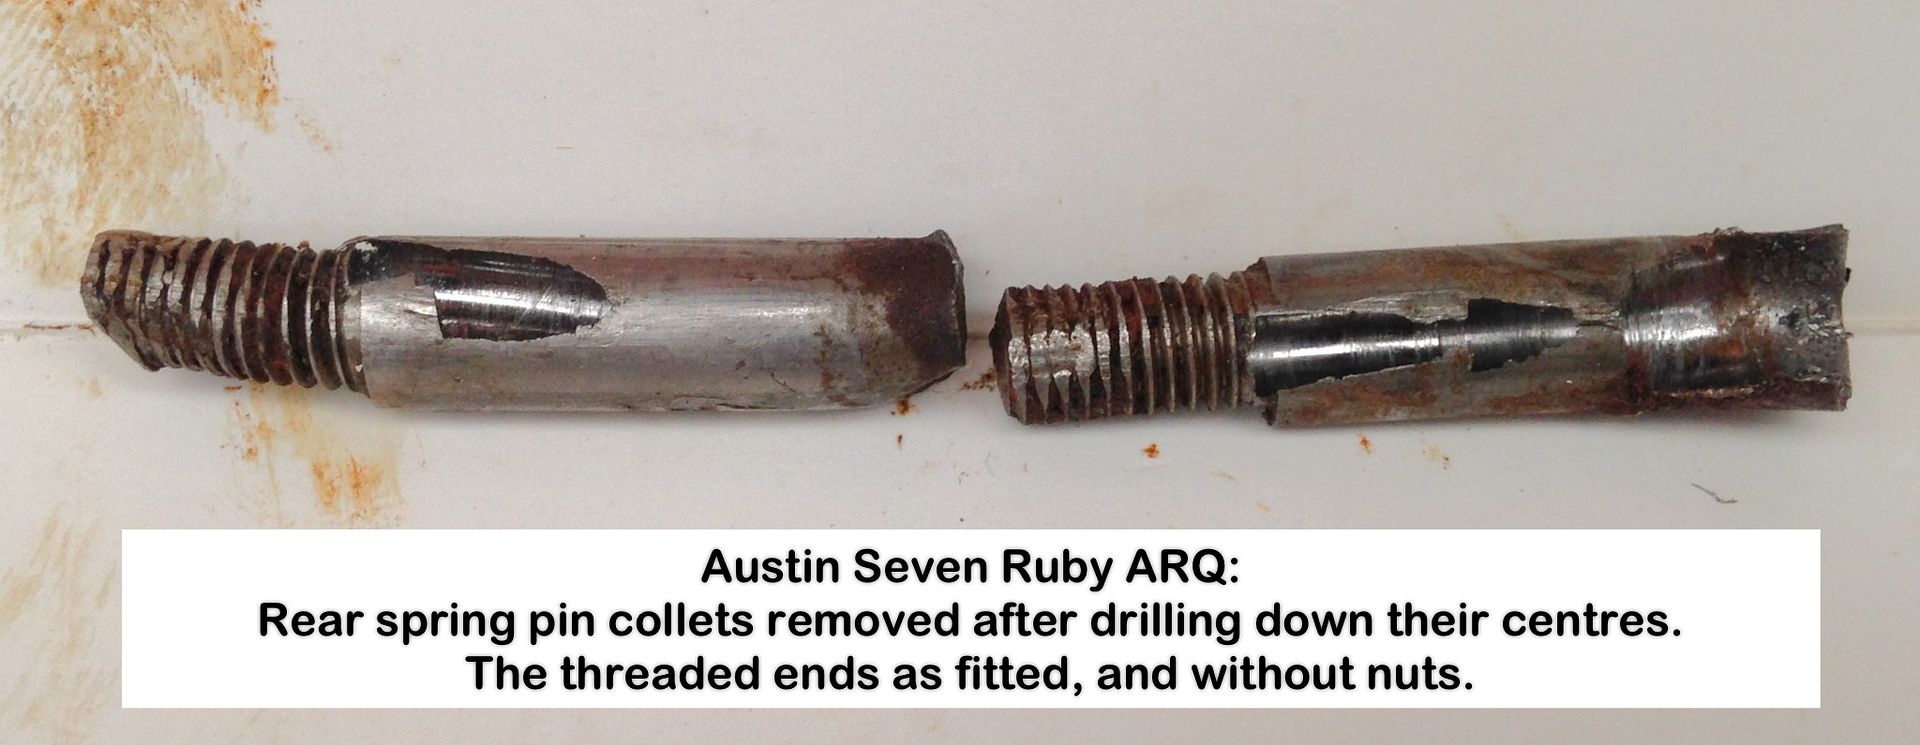
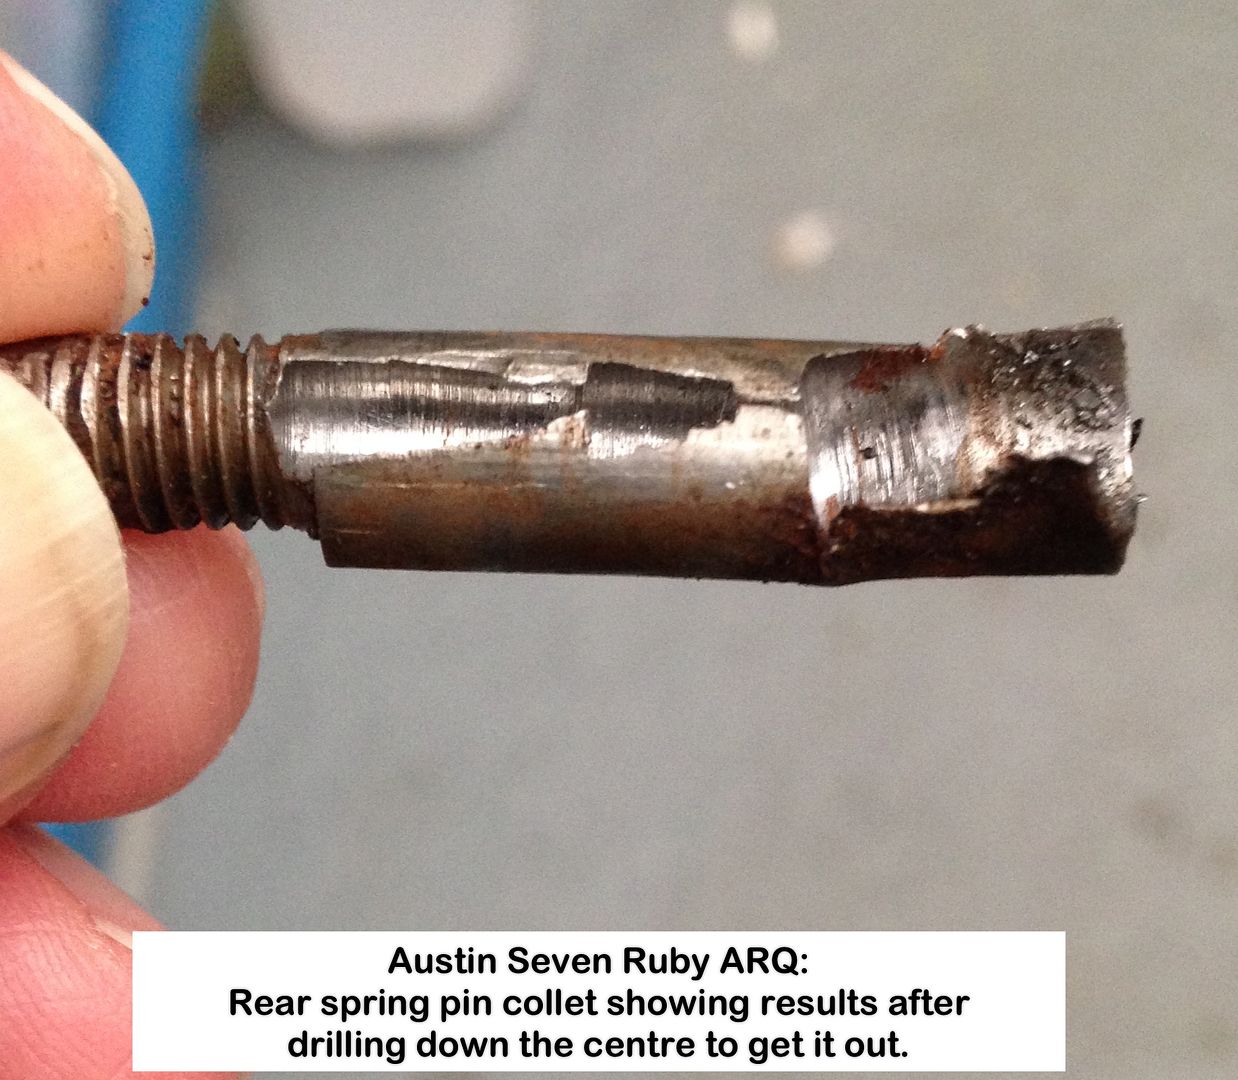
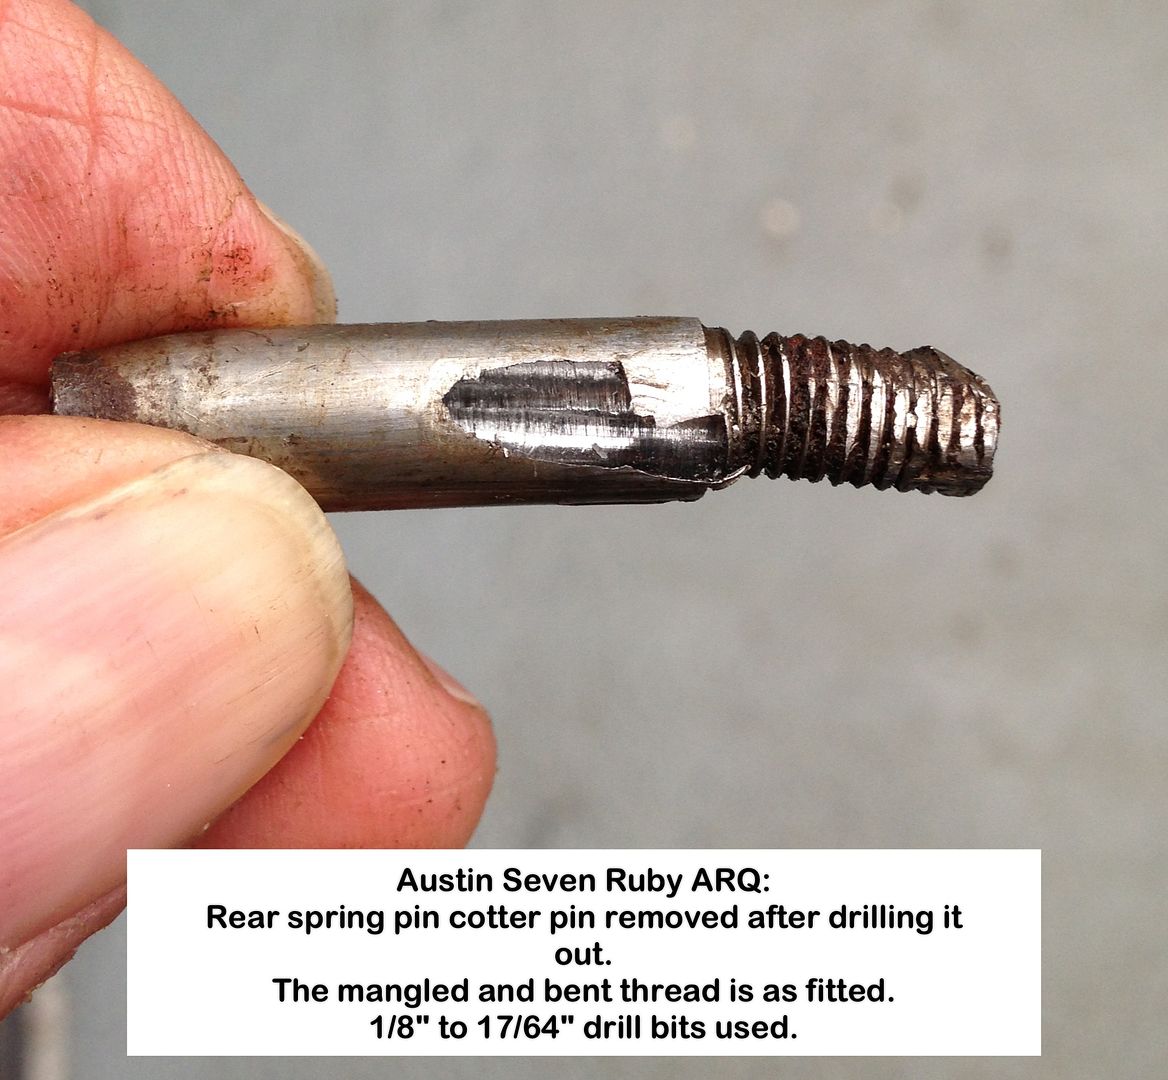
Photos of the method used to get the rear spring pin collets out as they where well and truly stuck.
Club hammer was aimed at the steel bar as close to the backplate as possible, but had absolutely no effect until I drilled the collets.
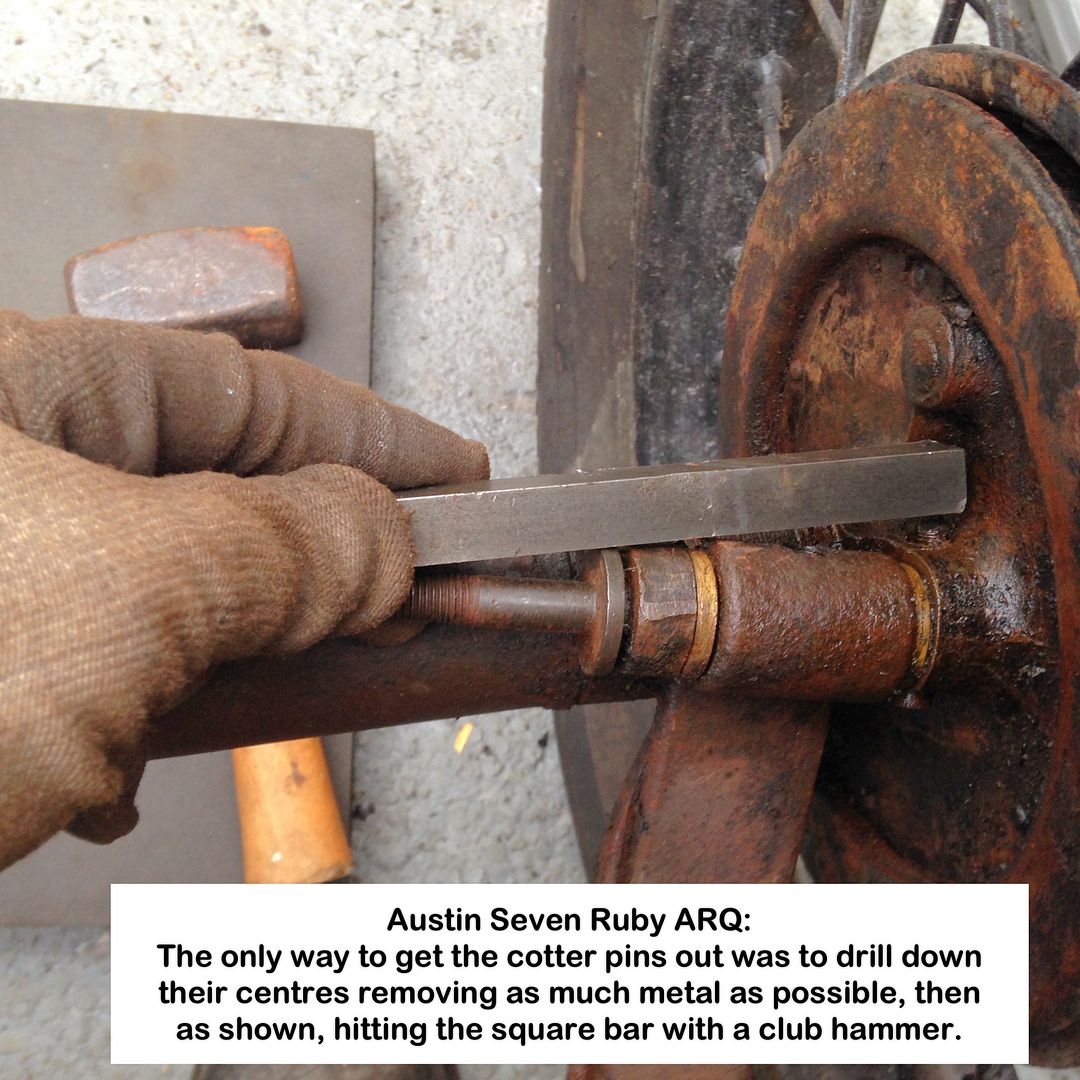
Preparing the collets to be drilled:
Collets being drilled:
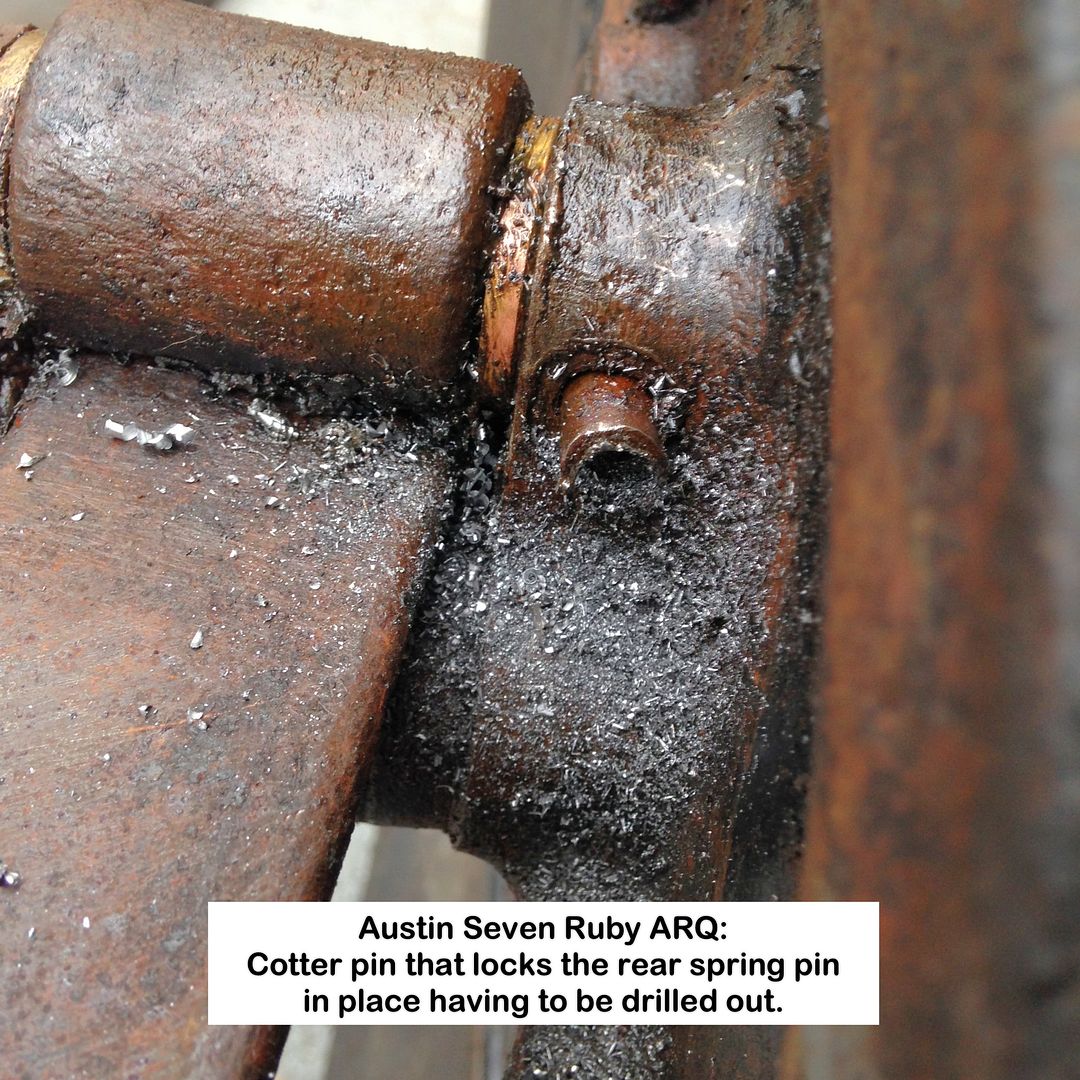
End result:
Geoff - In recovery mode.
Edit:
 iOS 9.0.2
Location: South Norfolk - Next to Suffolk
Duplicated this post, in an effort to keep this thread up to date.
Tom the Blacksmith was kind enough to drop his slide hammer off Wednesday evening.
Central heating (CH) guy arrived at the same time, my CH being on the blink, he finding that a temp fuse, at the top of the fan housing had blown, and he just having used his last.
Thursday attacked the spring pins, using a slide hammer for the very first time and the efficacy of such tools made me realise that they are a must in any workshop, so I shall be making one.
Attached it to the NS pin 'activated' it, but nothing!
Not enough welly so second time put more force in shifting the slider back and blow me the pin was out.
Couldn't quite believe how easy it was, and made me realise why everyone has suggested using a drift to punch them out.
The OS pin came out with just one action of the slider.
Another surprise was the new condition of the pins and their bushes, expecting to have to replace them due to wear.
Brand new Spring pins and bushes:

Thumb:
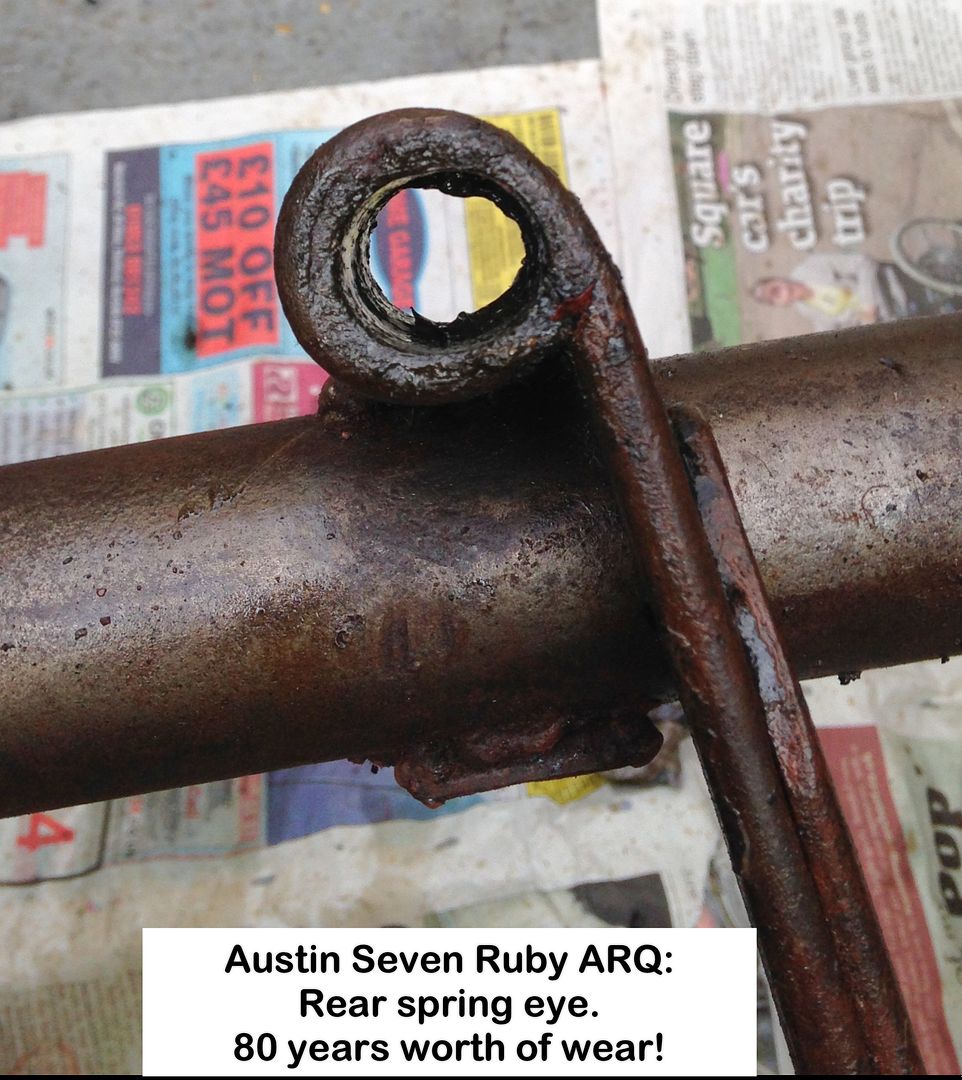
Cannot say the same about the springs.
There now appears to be some question whether these grooves are through wear, or done at time of manufacture.

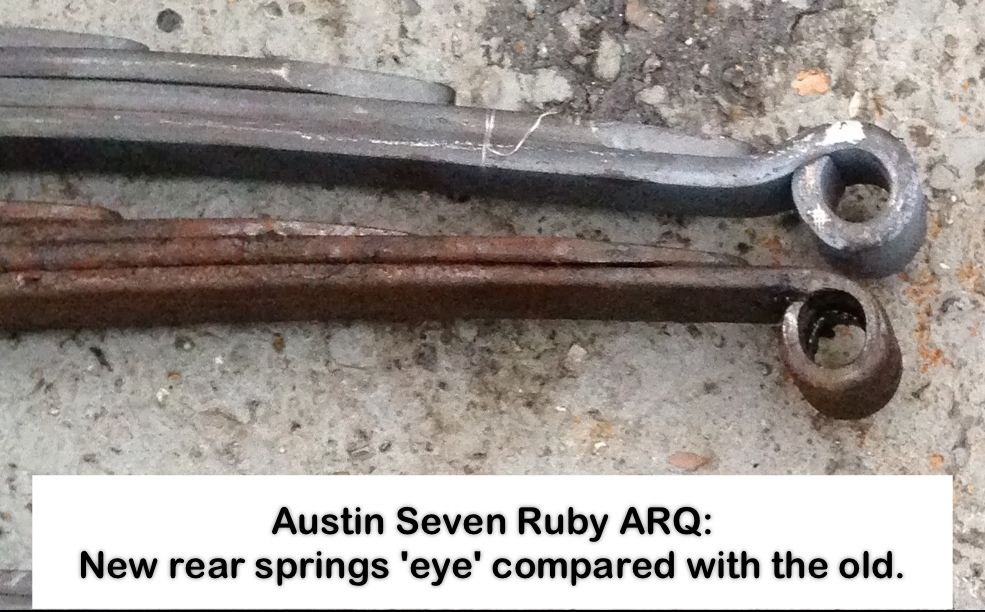
Spring eyes with unquestionable wear:
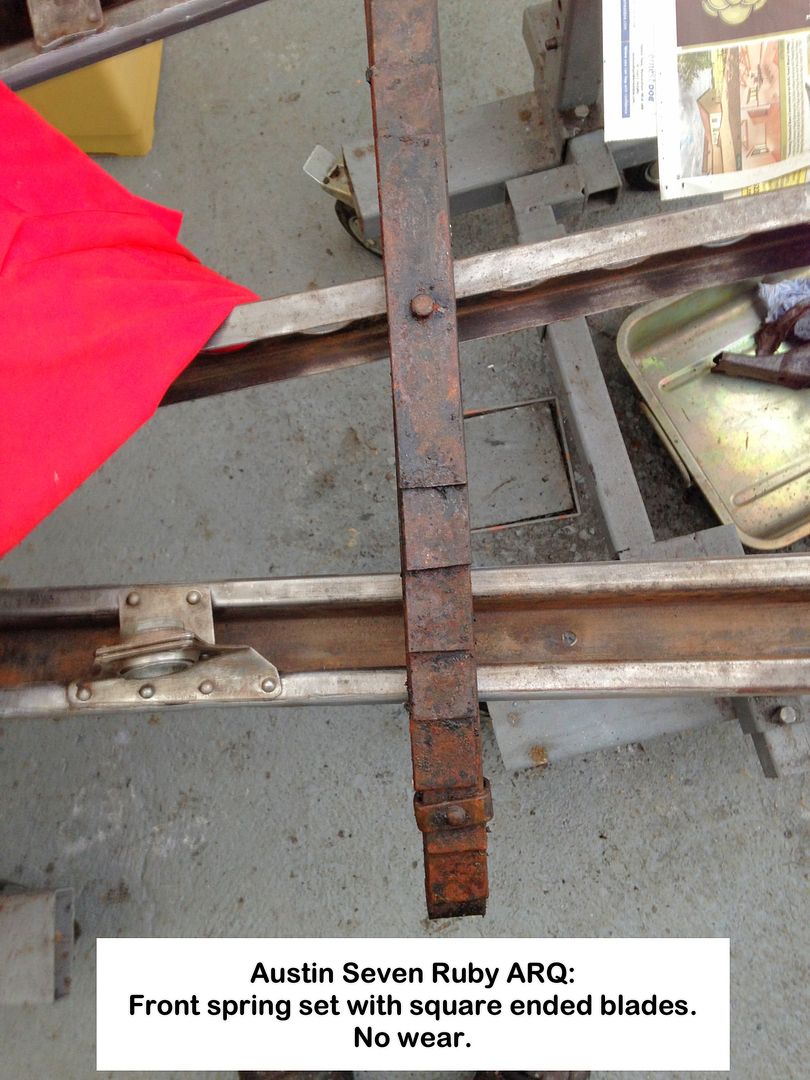
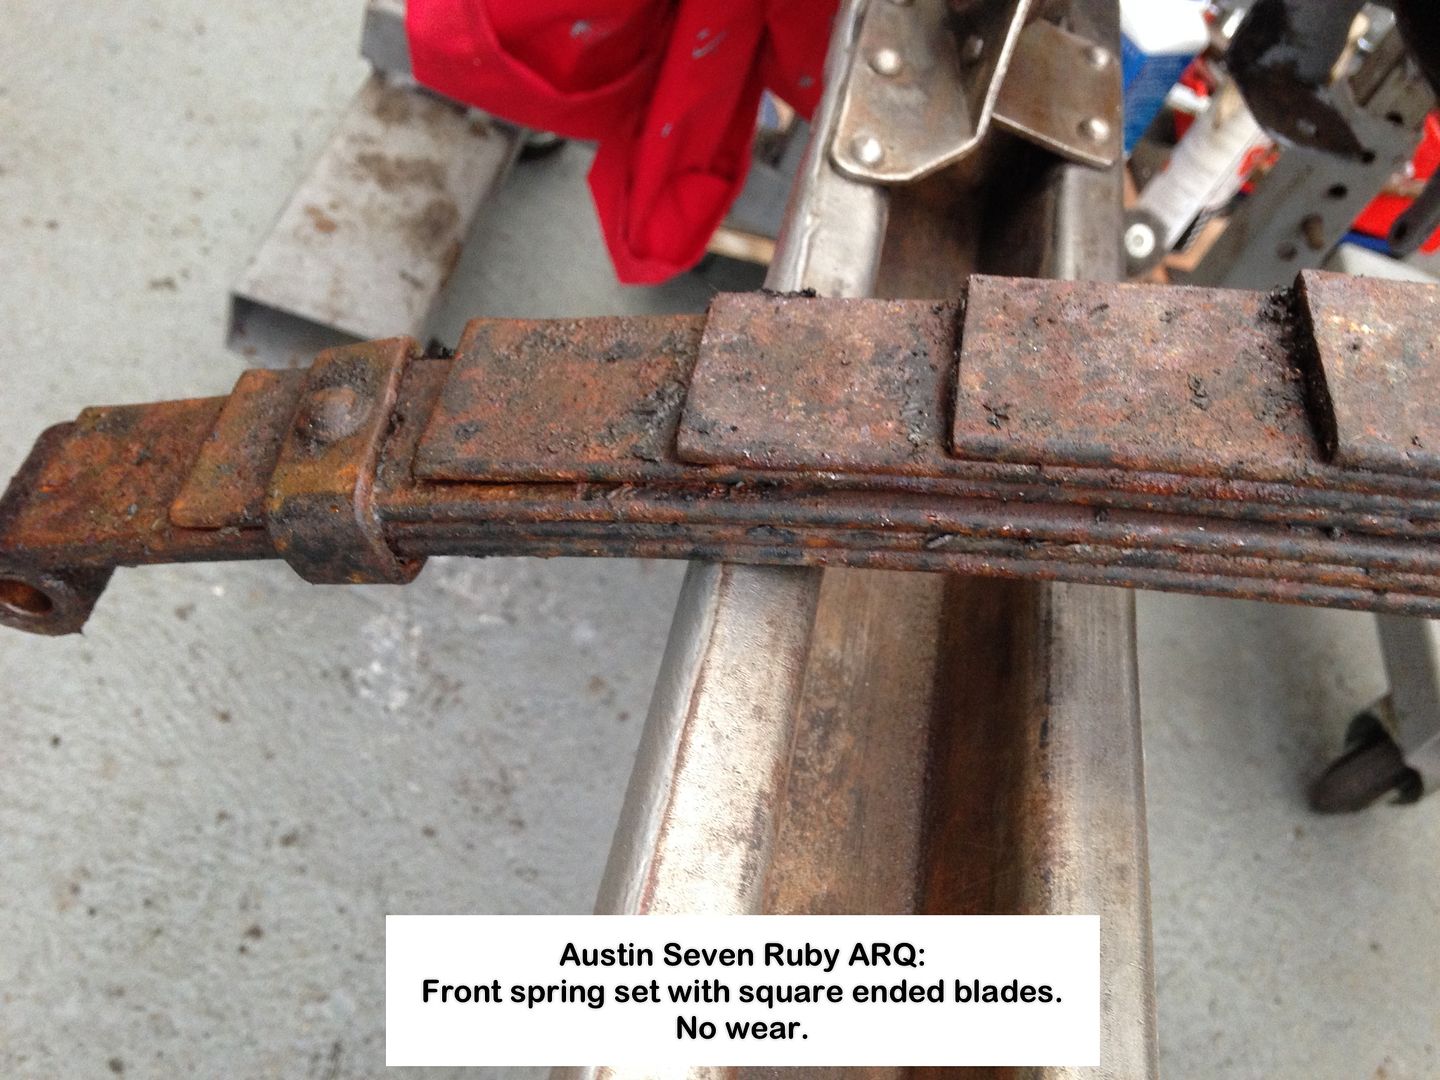
Front springs in comparison:
Geoff - Should have the rear axle assembly cleaned today.
Location: South Norfolk - Next to Suffolk
High time for an update.
Just noticed that I forgot to ask whether the Brake Cross-shaft OS bearing should be capable of swivelling as the NS and centre ones do, or purposely 'locked' as mine is?
I can only free it as shown, after I drilled the rivets out and spreading the housing sides.
More progress.
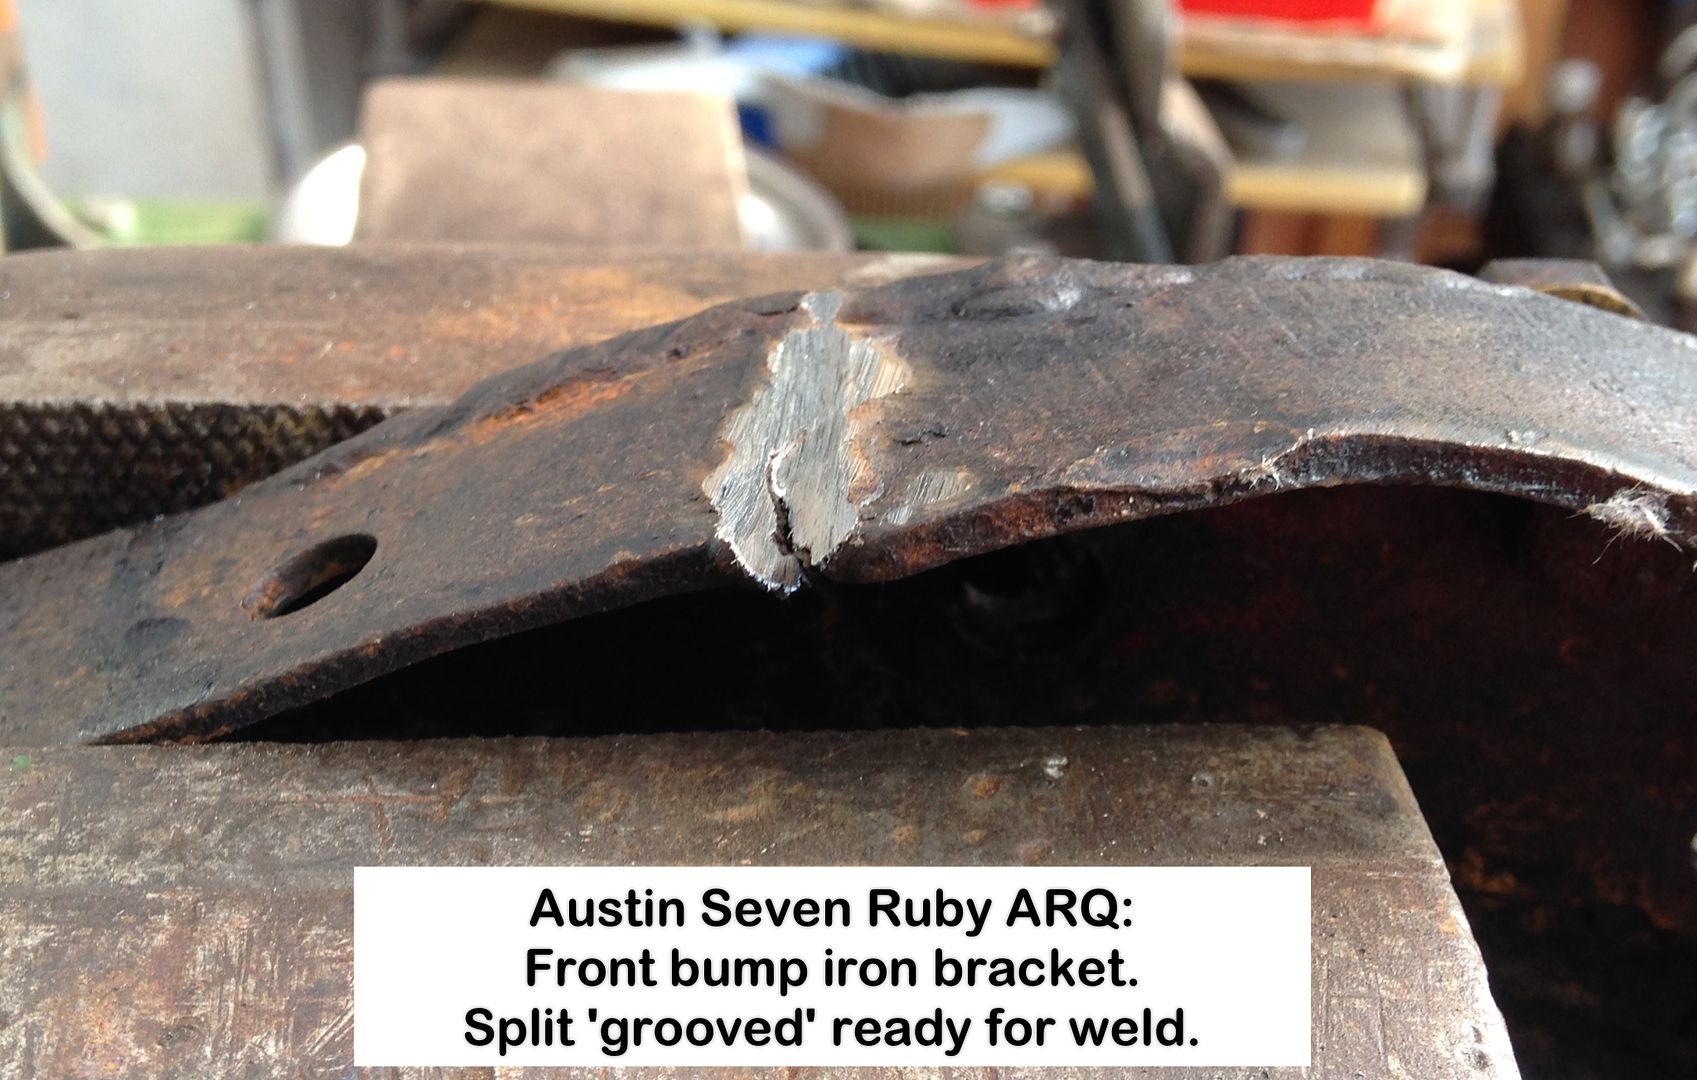
Front Bumper Irons Bracket that from appearance has been repaired in the past.
Split:
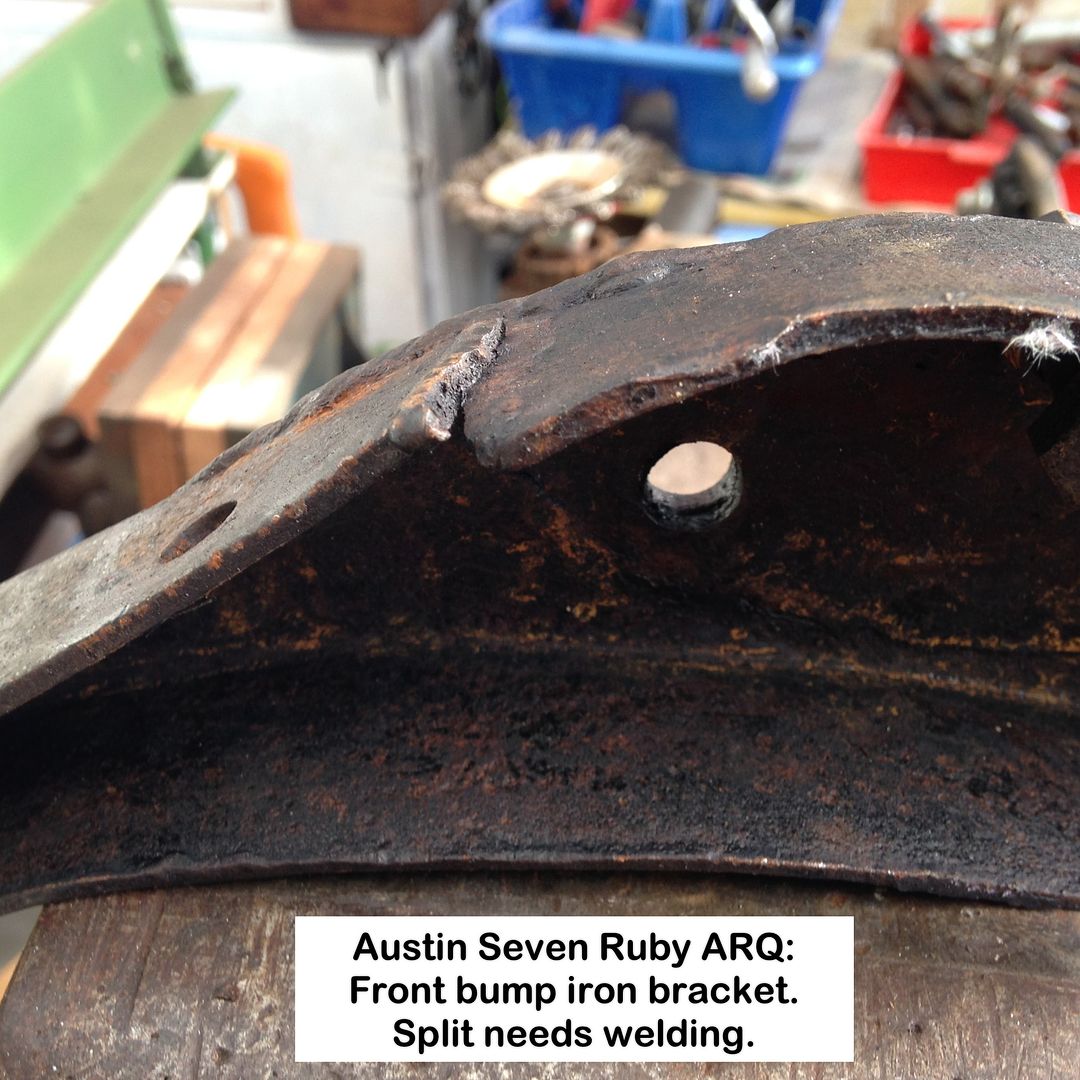
Groove cleaned:
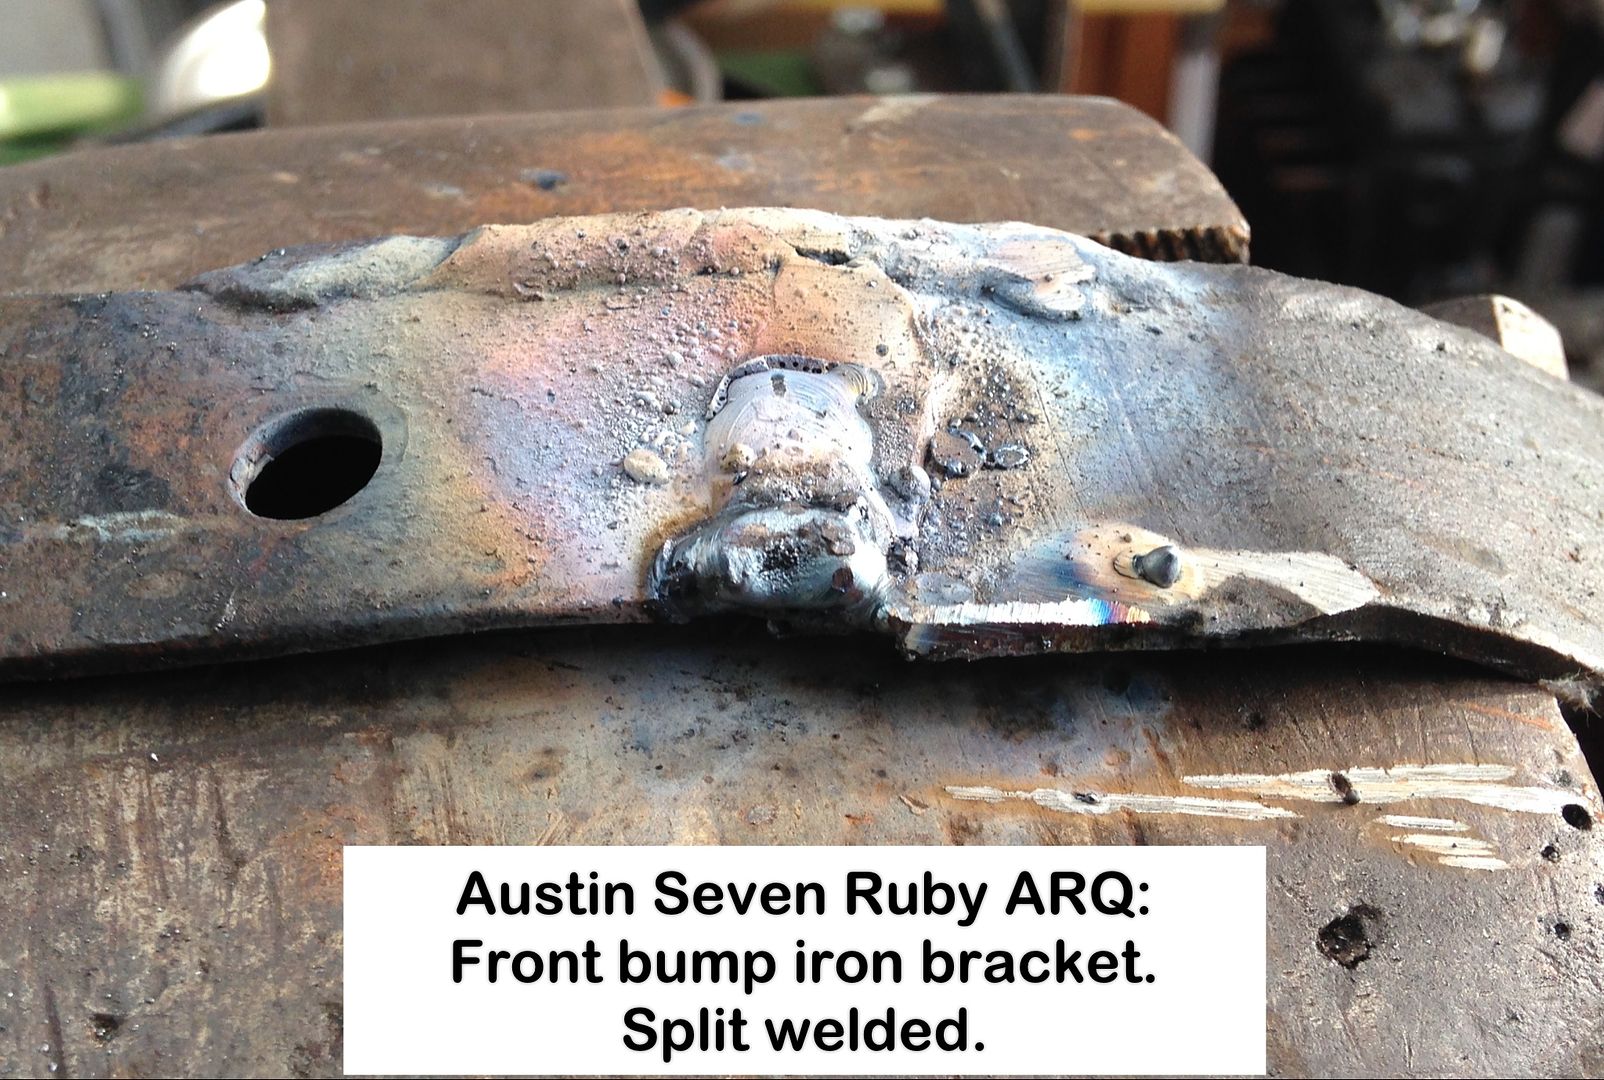
Split closed and welded:
Inside welded as a precaution:
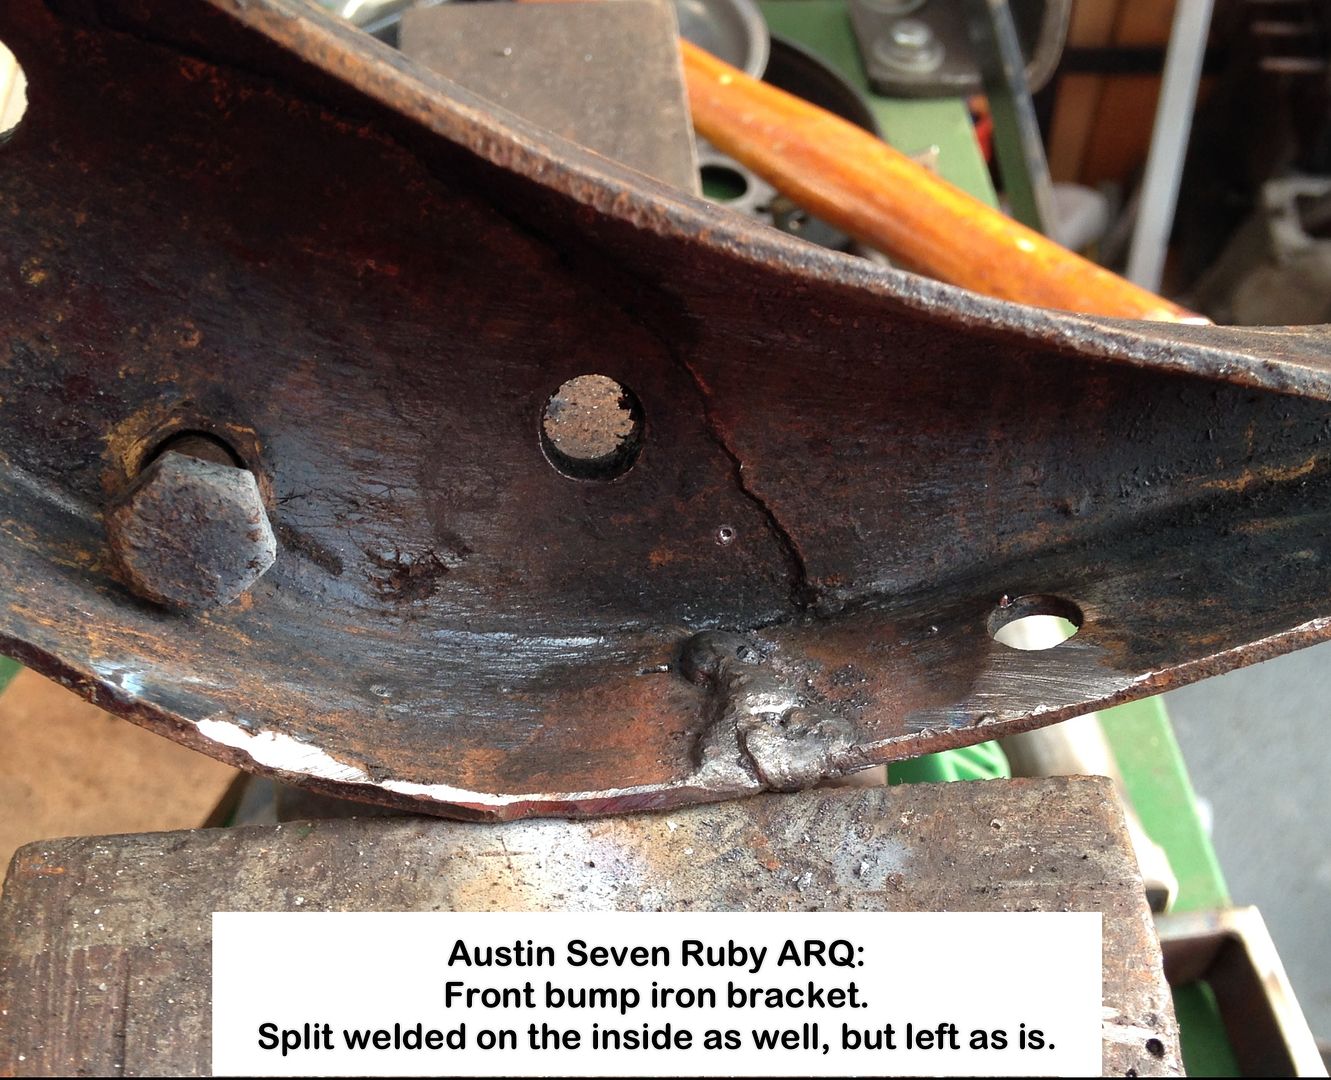
The gene, passed on by Mom & Dad, on doing it properly kicked in.
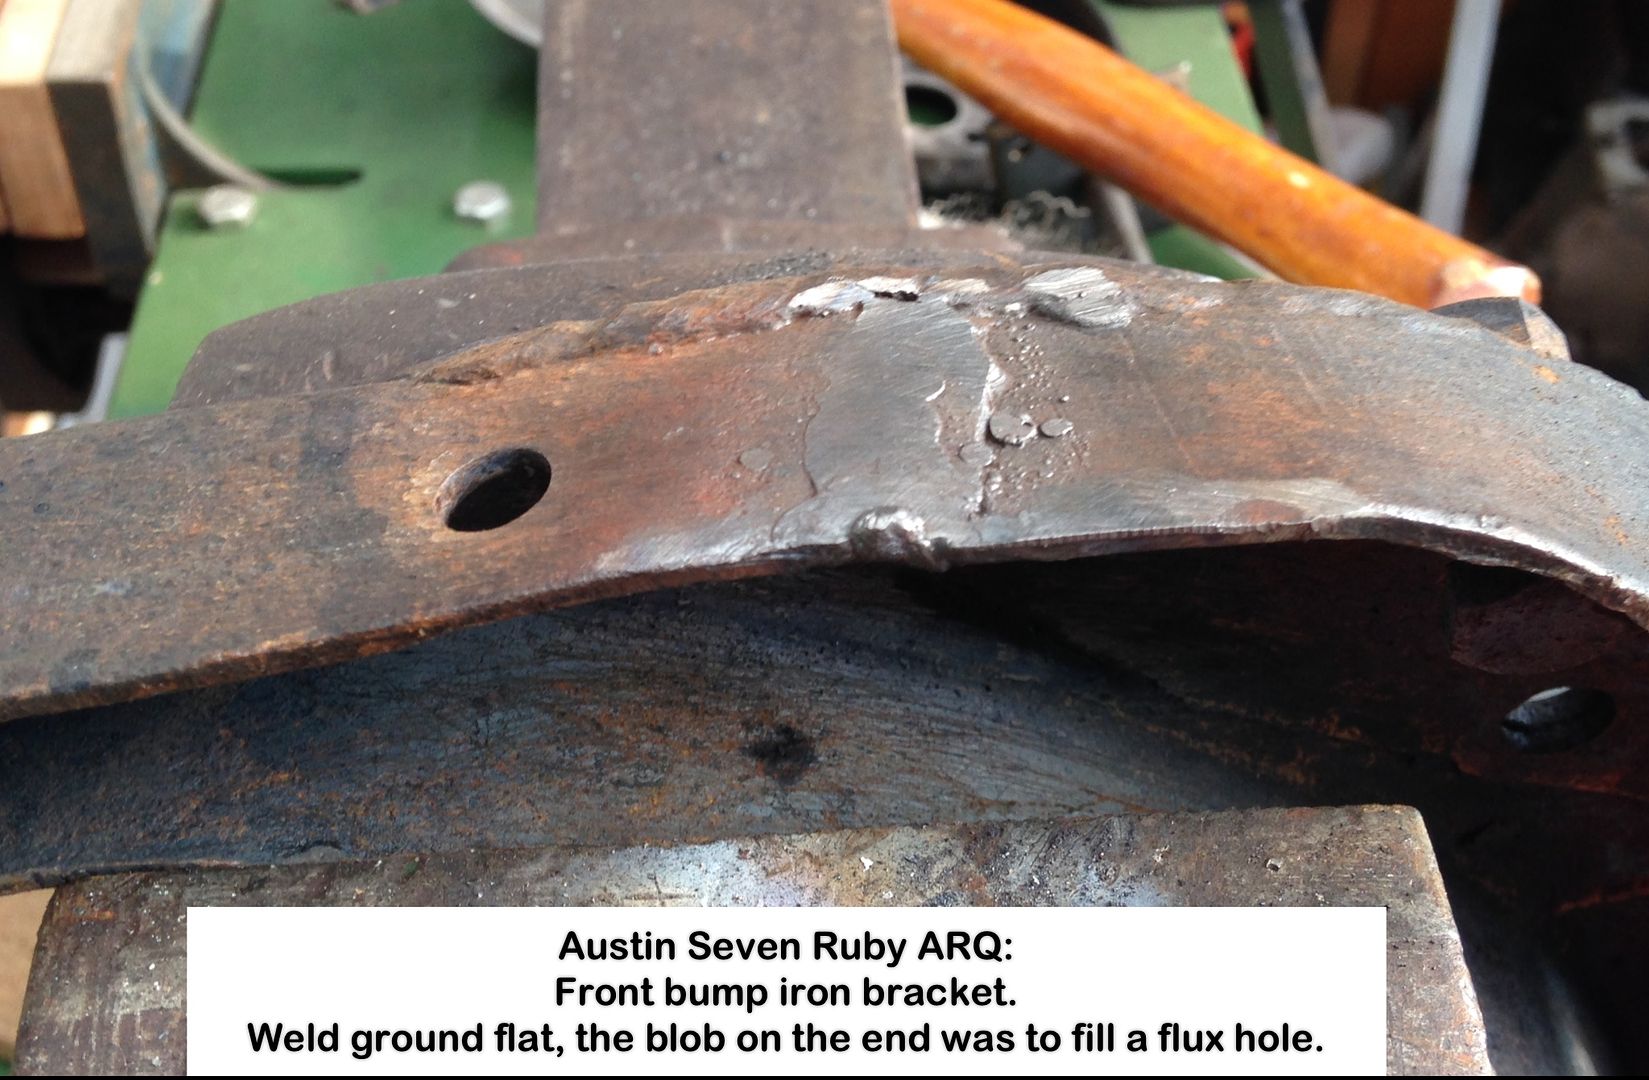
Weld ground:
Underside of Chassis receiving a coat of paint.
Jotamastic 87 Aluminium Epoxy paint:
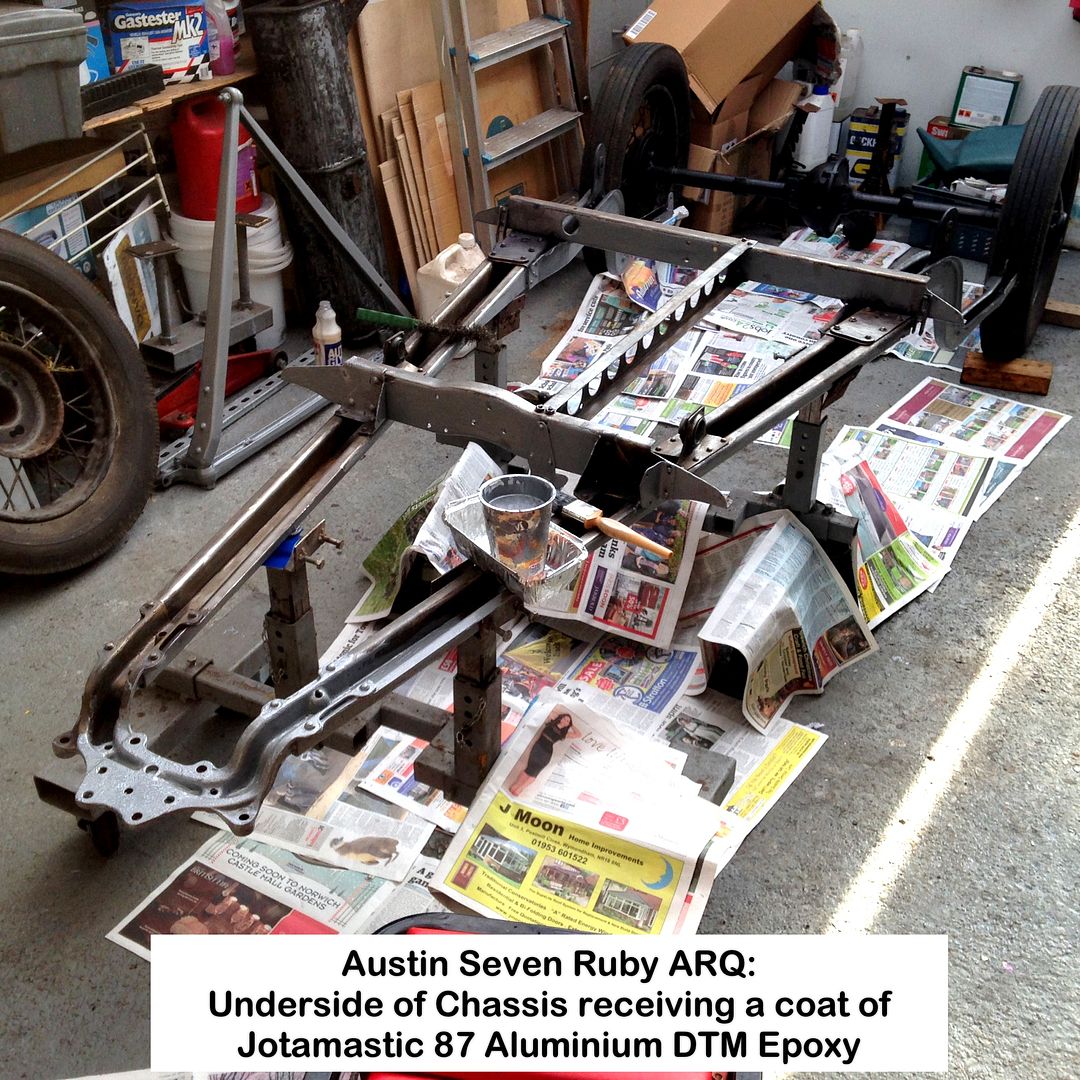
Done:
This stuff stick like you-know-what!
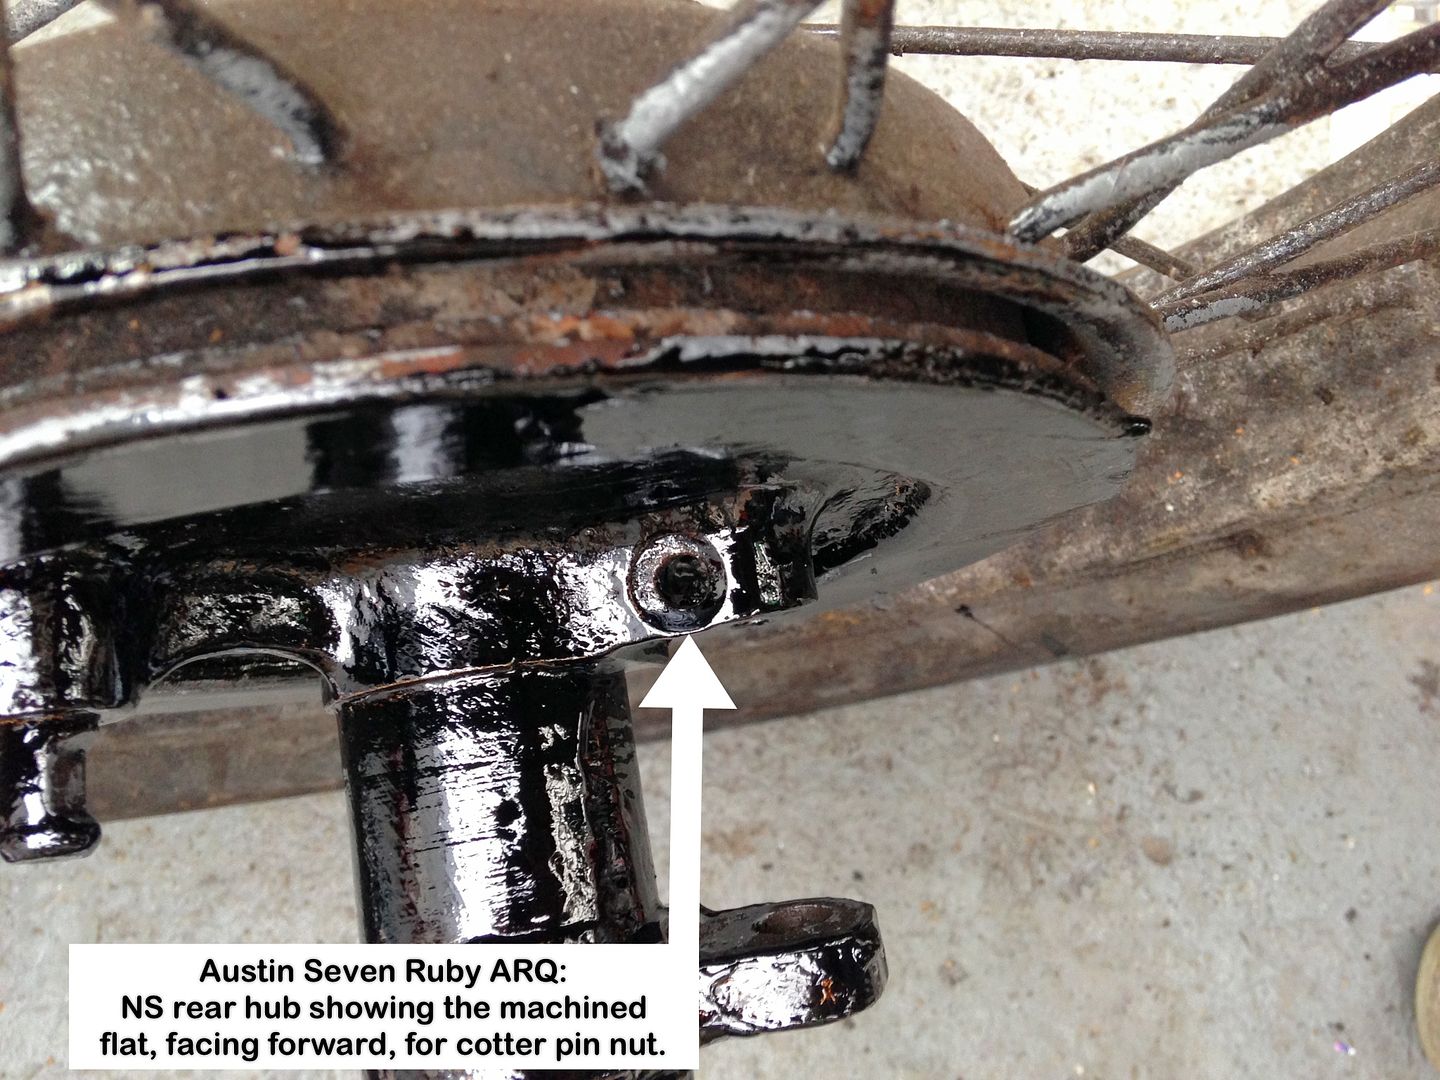
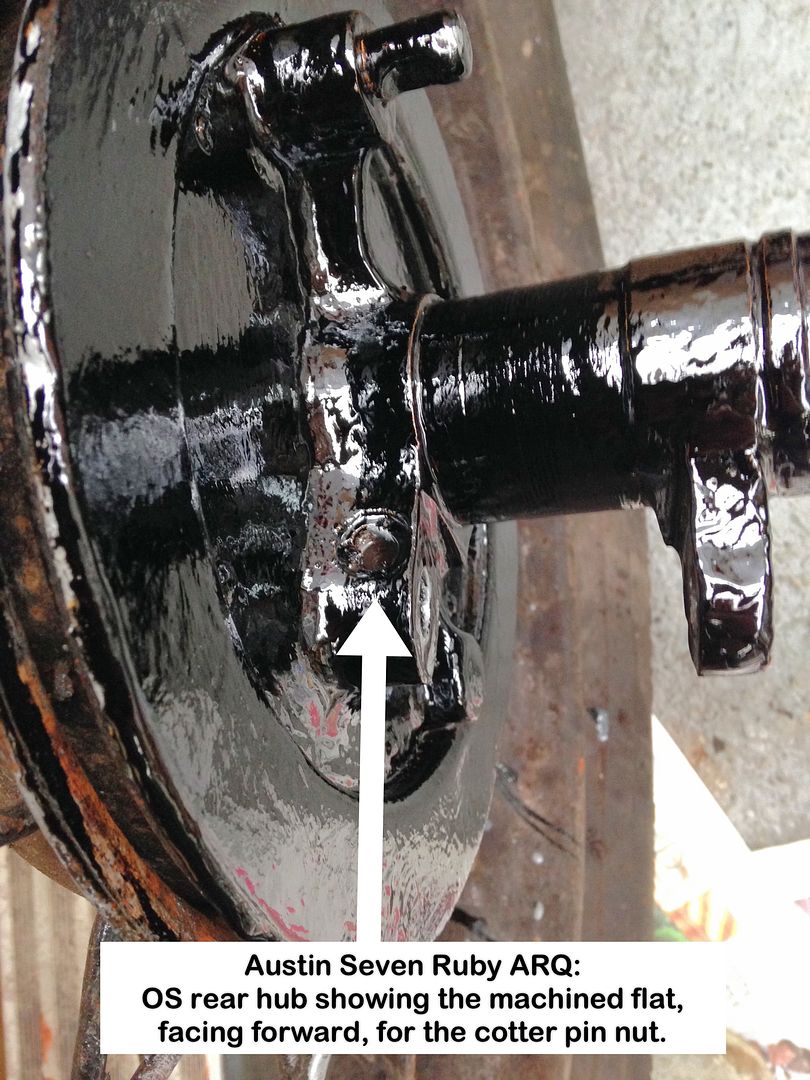
Now for something that had me shaking my head, NOT at some previous owner's 'delicate' touch this time, however, but at 'The Austin' itself.
Photos show why:
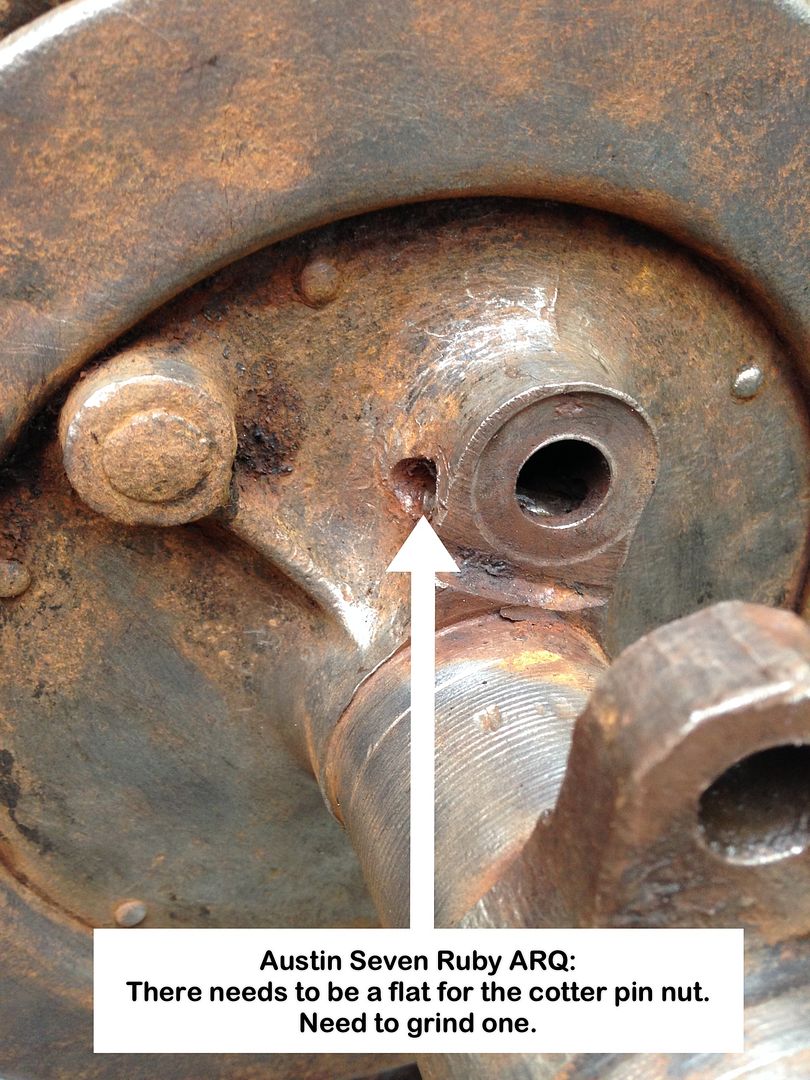
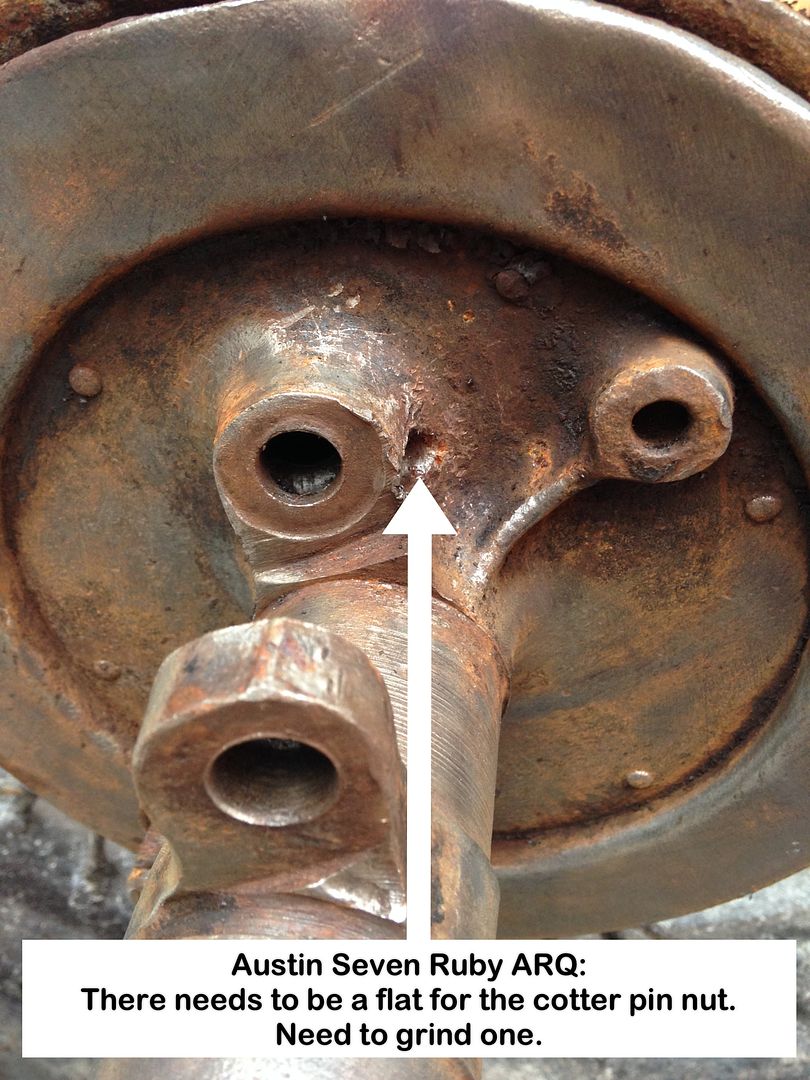
Definitely need to grind flats for the cotter pin nuts.
Wonder how many left the factory like this.
Geoff - Done a few posts waiting for paint to dry, so something achieved.
Location: South Norfolk - Next to Suffolk

Should not the cotter pin go in the other way? ie With the pins inserted from the back and the nut on the front.
Also makes access to the cotter pin better so that it can be driven out more easily.
Location: Melrose, Roxburghshire
I think Jim is right- the cotter nut flat looks to be on the other side?
Lovely job so far- well done.
Looking at the rear springs and Bill Sheehan's comments I would think that they are replacements, using an earlier spring set having recessed leaves. The front spring seems to confirm this.
The broken chassis at the rear U bolt indicates that the U bolt was loose at some time possibly needing a spring replacement.
May be a good plan to use new rear springs of the correct form and set?
Tony.
Addendum-
The cotter nut flat is on the front side - see Woodrow E1-4
Tony.
Looking at the rear springs and Bill Sheehan's comments I would think that they are replacements, using an earlier spring set having recessed leaves. The front spring seems to confirm this.
Tony.
Would the recesses have been machined offset?
Andy
Location: Oxfordshire
I must say I don't know- I have never seen them.
Tony.
Jim, Tony,
You are both correct, and something I forgot about (nothing new then) and then totally failed to 'see', and one reason the car will go for an MOT when done
The cotters on mine where inserted from the front with the threaded ends hammered sideways to lock them in place.
More head shaking aimed at whoever did this, plus at myself this time 
Machined flats very much in evidence:
Chassis now painted:
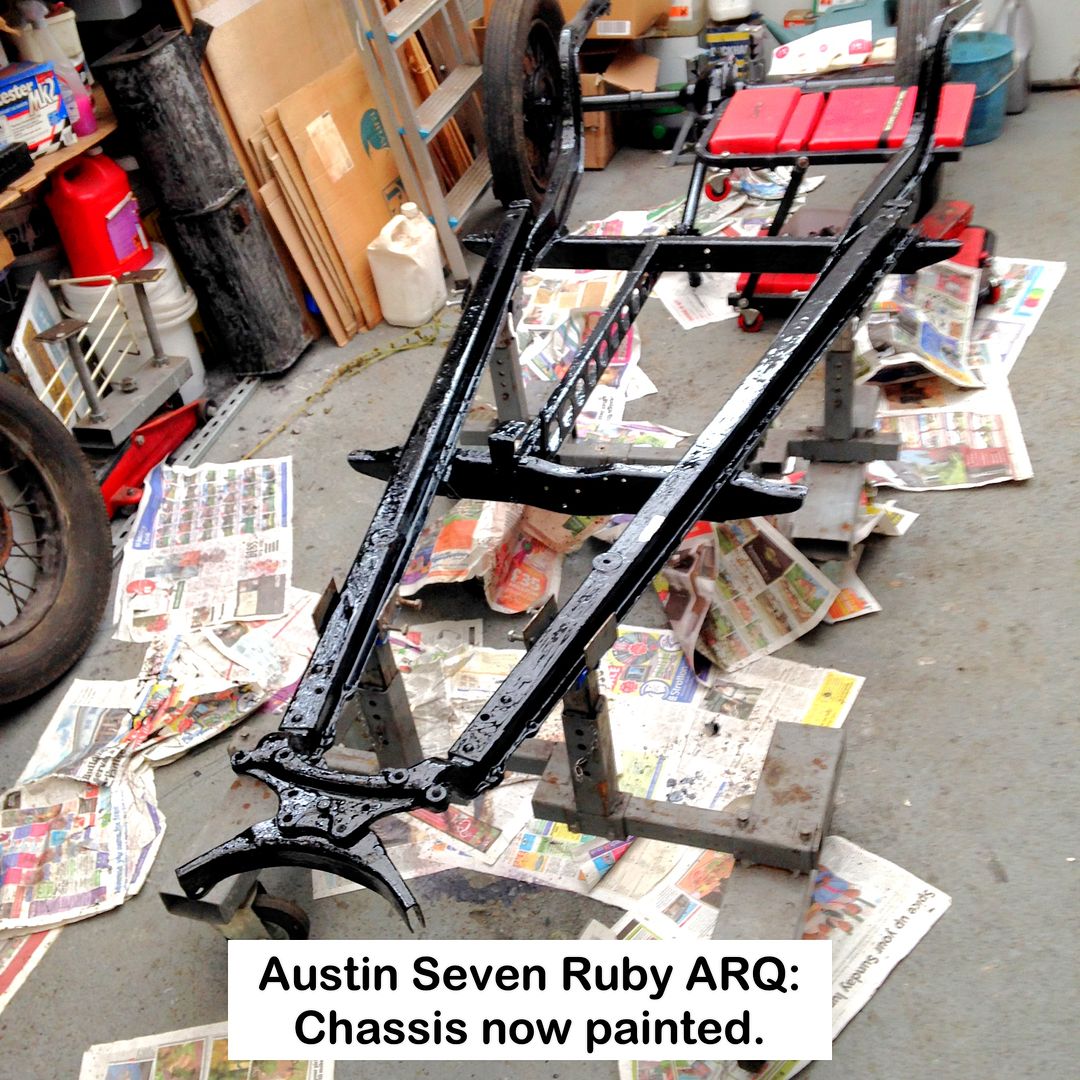
Geoff - If I'm not careful my head will unscrew from all the sideways shaking it's getting
Location: South Norfolk - Next to Suffolk
Nearly a month since my last update.
Where has the time gone?
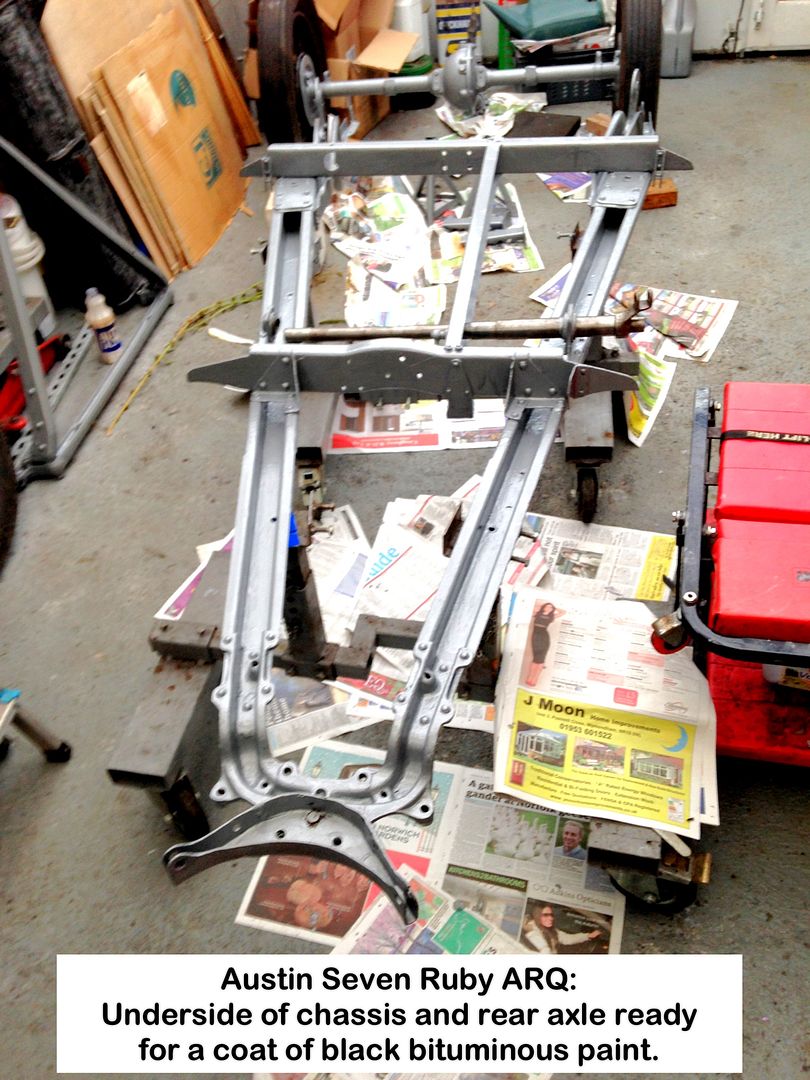
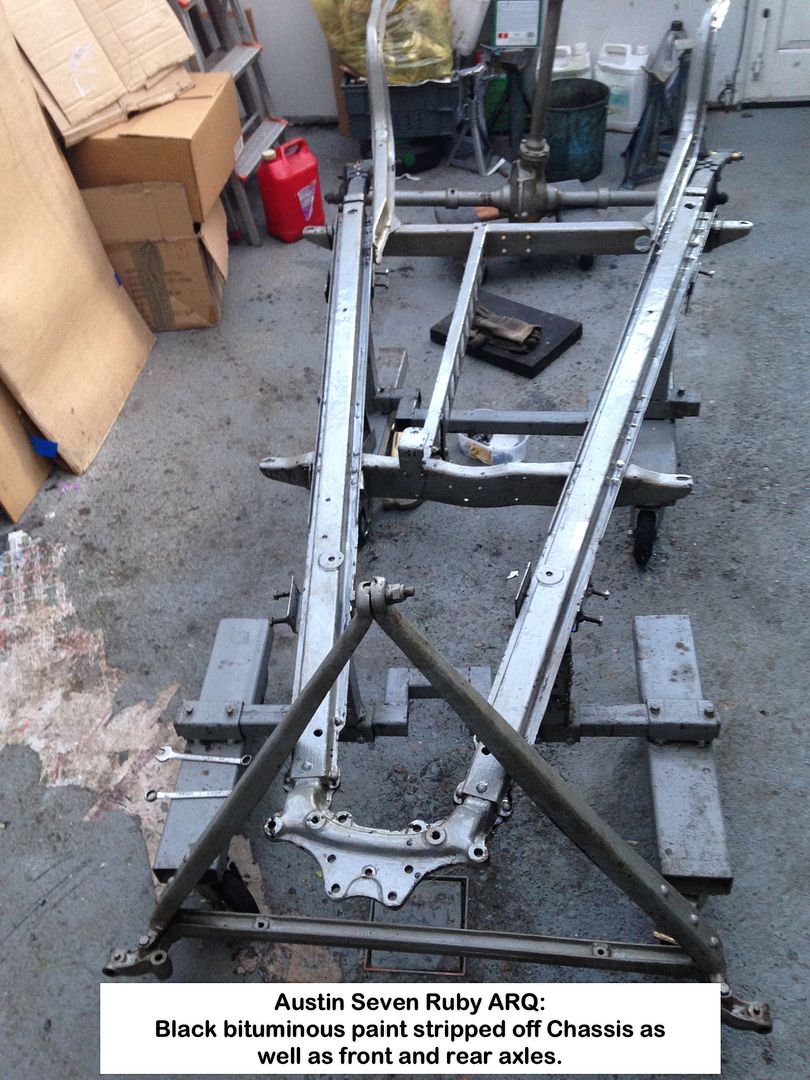
A lot of it has been spent in removing the black bituminous paint from the chassis and axles!
Anyone like to guess why I did this?
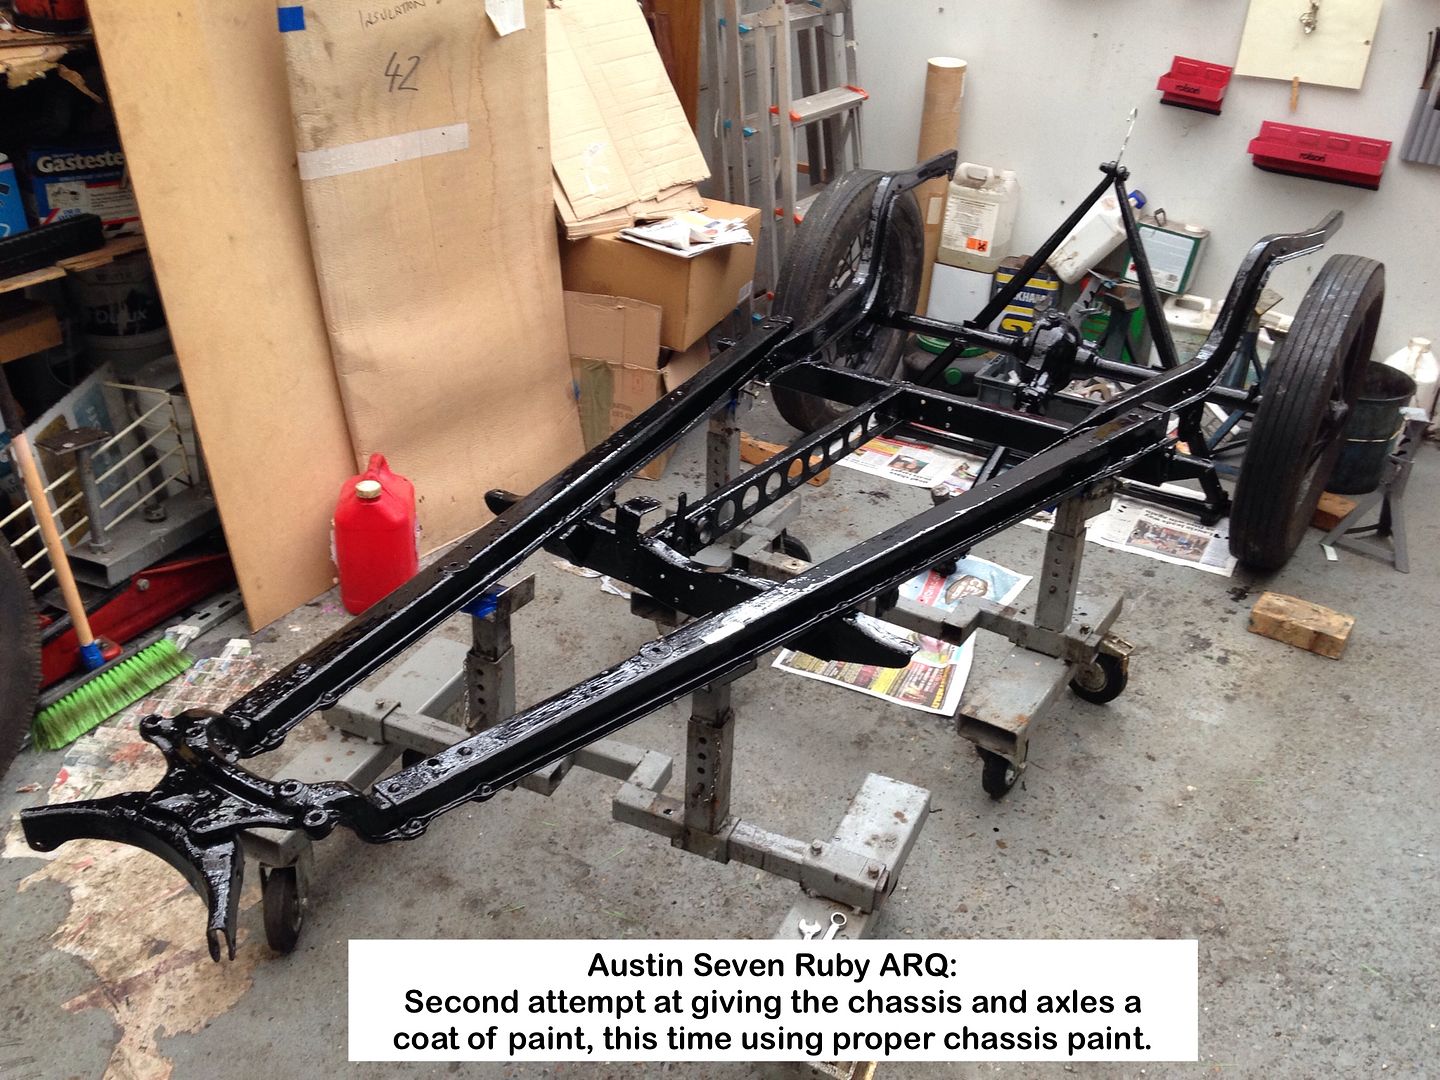
Back to square one on painting the chassis and axles:
What a messy job, resulting in the floor now looking decidedly worse off, even after covering it in layers of newspaper, regularly replaced.
Will apply another coat of floor paint BUT only once the body is stripped and DTM undercoat applied.
Brake Cross-shaft in place temporarily:
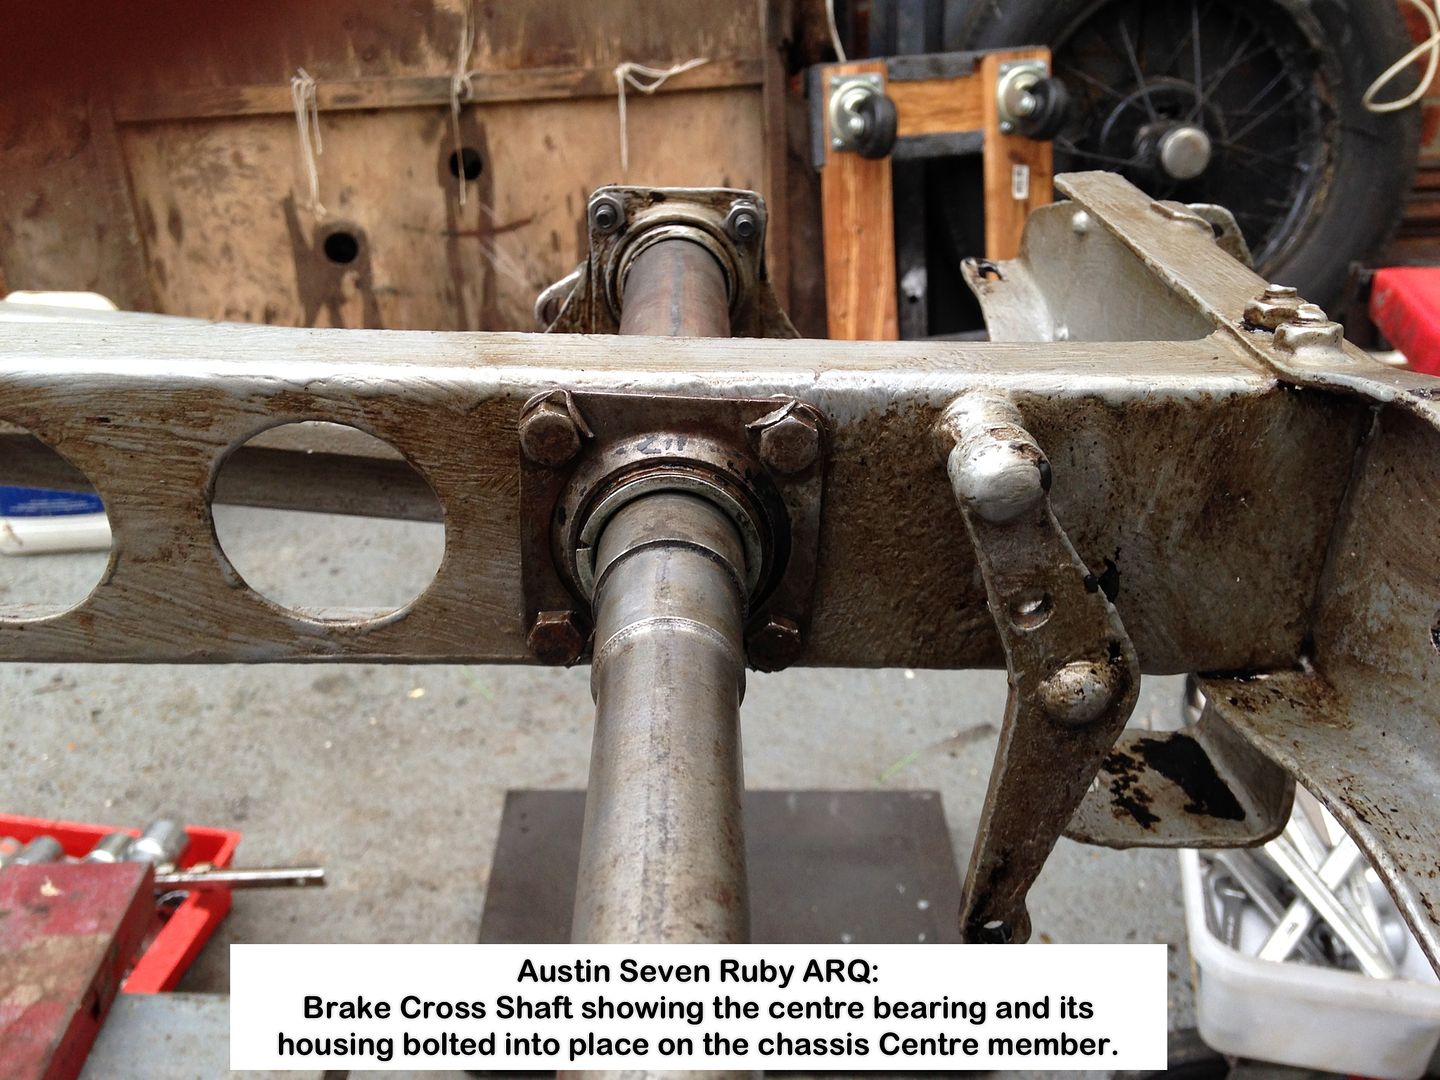
Cannot see any movement between the two cross tubes whilst attempting to lever the two OS brake levers apart, so will continue applying penetrating oil and heat.
New rear springs courtesy of Dunford senior:
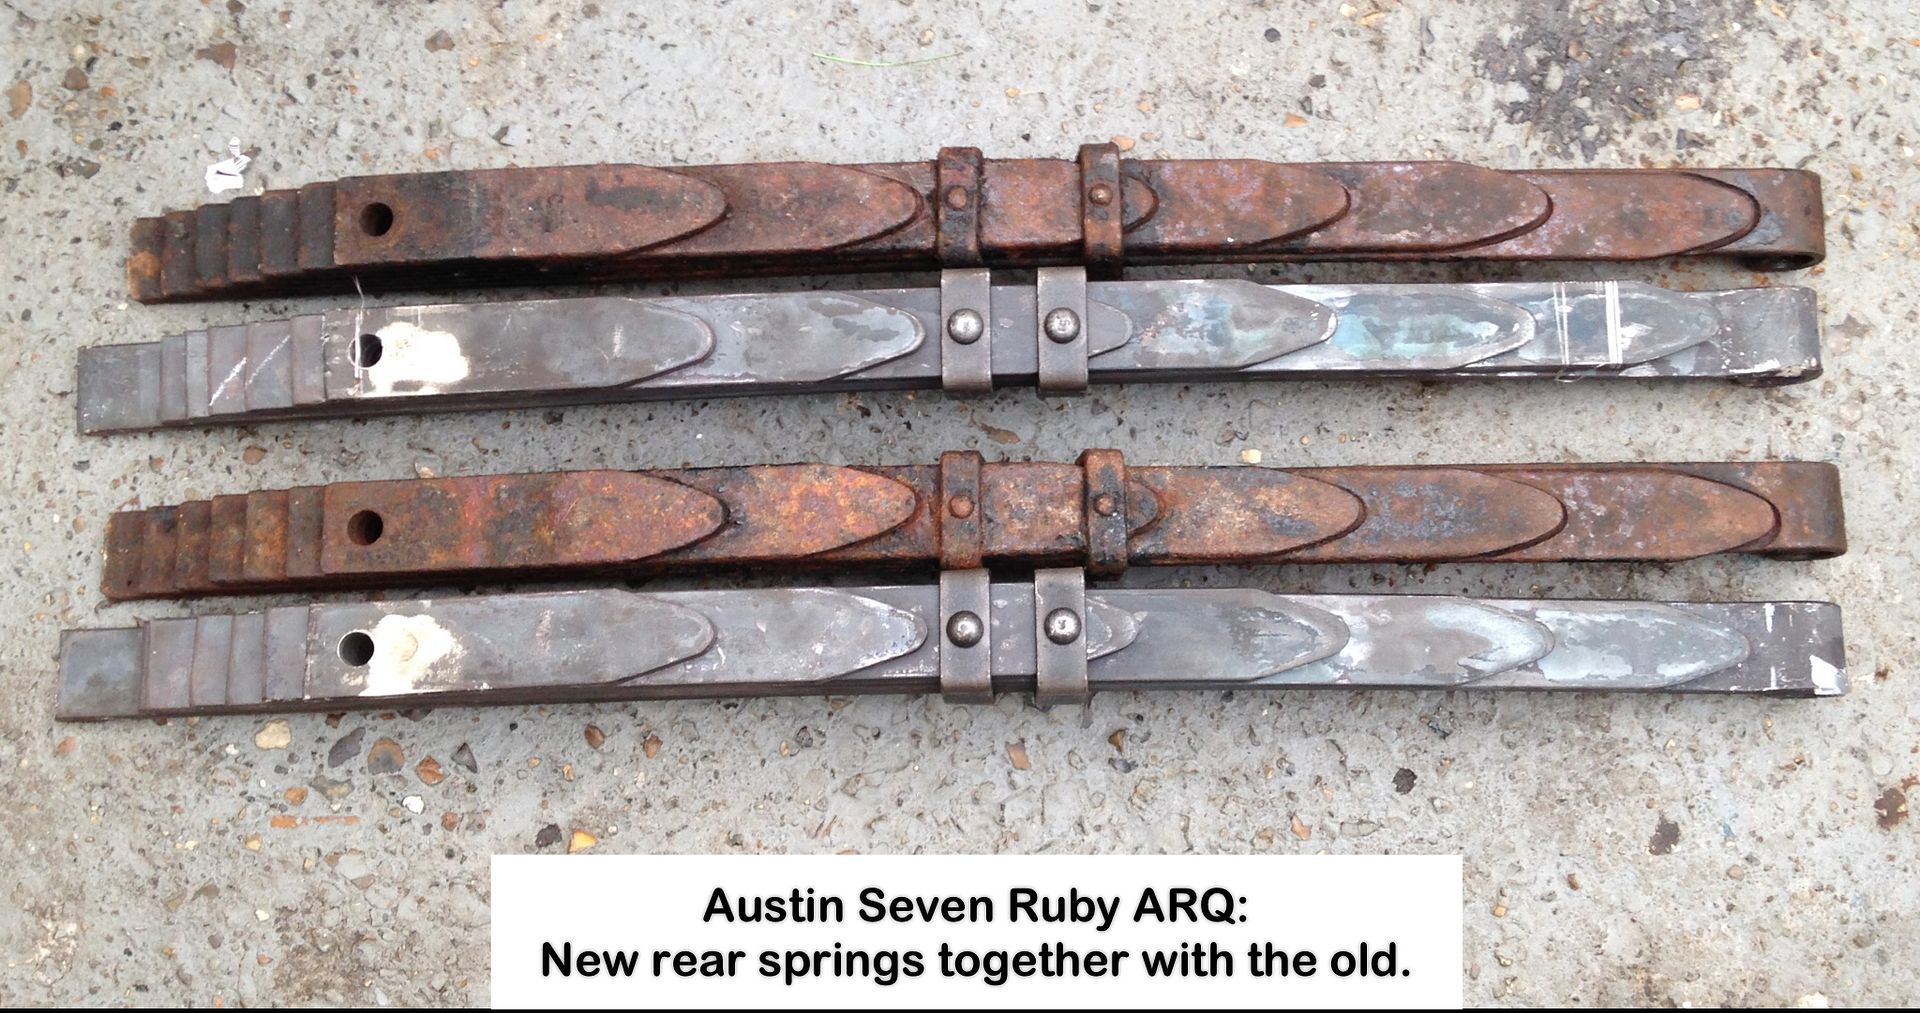
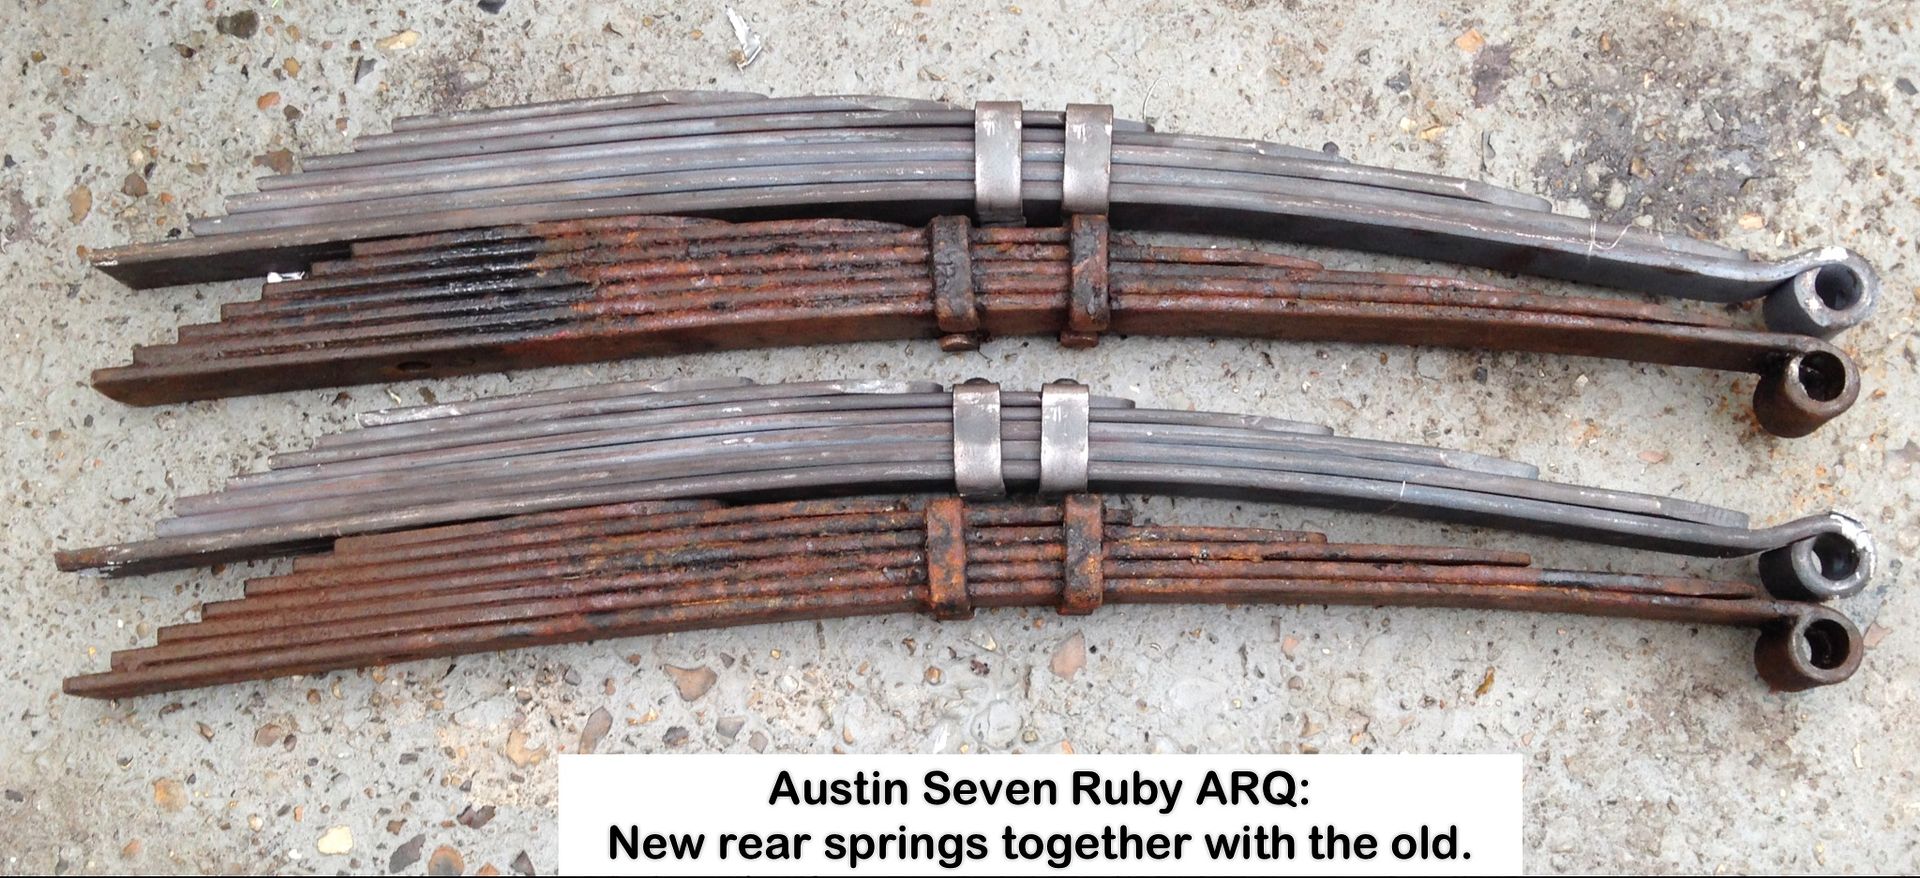
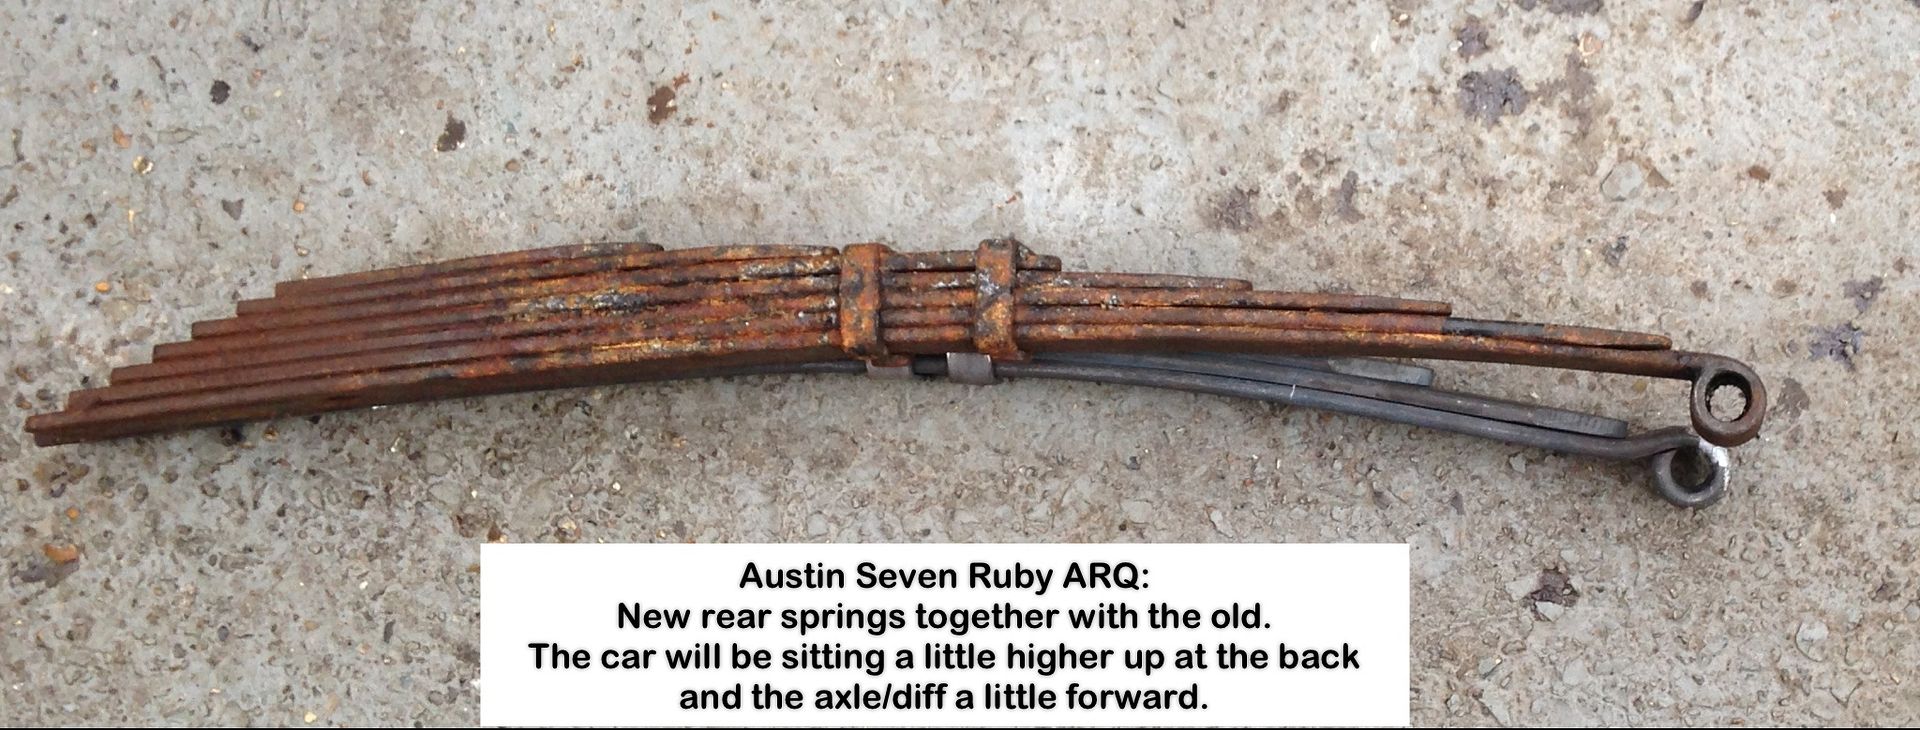
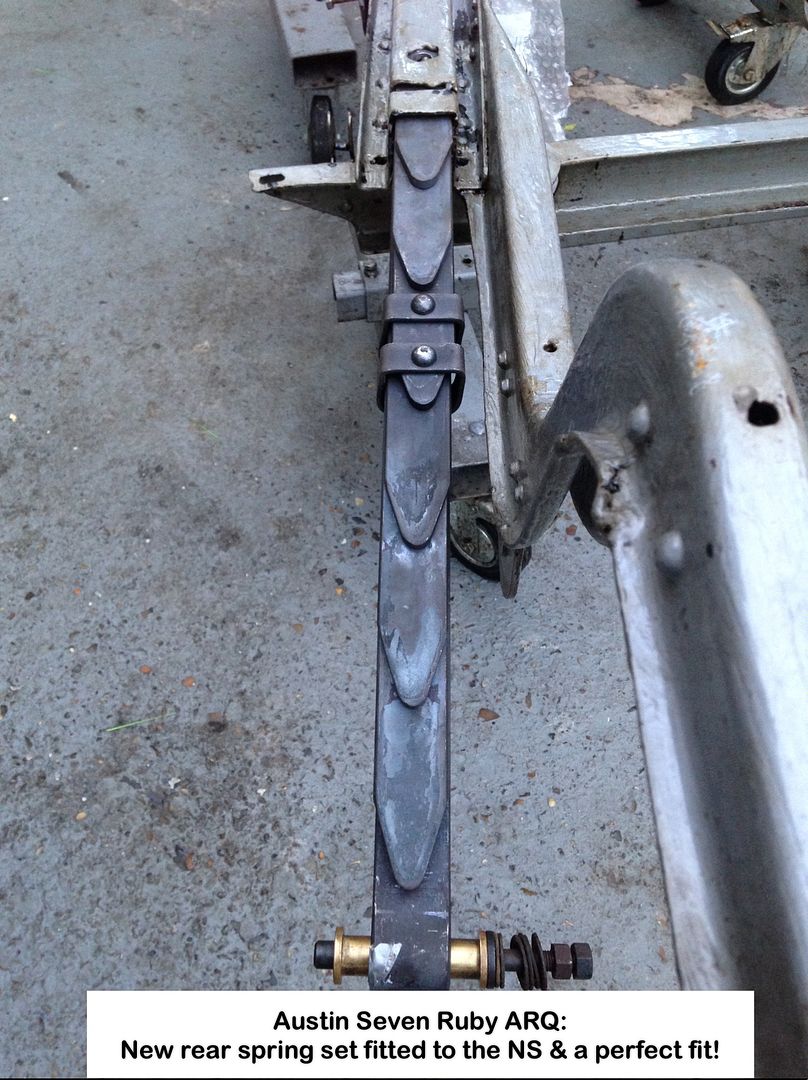
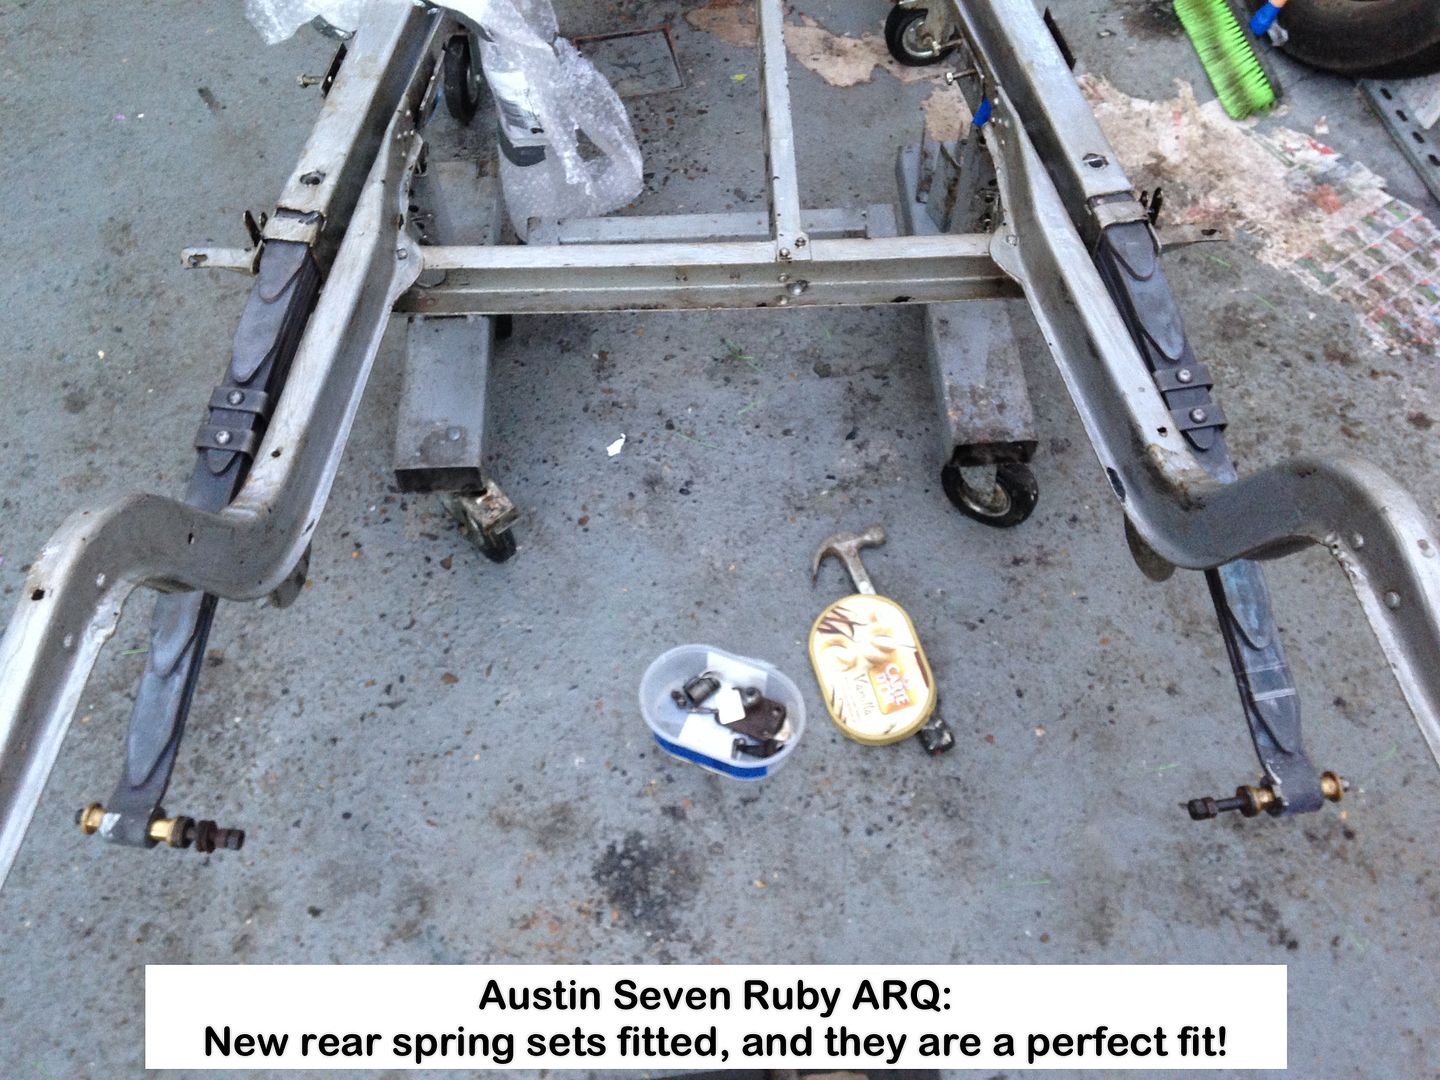
Annotations and photos say it all with regards quality and fit.
Thanks Ian!
Geoff - Next update will be second try with black paint, without the stupidity!
Location: South Norfolk - Next to Suffolk
Chassis, axles and brake parts now painted using 'proper' chassis paint.
Anybody realise why the bituminous paint was a no-no?
Ruairidh need not answer as he knows
Will store the parts against the Carport door once the paint has fully hardened, then assemble a table so that I can remove the door innards and start stripping paint off of them as well as the body parts previously removed.
I took two videos of me painting, each around 75min, but need to edit them before posting on YouTube.
Electric shower unit FUBAR so using a watering can
Geoff - Well, when needs must and all that, but it works a treat
Location: South Norfolk - Next to Suffolk
Hi Geoff, bituminous paint is not solvent or oil resistant, another one not to use is any aluminum based paint if any future welding may be needed, as is almost impossible to remove all of it from a pitted rusted surface and the small aluminum particles in the paint will weaken the weld.
Location: Pembrokeshire
Phil,
Got it in one with regards the bituminous paint.
Should of course have done a test piece first as usual.
Found out when I used paraffin to clean oil from the NS brake cross-shaft bearing and the paint just ran off.
For once I didn't resort to using any of my Navy repertoire.
Nice to know about that aluminium paint, thanks for the warning!
Geoff - Day to relax and get ready for the off tomorrow
Location: South Norfolk - Next to Suffolk
Chassis and axles stowed away:
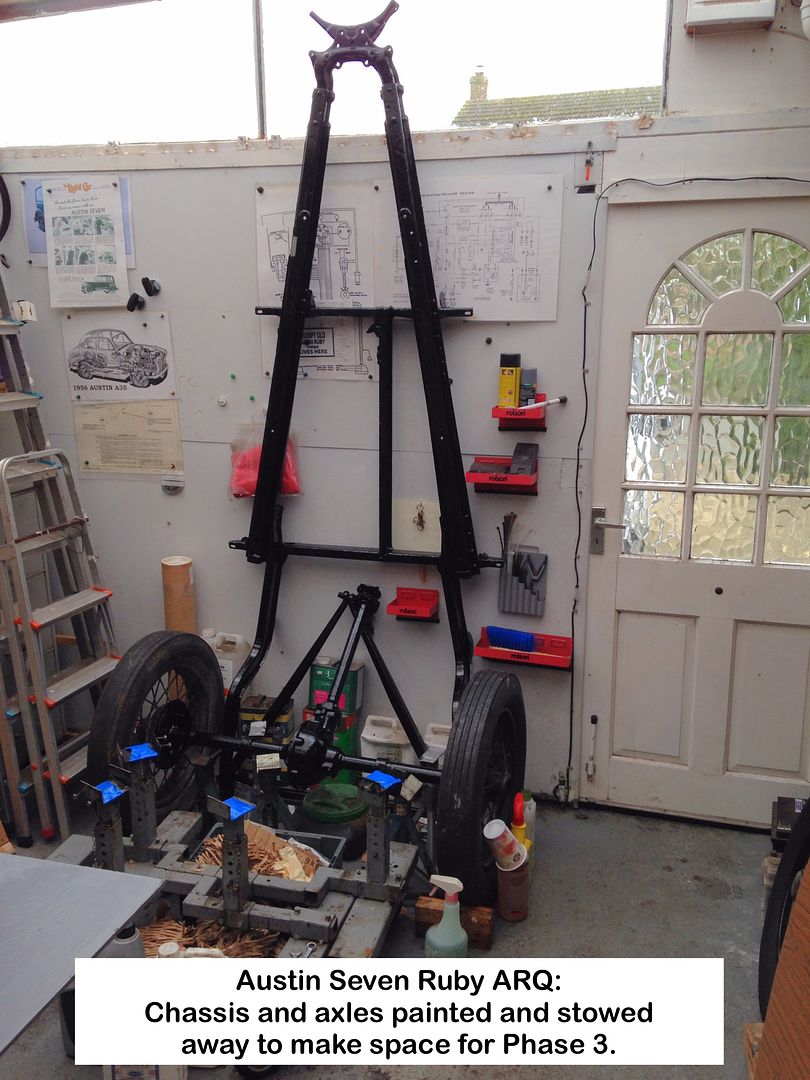
Phases 1&2 completed, namely removing the body then painting chassis and axles respectively.
Table assembled ready to start Phase 3 - To strip paint off of the body parts taken off.
I'm on my marks and ready:
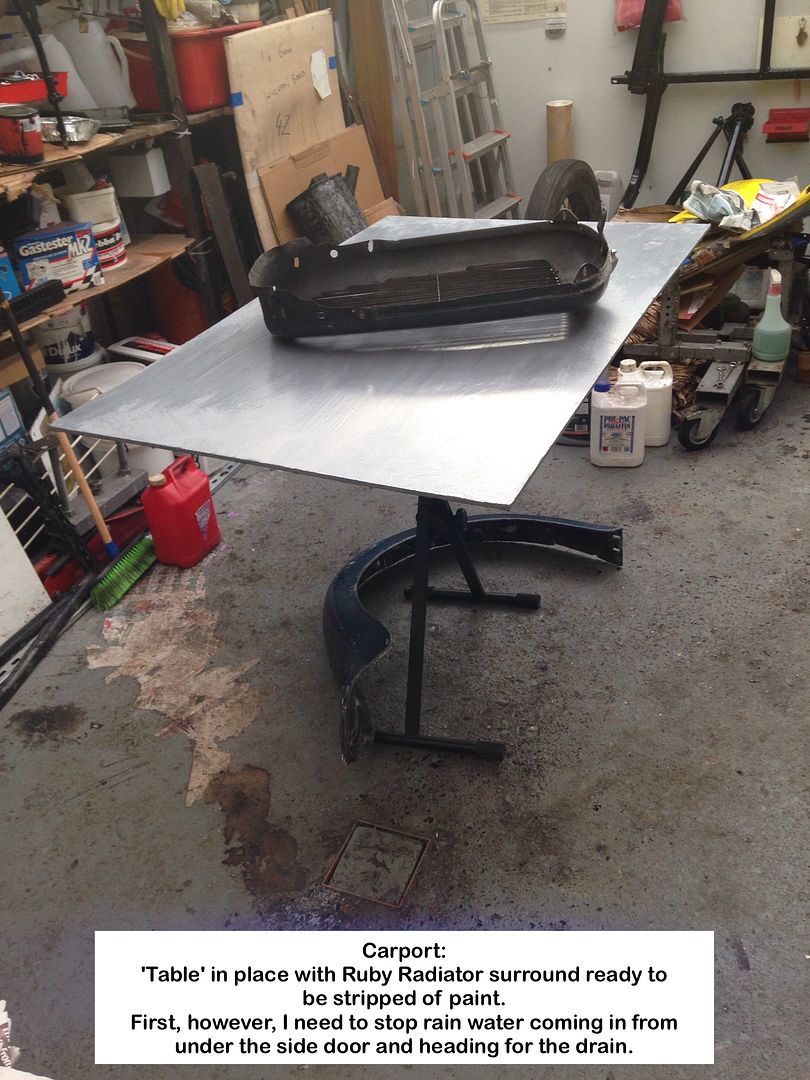
But first:
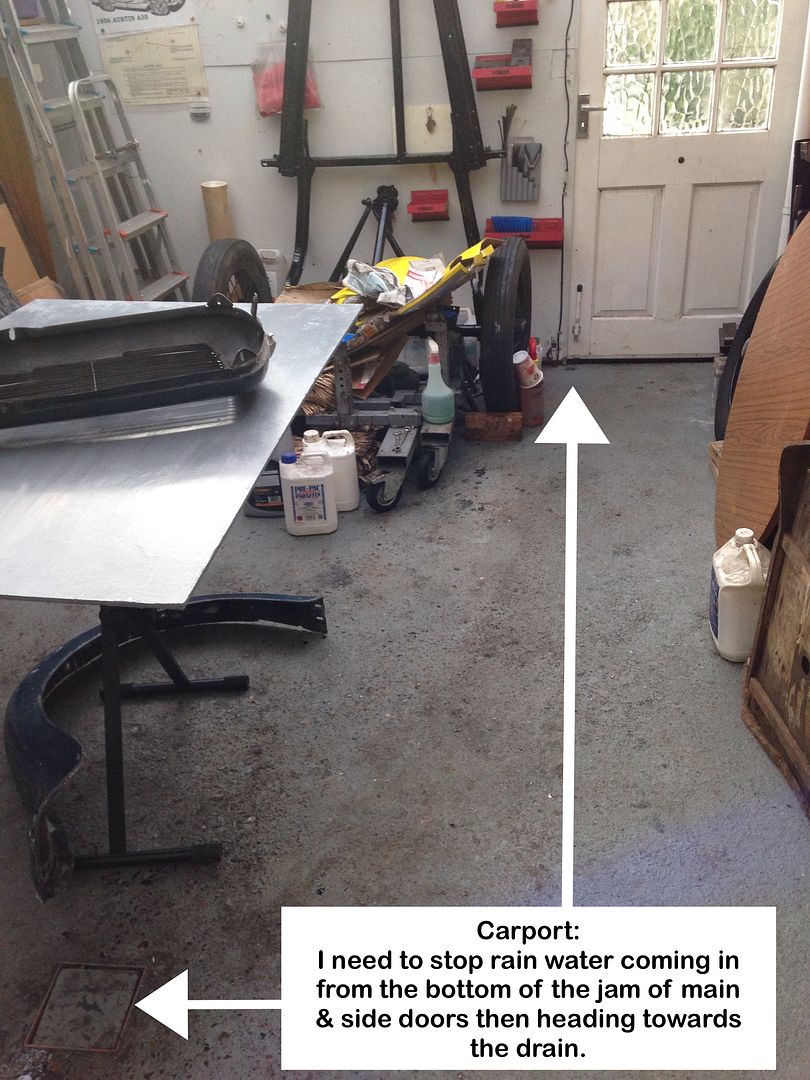
I need to sort this perpetual problem out!
Being an enclosed portion of the driveway, water flows towards the drain.
The side door opens outwards due to position of gutter downpipe, so normal door jam not possible :-(
The floor is going to need a fresh coat of paint before I do any spraying/coach painting.
Geoff - Lesson learned about using the wrong paint, TEST first!
Location: South Norfolk - Next to Suffolk
I have stopped the river of rainwater flowing from the bottom of the door after adding a silicone deflector at the top of the jam between the doors.
Only a small puddle now.
Update time at last:
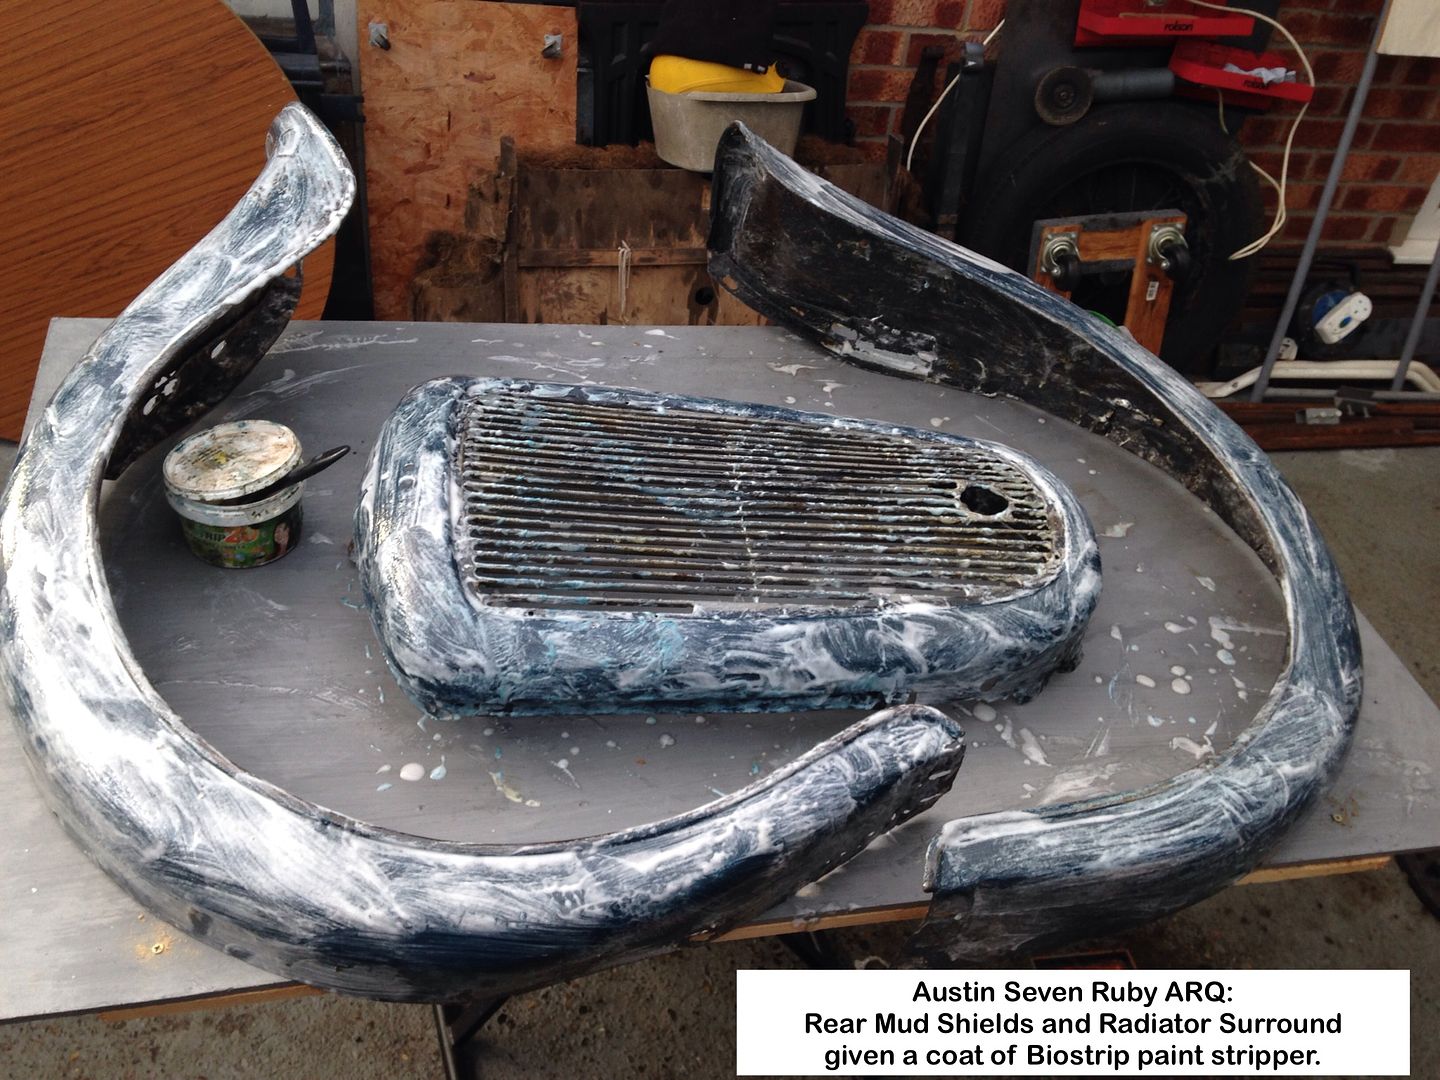
Got my finger out and decided to do some work on the Ruby this morning, and strip the paint from the Radiator Surround and rear Mud Shields.
Inside of the Radiator Surround:
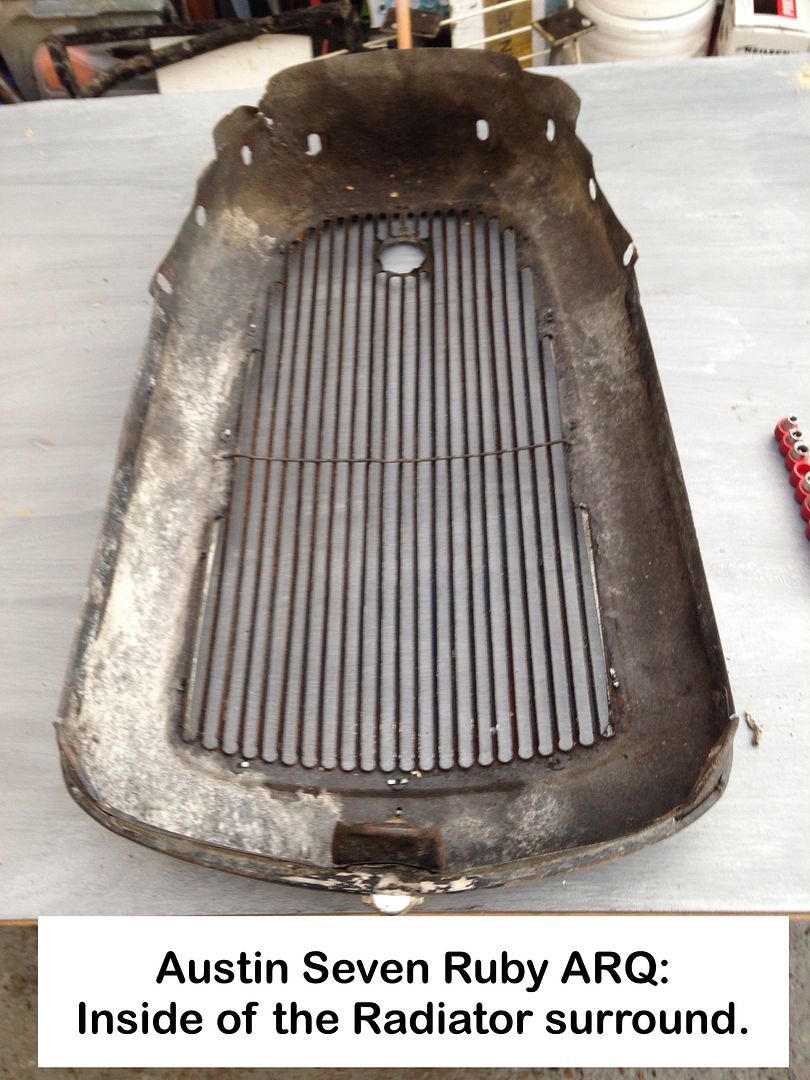
Close-up of the way the Winged badge is secured:
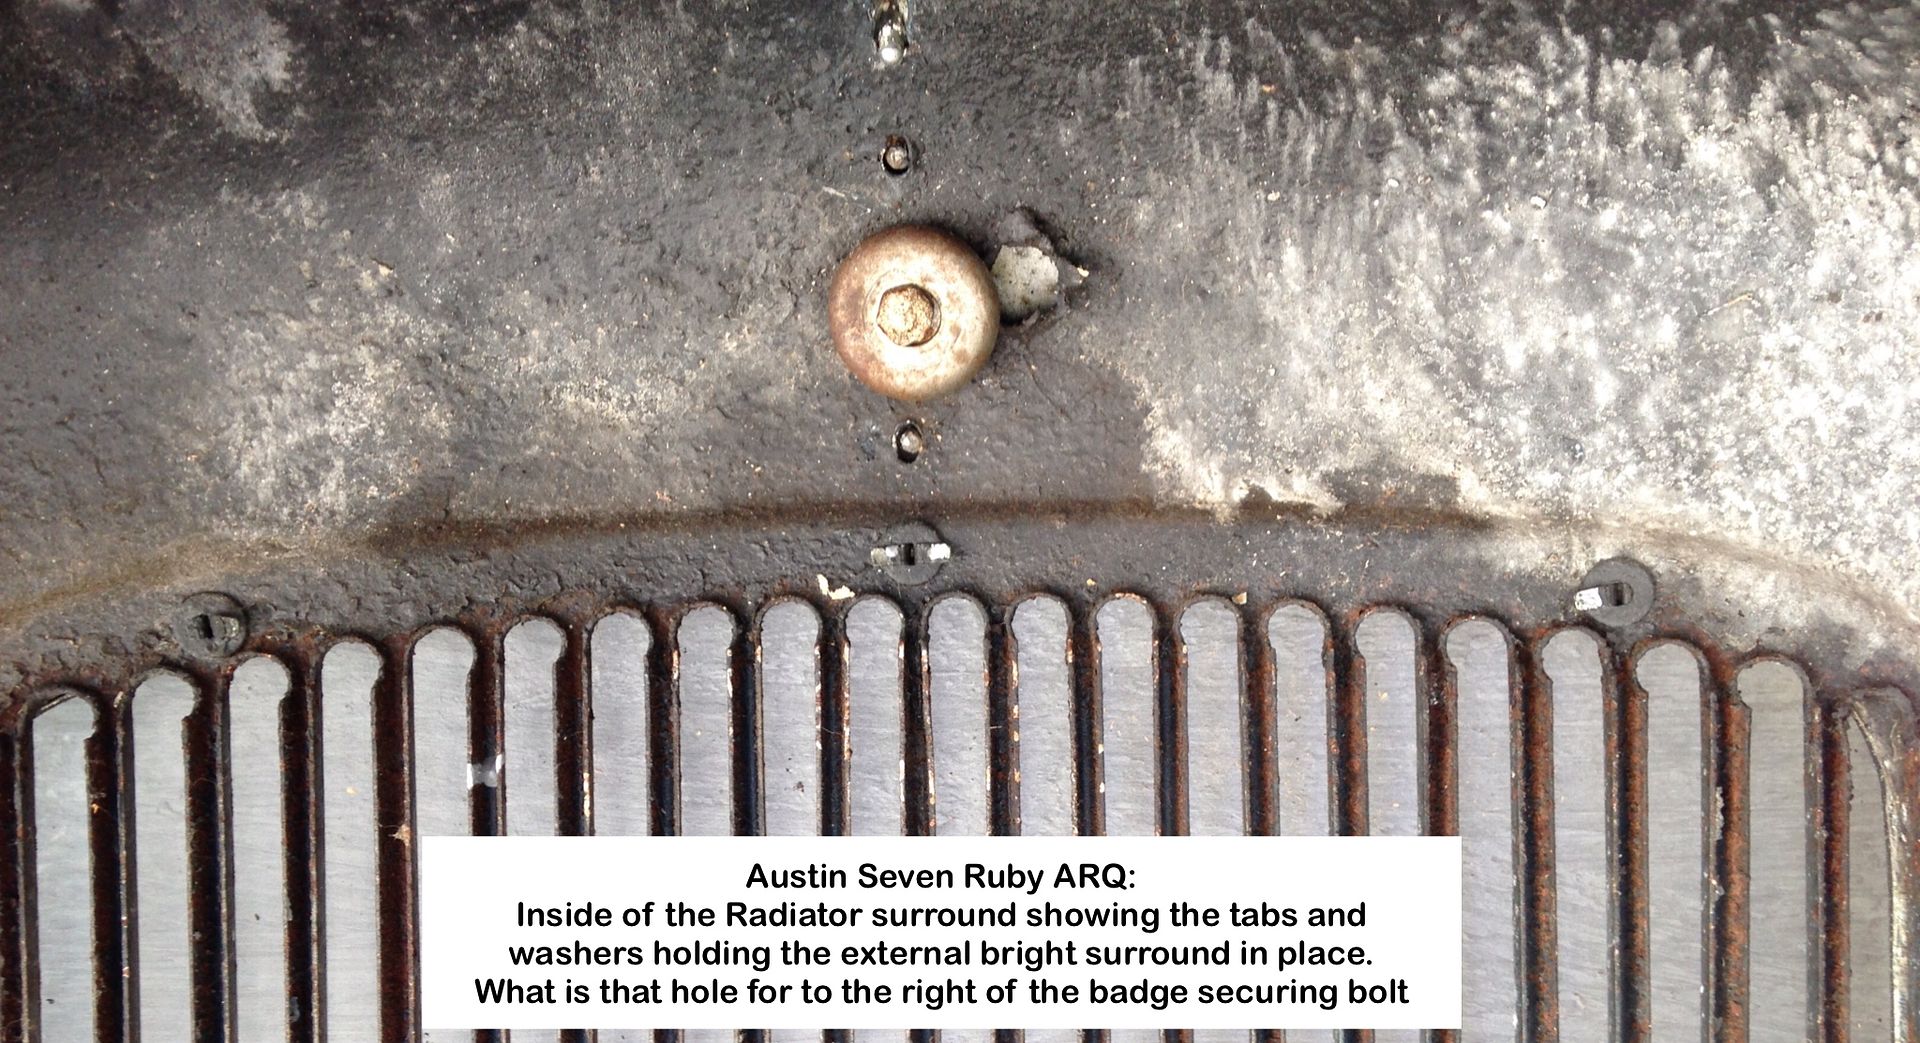
Why the nasty punched hole on the right I wonder.
How the Radiator Surround brightwork is secured
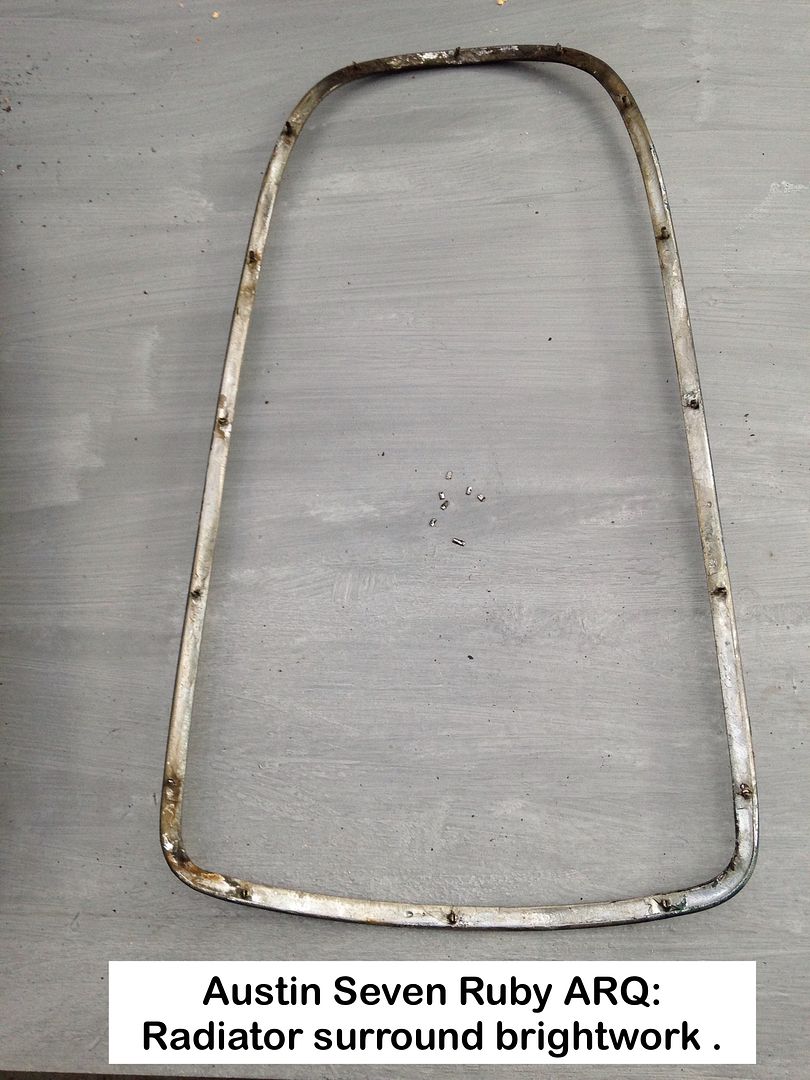
Radiator Surround brightwork:
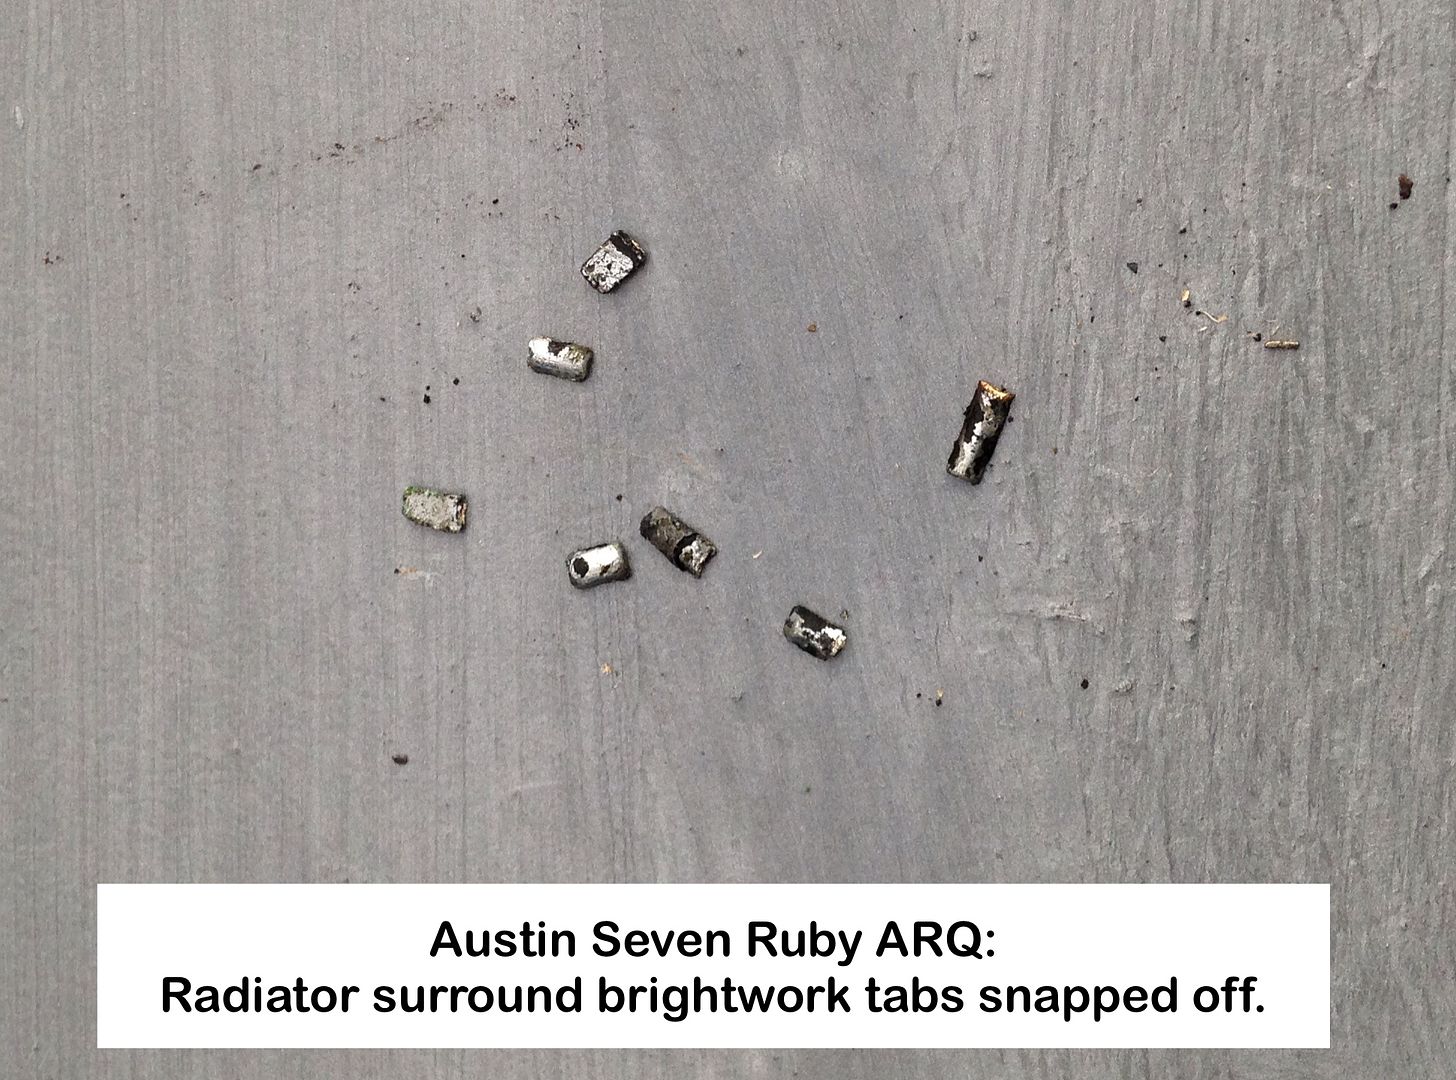
Tabs snapped off whilst removing the Radiator Surround brightwork:
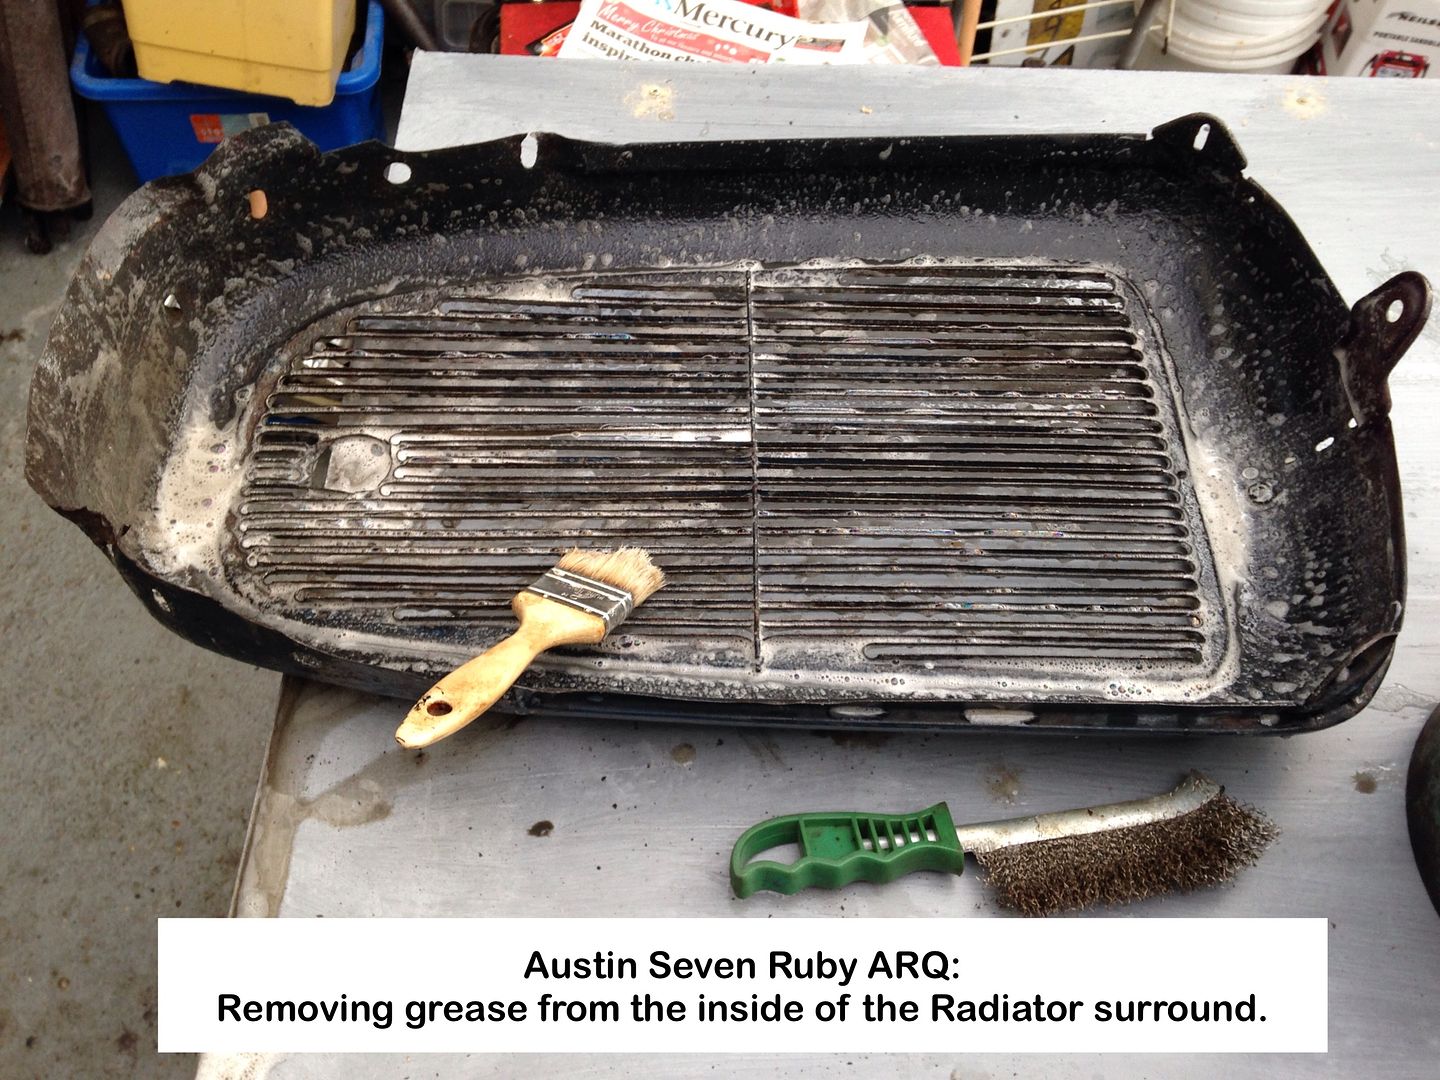
De-greasing the inside of the Radiator Surround:
Biostrip paint stripper applied:
Geoff - Hope to finish the car this year with luck.
Location: South Norfolk - Next to Suffolk
Back on the job after far too long an absence sorting out an issue with the lathe, then replacing Summerhouse felt amongst other things.
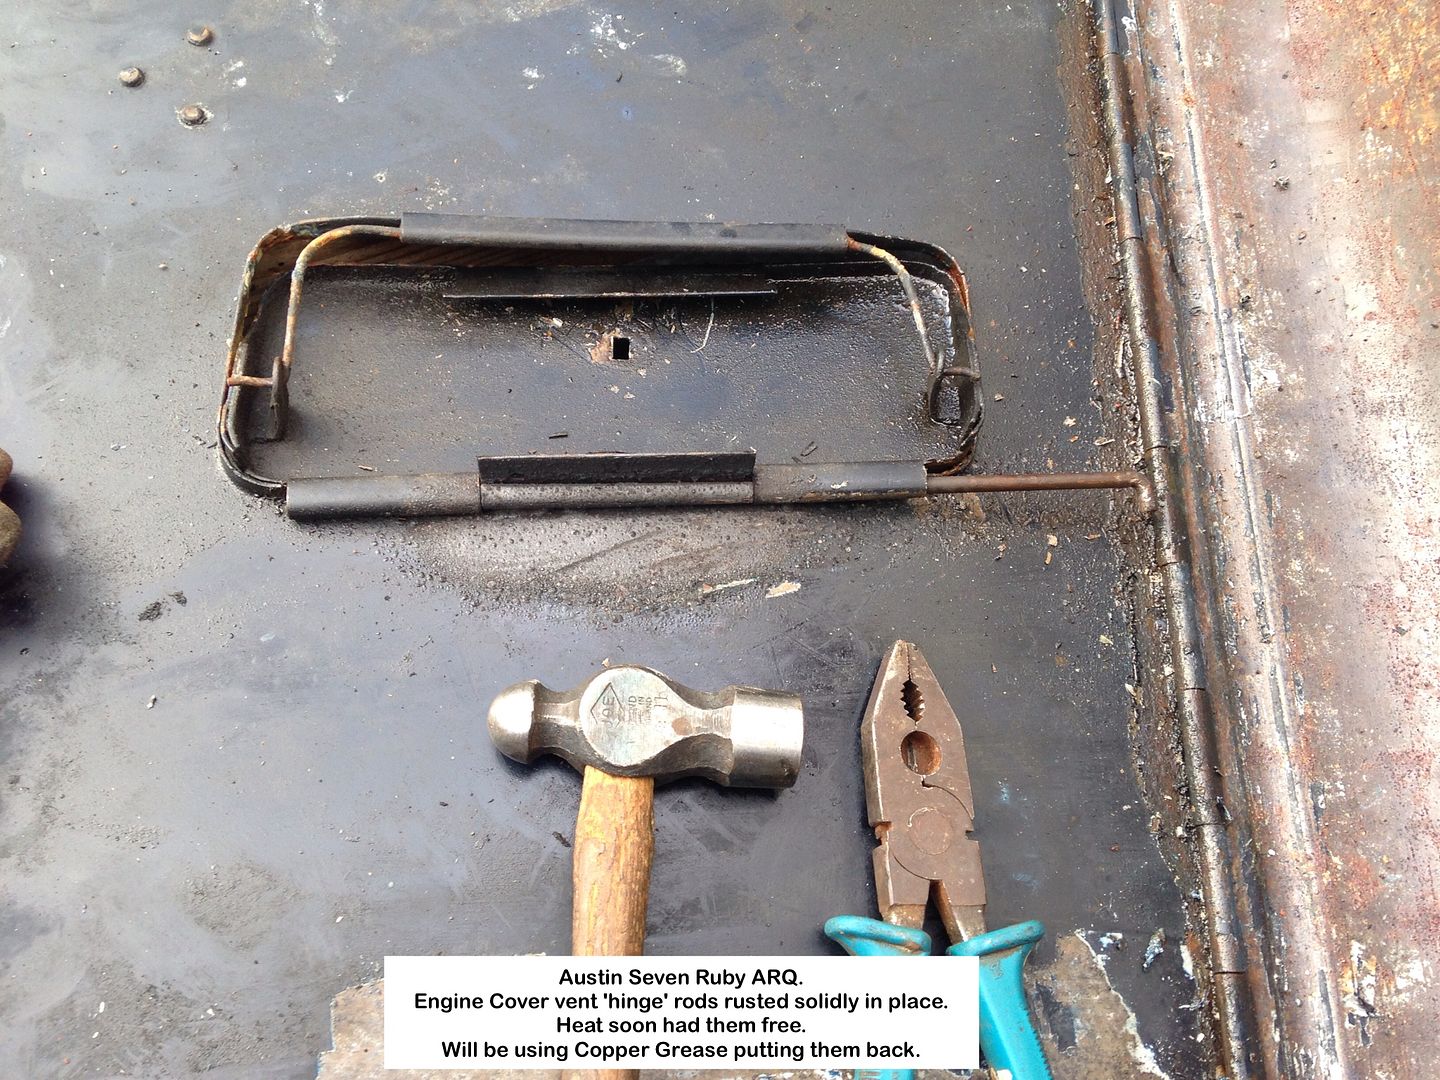
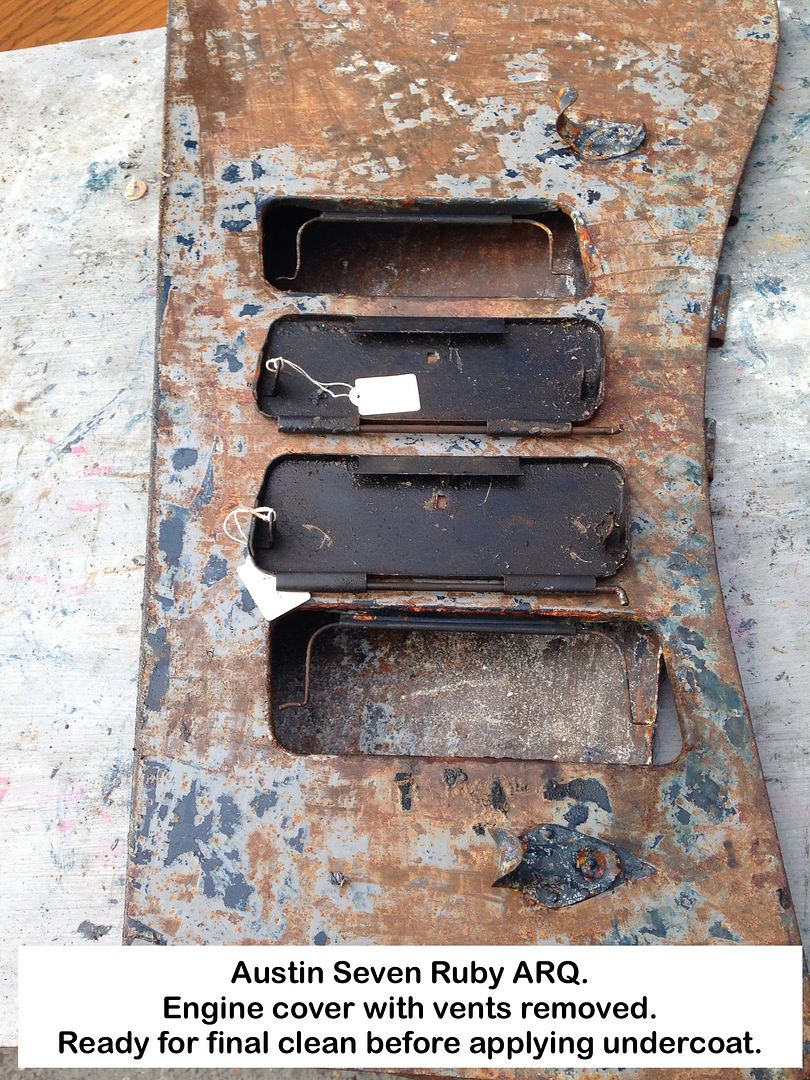
Engine cover vents.
Could only remove one of the 'hinge' rods as ALL the others had rusted in place and just would not budge even with the help of THE usual persuader, so resorted to using the ULTIMATE solution - FIRE🔥
From the end of a Blowlamp of course.
Hinge rod rusted in place, so heat applied after overnight dose of penetrating fluid.
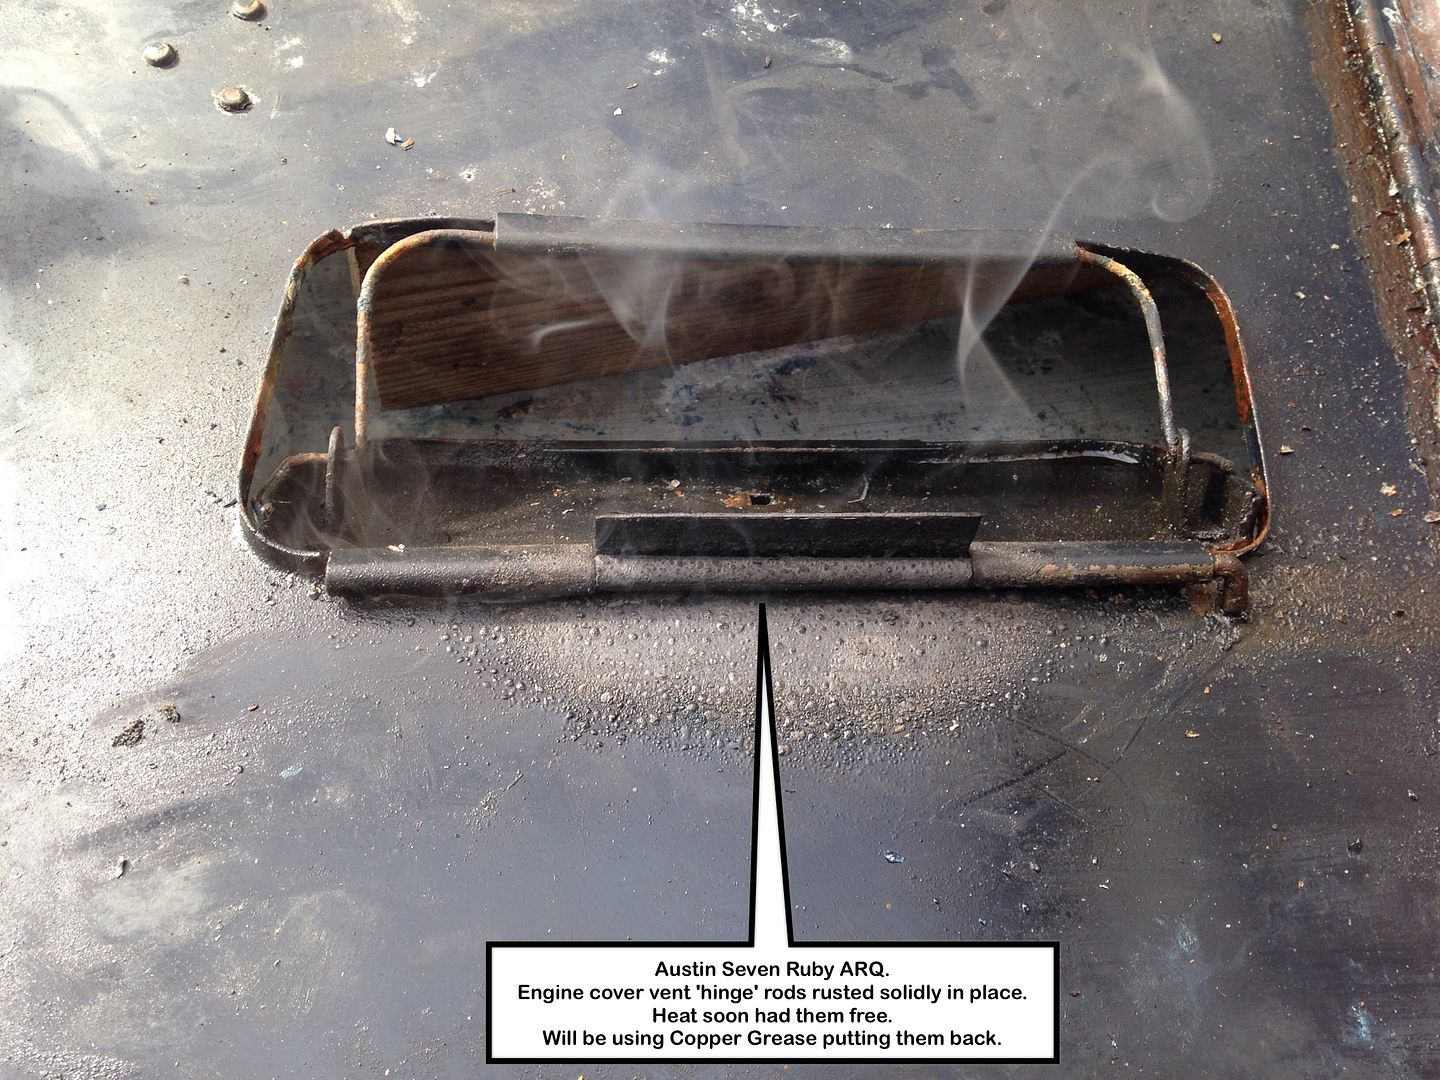
Heat and penetrating fluid did the job.
Interior ready for final clean and DTM undercoat.
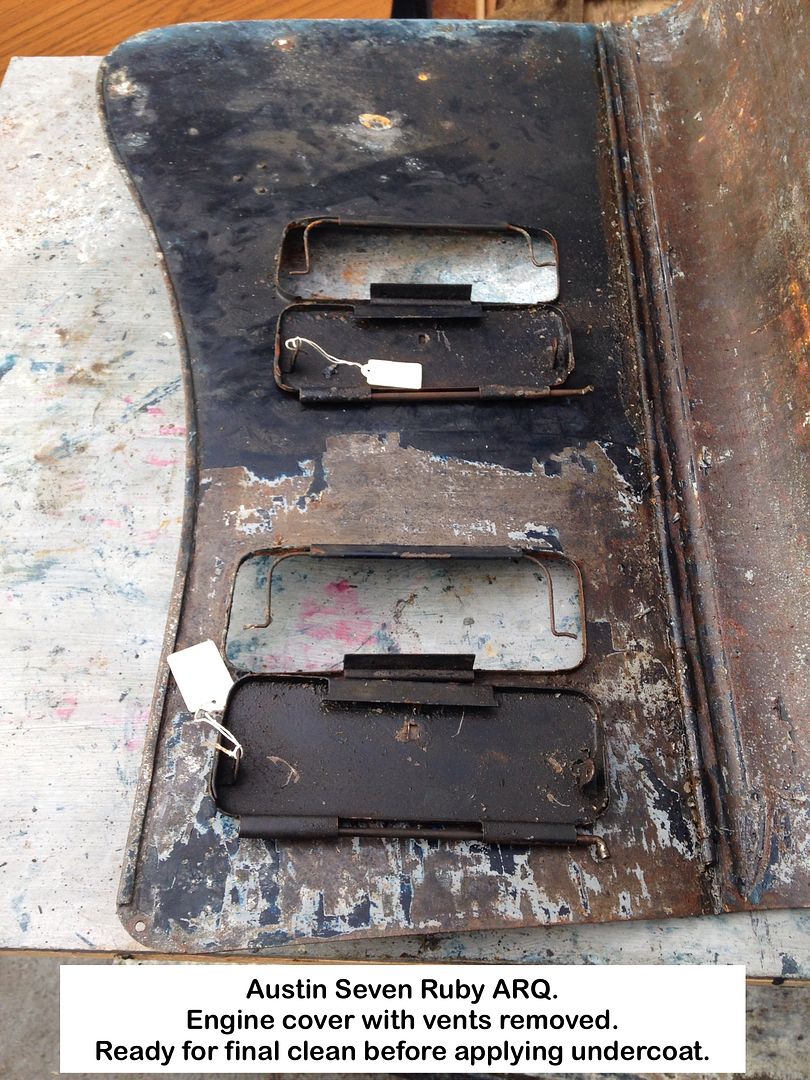
Exterior ready for final clean and DTM undercoat.
One more rear Mud Shield to do and strip the doors of glass, mechanism, strip the paint from the OS door, then apply DTM undercoat to all the loose body parts.
I can then get the body back into the Carport for repairs, especially making good the horrible mess done to the NS door lower hinge area, ditto the NS B-pillar bottom section, final stripping of paint, then application of DTM undercoat, then decide how to proceed.
May apply the top coat/s to the body with the doors attached, but not sure.
Advice please from anyone who has done a bare metal repaint, especially on sequence used.
Geoff - Progress at last.
Location: South Norfolk - Next to Suffolk
Good to see you out in the car port again Geoff. On mine that is being sprayed Ford Midnight blue at the moment I am having it sprayed doors on , I sprayed the door shuts and the sides and top of the doors with a Halfords aresol.
Nice to see your project Geoff. Certainly got some work cut out for you there. Nice work going into the chassis
Location: Wymondham, Norfolk
Geoff,
Thanks for sharing all your pics and info. - splendid!
Location: Staffs
Thanks for the responses, much appreciated, especially on days when I wonder if it's all worth while.
It most definitely IS.
Making good progress stripping, now that I have more Biostrip.
Those Strip&Clean angle grinder disks work an absolute treat on metal.
Found the perfect way to remove cellulose filler:
HEAT GUN!
The filler then comes off just like paint following application of stripper.
Saw this mentioned on YouTube I think, but thanks to whoever posted it.
Wish I had known when I removed that huge area at the bottom of the NS door, and creating a fog of dust doing so, with everything in sight covered in the stuff.
Need to isolate the work area using thin plastic sheet/film before I paint the parts I'm readying now, but most certainly before I do anymore work on the body.
Need to sort out an extraction fan for the Carport.
Anyone have a spare fan they don't need?
Geoff - Now to make an engine stand, as I don't want to upset neighbours today by grinding.
Location: South Norfolk - Next to Suffolk
Back on track at last!
At last I'm making progress as weather is far more conducive.
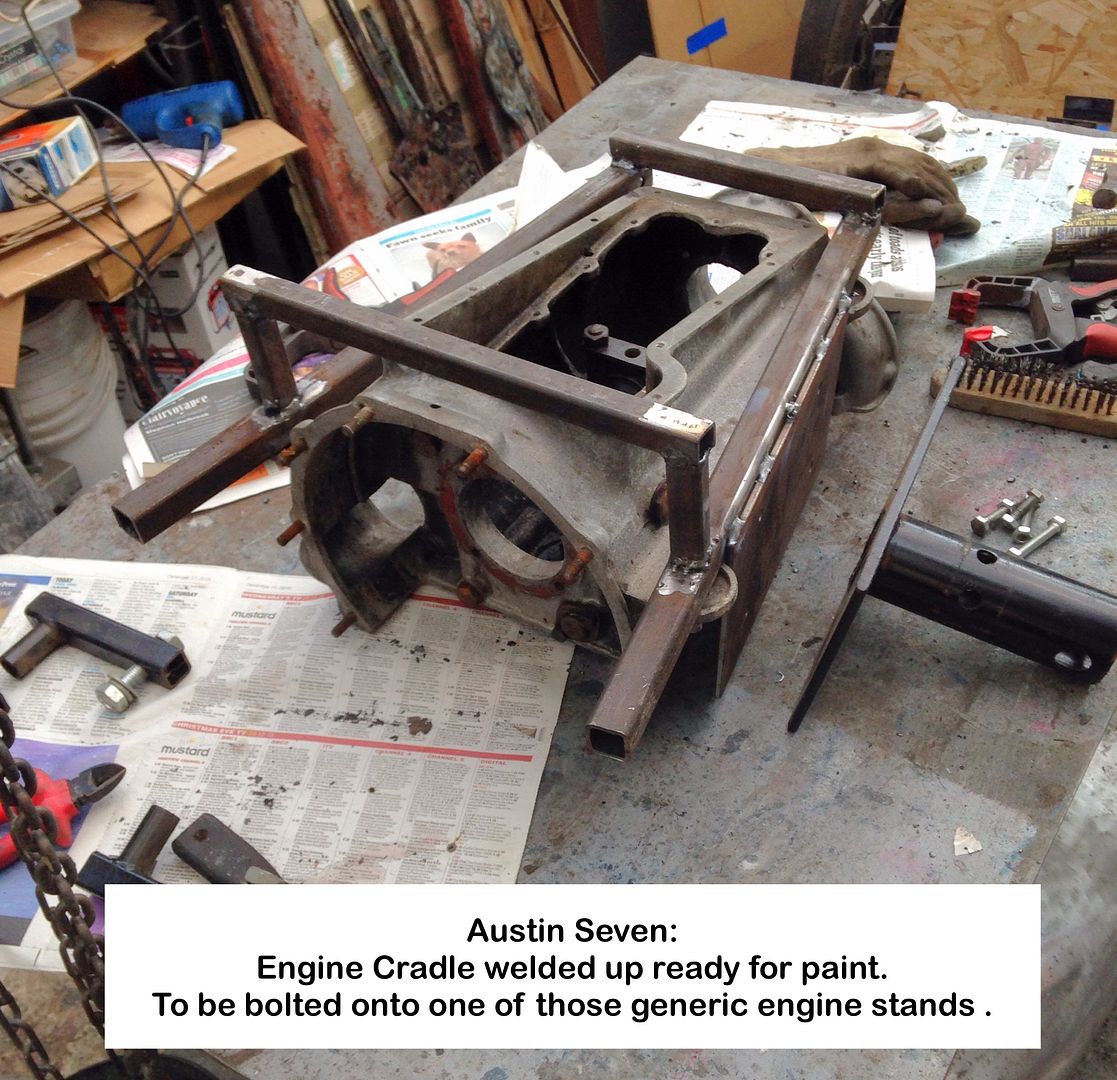
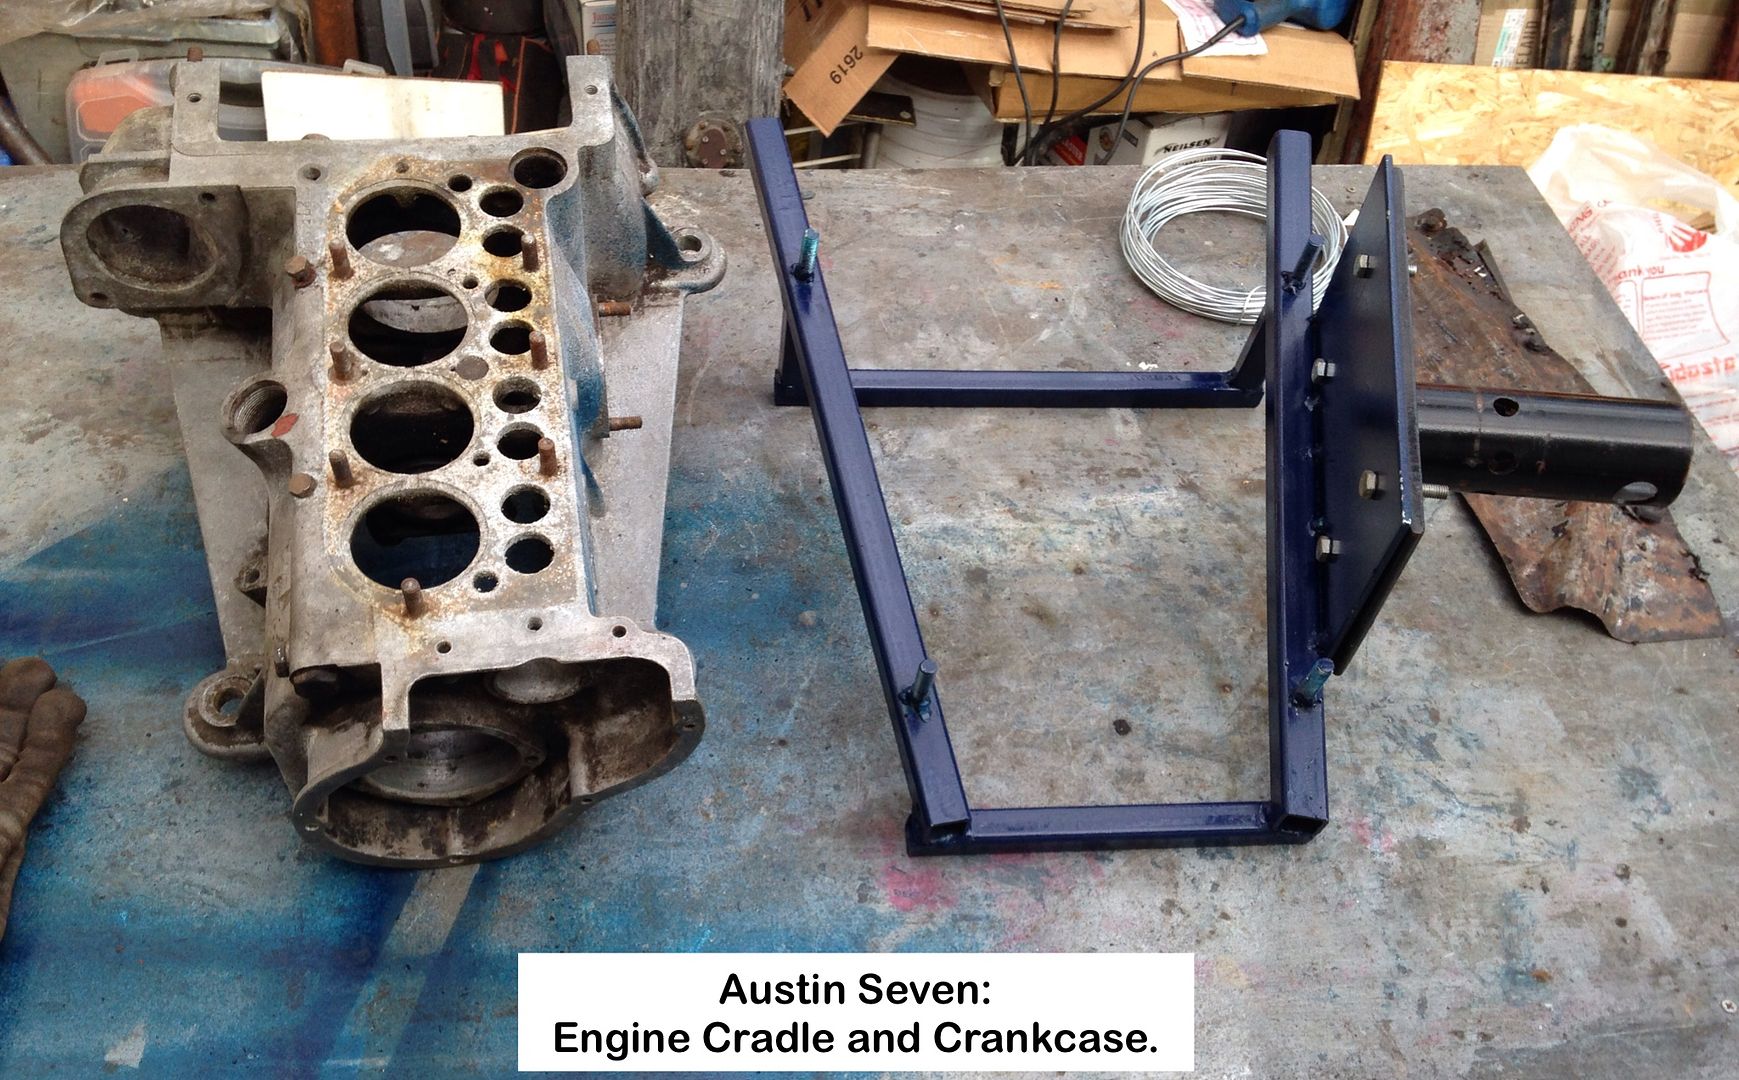
Engine Cradle.
Now that I have sorted the lathe out, it was time to think about some way of getting the engine and gearbox attached to my generic engine stand, and then into the Workshop so that I can work on it at night in comfort.
I did the usual internet search, for a suitable design, but only found one that looked as if it would hold an engine weighing a ton.
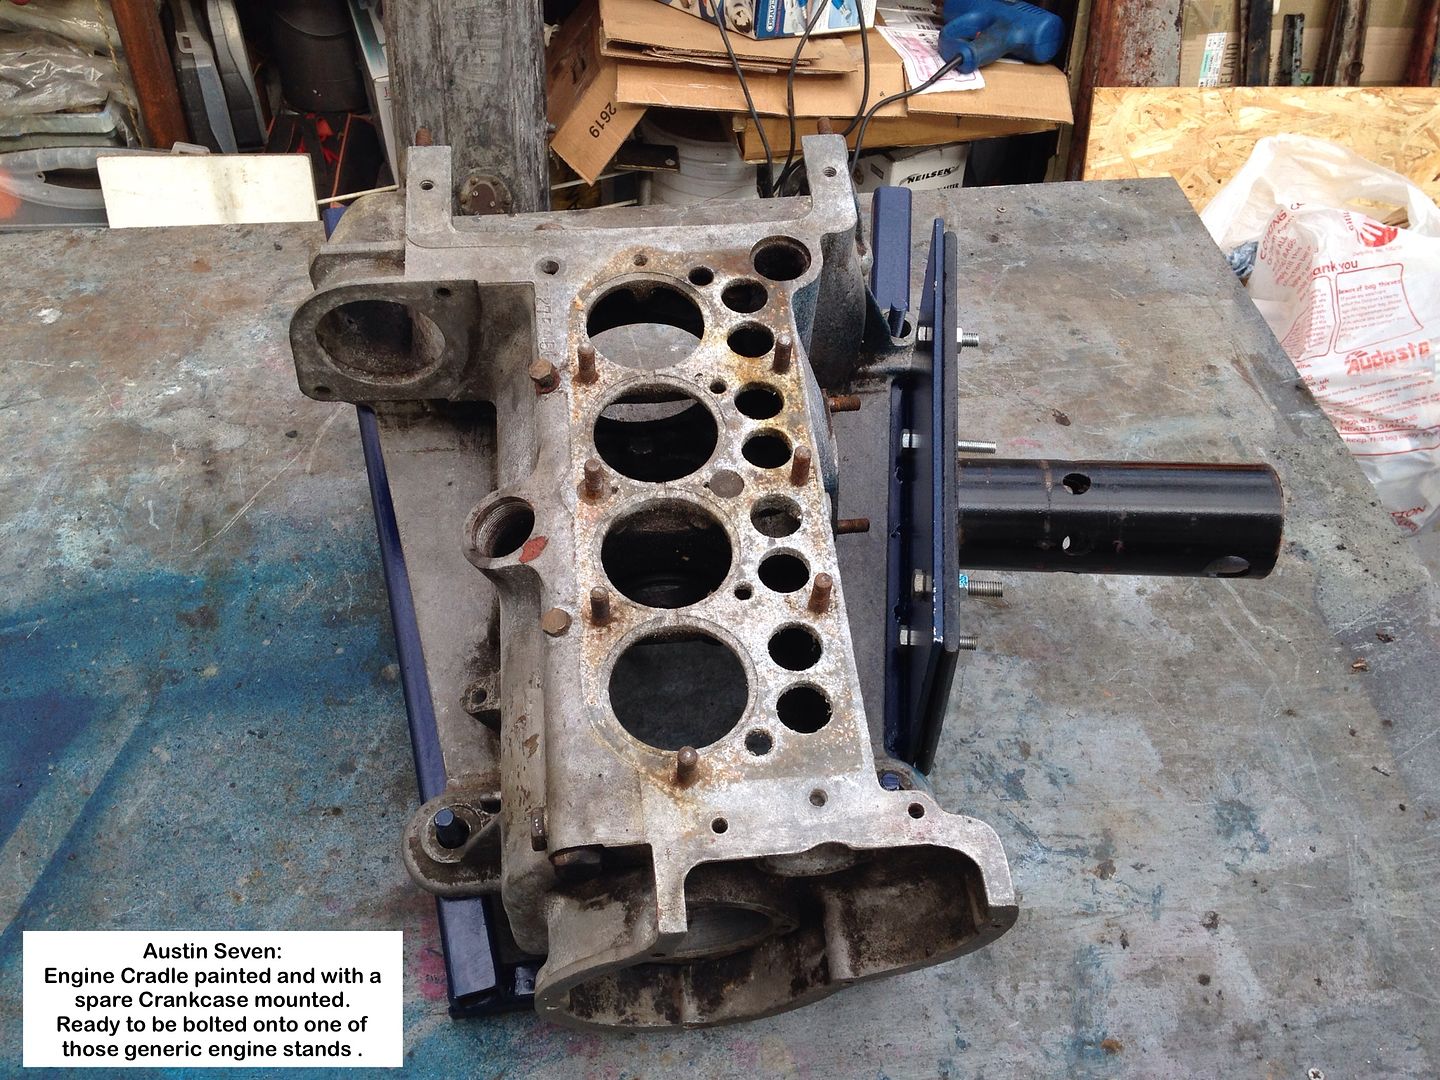
Having a spare crankcase to hand, it was easy to use it as a template.
It took just a few days to come up with a suitable design that was simple, light plus quick and easy to make.


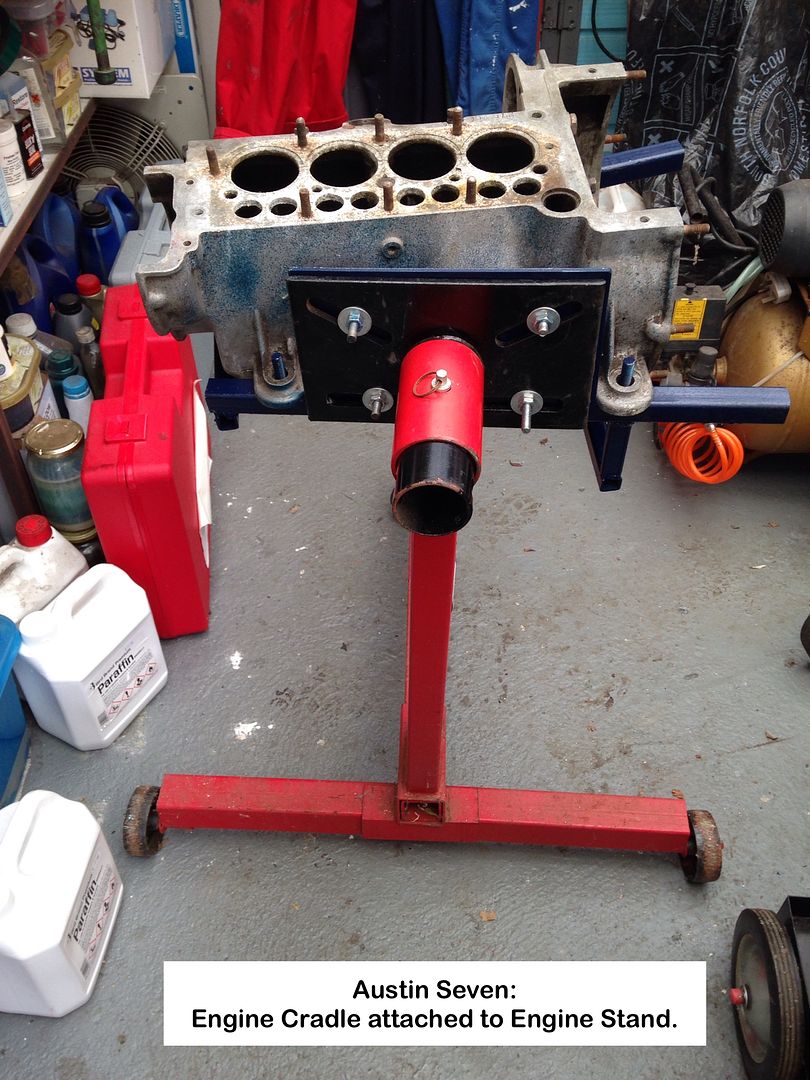
Video of the assembly being used.
Geoff - Now to carry out repairs to the parts taken off of the car.
Location: South Norfolk - Next to Suffolk
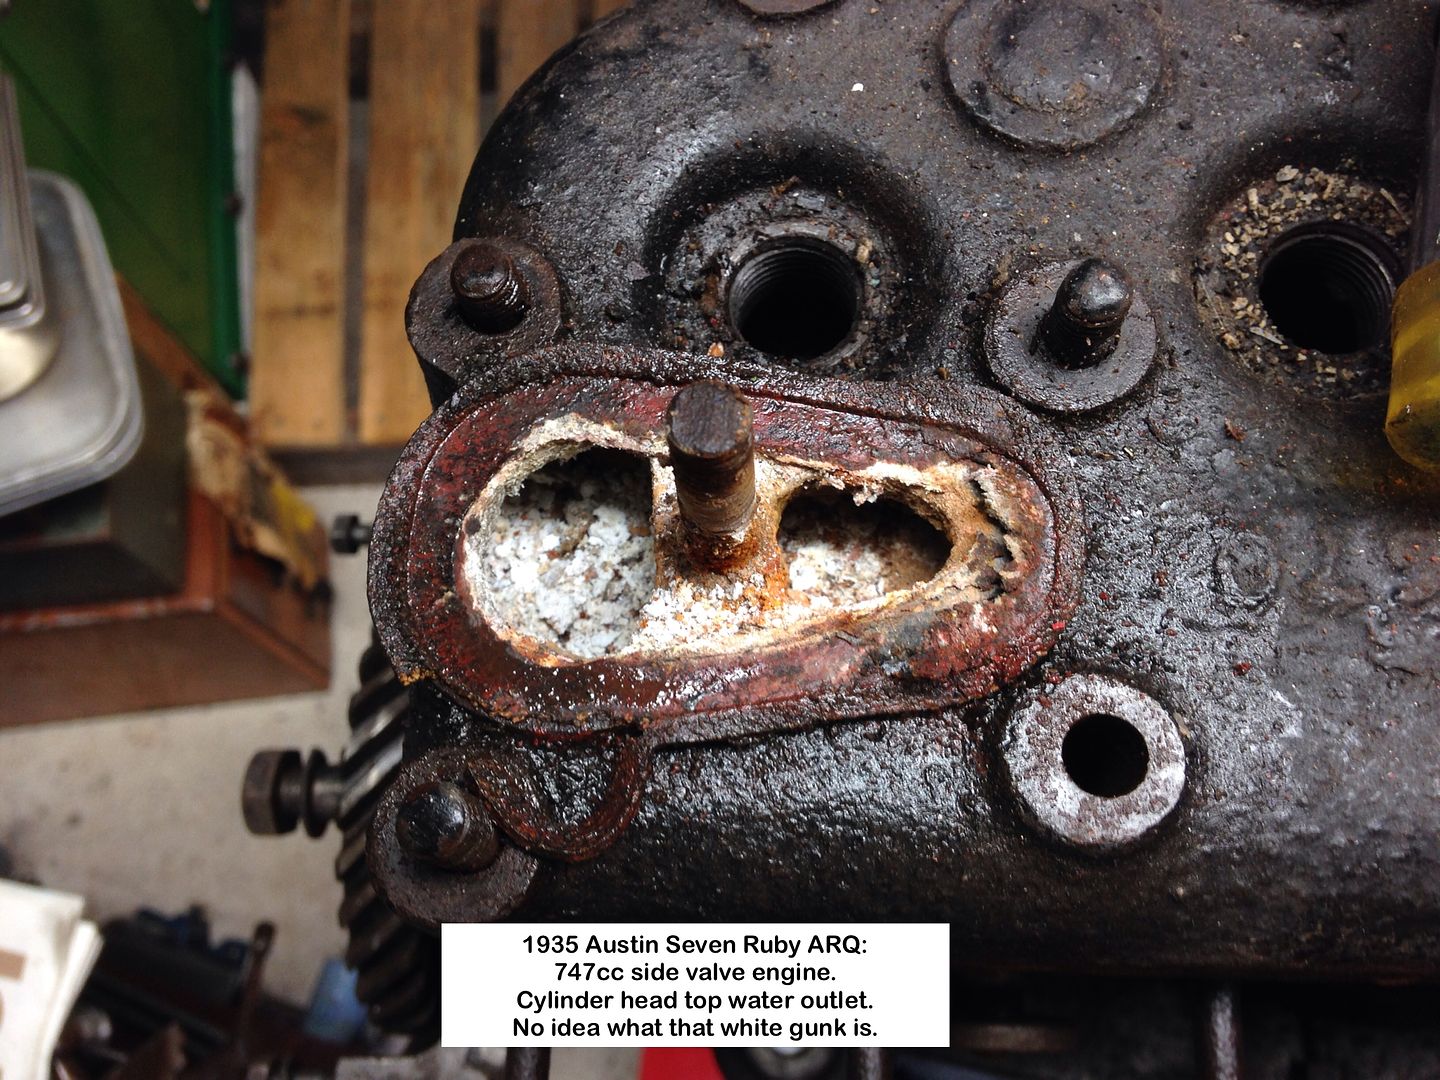
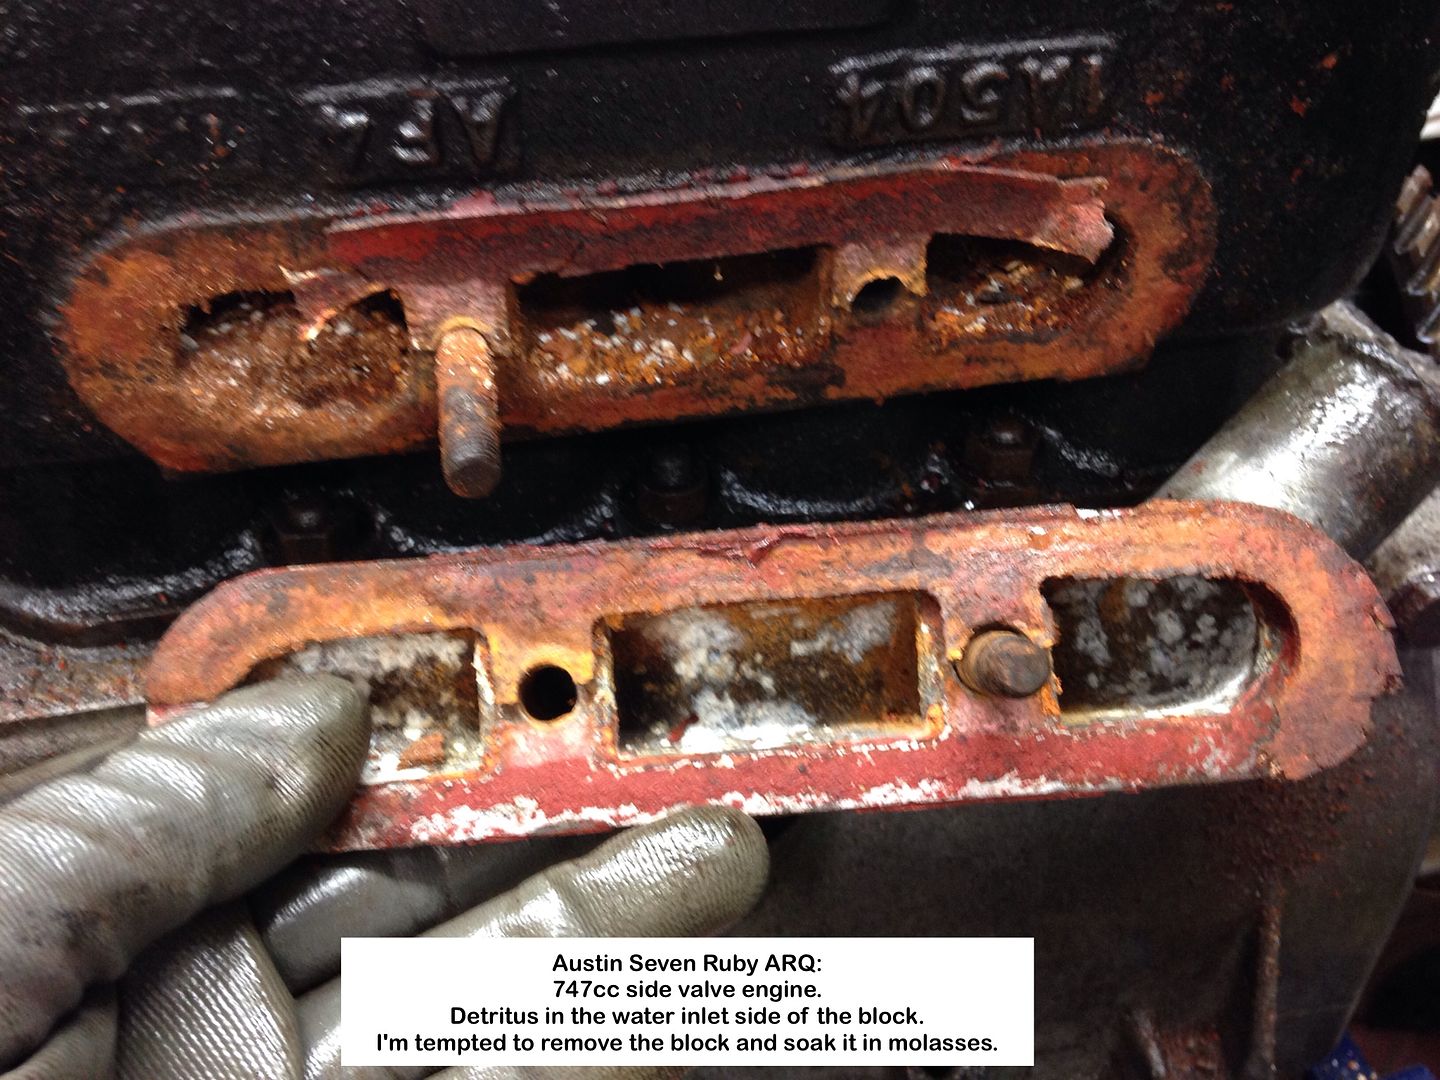
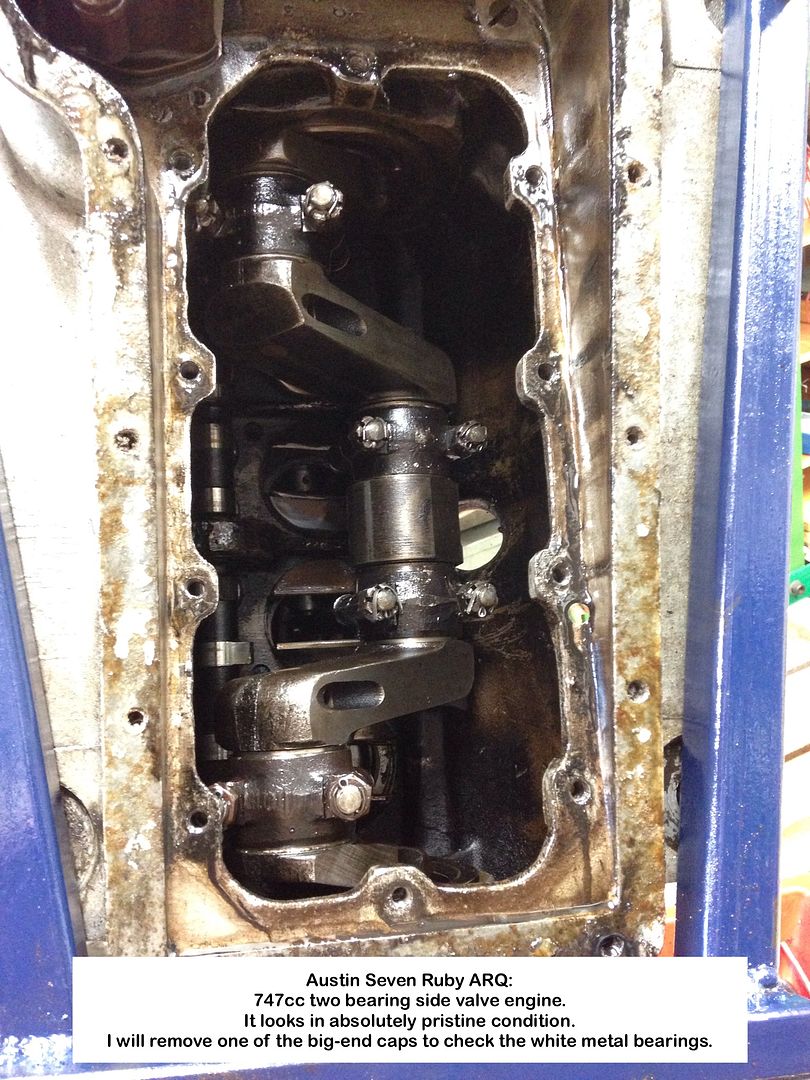
Been checking the engine and it appears to be totally unmolested.
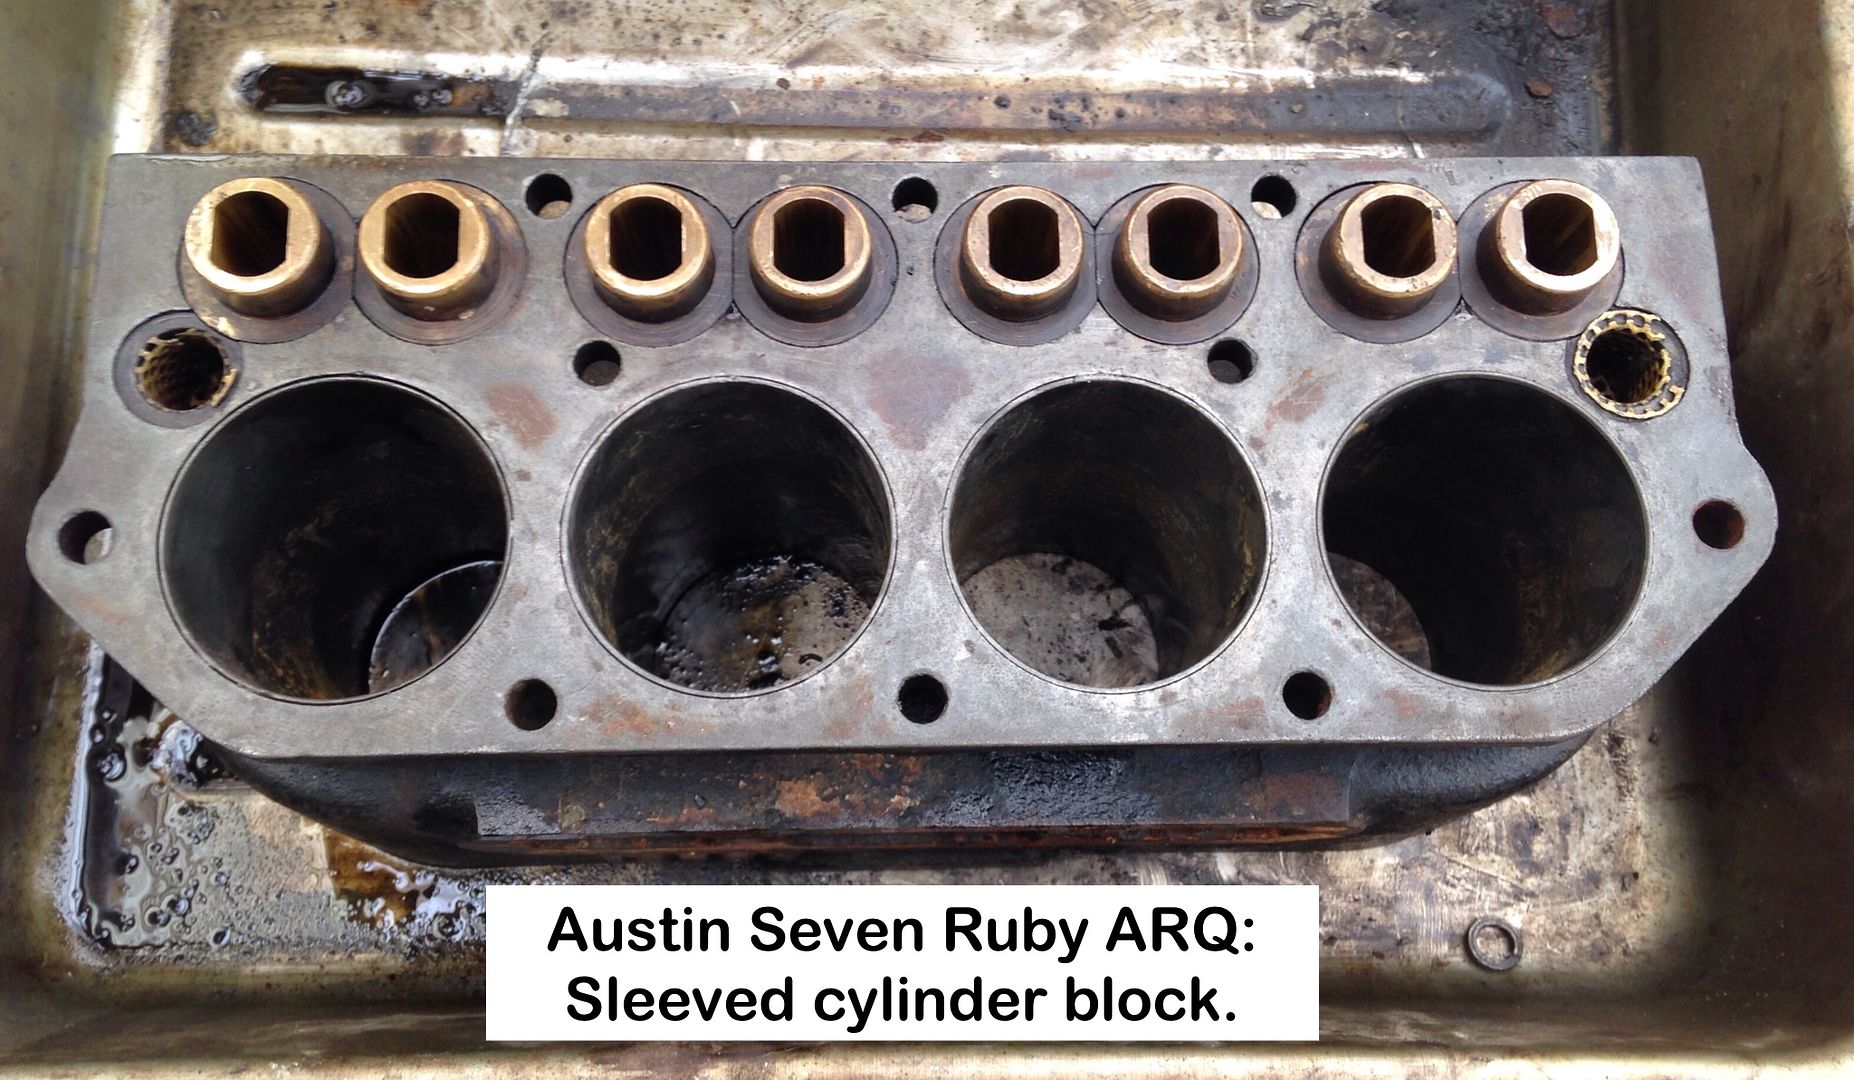
With all that white gunk in the top water outlet, and the detritus in the inlet aside of the block, I think it best to remove it and soak it in molasses, as I will be doing with the head, after removing all Welsh plugs.
There is absolutely no wear in the bores, much to my surprise, but haven't cleaned top of pistons yet to see if there is any oversize stamped on them.
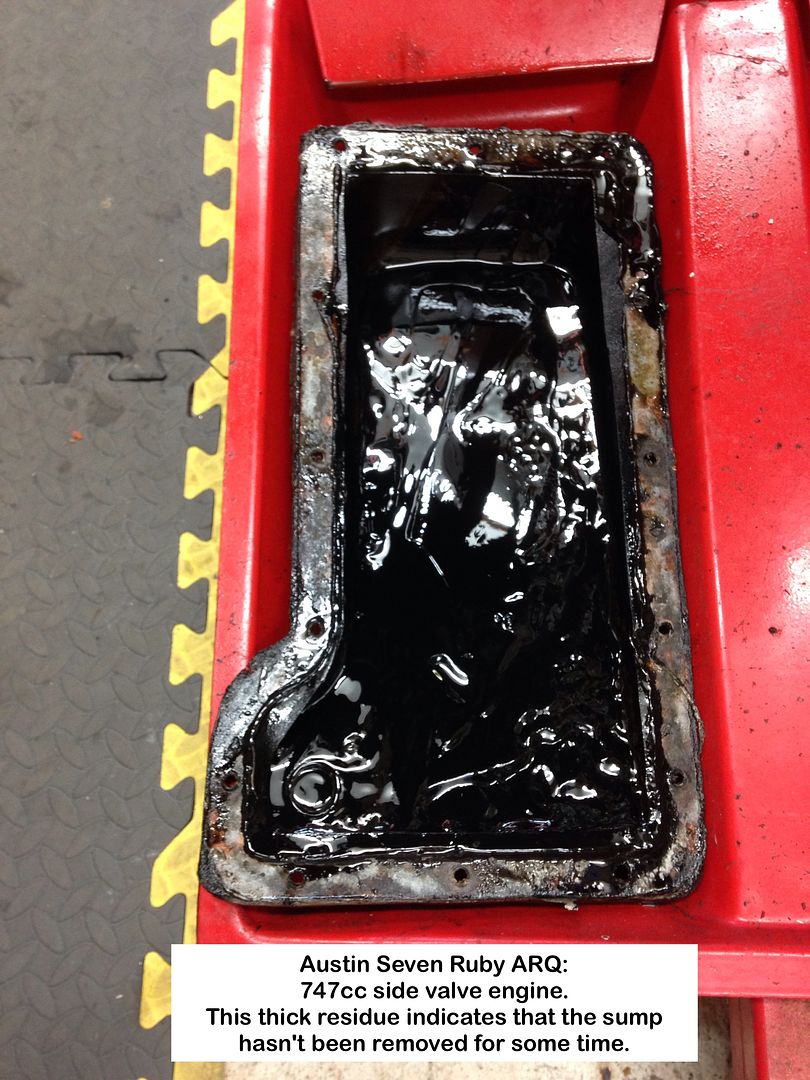
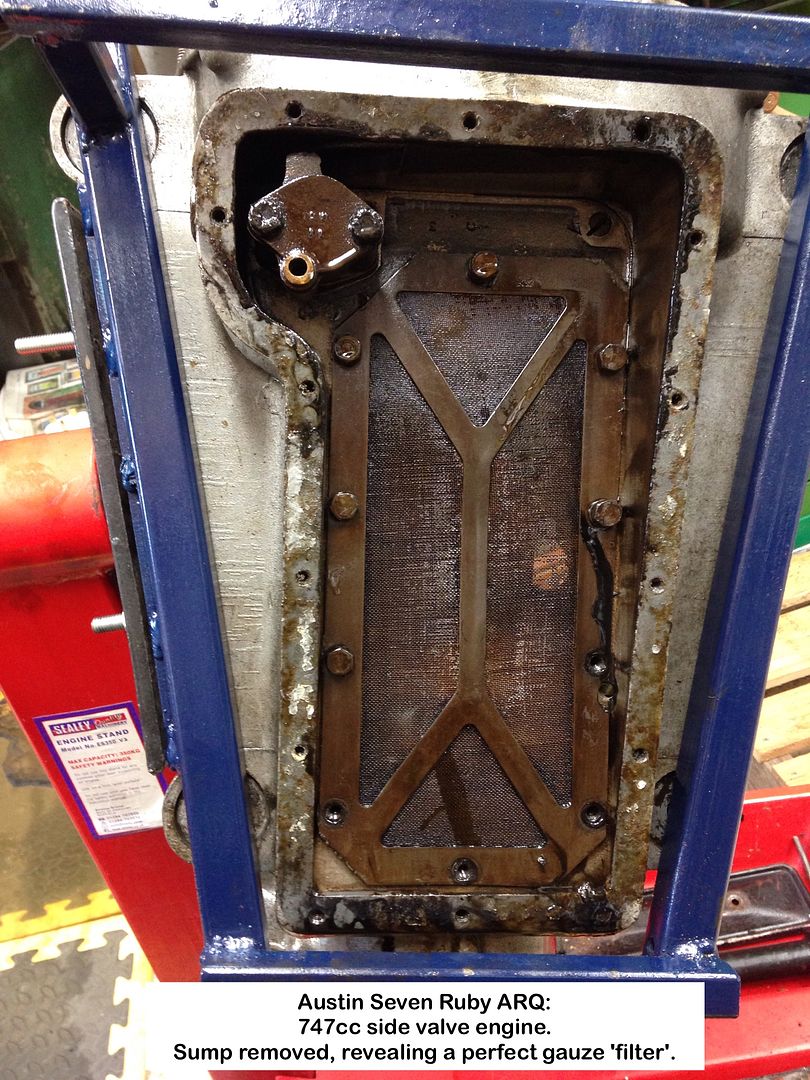
That thick sediment in the Crankcase Bottom Cover, indicates that it hasn't been off for ages, if ever.
I shall be removing the crank and rods to check for cracks, seeing that the engine is out.
Geoff - Busy stripping the loose body parts.
Location: South Norfolk - Next to Suffolk

Thanks for putting me right Ruairidh, and compliment.
Do I bolt the box back on top of the black paint, or scrape it away, down to the DTM coat?
Geoff - Surprised at the impression made though.
Location: South Norfolk - Next to Suffolk
Thanks - 👍
Geoff - One item not to worry about then 👏
Location: South Norfolk - Next to Suffolk
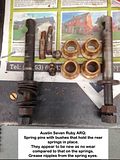
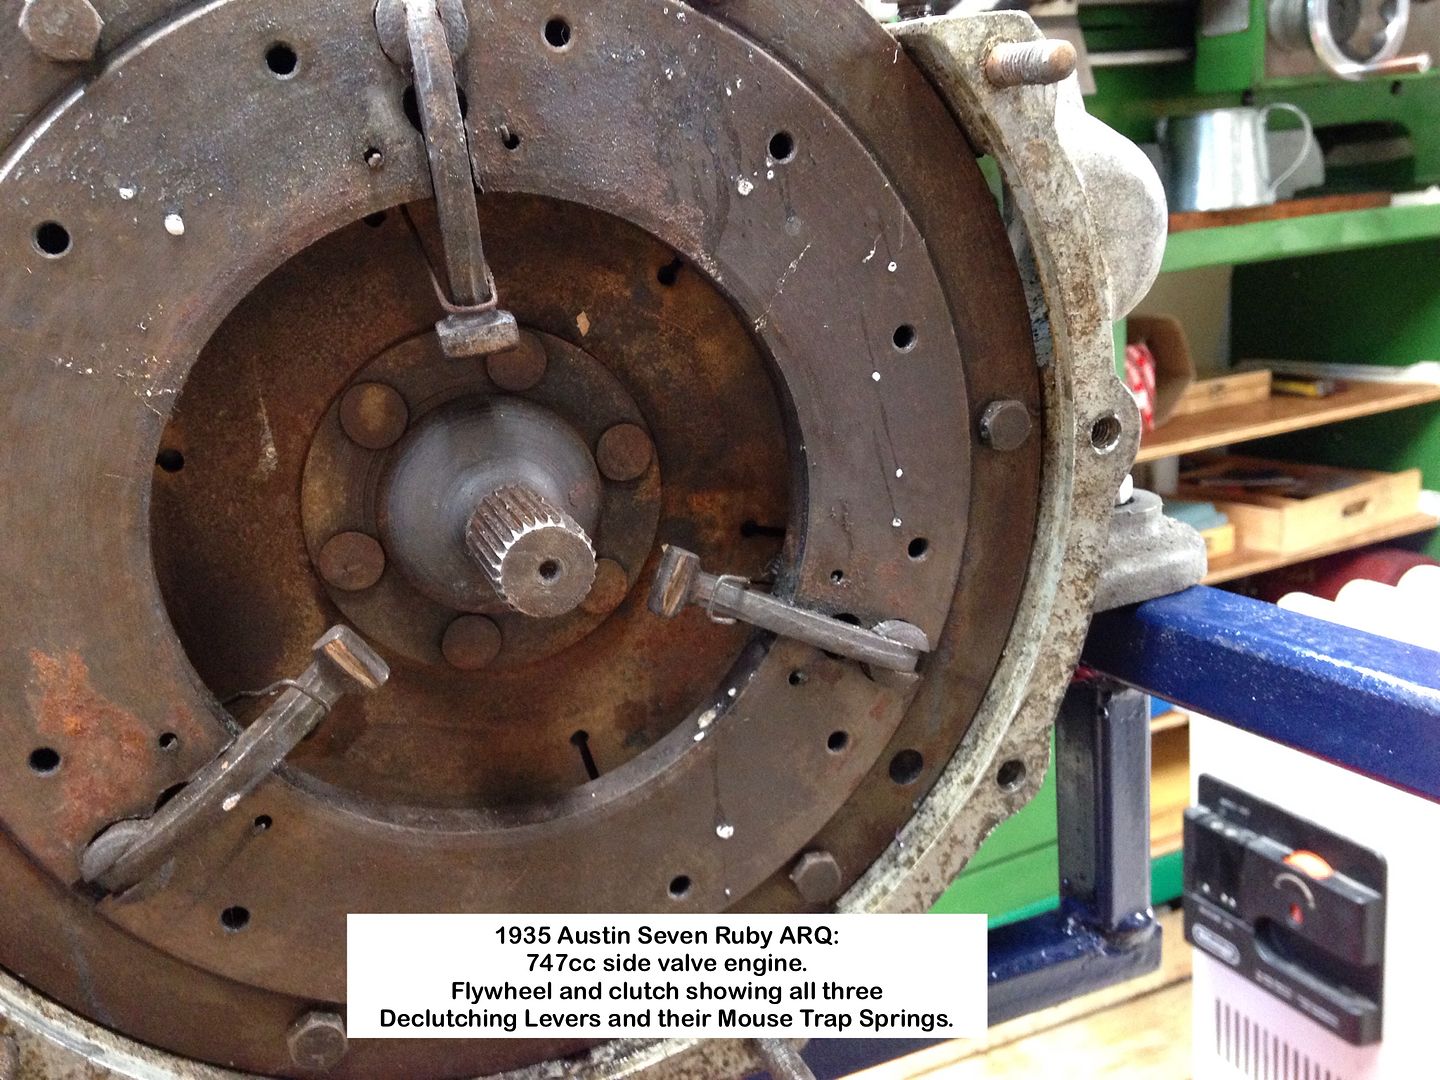
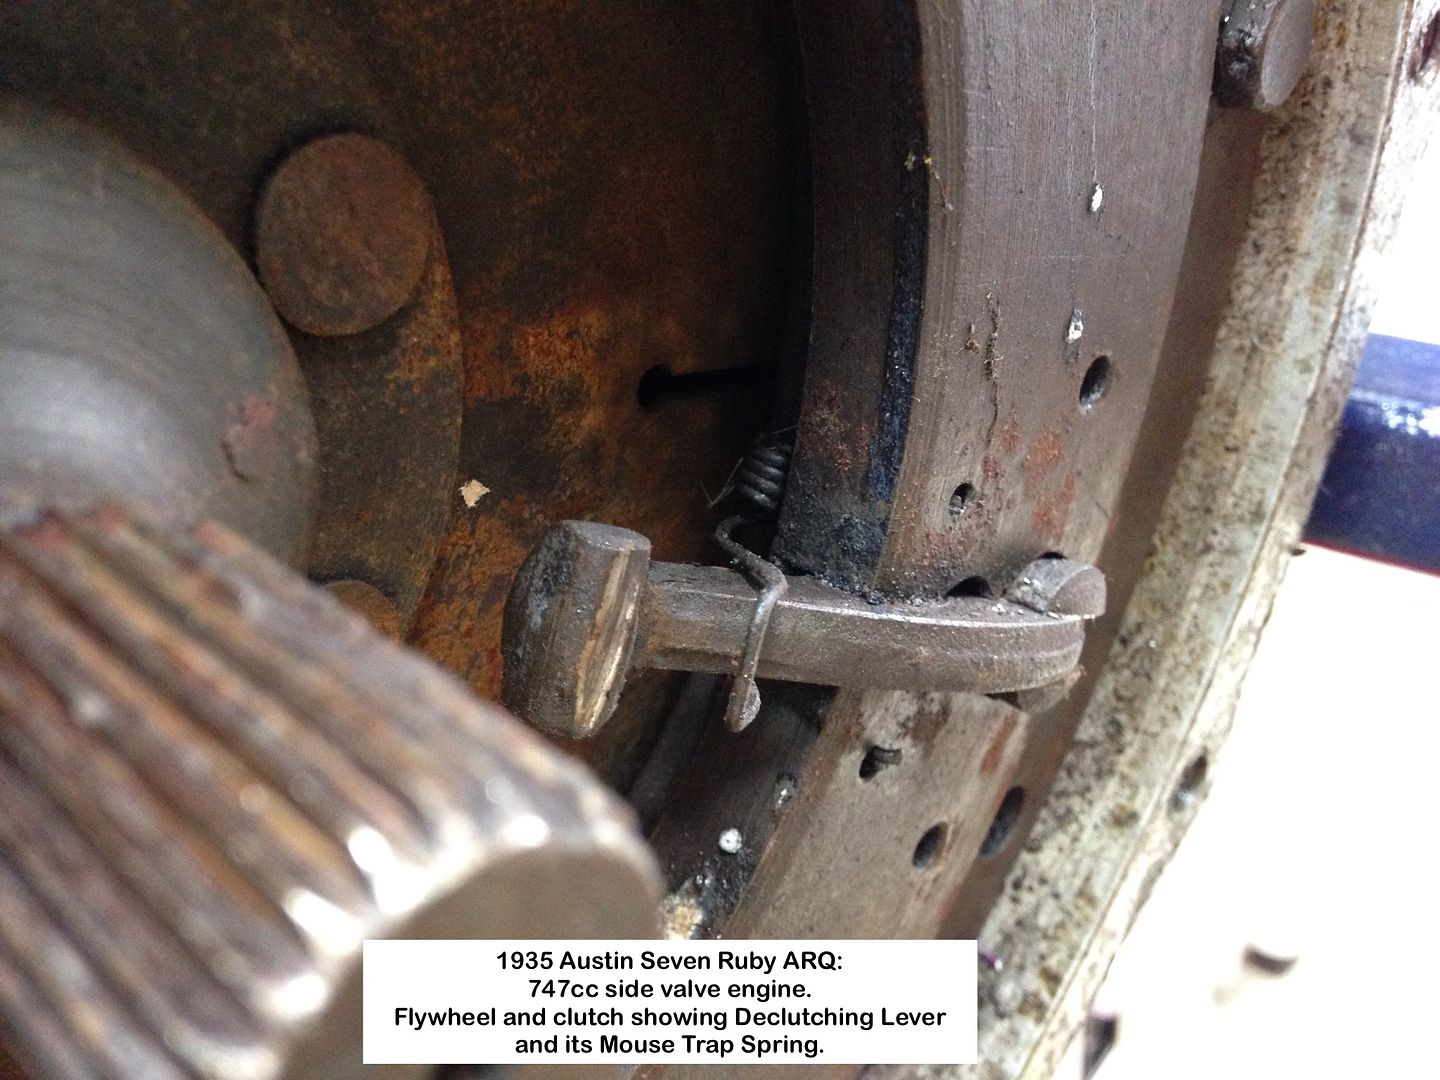
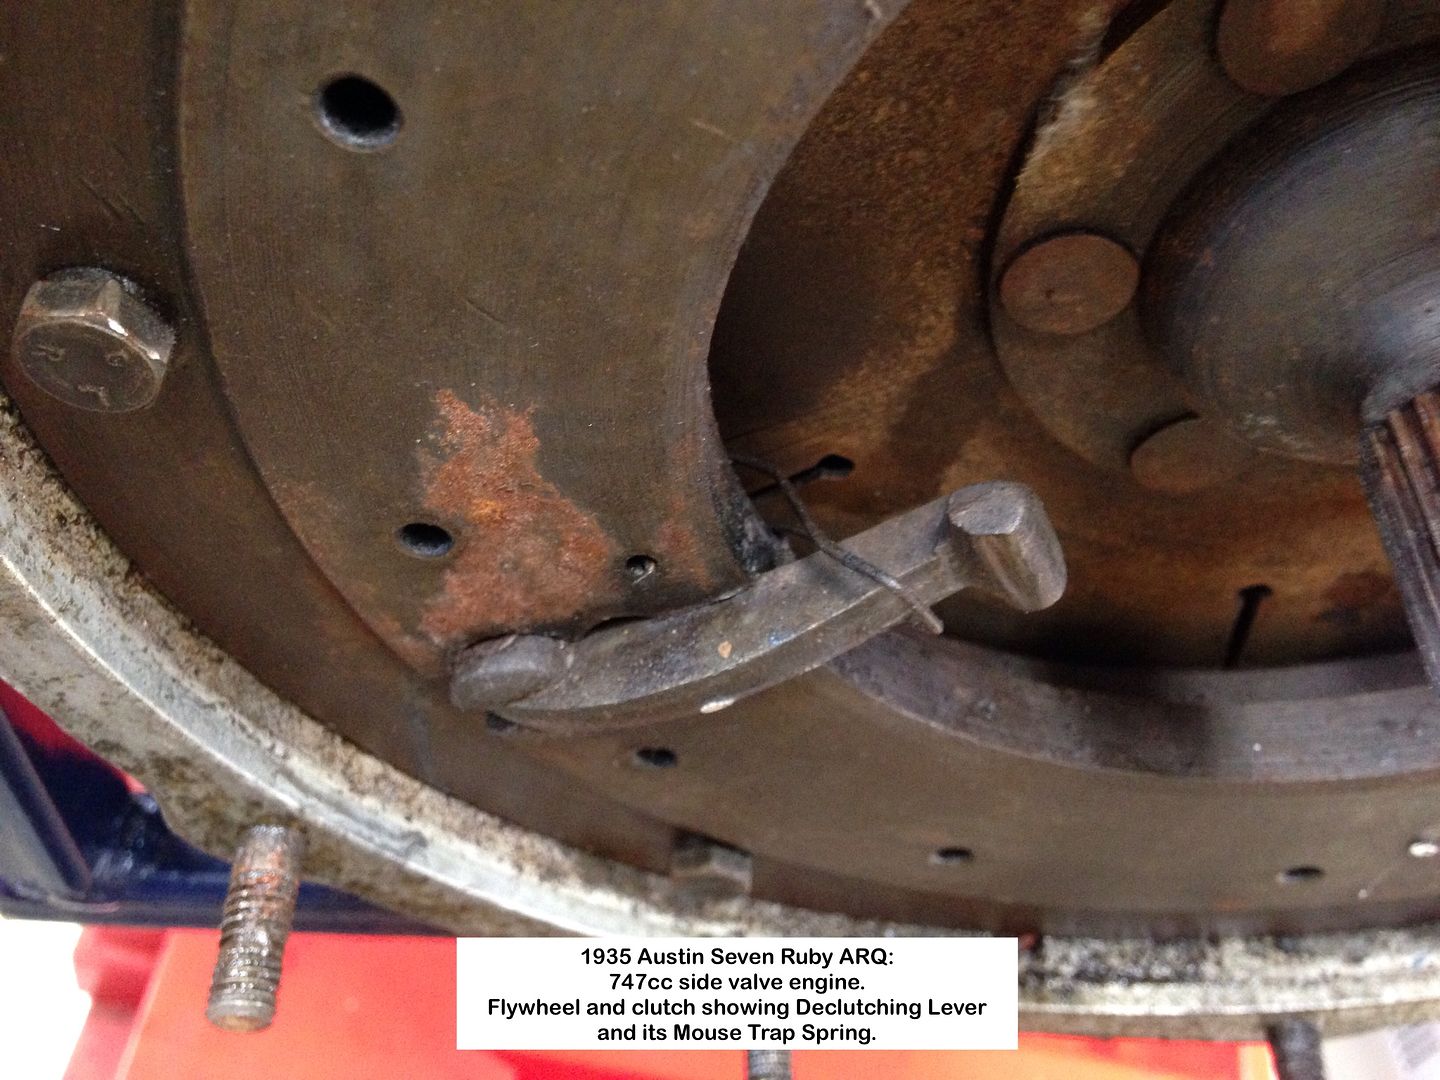
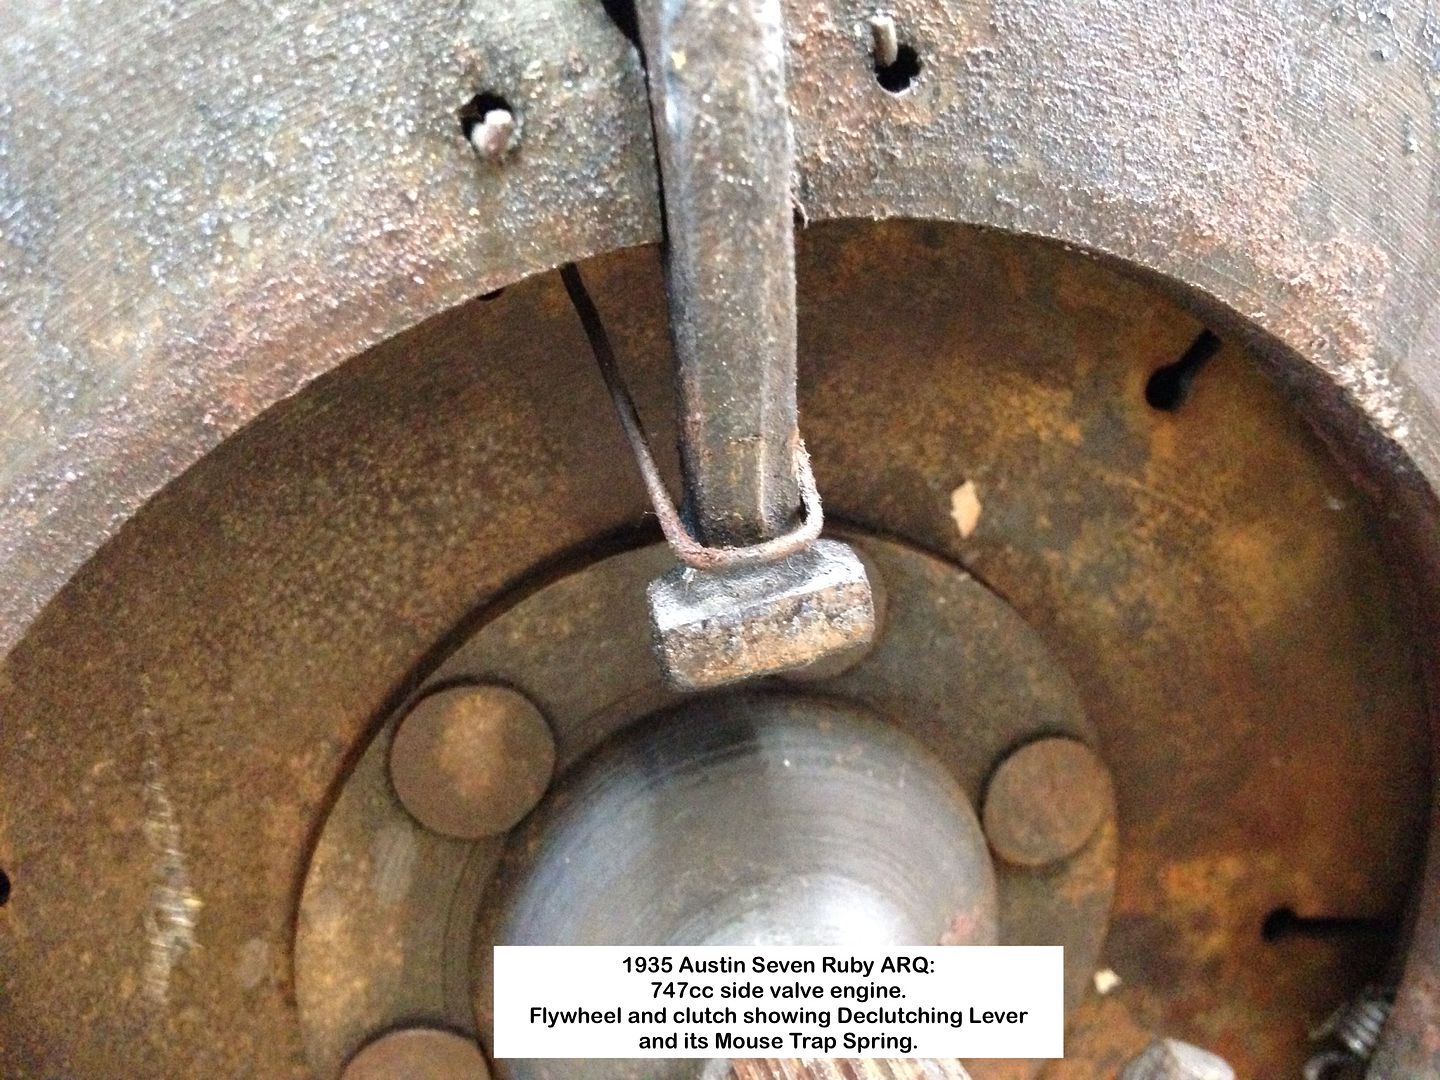
Clutch Mouse springs.
Not sure how these should appear once fitted.
Should they be loose as two are, or resting up against the Declutching levers.
Geoff - More stripping today.
Location: South Norfolk - Next to Suffolk
Quick sideline, as I will be using the machine to do upholstery.
Singer 660 A1 sewing machine:
Have at last got the beast to operate as if it has a servo motor fitted.
Now nice and slow
Proof:
Singer operating
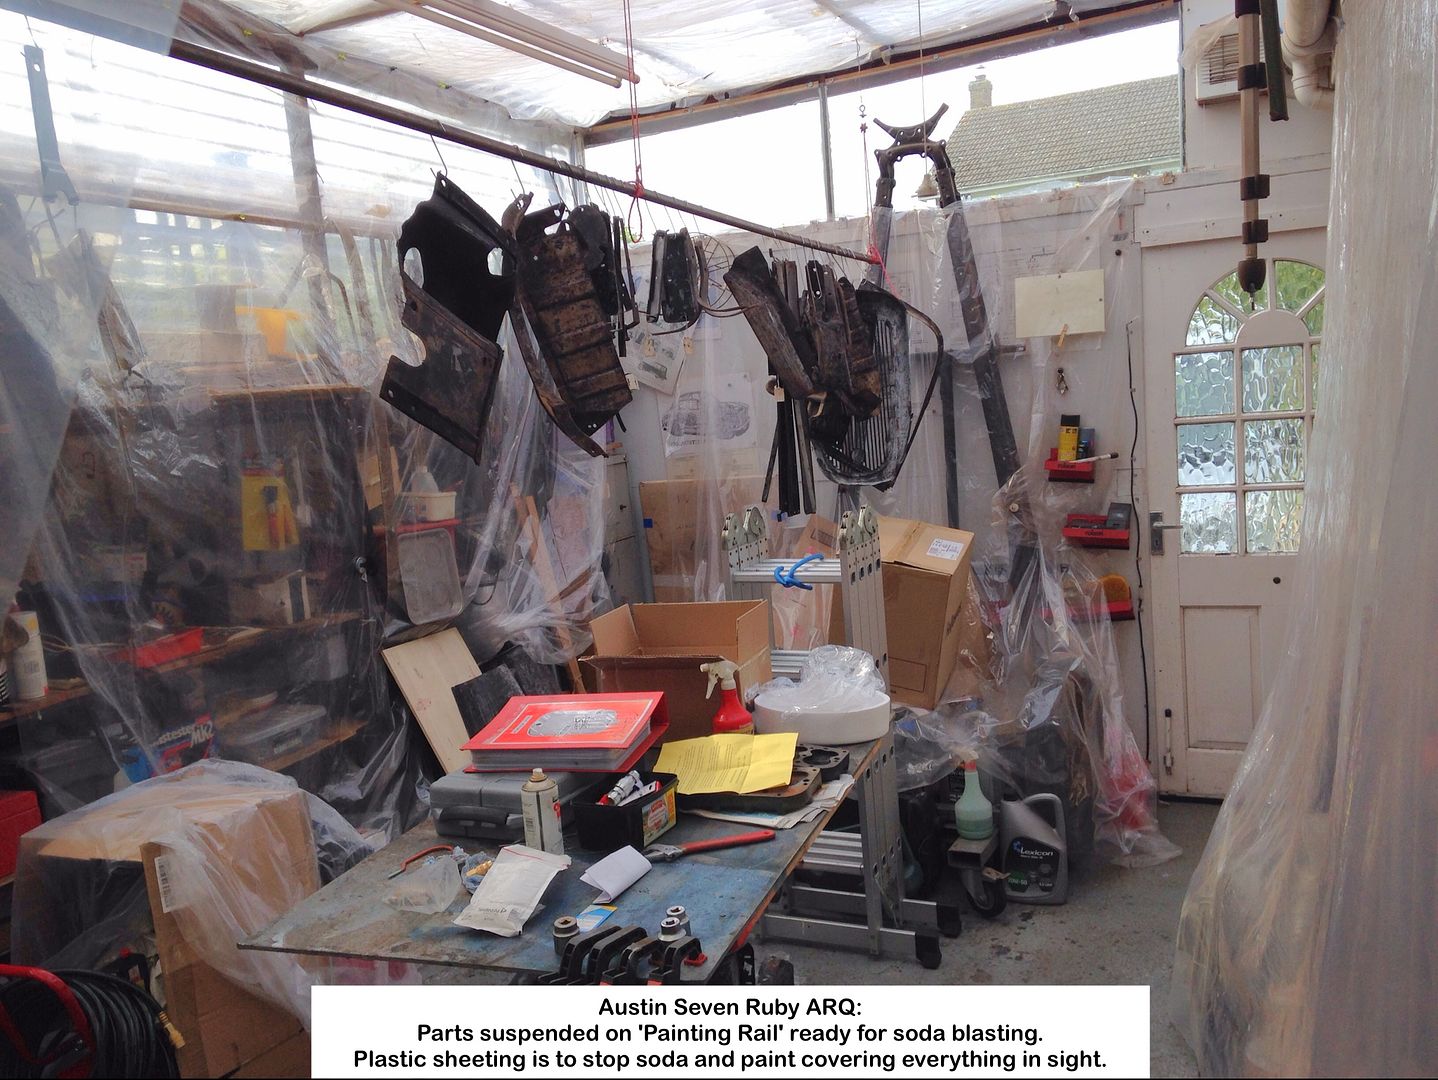
Ruby Painting:
Thinking about how to proceed with painting the loose body parts, once stripped of paint, I came up with the 'brilliant' idea of hooking them onto a rail suspended from the Carport roof beams:
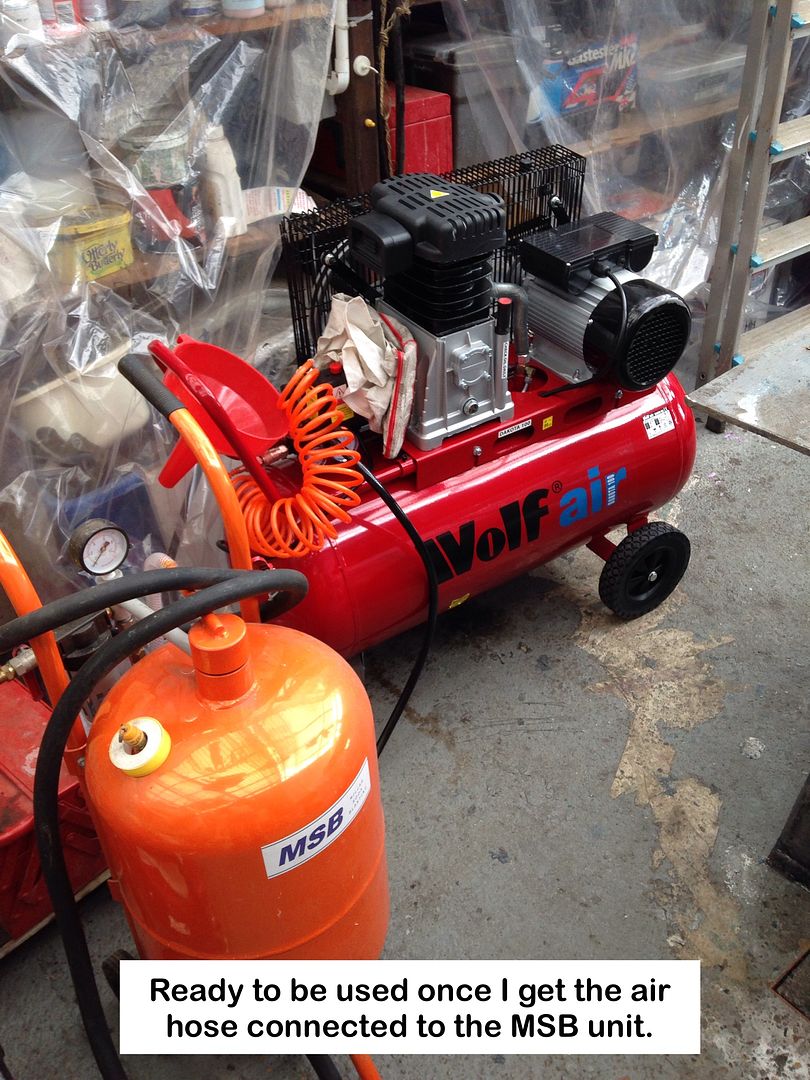
New toy:
The old compressor proved useless at doing much more than operating an air gun, airbrush or inflating tyres, but it then started tripping the ELCB before the pressure switch died, after spewing a fat spark.
I had bought a Miller Soda Blaster (MSB) years ago, so what better time to actually start using it, but a more manly compressor was needed.
Wolf Air Dakota 100 the new toy the result:

Assembled and next to the MSB unit:
Photos of the method I used to fit the wheels:
http://s1104.photobucket.com/user/Geoff_Halstead/Wolf%20Dakota%20100%20compressor/story
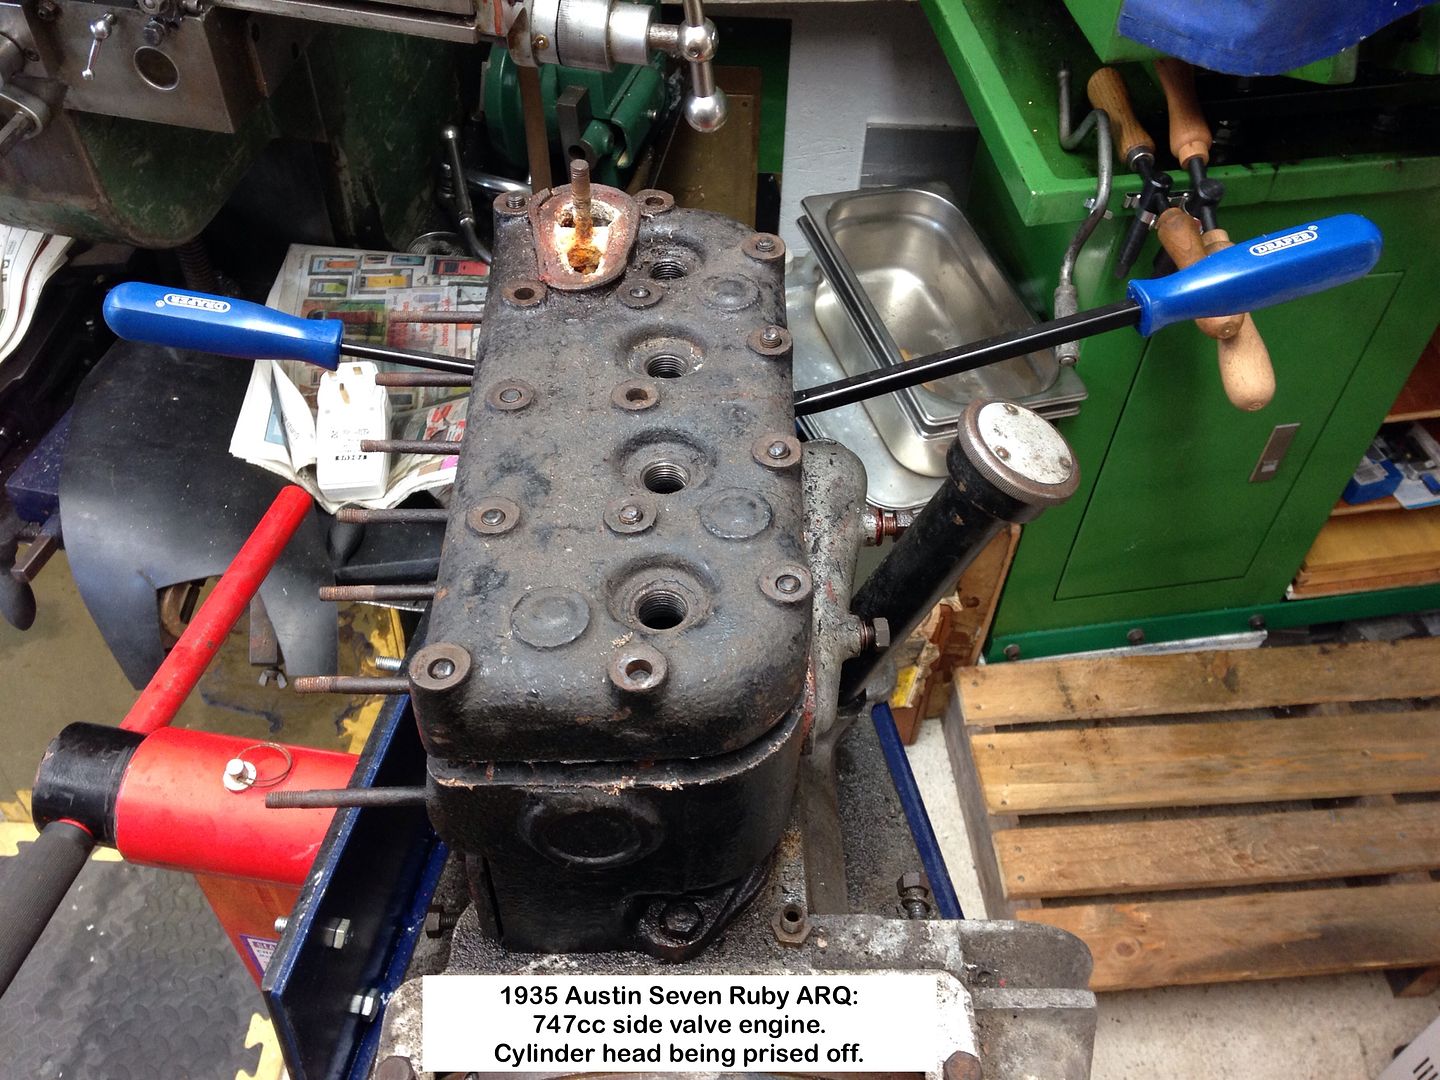
Engine:
Whilst waiting for an adaptor to connect compressor to the MSB unit, decided it was the perfect opportunity to strip the engine.
Removing the Flywheel
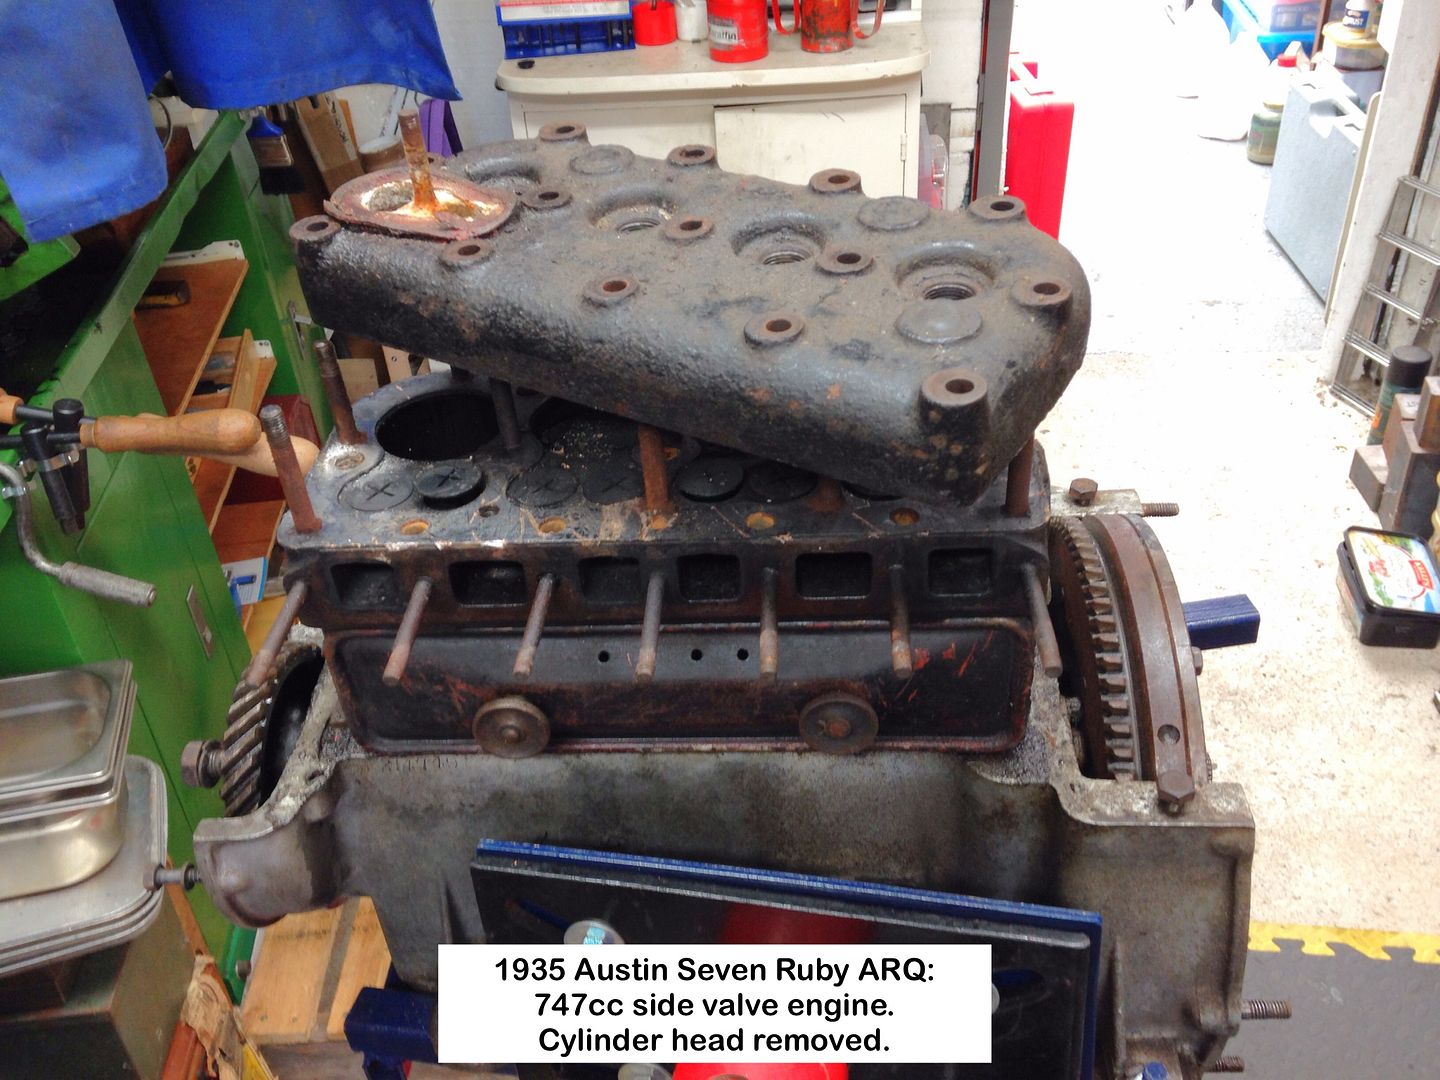
Removing the Cylinder Block
Cam followers and valve springs removal
RubyEnginePartsOganiser
REPO
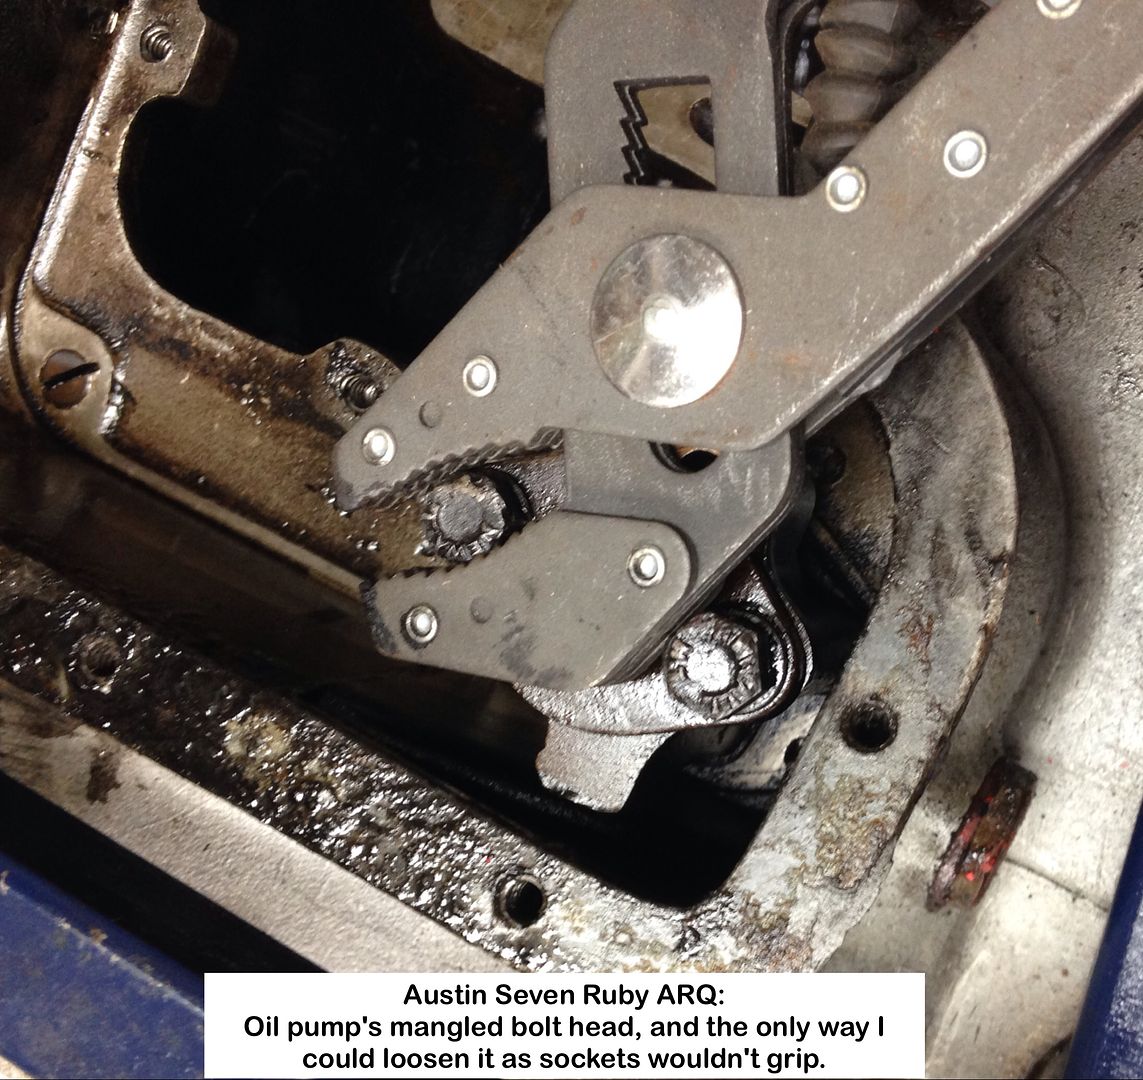
Mangled bolt head on the oil pump:
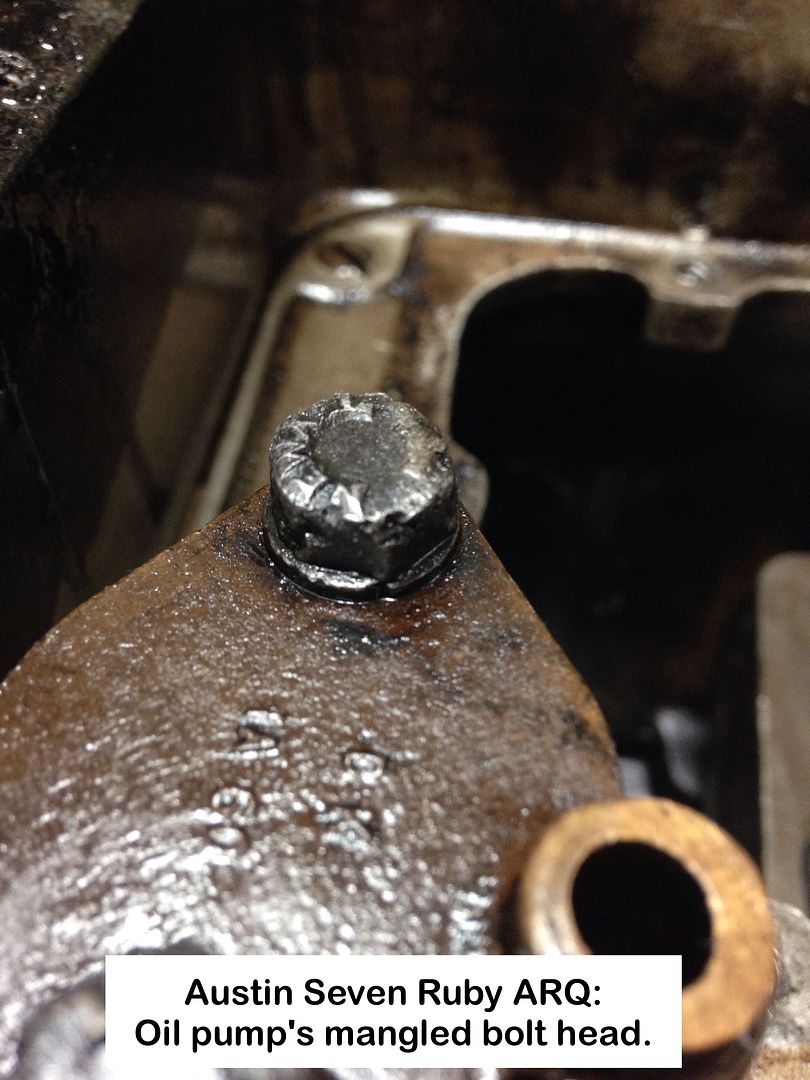
The only tool that would loosen it:
Geoff - Approaching 30° in the Carport 😓
Location: South Norfolk - Next to Suffolk
The Singer sewing machine is now behaving impeccably.
Foot pedal to clutch lever tidied up
Perfect control now
Geoff - Busy editing the video showing the crankcase bearings being removed.
Location: South Norfolk - Next to Suffolk
Sorry about duplicating the Singer details.
Up and down a ladder about 10 times on Wednesday, first to stop the TV aerial wobbling when doves landed and took off, and second to do repairs to the Carport roofing.
Aerial no longer wobbling, BUT my pins are now wobbly.
Why up and down so many times you may ask?
Easy!
I kept forgetting things to take up with me.
Geoff - It's been one of those weeks.
Location: South Norfolk - Next to Suffolk
Hi Geoff,
I have just watched your a couple of your videos, first well done for putting all this information up, I am sure it is a useful source of reference for many.
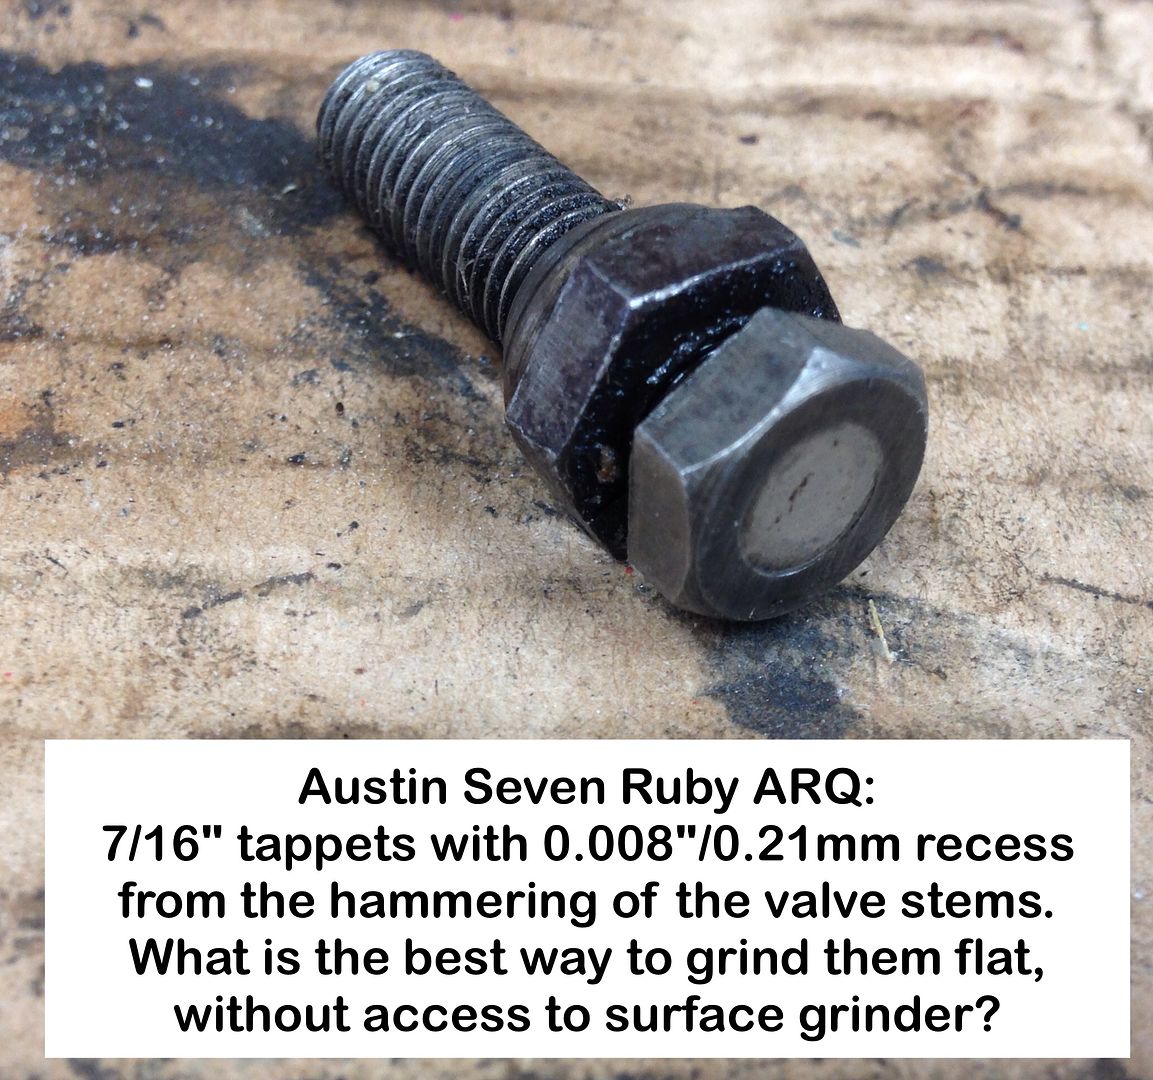
I did note your comment about the dimples on tappet adjusters; They are wear marks caused by the constant hammering on the base of the valve stem, they should be reground flat.
I also noted your cylinder block comment: I find Molasses to be an excellent but slow way of cleaning rusted steel parts, but I have encountered erosion issues with cast components, particularly when left for long periods. I don't know all of the technical details as to why this should be, but the chemical reaction that takes place eats away the surface of cast items.
Location: Auckland NZ
Great video Geoff ,much better than watching programs about the bloody referendum .
Ian/Nigel,
Thanks for comments.
Shows just how long it's been since I worked on a side-valve, thinking that the tappet heads are actuated by the cam lobes.
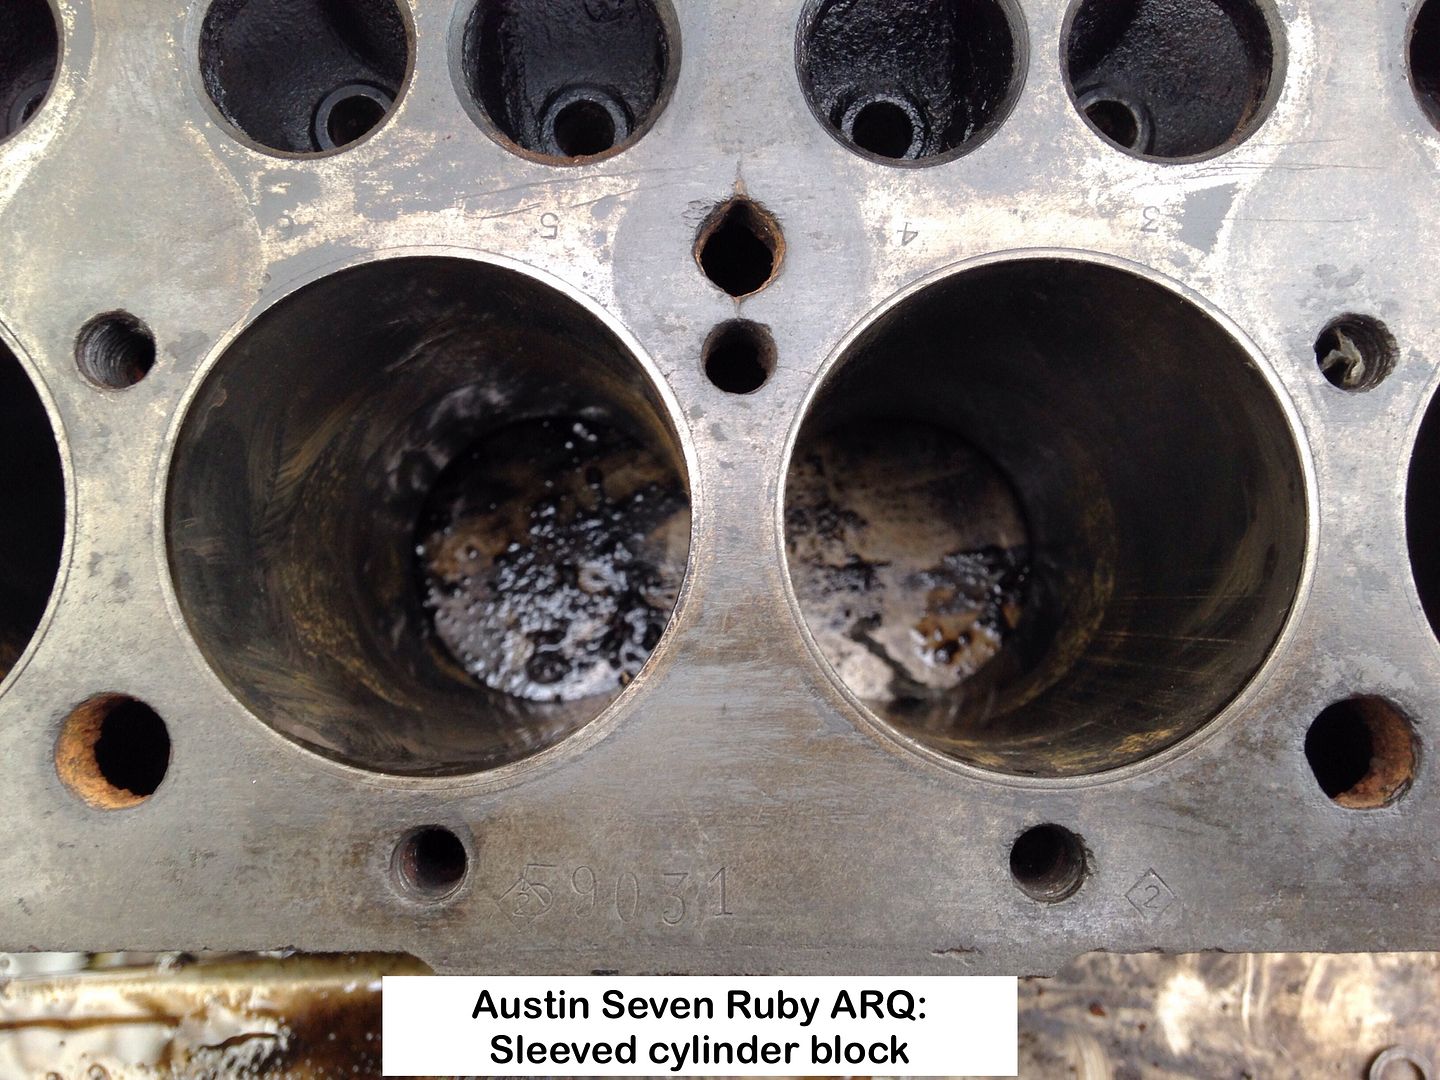
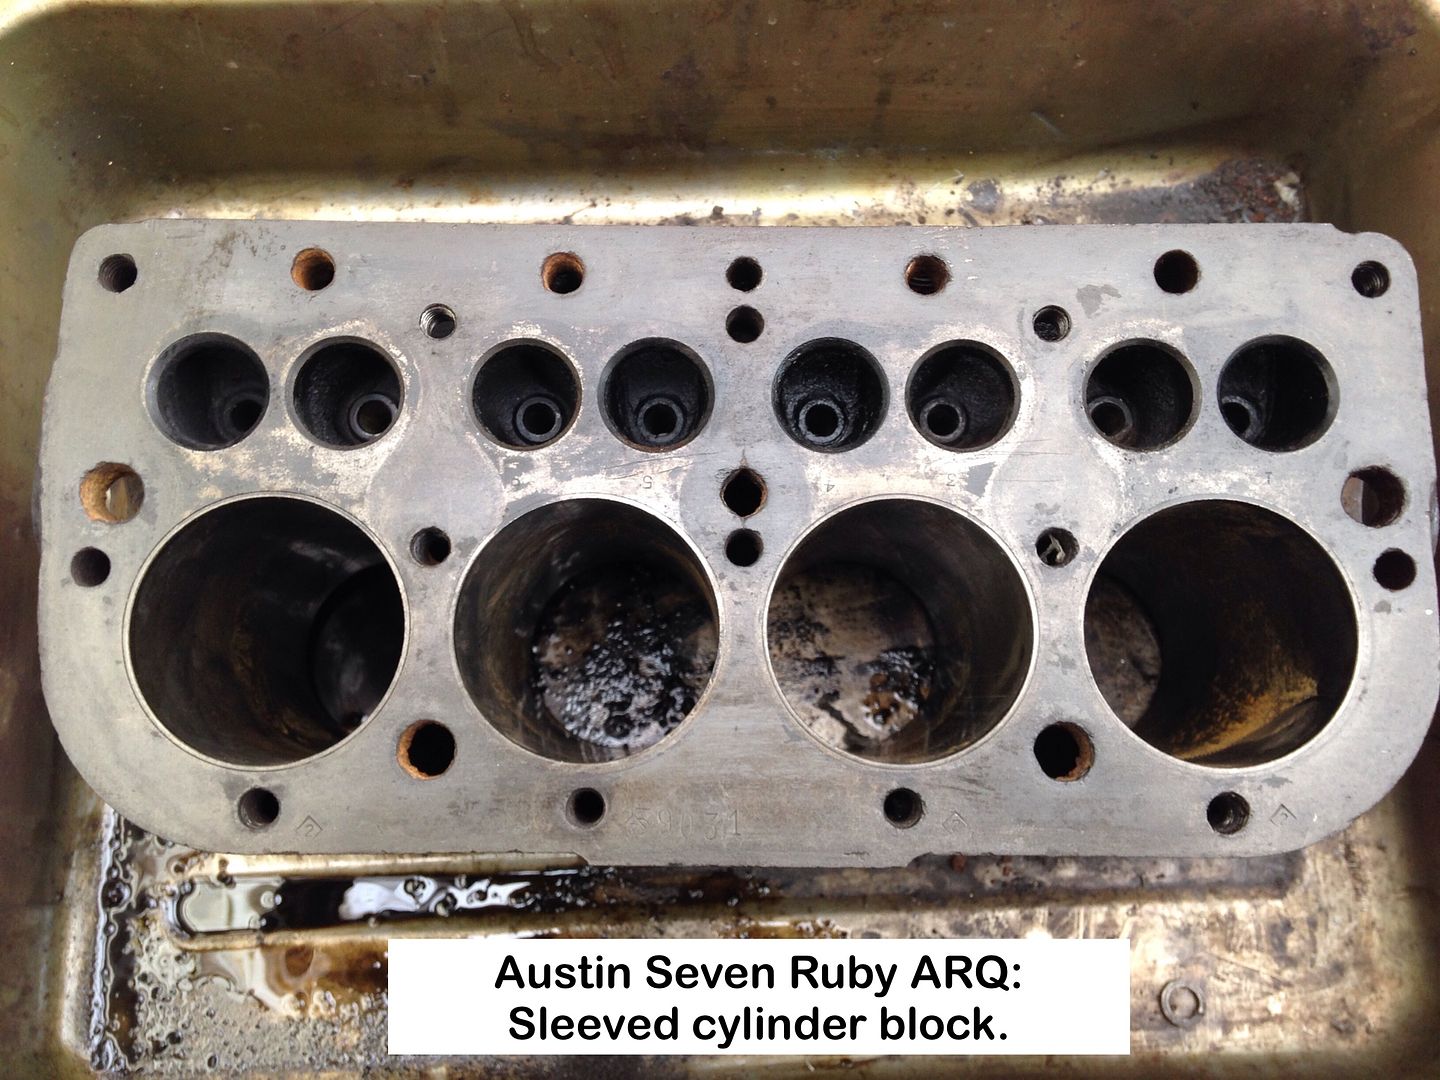
Engine block has cleaned up well, but I may run some descaler through the waterways.
Most definitely sleeved:
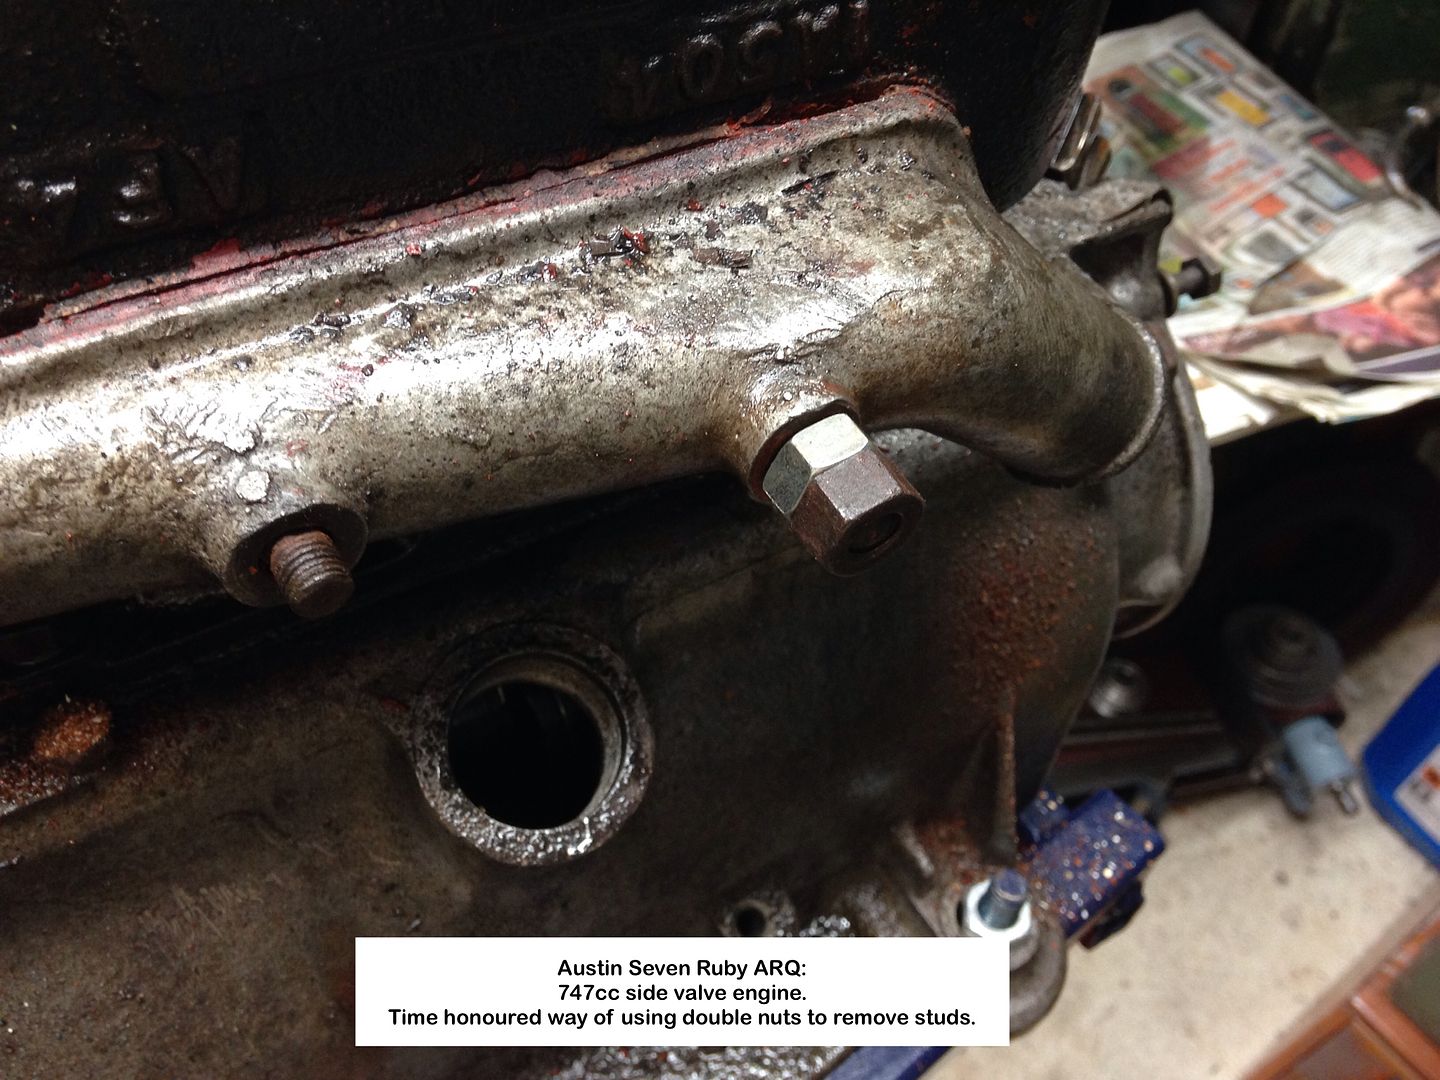
The manifold studs, only one being stepped, came out eventually after having to hammer the sides, thus bending them slightly, but they need replacing anyway, as I will do with the head studs.
Second attempt at removing the oil pump as the first was abysmal.
Geoff - My Facebook page shows both.
Location: South Norfolk - Next to Suffolk
Last week used the MSB unit for the first time, and man is it dusty.
Didn't seal up one section of the plastic sheeting properly that was isolating one half of the Carport, so some dust got through.
I will fix this before doing any more blasting or spray painting.


This method does, however, remove paint from areas nothing else can get into.
Attacked a lilac tree using chainsaw, then had to do some wood and felt replacement on Shed roof.
Geoff - Brain says "Can do" but body replies "No bl@@dy way"!
Location: South Norfolk - Next to Suffolk
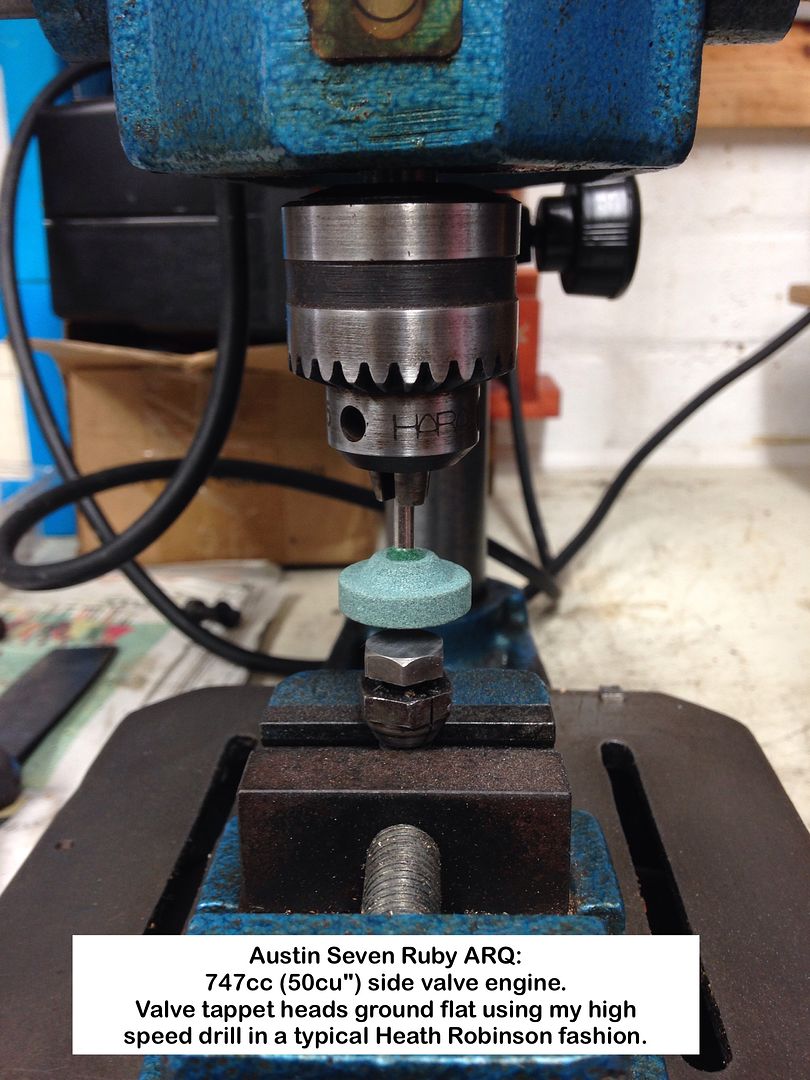
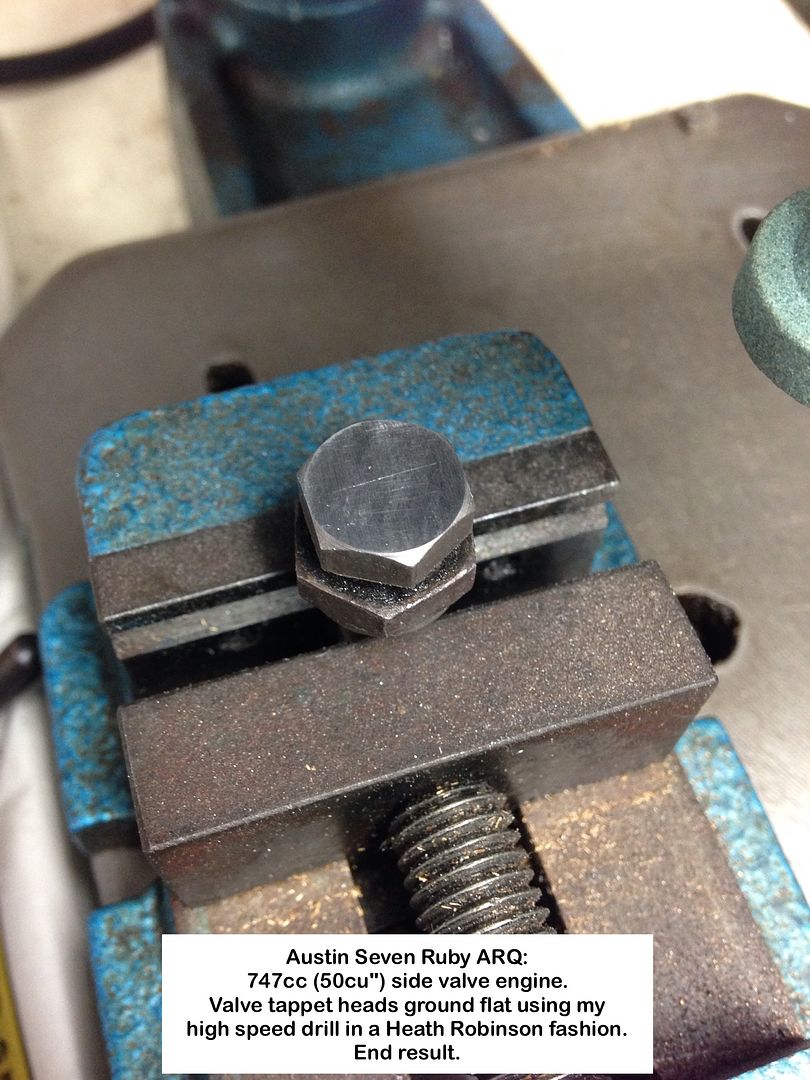
Grinding tappet heads courtesy of Heath Robinson thinking.
My Heath Robinson set-up of grinding them flat, in lieu of a surface grinder.
High speed bench drilling machine fitted with a grinding disc then diamond cards for final finishing.
Tappet heads - Before:
Grinding by sliding the tappet under the grind stone, but by not more than just over 1/2 Ø:
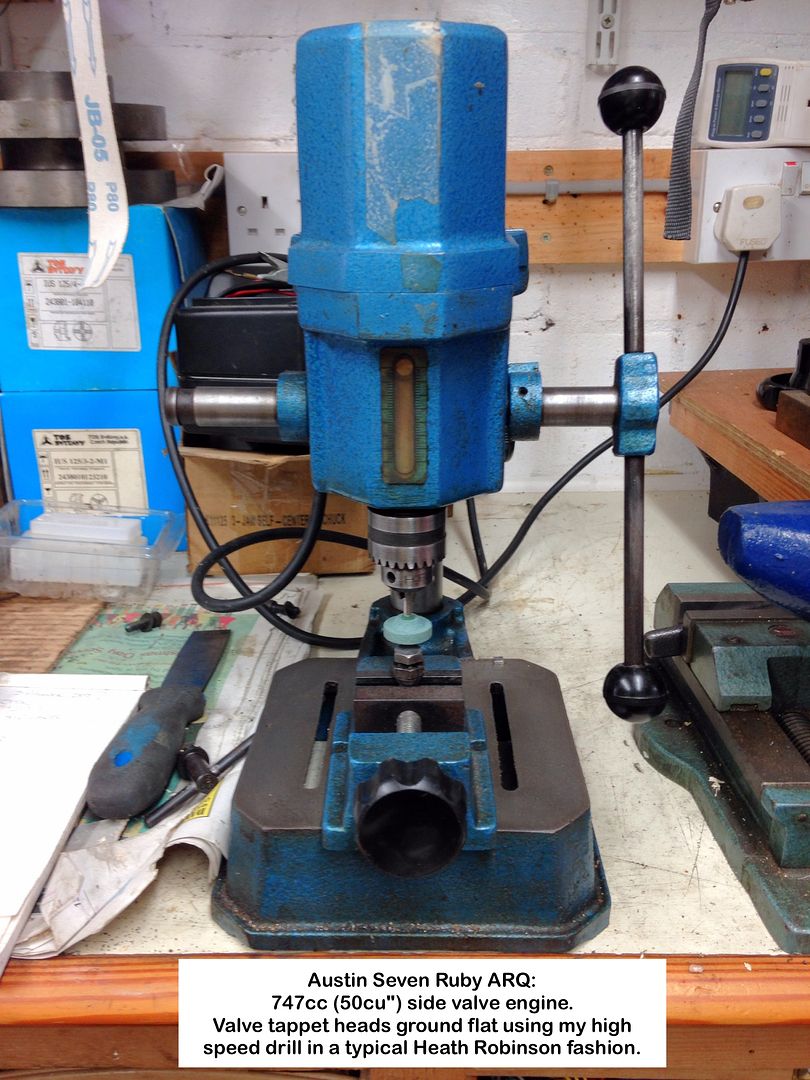
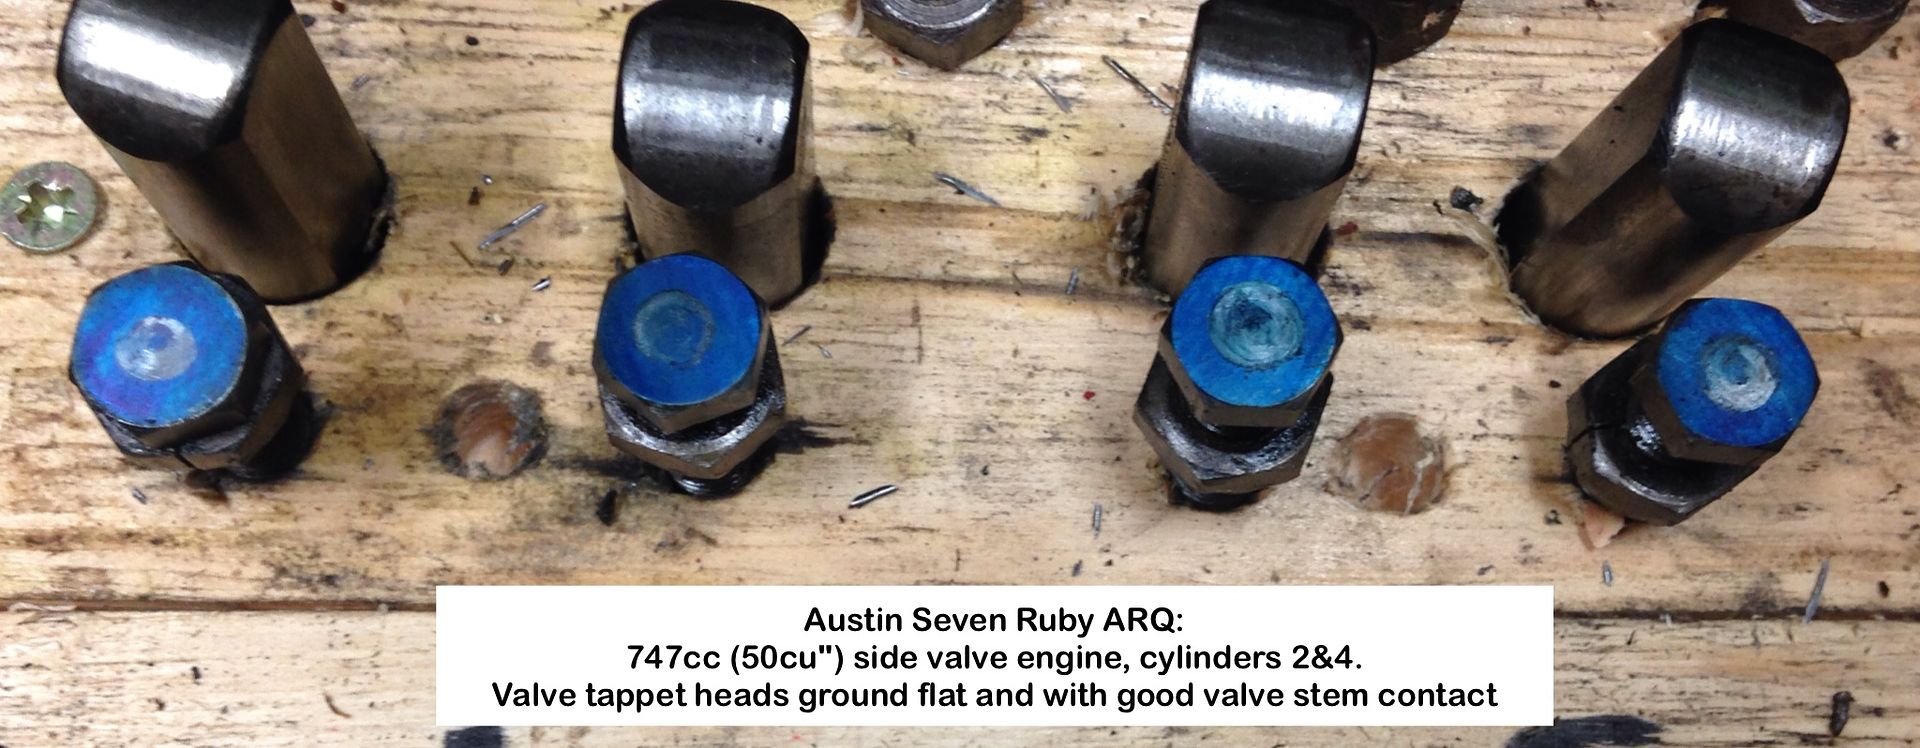
End result:
Good contact with valve stems after a rub on the diamond card:
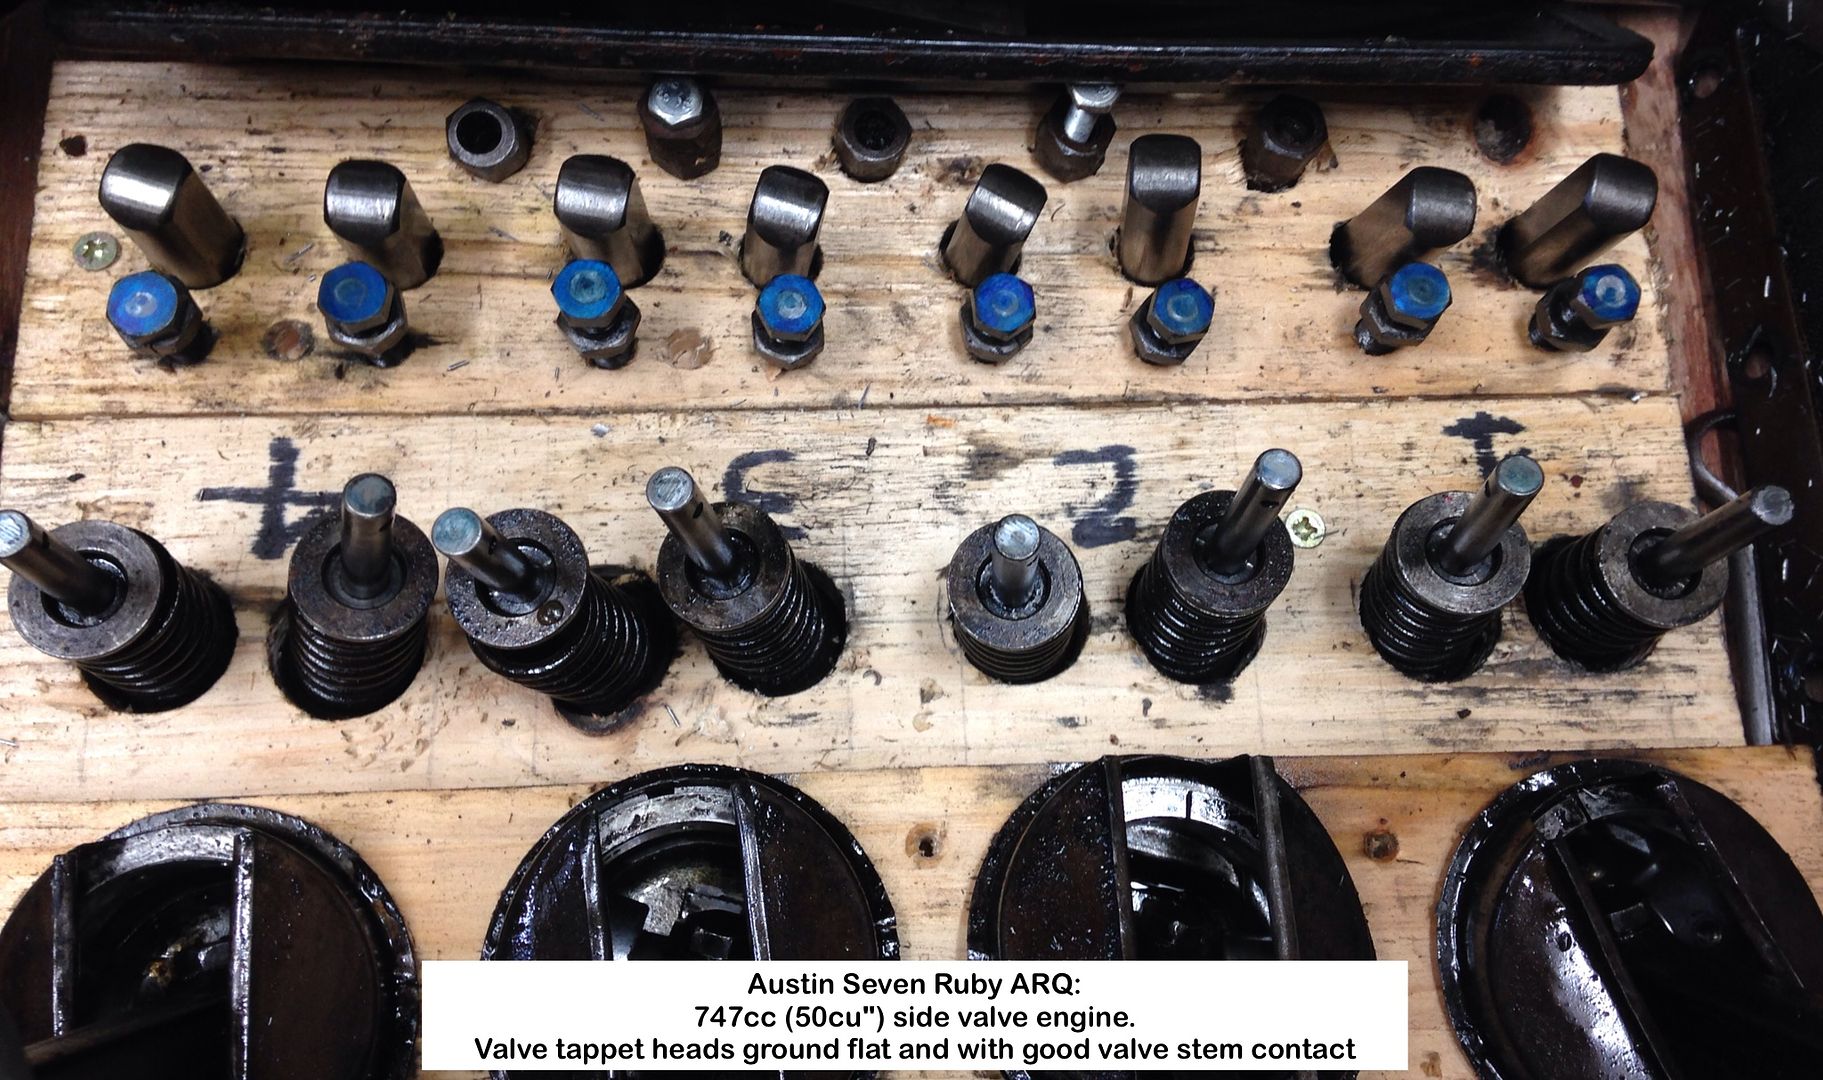

Cam followers look fine but will use marker pen to check contact areas during trial assembly of engine.
Time to use the TIG welder to repair body parts.
Geoff - If only I could do the same with my body parts!
Location: South Norfolk - Next to Suffolk
As far as I can tell from the photos Geoff, the block looks cracked to me? There appears to be a crack from centre stud to pots 2 and 3 and to the waterway.
Great pics and videos
Location: Farnham
Tappet screws have often been refaced many times. Worth checking with the edge of a file that still hard. Various simple ways of flattening; precision unnecessary.
Location: Auckland, NZ
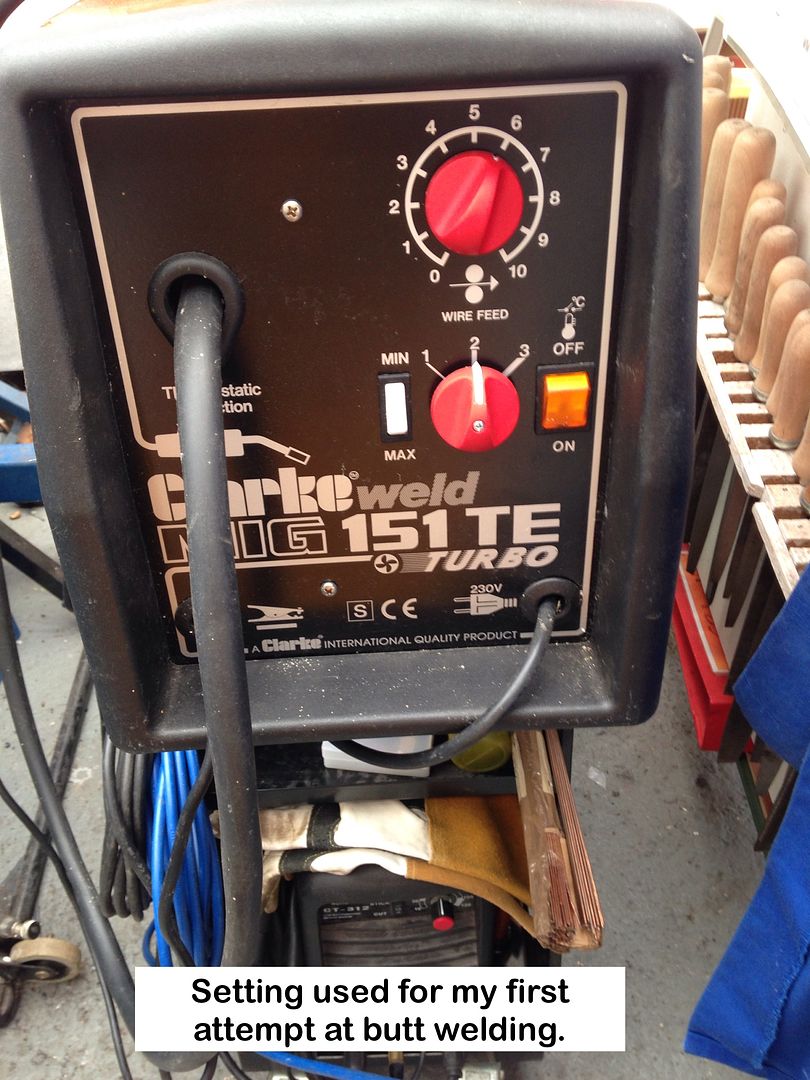
Updates soon as I've just got the MIG machine I bought years ago up and running.
Had to remove the cover and re-seat all the spade connectors as the wire feed motor was dead.
Beginning to see why MIG is so popular.
Geoff - MIG practice day.
Location: South Norfolk - Next to Suffolk
Time to let everyone know what's been happening,.
S*d all on the Ruby unfortunately.
The heat and humidity has made the Carport nigh on impossible to work in, especially welding.
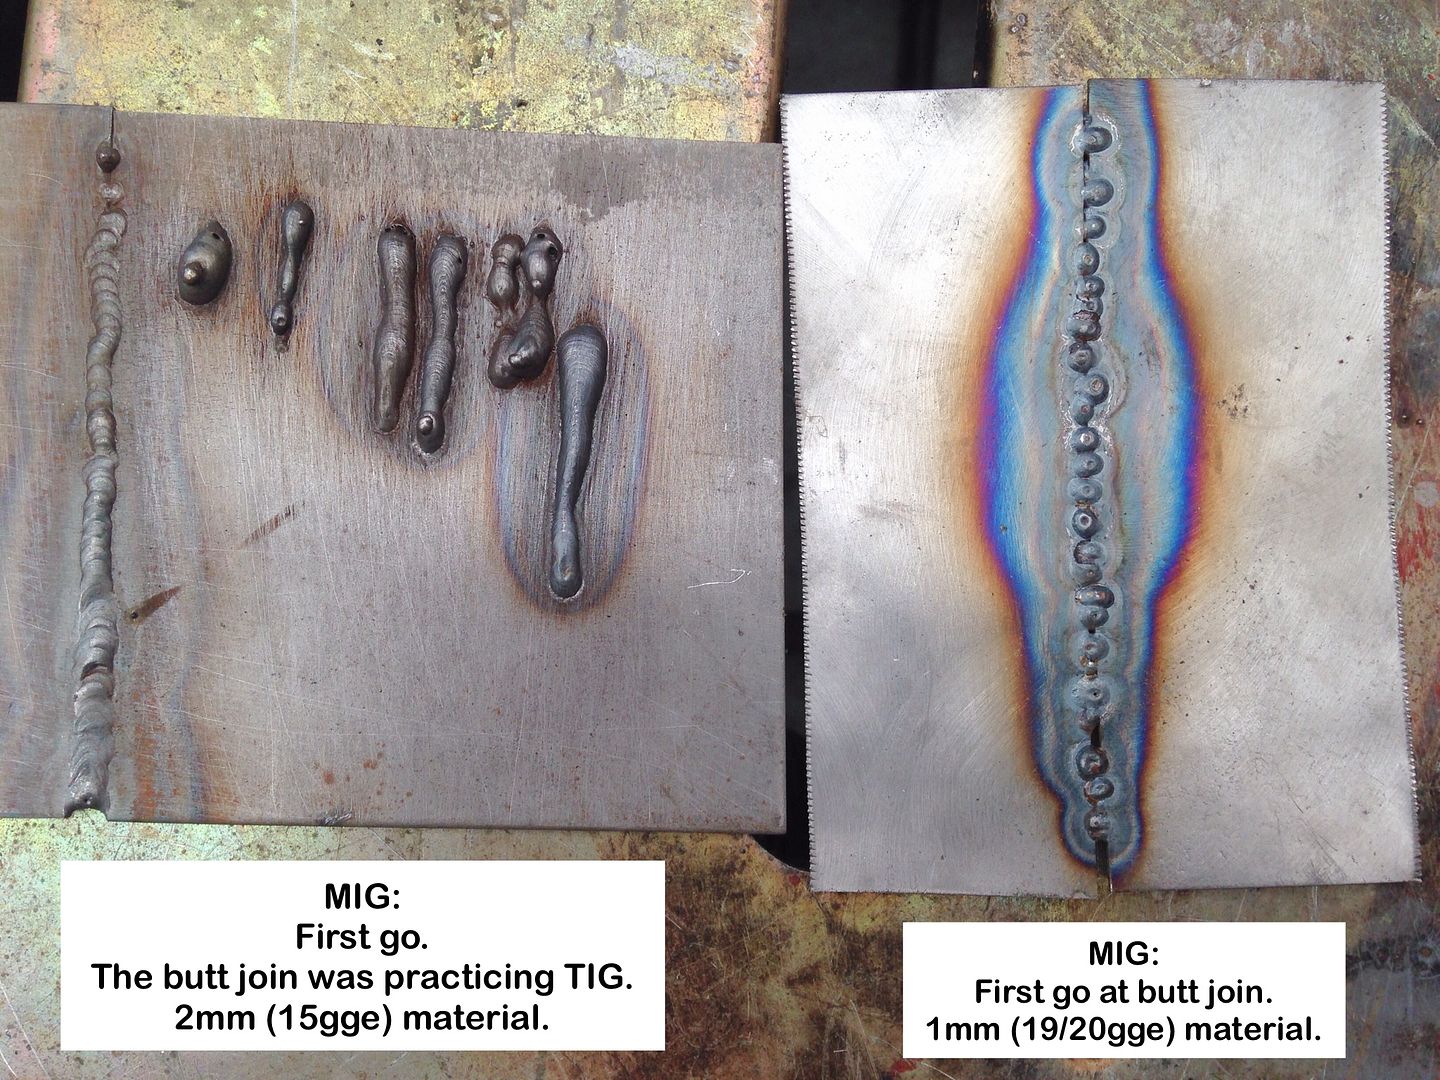
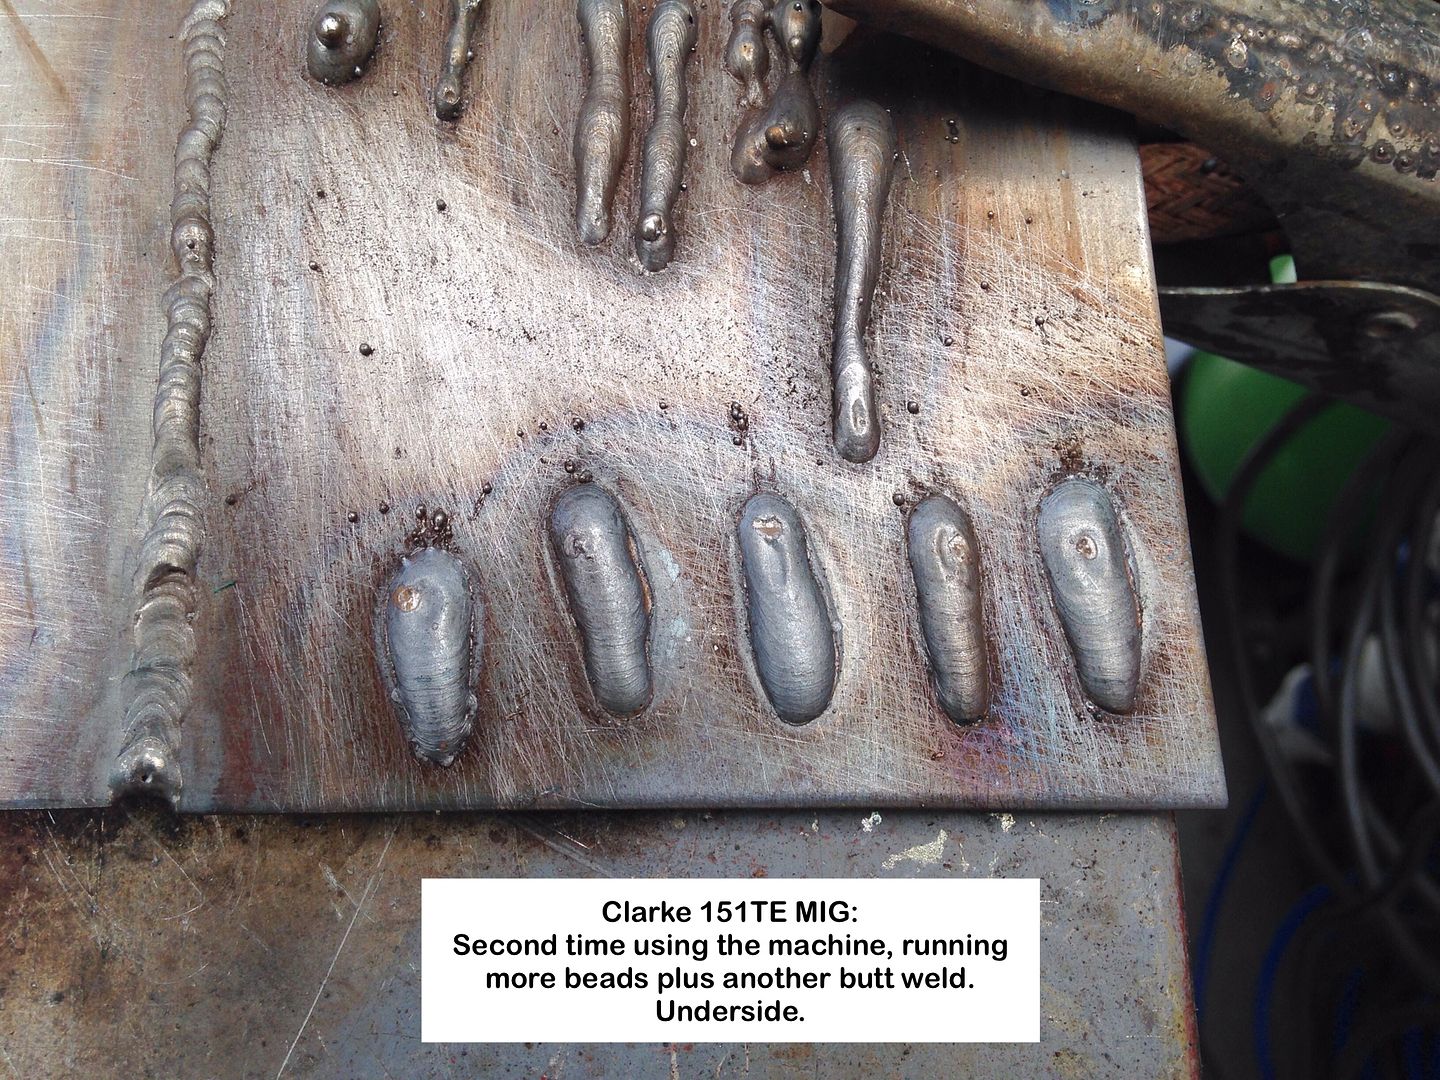
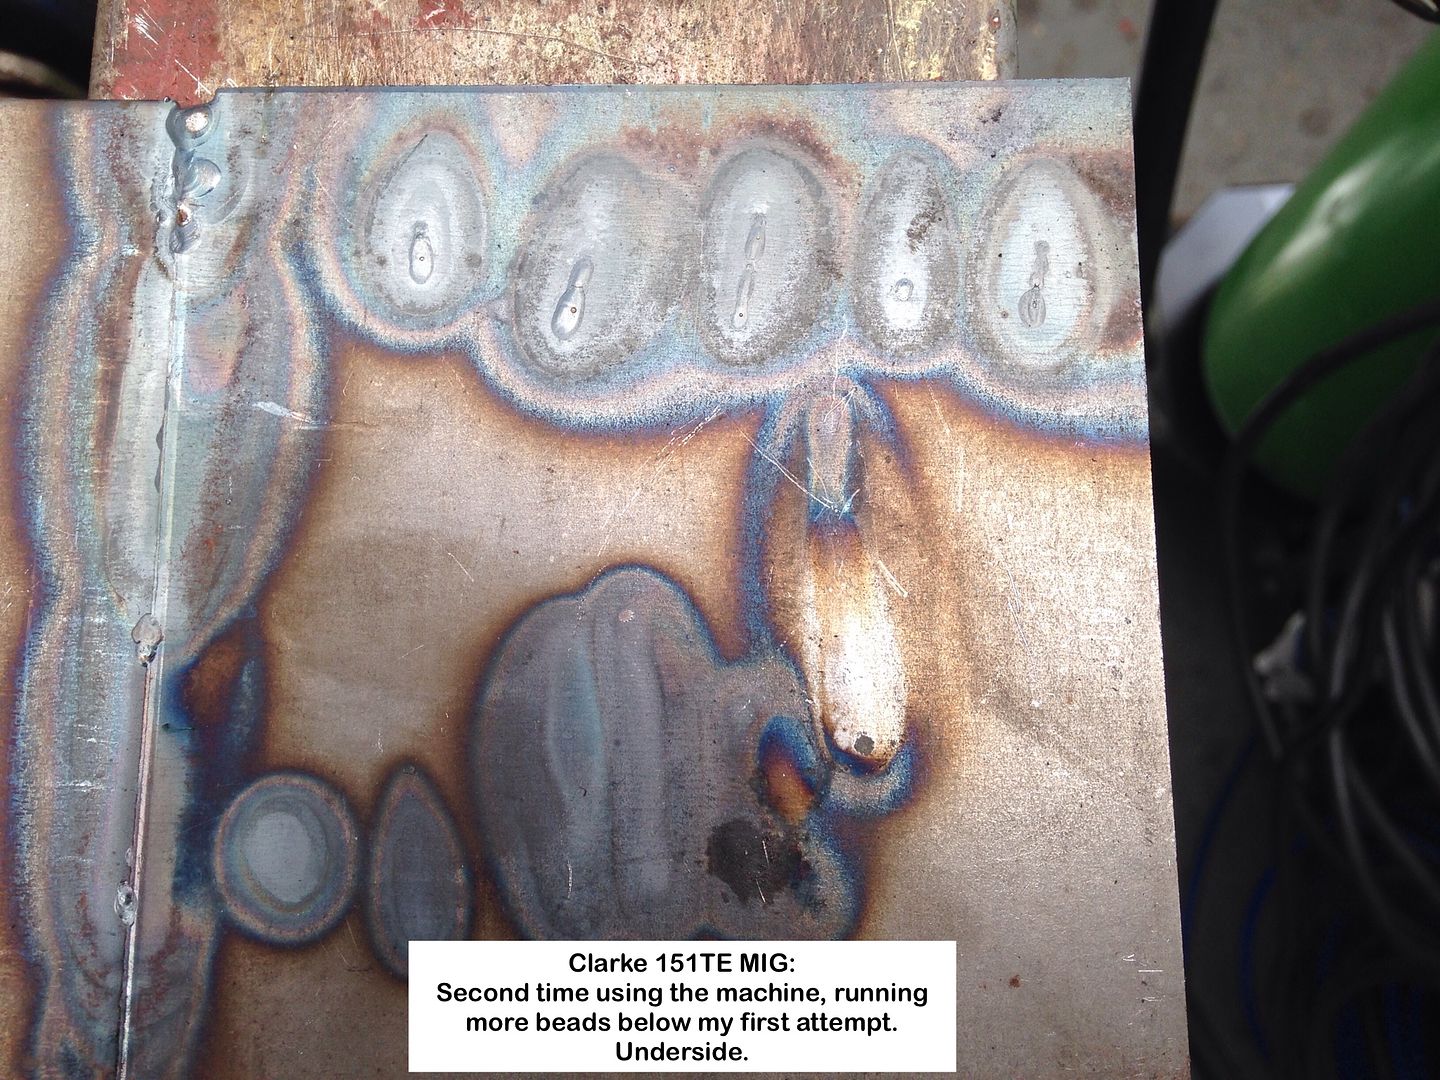
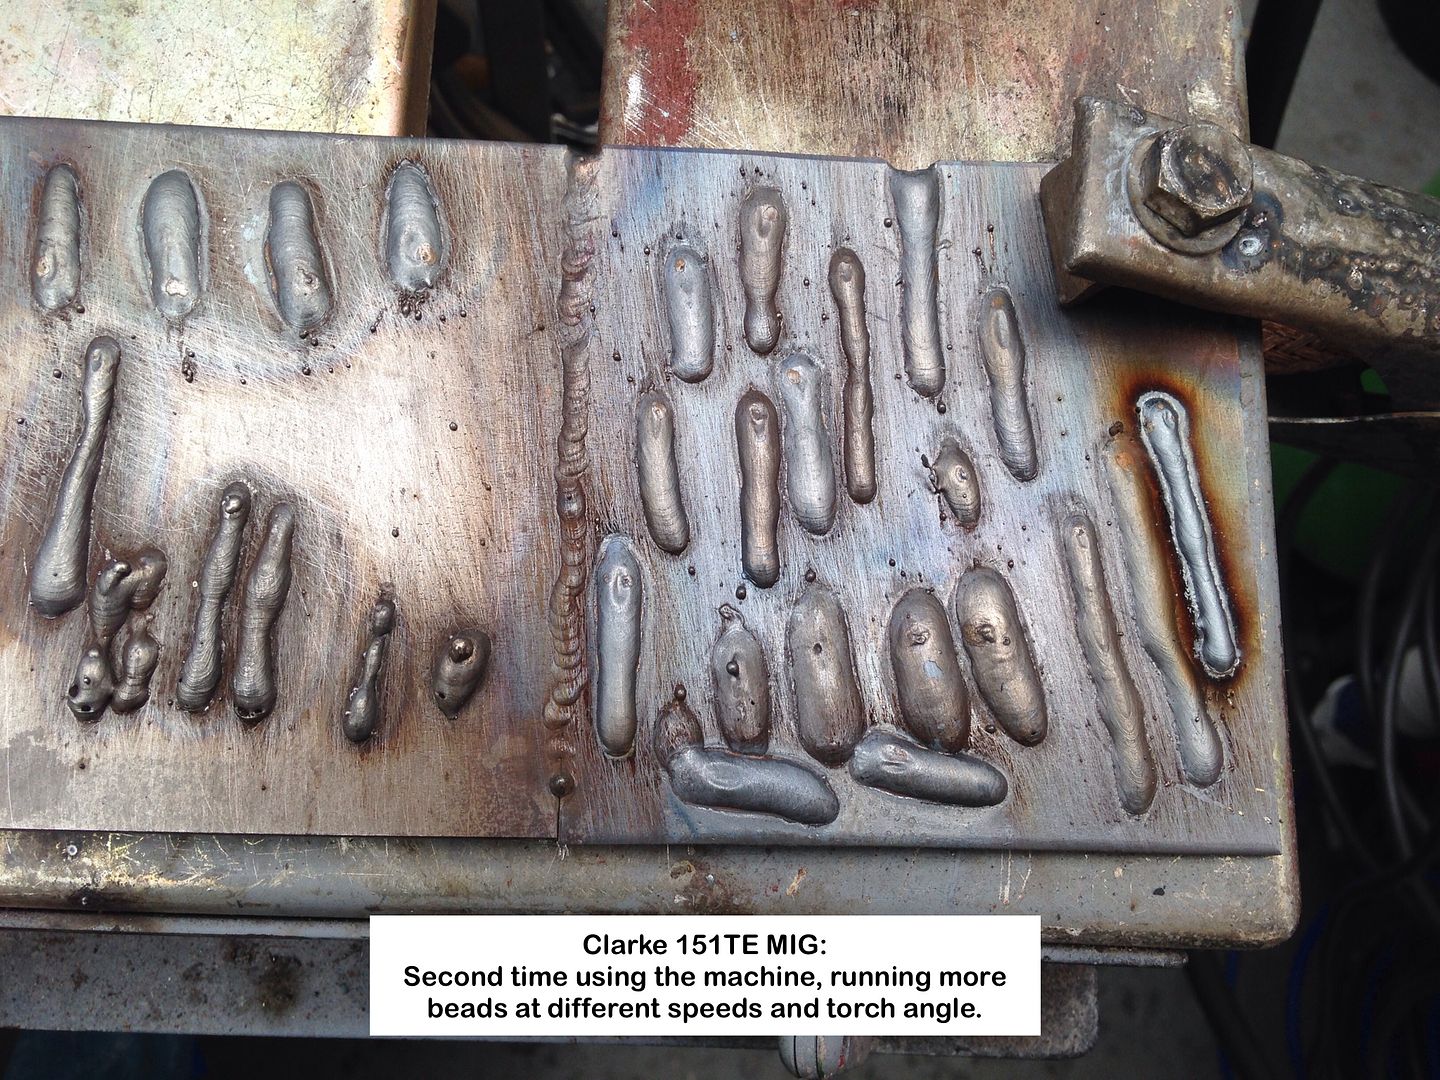
I did do quite a few practice beads using the MIG before the heat 'stopped play' though.
Plenty to do in the Workshop to keep me occupied though.
Machined backplates for smaller lathe chucks, made a rear tool post and now busy with backplates to mount chucks on the dividing head.
Other half dumped a DOA Dyson Telescope in my lap, having procured it for a fiver at local car boot, with the words "You are a man, you should be able to fix it"
My response was "I have the three parts that confirms my gender, albeit the middle one not as vigorous as before", receiving that look only a female can give.
She then bu**ered of on her yearly 3-week jolly visiting family.
Took a while sorting out how to strip the machine, but eventually had it in parts only to find one carbon brush wasn't making contact with the commutator and that meant bending three tabs back in order to get the brush housing out.
As I pulled the brush clear of its tube it promptly broke in half with that loose bit crumbling in my fingers.
Never experienced this before.
Found a suitable replacement in my electric spares box and used the RSU to solder the lead on and then reinstall and power leads back.
Quick check with motor free and good as new.
Not bad for a fiver and a few hours work.
A well thought out design to make it easy to assemble in the factory, BUT not for carbon brush replacement, so bin and buy a new Dyson.
Was hoping for cooler weather, but 80% humidity in the Carport and not much less this last month is not comfortable.
Geoff - Workshop only slightly less humid
Location: South Norfolk - Next to Suffolk
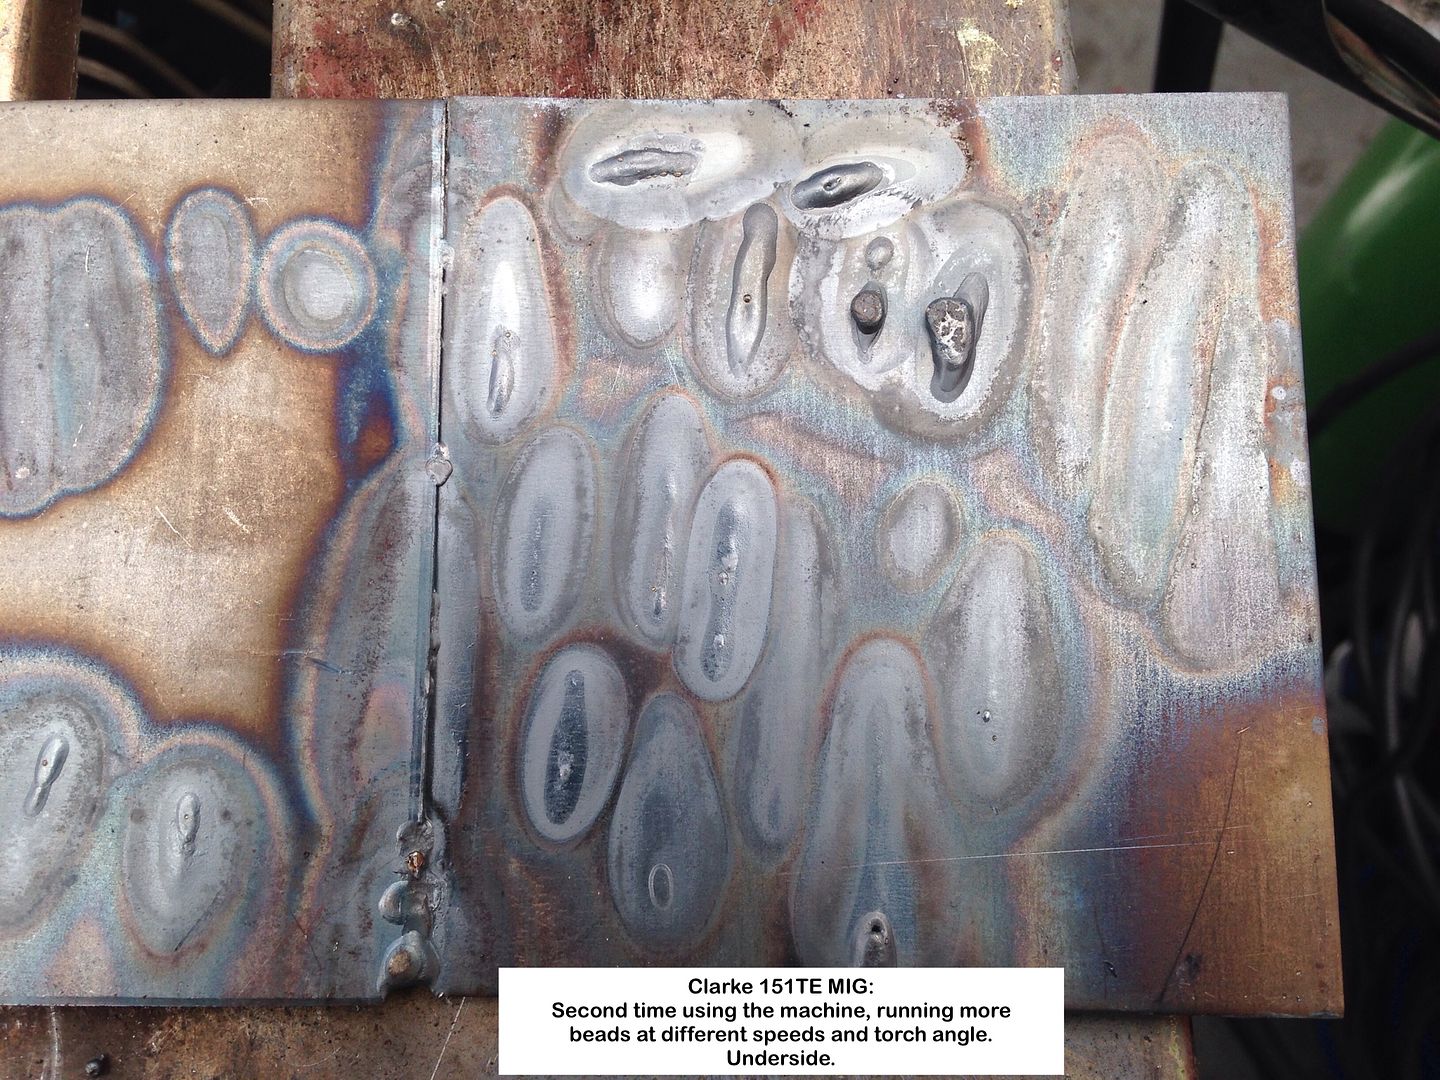
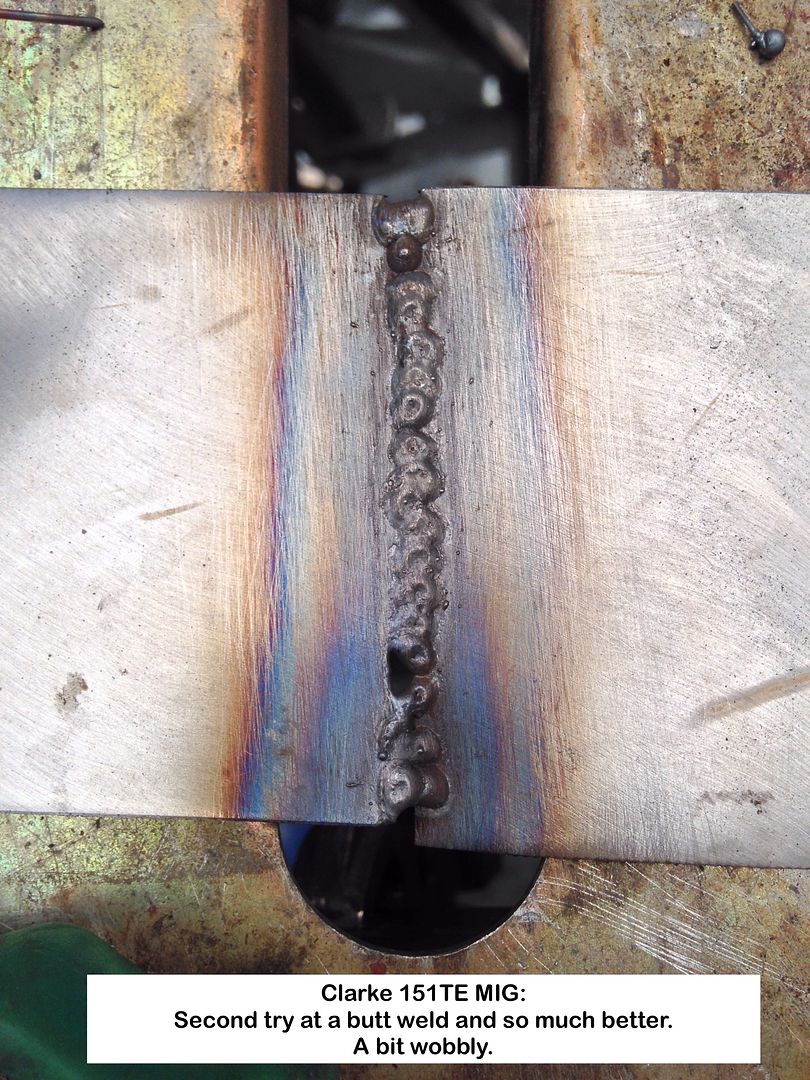
Update with photos of my first attempts with the MIG and progress on the Ruby.
Hope the photos show this.
As mentioned previously I can now see why MIG has become the de facto method to use.
Quick and fairly easy, but need more practice though.
I think that minute tube from the gas bottle to the nozzle is restricting gas flow as I can only get 5lt/min, so may need to do some surgery to not only fit a larger dia one but also longer power cable as both are far too short for easy working on car bodies, or much else in fact.
The earth clamp was replaced PDQ.
MIG:

Been busy on the lathe machining backplates for and fitting the smaller chucks I bought 7 odd years ago, plus ditto for two chucks for the dividing head.
Had to do some screwcutting in the lathe for the first time, external to make a thread gauge to do the internal on the plates, and surprised myself no end in not making a dogs breakfast of it.
Did have a brain fade with the change gears on the lathe though, finding I could only get 11.5tpi instead of the 12tpi I needed to thread the backplates for the dividing head, so gave up, had lunch and the minute I looked at the lathe on returning saw I had to replace one of the two change gears with a similar 40tpi, then proceeded, sighing with relief.
I had looked at the information on the lathe detailing what gears to use for what thread umpteen times, but on occasion wood gets in the way of trees, as happened on this occasion
Ruby:
Started cleaning some of the loose body parts prior to applying epoxy primer, and suffered no end with the heat and humidity in the Carport.
September was just too hot and humid to do any work in the Carport so spent the time in the Workshop.
Ground the valves in, machined the flat surfaces for the water outlet and inlet/exhaust manifolds, then draw filed the head and block and they are as flat as I expected.
I need to edit the videos I took and clean up the photos, but the heat and humidity has effected me far more than I ever expected and only now starting to get back into the swing.
Geoff - Never ever thought I would look forward to cooler weather![/quote]
Location: South Norfolk - Next to Suffolk
I would try turning the wire speed back some what, that will remove the garden slug looking weld. the spots you have done is the right way just over lap them more.
good luck. and keep the posts coming I have learnt alot.
Location: Switzerland

Regarding the crude hole punched into the radiator surround. My 1935 ARQ has exactly the same! It also had holes in the roof just above the B pillar, quarter panels, and rear window. I liked the explanation of the WWII coal gas bags mounted on the roof. (Search this forum "gas bags")May not have anything to do with it, but its now my story and I'm sticking to it!
Robert
Michael,
Thanks for reminding me about wire feed!
I had forgotten that.
Glad the posts have been informative.
Robert,
The holes in the roof I can understand, but not the one in the radiator surround.
Geoff - Video editing time
Location: South Norfolk - Next to Suffolk
I have always assumed it was to hang it up on for painting??